Xomax XM-2VRSU726BT Скачать руководство пользователя страница 13

12

1. AV Input

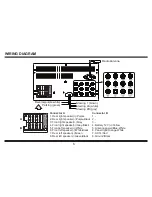
The AV Input Jack is a set of composite input on the rear of the unit. Press the Mode button to choose AUX. Connect any portable audio/

video device such as a DVD player or VCD player to unit. Use the volume control to adjust volume.

2. Backup Camera Input

The backup camera input is on the back of the unit. (refer to wiring diagram). This input (in yellow) is for connecting backup camera for 

parking. You must connect the VCC wire (in pink color) to the reverse gear switch in order to activate this video input mode when you 

switch the reverse gear of your car. Please refer to the wiring diagram for more details.

3. Video Output

The Video Output Jack is on the back of the unit. (Refer to Wiring Diagram) This output (in yellow) is for connecting monitor(s). You must 

connect a monitor for car in order to play this unit in another monitor. Consult your dealer for any kinds of monitors that are suitable to 

use in car. Press the “BND/SYS ” button to choose between PAL and NTSC mode.

4. RCA Output

The RCA Output Jack is on the back of the unit. (Refer to Wiring Diagram) This output is for connecting amplifier, equalizer, or other 

audio component that requires a pre-amp out connection. (Red=Right, White=Left) Follow the manufactures instructions for the audio 

component that you are connecting.

5. Subwoofer Output x 2

The Subwoofer Output Jack is on the output wire harness. (Refer to Wiring Diagram) This output is for connecting up to 2 subwoofer 

amplifier to the Subwoofer Output Jack to drive a subwoofer. Follow the amplifier’s installation instructions. Press and hold the BND/NP/

SUB button to activate or deactivate this function.

Other Operations

MAINTENANCE

Cleaning the Unit

Do not use any liquids to clean this unit. Do not use petroleum distillates to clean this unit. Use a clean, dry cloth to clean this unit.

Replacing the Fuse

Make sure the amperage matches the specified value when replacing the fuse(s). If the fuse is bad, check the power connection and 

replace the fuse with a new one. If the same problem occurs, this might indicate a malfunction within the unit. 

Warning

When replacing a fuse, do not use a fuse with a higher amperage rating than the fuse originally sup-

plied to your unit, otherwise damage will result to your unit.

Содержание XM-2VRSU726BT

Страница 1: ...Deckless Video Player with AM FM Receiver Double Din Mounting Chassis Built in 6 2 TFT Display XM 2VRSU726BT ...

Страница 2: ...ng Connections 6 7 Controls of the Unit 8 Basic Operation 9 Radio Operation 10 USB SD Operation 11 Steering Wheel Control 11 Other Operations 12 Maintenance 12 Infra Red Remote Control 13 Simple Troubleshooting Guide 14 Specifications 15 CONTENTS ...

Страница 3: ...ay cause the unit to malfunction or damage the vehicle s electrical system Cords for this product and those for other products may be different colours even if they have the same function When connecting this product to another product refer to the supplied installation manuals of both products and connect cords that have the same function Be sure to connect the negative speaker leads to the negat...

Страница 4: ...s a glass antenna connect to the antenna booster power supply terminal When an external power amp is being used with this system do not connect the orange lead to the amp s power terminal Such con nection could cause excessive current drain and a major malfunction Refer to the relevant owner s manual for details on connecting the power amp and other units then make the connections correctly Do not...

Страница 5: ...rienced of installation technicians We strongly rec ommend that this unit should be professionally installed by a VAT registered installer this is a requirement to validate the warranty IMPORTANT Remove the two transport screws from the top fo the unit before installing Mark Polarity of the Speaker Wires Marking the polarity of the speaker wirers will make it easier to connect the existing speaker...

Страница 6: ...e vehicle s owner s manual for proper instructions NOTE Mark the polarity of the existing speaker wires before disconnecting battery NOTE Remove the two transport screws from the top of the unit before installing NOTE Make sure there is enough space for the installation of this double din unit 5X12 SUPPLIED TOOLS ...

Страница 7: ...er Purple Black 4 Front right speaker Grey Black 6 Front left speaker White Black 7 Rear left speaker Green 8 Rear left speaker Green Black Connector B 1 2 3 4 Battery 12V Yellow 5 Antenna power Blue White 6 Panel light Orange White 7 ACC Red 8 Ground Black Reverse purple white Parking green Steering 1 brown Steering 2A white Steering 2B grey ...

Страница 8: ...e sure you have a good chassis ground This will eliminate most electrical noise form the motor and alternator A good chassis ground requires a tight connection to ground The area should be free from rust paint or any form of dirt Red Ignition Connect to car ignition switch for main power supply of the unit Yellow Memory Backup Connect to electrical terminal always supplied with power regardless of...

Страница 9: ...8 CONTROLS OF THE UNIT XM 2VRSU726BT 6 2 TFT Screen MIC Receiver Mode Select Menu Sound Select Volume IR Receiver USB Slot AUX Input Jack SD Card Slot Reset Power on off TFT on off Mute ...

Страница 10: ...eble control is not available D Balance Press SEL Button until the display shows BAL then use the VOL Button to adjust the balance between the left right speakers E Fader Press SEL Button until the display shows FAD then use the VOL Button to adjust the balance between the front rear speakers F Other Audio Settings You can adjust other audio settings like preset equalizer loudness or subwoofer ON ...

Страница 11: ... stations for each band While listening to a radio station you would like to save as a preset touch and hold any key from P1 P6 until you hear a beep The station will be saved in the designated number 4 Mono Stereo Reception Control In FM radio mode touch the ST button to select stereo or mono reception 5 Local Distance Reception Control In radio mode touch the LOC button to select local or distan...

Страница 12: ... screen 16 9 and 4 3 accordingly The viewing effect will depend on the video file so it may vary 6 Other Settings During playback you can adjust other settings including random repeat play and sub title audio channel etc by tapping on the menu list on the button of the screen During video playback tap the screen once and the menu list will show up Steering Wheel Control Refer to the wiring diagram...

Страница 13: ... on the back of the unit Refer to Wiring Diagram This output is for connecting amplifier equalizer or other audio component that requires a pre amp out connection Red Right White Left Follow the manufactures instructions for the audio component that you are connecting 5 Subwoofer Output x 2 The Subwoofer Output Jack is on the output wire harness Refer to Wiring Diagram This output is for connectin...

Страница 14: ...ck Previous Radio Station 22 GO TO Button track selection 23 Aspect Ratio Button Operating the remote control Aim at the face panel of the CD Receiver the maximum distance at which signals can be received is about 6M Make sure that the signal path is not obstructed Do not drop or throw the remote control Do not place the remote control in a location that is exposed to direct sunlight or next to a ...

Страница 15: ...perly Poor effect on receiving a station Antenna may not be of the proper length Make sure the antenna is fully extended If broken replace the antenna with a new one The broadcasting signal is weak The antenna is poorly grounded check and make sure the antenna is properly grounded at its mounting location No pictures The video line from main unit to monitor is not connected properly for external m...

Страница 16: ...mpatible 4 to 8 Ohm Speakers Fuses 10 amp Dimensions 178mm W x 137mm D x 100mm H Weight 2 0Kg TFT SYSTEM Resolution 800RGB H X480 V Brightness Contrast 400cd m2 600 Viewing angle 70 Response Time Tr 2s Tf 6s Dimension 6 2 Aspect Ratio 16 9 FM TUNER Tuning Range 87 5 108 MHz FM Sensitivity 12dBu Stereo Separation 1 Khz 35dB AM TUNER Tuning Range 522 1620 KHz Am Sensitivity 30dBu ...

Отзывы: