background image

17

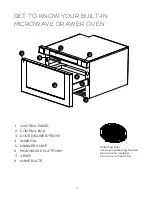
GET TO KNOW YOUR BUILT-IN

MICROWAVE DRAWER OVEN

OPERATION - continued

AUTO MENU: MELT
•   Press “MELT” button. Screen displays “BUTTER”. “AUTO MENU” indicator will light. 

•   Continue to press “MELT” button, “BUTTER”, “CHOCOLA”, “CHEESE” or 

“MARSHMA” will display in order.

•   Press “START/+30SEC.” to confirm the selection.
•   Press “MELT” button to select the weight. “OZ” will light except butter menu.
•   Press “START/+30SEC.” to start cooking. Buzzer sounds once. “OZ” will go out. 

The cooking time begins to count down. When cooking finished, buzzer sounds 
five times and “FINISH” displays.

AUTO MENU: SOFTEN
•   Press “SOFTEN” button. Screen displays “BUTTER”. “AUTO MENU” indicator will light. 

•   Continue to press “SOFTEN” button, “BUTTER”, “ICE-CRE” or “CHEESE” will display in order.

•   Press “START/+30SEC.” to confirm the selection.
•   Press “SOFTEN” button to select the weight. “OZ” will light except butter menu.
•   Press “START/+30SEC.” to start cooking. Buzzer sounds once. “OZ” will go out. 

The cooking time begins to count down. When cooking finished, buzzer sounds 
five times and “FINISH” displays.

Menu

Display

Weight

Butter/Margarine

BUTTER

8

16

Ice Cream/

Frozen Juice

32

3

8

ICE-CRE

Cheese

CHEESE

 1 Stick
2 Sticks
3 Sticks

Menu

Display

Weight

Butter/Margarine

BUTTER

Chocolate

CHOCOLA

4
8

Cheese

CHEESE

8

16

Marshmallows

MARSHMA

5

10

 1 Stick
2 Sticks
3 Sticks

Содержание XOMWD24S

Страница 1: ...SAFETY PRECAUTIONS 3 RADIO INTERFERENCE 5 ELECTRICAL GROUNDING 6 INSTALLATION INSTRUCTIONS 7 OVERVIEW 11 UTENSILS FOOD SAFETY 12 CONTROL PANEL 13 OPERATING INSTRUCTIONS 14 CLEANING MAITENANCE 19 WARRANTY 20 WWW XOAPPLIANCE COM IMPORTANT INSTALLER LEAVE THIS MANUAL WITH THE CUSTOMER ...

Страница 2: ... a moment to register your XO at Ensuring warranty coverage should you need service Providing ownership verification for insurance purposes Let s XO notify you in the event of product changes or recalls www xoappliance com register your product REGISTRATION HELPS YOU BY ...

Страница 3: ... operate the oven if it is damaged It is particular important that the oven door close properly and that there is no damage to the 1 DOOR bent 2 HINGES AND LATCHES broken or loosened 3 DOOR SEALS AND SEALING SURFACE d The oven should not be adjusted or repaired by anyone except properly qualified service personnel S ly Specifications Model Rated Voltage Rated Input Power Microwave Rated Output Pow...

Страница 4: ...r dropped This appliance should be serviced only by qualified service personnel Contact XO to find your nearest authorized service for examination repair or adjustment Do not cover or block any openings on the appliance Do not store this appliance outdoors Do not use this product near water for example near a sink in a wet basement near a swimming pool or similar location Do not immerse cord or pl...

Страница 5: ...cooking appliance beneath the microwave Do not mount the unit over or near any portion of a heating or cooking appliance Do not mount over a sink Do not store anything directly on top of the appliance surface when the unit is in operation Operation of a microwave may cause interference to your radio TV or similar equipment When there is interference it may be reduced or eliminated by taking the fo...

Страница 6: ...he event that the unit is temporarily used in a non permanent location and If it is necessary to use an extension cord use only a 3 wire extension cord that has a 3 blade grounded plug and a properly grounded 3 slot receptacle that will accept the plug on the appliance The marked rating of the extension cord must be equal to or greater than the electrical rating of the appliance If a longer extens...

Страница 7: ...ve these instructions with the consumer IMPORTANT NOTES TO THE CONSUMER Keep this manual for the future reference With use of any heat generating microwave oven there are certain safety precautions you should follow These are listed in the operation portion of the manual Read all and follow carefully Be sure your microwave drawer is installed and grounded properly by a qualified installer or servi...

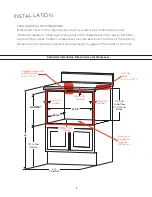
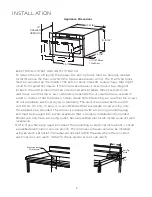
Страница 8: ...he floor of the opening should be constructed of plywood strong enough to support the weight of the oven INSTALLATION Standard Installation Dimensions and Clearances 8 Suggested electrical outlet location 4 W x 5 H Allow 7 8 Overlap 14 13 16 22 1 8 19 to Top Of Base 36 14 13 16 to Bottom Of Anti Tip Block Allow 3 16 Overlap Anti Tip Block 6 W x 3 1 2 D Base must be able to support 100lbs min Allow...

Страница 9: ...equirements are 120 volt 60 Hz AC only 15 amp It isrecommended that a separate circuit serving only this appliance be provided The drawer is equipped with a 3 prong grounding plug and must be plugged into a wall receptacle that is properly installed and grounded Should you only have a 2 prong outlet have a qualified electrician install a cor rrect wall receptacle NOTE If you have any questions abo...

Страница 10: ...e microwave drawer fully The label can be found beyond the back wall of the microwave cavity facing up from the flat surface GROUNDING INSTRUCTIONS This appliance must be grounded The microwave drawer must be plugged into a wall receptacle that is properly installed and grounded in accordance with the National Electrical Code along with local codes and ordinances In the event of an electrical shor...

Страница 11: ... DRAWER OVEN 1 2 3 4 5 6 7 8 CONTROL PANEL CONTROL BOX DOOR DRAWER FRONT WINDOW DRAWER GUIDE MICROWAVE PLATFORM VENTS NAME PLATE Defrosting Rack Use only in defrosting function Do not use for cooking Do not use without food 1 2 3 4 5 6 7 8 ...

Страница 12: ...epartment of Agriculture Recommended Temperatures 145 F 63 C Beef Lamb or Veal cut into steaks chops or roasts 160 F 71 C Pork Ground Meat Seafood Eggs Dishes or Frozen Prepared Foods 165 F 74 C Leftovers Ready To Heat Carry Out Chicken Turkey or Ground Poultry Temperature should be checked with a meat thermometer in a thick dense area away from bone or fat Never leave the thermometer in unless it...

Страница 13: ...E DRAWER OVEN THE CONTROL PANEL 1 2 3 4 5 6 7 8 9 10 11 12 OPEN SET UP AUTO MENU WEIGHT DEFROST CLOSE CLOCK KITCHEN TIMER TIME DEFROST NUMBER KEYS POWER START 30 SECONDS TIME COOK STOP CANCEL Operating Panel 8 8 7 5 6 3 11 12 9 10 4 1 2 3 ...

Страница 14: ... will flash and other 0 will light Press the number buttons to enter the correct time The input should be between 01 00 12 59 Press CLOCK KITCHEN TIMER to finish the setting will flash Note In the process of clock setting if the STOP CANCEL button is pressed or if there is no operation within 1 minute the oven will go back to former setting automatically KITCHEN TIMER Press CLOCK KITCHEN TIMER but...

Страница 15: ...ocess of setting if the STOP CANCEL button is pressed or if there is no operation within 1 minute the oven will go back to the former setting automatically POWER LEVEL 10 Power levels are available LEVEL POWER DISPLAY 10 100 PL100 9 90 PL90 8 80 PL80 7 70 PL70 6 60 PL60 5 50 PL50 4 40 PL40 3 30 PL30 2 20 PL20 1 10 PL10 FAST COOKING FUNCTION In ready mode instant cooking at 100 power level with 30 ...

Страница 16: ...tart defrosting Buzzer sounds once The defrosting time begins to count down When cooking finished buzzer sounds five times and FINISH displays NOTE The defrosting power level is PL30 AUTO MENU BEVERAGE Press BEVERAGE button Screen displays 1 AUTO MENU and indicators will light Continue to press BEVERAGE button 1 or 2 will display in order Press START 30SEC to start cooking Buzzer sounds once The c...

Страница 17: ...lays AUTO MENU SOFTEN Press SOFTEN button Screen displays BUTTER AUTO MENU indicator will light Continue to press SOFTEN button BUTTER ICE CRE or CHEESE will display in order Press START 30SEC to confirm the selection Press SOFTEN button to select the weight OZ will light except butter menu Press START 30SEC to start cooking Buzzer sounds once OZ will go out The cooking time begins to count down W...

Страница 18: ...for 3 seconds to release the lock INQUIRING FUNCTION In cooking state press CLOCK KITCHEN TIMER button to check the clock The current time will display for 3 seconds In the microwave cooking state press POWER button to inquire the microwave power The current microwave power will display for 3 seconds OTHER SPECIFICATIONS The buzzer sounds once by efficient press inefficient press will be no respon...

Страница 19: ...ces with a soft cloth and warm water Never use household or abrasive cleaners or scouring pads For heavier spills use baking soda or a mild soap taking care to rinse the area thoroughly afterwards with hot water on a soft cloth WAVEGUIDE COVER NOTE NEVER REMOVE THE WAVEGUIDE COVER The wave guide cover is made of mica a naturally occuring mineral Exercise care when cleaning as mica is fragile Remov...

Страница 20: ... XO willl be there to help resolve the issue Your total satisfaction is our main concern Be believe in extraordinary customer service with a personal touch We are putting into practice our vision of becoming the most innovative customer oriented appliance company in the world Your New XOMWD24S is backed by One Year Parts and Labor Warranty on our Performance Collection and our unmatched 90 Day Lov...

Отзывы: