background image

Removing the old processor

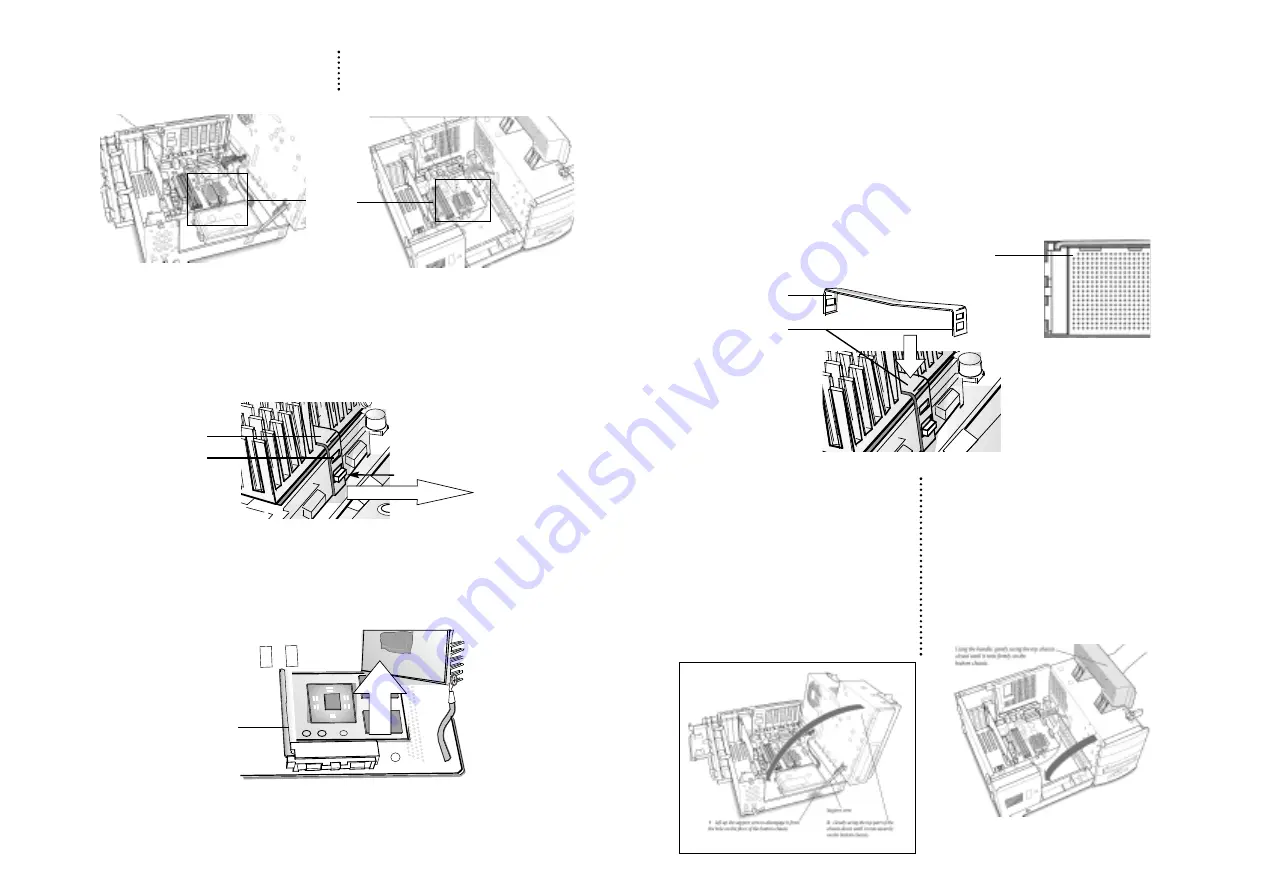
5. Remove the heat-sink.

• Insert the small screw-driver into the slot on the heat-sink clip.
• Press down and rock the handle of the screwdriver towards the heat-sink fins, 

releasing the heat-sink’s clip from the lock tab.

6. Remove the CPU Card.

• Carefully raise the ZIF Socket Release Lever and lift the CPU card from the 


socket.

 NOTE: A razor is included to clean the bottom of the heatsink. 

• Put the used card into MACh Speed anti- static box. If you ever have a problem, it 

may be handy to be able to use the old card while troubleshooting the system.

7. Install the MACh Speed ZIF into your system. 

• The MACh Speed ZIF Upgrade will face the same direction as the older card that 

you just removed (note the missing pin.) 

• Holding the card by the edges (do not depress the center of the card), line up 

the pins and insert the card straight down. Insertion should require only 
minimal force.

• Lower the ZIF Socket release lever to lock the card into the socket.
• Replace the heat-sink on the MACh Speed ZIF card.
• Reattach the heat-sink clip by first “hooking” the end of the clip with the single 

hole to the back of the processor socket. 

• Press down on the front end of the clip to snap onto the lock tab on the front of 

the processor socket

.

Chapter 3 - Installing the MACh Speed card

Page 14

Chapter 3 - Installing the MACh Speed card
Page 13

Heat-sink 
clip

Slot for 
Screwdriver

Lock tab

Hook behind
processor socket

Press down on
clip to snap onto
lock tab

Raise Card

ZIF socket

release lever

Leverage clip outward

Desktop

Locate the processor and heatsink

Mini-Tower

Locate the processor and heatsink

CPU and
Heatsink

Missing pin on the

ZIF connector

Desktop

Close the chassis by disengaging the
support arm and gently swing the chassis
back into place. 

Lift up the support arm to disengage it 
from the hole on the floor of the 
bottom chassis.

Gently swing the top part of the chassis 
down until it rests securely on the 
bottom chassis.

Close the expansion card cover and put 
back the main cover onto the computer.

Mini-Tower

Replace the chassis by swinging it back into
place and lock it with the two green levers.

Replace the cover on the computer

Содержание MACh Speed G3 ZIF

Страница 1: ... adjust card switches jumpers and or dials all available to the relat ed settings in the chart below 4 Remove motherboard cache from motherboard if possible 5 Press CUDA reset on motherboard with CarrierZIF only 6 Reinstall card boot system XLR8 Standard ZIF Settings Set jumpers with card oriented with CPU to left and XLR8 right side up ZIF Daughtercards MAChSpeedG 4Z MAChSpeedG 3Z G3 and G4 ZIF D...

Страница 2: ...3 Only 550 1 4 6 7 9 10 12 46 0 12 0 to 1 600 1 2 4 6 7 8 9 10 12 50 0 12 0 to 1 1 Install the latest version of XLR8 MACh Speed Control 2 Locate CPU base settings 3 Remove and adjust card switches jumpers and or dials all available to the relat ed settings of THE DESIRED SPEED 4 Remove motherboard cache from motherboard if possible 5 Press CUDA reset on motherboard with CarrierZIF only 6 Reinstal...

Страница 3: ...ware Page 2 1 Preface Thank you for choosing the MACh Speed ZIF upgrade This manual is designed for two XLR8 processor upgrades MACh Speed G3 ZIF G3 Processor upgrade MACh Speed G4 ZIF MPe Multiprocessing Enabled G4 Processor upgrade This manual contains the following sections Installing the software Detailed information on the installation and use of XLR8 s exclusive XLR8 MACh Speed Control softw...

Страница 4: ...nu In addition to controlling the backside cache of the upgrade card XLR8 MACh Speed Control also provides dynamic information on the status of your card and the configuration of your computer Navigating the Control Panel is accomplished via the tabs at the top of the dialog Information for each of the tabs is shown below Interactive help is always available by clicking on the Help icons 1 Setting...

Страница 5: ...your PowerMac The jumpers are set from the left to the right when the XLR8 logo is at the top left corner and the jumper block at the right side of the card Chapter 2 Preparing the MACh Speed for the installation Page 6 4 Memory Panel The memory panel gives extensive information on the RAM configuration of your computer This panel shows the location of each RAM module A RAM bank has an unique iden...

Страница 6: ...rself but experience difficulties it is recommended that you have an Apple authorized service provider complete the process Apple does not warranty damage caused by improper removal or installation of CPU cards Chapter 3 Installing the MACh Speed card Page 8 3 The default settings are the following Applying the thermal grease The MACh Speed ZIF upgrade card ships with a box containing thermal grea...

Страница 7: ... CD into your CD ROM drive 2 Open the folder For B W G3s 3 Double click the file 1 G3 Firwware Update if you DO NOT have the latest 1 1f4 4 This will open a disk image on your desktop 5 Open thedisk image and double click on the installer file 6 Launch the installer 7 Follow the on screen instructions 8 Click the shutdown button 9 While holding down the Programmer s button on the front of the comp...

Страница 8: ...sor socket Press down on the front end of the clip to snap onto the lock tab on the front of the processor socket 6 Raise the computer s side panel and press it against the case Squeeze the side panel until it snaps securely into place 7 Package the old CPU card for later Put the used card into MACh Speed anti static box If you ever have a problem it may be handy to be able to use the old card whi...

Страница 9: ... the heat sink on the MACh Speed ZIF card Reattach the heat sink clip by first hooking the end of the clip with the single hole to the back of the processor socket Press down on the front end of the clip to snap onto the lock tab on the front of the processor socket Chapter 3 Installing the MACh Speed card Page 14 Chapter 3 Installing the MACh Speed card Page 13 Heat sink clip Slot for Screwdriver...

Страница 10: ... disable the backside cache on the upgrade card If you system did not freeze when booting with extensions off reboot holding the Space Bar down During the boot sequence the Apple Extension Manager dialog will be displayed Select Base OS settings then scroll to re enable the MACh Speed Control Press Continue If you are able to boot at this point you have a software conflict Reboot and re enable ext...

Страница 11: ...ic setting used by the MACh Speed software should generally be safe but it is not foolproof In particular if MVP is being used to squeeze extra performance out of the processor upgrade the software may select a speed that is unsustainable Use Manual to select the next lowest speed from the pop up menu and restart the machine If stability returns then the backside cache was running too fast If you ...

Отзывы: