Xirrus Wi-Fi Array XN16 Скачать руководство пользователя страница 5

5

Connect the Cables

Refer to 

Figure 4

.

w

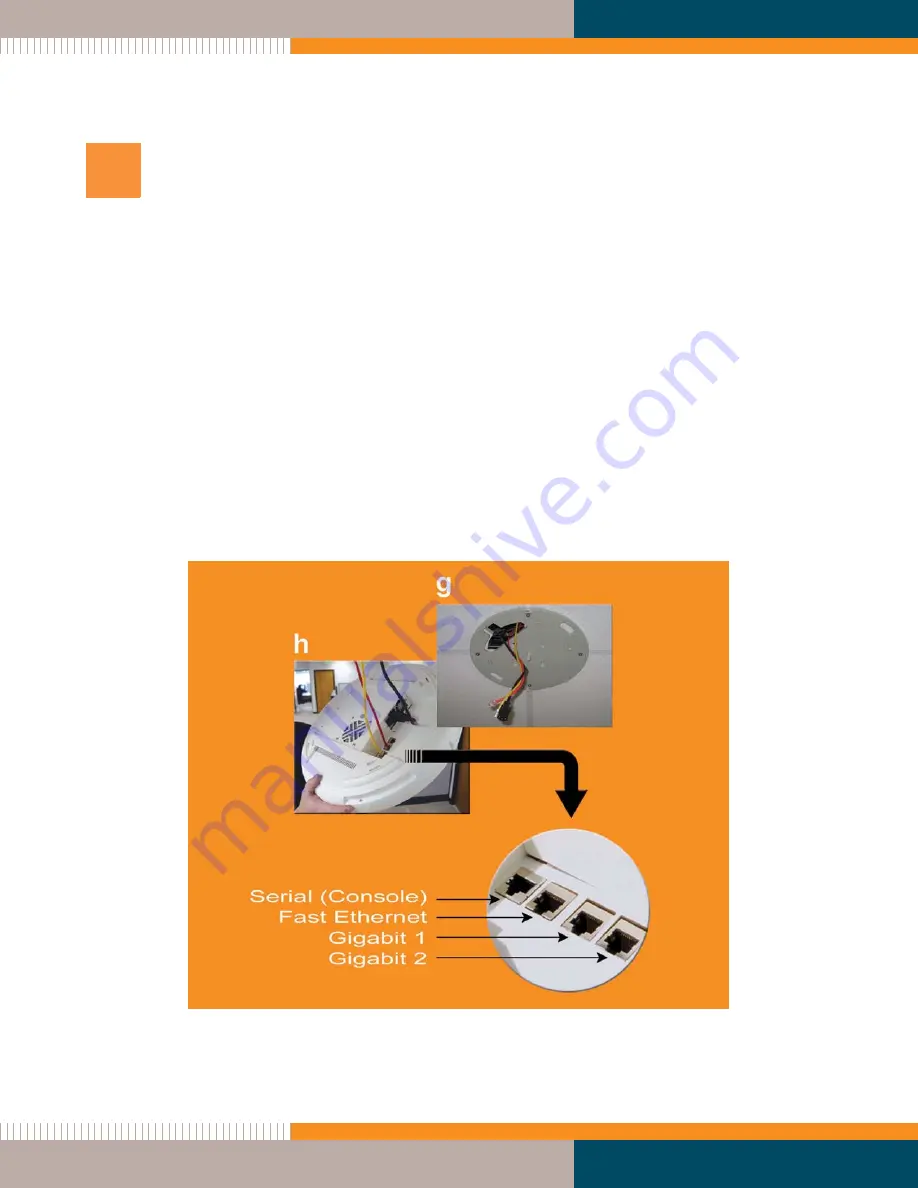
Feed the power and Ethernet cable(s) through the access hole in the ceiling tile and the 
mounting plate, then connect the cables to the Array (steps g and h). The Ethernet 
cable(s) should be connected as follows:

z

Gigabit 1 (mandatory)—used for the primary data and management connection 
to the Array.

z

Gigabit 2 (optional)—used as a redundant connection to Gigabit 1.

z

Fast Ethernet (optional)—used for a management-only connection to the Array.

w

Turn ON the power switch.

w

Verify that the Ethernet link LED lights and the LED boot sequence begins—the IAP 
LEDs on the front of the Array will illuminate in rotation.

Figure 4. Connecting the Cables 

6

Содержание Wi-Fi Array XN16

Страница 1: ...h unit or remote AC outlet s if using the optional Xirrus Power over Gigabit Ethernet PoGE single port or eight port modules If using PoGE the Array must be connected to PoGE networks without routing...

Страница 2: ...plate Refer to Figure 1 w Pre load the 4 T bar clips through the holes in the mounting template and twist the clips until they are correctly aligned with the markings on the template Figure 1 Attachin...

Страница 3: ...mounting template to find the correct location for all four T bar clips step a then twist the T bar clips onto the metal ceiling support grid and tighten the screw posts to 10 12 lbf ft 1 38 1 66 kgf...

Страница 4: ...to Figure 3 w Align the Array s mounting plate and secure it to the four T bar clips using the nuts provided steps e and f Tighten the nuts to 10 12 lbf ft 1 38 1 66 kgf m but do not overtighten Figur...

Страница 5: ...follows z Gigabit 1 mandatory used for the primary data and management connection to the Array z Gigabit 2 optional used as a redundant connection to Gigabit 1 z Fast Ethernet optional used for a mana...

Страница 6: ...the keyed slot in the center of the Array with the key post on the mounting plate Figure 5 Attaching the Array to the Mounting Plate w Turn the Wi Fi Array to the right to lock the unit into place si...

Страница 7: ...port your computer must be equipped with a male 9 pin serial port and terminal emulation software for example HyperTerminal Use the following settings when establishing a serial connection z If a DHCP...

Страница 8: ...r basic configuration data then click on the Save button to save your settings w Click on the Execute button to configure and enable all IAPs radios automatically w With a basic configuration establis...

Страница 9: ...non condensing Storage Temperature 20 C to 60 C 5 to 95 relative humidity non condensing System 1 GHz CPU XN16 XN8 1 GB RAM XN16 XN8 512 MB system flash Expansion slot for future options Electrical E...

Страница 10: ...d QoS settings for each SSID Security Wireless Security WEP 40bit 128bit encryption WPA and WPA2 with TKIP and AES encryption Rogue AP detection with alerts and classification User and System Authenti...

Страница 11: ...0 5 725 ETSI 11a n 5 725 5825 GHz UNII 3 11b g n 2 412 2 462 GHz FCC 11b g n 2 412 2 472 GHz ETSI 11b g n 2 412 2 484 GHz TELEC Antennas XN16 12 x internal 6 dBi 60 802 11a n sectorized 4 x internal 3...

Страница 12: ...ion MAP CoS to TCID Fair queuing of downstream traffic Compliance FCC Part 15 107 and 15109 Class A EN 301 489 Europe Certifications Spectralink Polycom VIEW operation with Spectralink Wi Fi phones Ou...

Отзывы: