Page 1 of 1
The
Calibrate Margins Menu
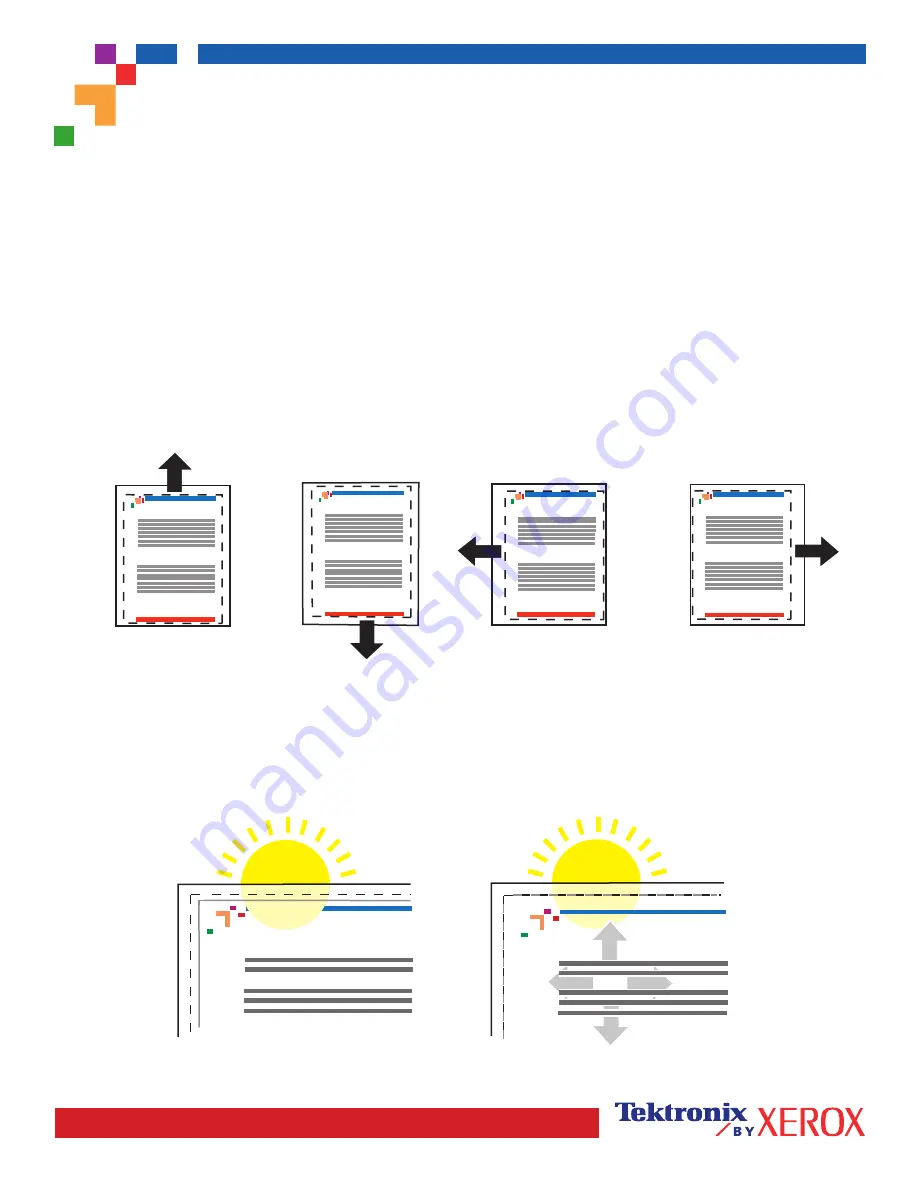
allows you to adjust the printer's imaging area relative to the edges of the paper. The
imaging area is shown as a dashed rectangle; the printer will not print outside this rectangle.
Step 1.
Adjust Side 1 Margins. To move the dashed rectangle to the postion you want it on the page:
1.
From the printer's front panel
Support Menu
, scroll to
Improve Print Quality?
and press OK.
2
. Scroll to the
Calibrate Margins Menu
and press OK. Select
Print Calibrate Margins Page
and press OK to print this
page.
3
. To move the dashed rectangle you see on the page printed to the position you want, use the front panel menu
items
Adjust Side 1 "A" Margin
and
Adjust Side 1 "B" Margin
as illustrated below.
4.
Reprint this page to verify the adjustment.
You can adjust the settings from -40 to +40 units. The thickness of the rectangle's dashed lines is 1 unit. 12 units move
the rectangle 1 mm. The maximum distance the rectangle can be moved (-40 to +40) is 6.7 mm.
Decrease
Adjust Side 1 "B"
Margin
setting to move left.
Increase
Adjust Side 1 "A"
Margin
setting to move up.
Increase
Adjust Side 1 "B"
Margin
setting to move right.
Decrease
Adjust Side 1 "A"
Margin
setting to move down.
Step 2.
If the printer has the duplex option, adjust Side 2 Margins.
1.
With Side 1 facing you, hold the print up to a strong light. Note the shadow of the solid lines printed on Side 2.
2.
Use the front panel menu items
Adjust Side 2 "A" Margin
and
Adjust Side 2 "B" Margin
to move the Side 2 solid
lines until they align with the Side 1 rectangle. Reprint to verify your adjustment.
Phaser 7700 Color Printer
Calibrate Margins
Phaser 7700 Color Printer
Calibrate Margins
Phaser 7700 Color Printer
Calibrate Margins
Phaser 7700 Color Printer
Calibrate Margins
B-
B+
A+
A-
Phaser 7300
Cal
Phaser 7300
Cal
A
B
A
B
+
-
+
-
PHASER
®
7300 COLOR PRINTER
Calibrate for Margins
(Short-Edge Feed)
Содержание WorkCentre 7300 Series
Страница 1: ...P h a s e r C o l o r P r i n t e r 7300 Troubleshooting Guide...
Страница 28: ...Cleaning Kit Phaser 7300 Color Printer 14 Cleaning Kit 4 x 00 10...
Страница 29: ...Replacing the Fuser Phaser 7300 Color Printer 15 Replacing the Fuser 00 10...
Страница 30: ...Replacing the Fuser Phaser 7300 Color Printer 16...
Страница 31: ...Replacing an Imaging Unit Phaser 7300 Color Printer 17 Replacing an Imaging Unit 00 10 1 2...
Страница 33: ...Replacing an Imaging Unit Phaser 7300 Color Printer 19 1 2 4 x 4 x 4 x 1 2...
Страница 34: ...Replacing a Toner Cartridge Phaser 7300 Color Printer 20 Replacing a Toner Cartridge 00 10 4...
Страница 35: ...Replacing a Toner Cartridge Phaser 7300 Color Printer 21 8 2 1 10 9 1 2 7 7 2 7 1 4 x...
Страница 36: ...Replacing the Transfer Unit Phaser 7300 Color Printer 22 Replacing the Transfer Unit 3 2 1 1 2 2 1 00 10 00 10...
Страница 37: ...Replacing the Transfer Unit Phaser 7300 Color Printer 23...
Страница 39: ...Repacking Instructions Phaser 7300 Color Printer 25 7 8 10 9 11 1 3 2 68 kg 149 lbs 6 1 6 2 6 7 2 7 3 7 4 7 1...


