Xerox WorkCentre 6515 Скачать руководство пользователя страница 301

Specifications 


Total Space Requirements 


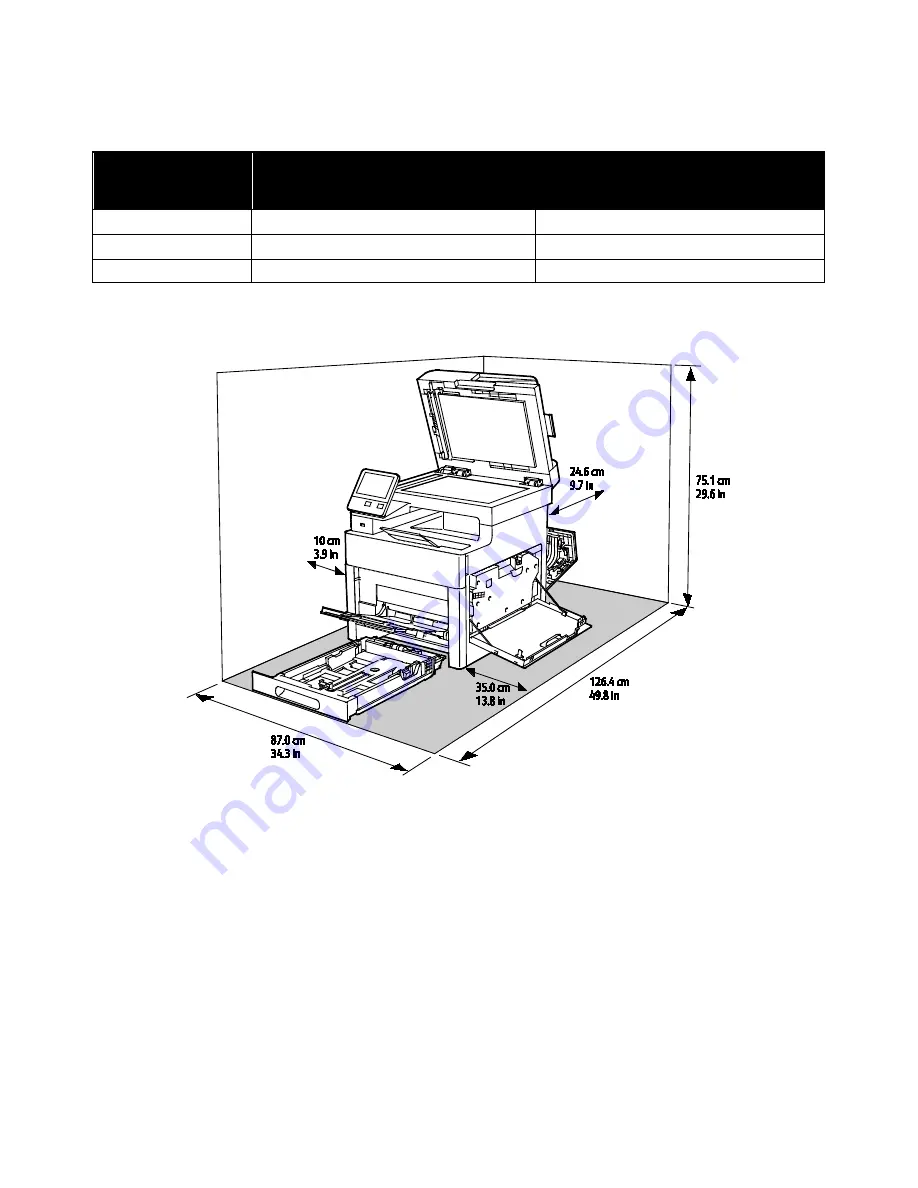
Configurations without the Optional 

550-Sheet Feeder 

All Models with the Optional 

550-Sheet Feeder 

Width 

870 mm (34.3 in.) 

870 mm (34.3 in.) 

Depth 

1264 mm (49.8 in.) 

1264 mm (49.8 in.) 

Height 

751 mm (29.6 in.) 

901 mm (35.5 in.) 


Clearance Requirements 


Xerox

®

 WorkCentre

®

 6515 Color Multifunction Printer  301 


User Guide 


Содержание WorkCentre 6515

Страница 1: ...Xerox WorkCentre 6515 Color Multifunction Printer User Guide ...

Страница 2: ...ademarks of Apple Inc registered in the U S and other countries AirPrint and the AirPrint Logo are trademarks of Apple Inc Google Cloud Print web printing service Gmail webmail service and Android mobile technology platform are trademarks of Google Inc HP GL HP UX and PCL are trademarks of Hewlett Packard Corporation in the United States and or other countries IBM and AIX are trademarks of Interna...

Страница 3: ...utomatic Document Feeder 27 Rear View 27 Internal Parts 28 Control Panel 29 Power Saver 31 Exiting Sleep Mode 31 Information Pages 32 Printing Information Pages 32 Configuration Report 32 Configuring Printing of the Startup Page at Power On 32 Administrative Features 33 The Embedded Web Server 33 Finding the IP Address of Your Printer 33 Accessing the Printer 34 Billing Meters Usage Counters 35 Mo...

Страница 4: ...for a Windows Network Printer 61 Installing the Print Drivers for a Windows USB Printer 61 Installing the Drivers and Utilities for Macintosh OS X 62 Installing Drivers and Utilities for UNIX and Linux 65 Installing the Printer as a Web Service on Devices 66 4 Paper and Media 67 Supported Paper 68 Recommended Media 68 Ordering Paper 68 General Paper Loading Guidelines 68 Paper That Can Damage Your...

Страница 5: ...Printing Mirror Images 113 Selecting Job Completion Notification for Windows 114 Using Special Pages 114 Using Custom Paper Sizes 116 Printing on Custom Paper Sizes 116 Defining Custom Paper Sizes 117 6 Copying 119 Making Copies 120 Single Pass Duplex Automatic Document Feeder Guidelines 121 Document Glass Guidelines 121 Copy Settings 122 Selecting Color or Black and White Copies 122 Setting 2 Sid...

Страница 6: ...etworked Computer 138 Scanning Images into an Application on a Connected Computer 139 Scanning an Image into an Application 139 Example of Scanning an Image in Microsoft Windows 140 Scanning an Image Using Windows Fax and Scan 141 Scanning from Windows Control Panel 141 8 Faxing 143 Faxing Overview 144 Configuring the Printer for Faxing 144 Phone Line Compatibility 144 Document Loading Guidelines ...

Страница 7: ... Control Panel 163 Modifying the Default Fax Settings 164 Configuring Fax App Settings at the Control Panel 164 9 Maintenance 165 Cleaning the Printer 166 Cleaning the Exterior 166 Cleaning the Scanner 166 Cleaning the Interior 170 Adjustments and Maintenance Procedures 176 Color Registration 176 Color Calibration 177 Scan Color Consistency 177 Adjusting Paper Registration 178 Transfer Voltage Adj...

Страница 8: ...oblems 218 Fax Problems 219 Getting Help 221 Viewing Warning Messages on the Control Panel 221 Viewing Current Faults on the Control Panel 221 Using the Integrated Troubleshooting Tools 221 Online Support Assistant 222 Information Pages 222 More Information 223 11 System Administrator Functions 225 Connecting the Printer 226 Connecting to a Wireless Network Using the Embedded Web Server 227 Connec...

Страница 9: ...43 Configuring PDL Settings from the Embedded Web Server 243 Configuring General Settings Using the Control Panel 247 Configuring the Power Saver Modes 247 Setting the Date and Time 248 Setting the Measurement Units 248 Setting the Display Brightness 248 Configuring Audio Tones 249 Configuring Low Supplies Alert Messages 249 Setting the Control Panel Timeout using the Control Panel 250 Configuring...

Страница 10: ... Authentication Using a Card Reader System 275 Configuring User Roles and Access Permissions 276 Setting the Login Method 276 Managing User Accounts 277 Managing Device User Roles 282 Managing Printing User Roles 285 Setting Up an LDAP User Permissions Group 288 Managing Certificates 289 About Security Certificates 289 Overview of Setting Up Digital Certificates 290 Before You Begin 290 Creating a...

Страница 11: ...nd Frequency 304 Power Consumption 304 ENERGY STAR Qualified Product 304 Germany Blue Angel 304 Recycling Supplies 304 Performance Specifications 305 Print Speed 305 B Regulatory Information 307 Basic Regulations 308 United States FCC Regulations 308 Canada 308 European Union 309 European Union Lot 4 Imaging Equipment Agreement Environmental Information 309 Germany 311 Turkey RoHS Regulation 311 R...

Страница 12: ... European Union 324 Domestic Household Environment 324 Professional Business Environment 324 Collection and Disposal of Equipment and Batteries 325 Battery Symbol Note 325 Battery Removal 325 Other Countries 326 12 Xerox WorkCentre 6515 Color Multifunction Printer User Guide ...

Страница 13: ...nvironmental Health and Safety Contact Information 23 Your printer and the recommended supplies have been designed and tested to meet strict safety requirements Attention to the following information ensures the continued safe operation of your Xerox printer 1 Safety Xerox WorkCentre 6515 Color Multifunction Printer 13 User Guide ...

Страница 14: ...y evaluation and certification and compliance with electromagnetic regulations and established environmental standards The safety and environment testing and performance of this product have been verified using Xerox materials only Note Unauthorized alterations which can include the addition of new functions or connection of external devices can affect the product certification For more informatio...

Страница 15: ...oving covers and guards for installing optional equipment Except for user installable options there are no parts that you can maintain or service behind these covers The following are hazards to your safety The power cord is damaged or frayed Liquid is spilled into the printer The printer is exposed to water The printer emits smoke or the surface is unusually hot The printer emits unusual noise or...

Страница 16: ...printer in an area where people can step on the power cord Do not place objects on the power cord Do not plug or unplug the power cord while the power switch is in the On position If the power cord becomes frayed or worn replace it To avoid electrical shock and damage to the cord grasp the plug when unplugging the power cord The power cord is attached to the printer as a plug in device on the back...

Страница 17: ...covers Do not override any electrical or mechanical interlock devices Do not attempt to remove paper that is jammed deeply inside the product Switch off the product promptly and contact your local Xerox representative WARNING The metallic surfaces in the fuser area are hot Always use caution when removing paper jams from this area and avoid touching any metallic surfaces Ozone Release This printer...

Страница 18: ...e supplies designed for your printer The use of unsuitable materials can cause poor performance and a possible safety hazard Follow all warnings and instructions marked on or supplied with the product options and supplies Store all consumables in accordance with the instructions given on the package or container Keep all consumables away from the reach of children Never throw toner toner cartridge...

Страница 19: ...n with a dry lint free cloth only Do not burn any consumables or routine maintenance items For information on Xerox supplies recycling programs go to www xerox com gwa WARNING Do not use aerosol cleaners Aerosol cleaners can cause explosions or fires when used on electromechanical equipment Xerox WorkCentre 6515 Color Multifunction Printer 19 User Guide ...

Страница 20: ...to avoid damage to the property Caution To avoid damage to the property be careful not to spill toner when handling the waste cartridge Do not touch the part or area of the printer Do not expose the drum cartridges to direct sunlight Do not burn the toner cartridges Do not burn the waste cartridge Do not burn the drum cartridges Do not use paper attached with staples or any other form of binding c...

Страница 21: ...ransparencies or overhead projector sheets Do not reload paper previously printed on or used Do not copy money revenue stamps or postage stamps Add paper or media Paper Jam Lock Unlock Document Paper WLAN Wireless Local Area Network Xerox WorkCentre 6515 Color Multifunction Printer 21 User Guide ...

Страница 22: ...stcard Load envelopes in the tray with the flaps closed and facing up Load envelopes in the tray with the flaps open and facing up NFC Area Data Transmission Home Button Power Wake Button Paper Feeding Direction Indicator 22 Xerox WorkCentre 6515 Color Multifunction Printer User Guide ...

Страница 23: ... contact the following customer help lines United States and Canada 1 800 ASK XEROX 1 800 275 9376 Europe 44 1707 353 434 For product safety information in the United States and Canada go to www xerox com environment For product safety information in Europe go to www xerox com environment_europe Xerox WorkCentre 6515 Color Multifunction Printer 23 User Guide ...

Страница 24: ......

Страница 25: ...his chapter includes Parts of the Printer 26 Power Saver 31 Information Pages 32 Administrative Features 33 More Information 36 2 Features Xerox WorkCentre 6515 Color Multifunction Printer 25 User Guide ...

Страница 26: ...rts 28 Control Panel 29 Front View 1 Tray 2 Optional 550 Sheet Feeder 2 Tray 1 3 Bypass Tray 4 Front Door 5 USB Memory Port 6 Power Wake Button 7 Touch Screen Display 8 Single Pass Duplex Automatic Document Feeder DADF 9 Output Tray 10 Output Tray Extension 11 Right Side Door 26 Xerox WorkCentre 6515 Color Multifunction Printer User Guide ...

Страница 27: ...ument Output Tray Extension 7 CVT Glass 8 Second Side Scanning Access Cover Lever 9 Document Glass 10 Document Cover Rear View 1 Fuser 2 Rear Door 3 Wireless Network Adapter Port Cover 4 Left Side Cover 5 Phone Connector 6 Fax Line Connector 7 USB Port Type A 8 USB Port Type B 9 Ethernet Connection 10 Power Connector Xerox WorkCentre 6515 Color Multifunction Printer 27 User Guide ...

Страница 28: ... 2 Toner Cartridges 3 Document Glass 4 Document Cover 5 Single Pass Duplex Automatic Document Feeder DADF 6 Drum Cartridges 7 Waste Cartridge 8 Cleaning Rod 9 Right Side Door 28 Xerox WorkCentre 6515 Color Multifunction Printer User Guide ...

Страница 29: ...t copy and scan features Provides access to reference materials Provides access to Tools and Setup menus Prompts you to load paper replace supplies and clear jams Displays errors and warnings Provides the Power Wake button used for turning on or turning off the printer This button also supports the power saver modes and blinks to indicate the power status of the printer Xerox WorkCentre 6515 Color...

Страница 30: ... the printer When the printer is on holding this button for 10 seconds turns off the printer This button also blinks to indicate the power status of the printer When the light blinks slow the printer is in Low Power or Sleep mode When the light blinks fast the printer is powering down or exiting a low power mode 5 Status LED This light blinks blue or amber to indicate printer status Blue Blinks bl...

Страница 31: ...tandby power consumption Sleep Timeout The printer shifts from Low Power mode to Sleep mode for a greater reduction in power consumption Note Increasing the default Power Saver activation times can result in an overall higher energy consumption of the printer Exiting Sleep Mode The printer exits Low Power mode or Sleep mode automatically when it receives data from a connected device To exit Low Po...

Страница 32: ...he Home screen press the Home button Configuring Printing of the Startup Page at Power On The Startup Page provides basic printer configuration information such as printer name serial number fonts firmware and Ethernet versions When this feature is on the Startup Page prints each time you power on your printer If you do not want the Startup Page to print you can disable the feature To configure th...

Страница 33: ... can view the IP address of your printer on the control panel or on the Configuration Report Note Wait until the printer has been on for 2 minutes to view the TCP IP address If the TCP IP address is 0 0 0 0 or begins with 169 this indicates a network connectivity issue For details refer to Printer Does Not Print on page 193 To view the IP address of the printer on the control panel 1 At the printe...

Страница 34: ... the printer for authentication If authentication is set to access printer features you log in with your user credentials Logging In at the Control Panel 1 At the printer control panel press the Home button 2 Touch Log In 3 Type the User Name using the keypad then touch Enter 4 If prompted enter the password then press Enter 5 Touch OK Notes To access each service that is password protected repeat...

Страница 35: ...option 4 After viewing the usage readings to return to the Home screen press the Home button To view the Usage Counters using the Embedded Web Server 1 At your computer open a Web browser In the address field type the IP address of the printer then press Enter or Return Note If you do not know the IP address for your printer refer to Finding the IP Address of Your Printer on page 33 2 To view the ...

Страница 36: ...ownloads www xerox com office WC6515support Information Pages Print from the control panel For details refer to Information Pages on page 32 Order supplies for your printer www xerox com office WC6515supplies A resource for tools and information including interactive tutorials printing templates helpful tips and customized features to meet your individual needs www xerox com office businessresourc...

Страница 37: ...gs 54 Configuring AirPrint 56 Google Cloud Print 57 Configuring General Setup Using the Control Panel 58 Configure the Fax Defaults and Settings 59 Installing the Software 60 For reference Installation Guide packaged with your printer Online Support Assistant at www xerox com office WC6515support 3 Installation and Setup Xerox WorkCentre 6515 Color Multifunction Printer 37 User Guide ...

Страница 38: ...outers network switches modems Ethernet cables and USB cables are not included with your printer and must be purchased separately Xerox recommends an Ethernet connection because it is typically faster than a USB connection and it provides access to the Embedded Web Server Note If the Software and Documentation disc is not available you can download the latest print drivers from www xerox com offic...

Страница 39: ...id contact with the surface To find the weight for your printer configuration refer to Physical Specifications on page 300 Select a location with adequate clearance to access supplies and to provide proper ventilation To find the clearance requirements for your printer refer to Clearance Requirements on page 301 3 After positioning the printer you are ready to connect it to the power source and co...

Страница 40: ...thernet cable to connect the printer to the network You cannot connect the printer directly to the computer The printer must be connected through a router or network switch An Ethernet network can be used for one or more computers and supports many printers and systems simultaneously Ethernet connection is typically faster than USB and allows you direct access to the settings of the printer using ...

Страница 41: ...print driver For reference Installing the Software on page 60 Connecting to a Wired Network 1 Ensure that the printer is powered off 2 Attach a Category 5 or better Ethernet cable from the printer to the network or router socket Use an Ethernet switch or router and two or more Ethernet cables Connect the computer to the switch or router with one cable then connect the printer to the switch or rout...

Страница 42: ...ry credentials Note Wireless networking is available only on printers with the optional Wireless Network Adapter installed Installing the Wireless Network Adapter The optional wireless network adapter plugs in to the back of the control board After the adapter is installed and wireless networking is enabled and configured the adapter is able to connect to a wireless network To install the Wireless...

Страница 43: ...the adapter only as needed and according to the Wireless Network Adapter removal instructions For details refer to Removing the Wireless Network Adapter on page 44 5 Power on the printer 6 Configure the Wi Fi Settings For reference Connecting to a Network with a Wi Fi protected Setup on page 48 Connecting to a Wireless Network Manually on page 50 Connecting to a Wireless Network Using the Embedded...

Страница 44: ...the printer 2 To unlatch the left side cover slide the handle away from the printer then swing the handle toward the rear of the printer 3 To remove the cover slide it toward the back then away from the printer 44 Xerox WorkCentre 6515 Color Multifunction Printer User Guide ...

Страница 45: ...UTION Do not use force to pull on the Wireless Network Adapter If the latch is released properly the adapter pulls out easily Pulling on a secured adapter can damage it 5 To reinstall the Wireless Network Adapter Port Cover insert the bottom tab into the small slot Gently press the port cover against the back of the printer until it latches into place Xerox WorkCentre 6515 Color Multifunction Prin...

Страница 46: ...printer 7 To latch the cover swing the handle toward the front of the printer then push the handle in until it clicks into the locked position 8 Connect the printer to your computer with a USB cable or to a network using an Ethernet cable 46 Xerox WorkCentre 6515 Color Multifunction Printer User Guide ...

Страница 47: ... To prevent the printer from attempting to connect to the previous network reset the wireless settings To reset the wireless settings 1 At the printer control panel press the Home button 2 Touch Device Connectivity Wi Fi 3 Touch the network selection that you want to reset 4 Touch Forget This Network 5 At the prompt touch Forget Reboot Xerox WorkCentre 6515 Color Multifunction Printer 47 User Guid...

Страница 48: ...he router provides the security and configuration information to the printer which uses it to connect to the network To connect to a WPS wireless network using the PBC method Note Before you install the device ensure that the wireless router is configured properly and is connected to the network 1 At the printer control panel press the Home button 2 Touch Device Connectivity Wi Fi 3 If Wi Fi is Of...

Страница 49: ... WPS Note If Wi Fi Protected Setup WPS is not visible at the top of the screen touch Manual Setup 8 Touch PIN 9 Record the PIN from the screen then touch OK The printer starts advertising using the displayed PIN Code Note The printer continues to advertise for 120 seconds If the printer does not locate the wireless router within 120 seconds the connection attempt stops 10 At your computer in the w...

Страница 50: ...less network settings For Enter the Network Name SSID type the name SSID of your network then press OK Touch Security then select the security method that your wireless network uses Touch Enter Password then enter the password for your wireless network Touch OK 5 To activate your Wi Fi setting changes press the Home button 6 At the prompt touch Restart Now 7 After the printer restarts wait two min...

Страница 51: ...s powered off 2 Connect a standard RJ11 cable No 26 American Wire Gauge AWG or larger to the Line port on the back of the printer 3 Connect the other end of the RJ11 cable to an operating telephone line 4 Power on the printer 5 Enable and configure the Fax functions For reference Configuring Fax Defaults and Settings on page 161 Xerox WorkCentre 6515 Color Multifunction Printer 51 User Guide ...

Страница 52: ...ow Power mode or Sleep mode automatically when it receives data from a connected device When in Low Power mode or Sleep mode the touch screen is turned off and unresponsive To wake the printer manually press the Power Wake button To restart place the printer in Sleep Mode or power off the printer 1 At the printer control panel press the Power Wake button 2 Select an option To restart the printer t...

Страница 53: ...nd the Power Wake button flashes until the printer has completed the power off process CAUTION Do not plug or unplug the power cord when the printer is powered on Installation Wizard The Installation wizard starts the first time you power on the printer The wizard prompts you with a series of questions to help you configure basic printer settings Note You can change these settings at any time Xero...

Страница 54: ...e network that is configured to use DHCP If you use a Cable or DSL router refer to the documentation for your router for information on IP addressing Assigning the Printer IP Address By default the printer is configured to acquire an IP address from the network server using DHCP Network addresses assigned by DHCP are temporary however After a specified time the network can assign a new IP address ...

Страница 55: ...r touch DHCP then touch OK Note For best results on most networks enable DHCP This option enables Dynamic DNS Registration 5 To save the settings touch OK 6 Press the Home button 7 For the settings to take effect at the prompt touch Restart Now 8 Two minutes after the printer restarts verify that the printer has obtained a valid IP Address For details refer to Finding the IP Address of Your Printe...

Страница 56: ...neration or later running the latest version of iOS 1 At your computer open a Web browser In the address field type the IP address of the printer then press Enter or Return Note If you do not know the IP address for your printer refer to Finding the IP Address of Your Printer on page 33 2 In the Embedded Web Server click Home Connectivity Note If this feature does not appear log in as a system adm...

Страница 57: ...ectivity 3 For Mobile Printing click Google Cloud Print 4 To enable Google Cloud Print click the Enable toggle button 5 Click OK 6 Restart the printer then wait two minutes for the printer to connect 7 Refresh your Web browser then for Mobile Printing click Google Cloud Print 8 Click Printer Registration 9 Click Register A printer registration page prints 10 To register the printer in your Web bro...

Страница 58: ...ut the printer 1 At the printer control panel press the Home button 2 Touch Device About Information Pages 3 To print a specific information page touch the desired report 4 To return to the Home screen press the Home button Displaying or Hiding Installed Apps 1 At the printer control panel press the Home button 2 Touch Customize 3 To display an installed but hidden App a Touch b Touch the App that...

Страница 59: ...number of the sending machine Date and time of the transmission The Installation wizard starts the first time you power on the printer The wizard prompts you with a series of questions to guide you through initial configuration of the printer and includes configuration of Fax settings and defaults At any time you can configure the Fax settings and defaults at the printer control panel or in the Em...

Страница 60: ... correctly and has a valid IP address The IP address usually appears in the upper right corner of the control panel If you cannot find the IP address refer to Finding the IP Address of Your Printer on page 33 If the Software and Documentation disc is not available download the latest drivers from www xerox com office WC6515drivers Operating System Requirements Windows Vista Windows 7 Windows 8 1 W...

Страница 61: ... Your Printer on page 33 7 Click Next 8 If desired you can name your printer by typing a name in the Queue Name field 9 If installing a print driver make a print driver selection 10 If installing a scan driver make a scan driver selection 11 Click Install 12 If desired set the printer as the default printer Note Before selecting Share Printer contact your system administrator 13 To complete the in...

Страница 62: ...lick Install 7 If prompted enter your password then click OK 8 From the list of discovered printers select your printer then click Next 9 If your printer does not appear in the list of discovered printers a Click the Network Printer Icon b Type the IP address of your printer then click Continue c Select your printer in the list of discovered printers then click Continue 10 If your printer was not ...

Страница 63: ...d verify that the printer is on and that the Ethernet cable is connected properly To add the printer by specifying the IP address 1 From the computer Applications folder or from the dock open System Preferences 2 Click Printers Scanners The list of printers appears on the left of the window 3 Under the list of printers click the plus button 4 Click IP 5 From the Protocol drop down menu select the ...

Страница 64: ... Installation 11 To restart click Log Out Installing LAN Fax Drivers for Macintosh 1 Insert the Software and Documentation disc into your computer 2 Double click the disc icon on your desktop to view the dmg file for your printer 3 Open the LAN Fax Installer dmg file then navigate to the appropriate installer file for your operating system 4 Open the LAN Fax Installer package file 5 Click Continue...

Страница 65: ...wn list choose Select Printer Software 7 In the printer software list select the appropriate Xerox LAN fax driver model then click OK 8 Click Add To add the printer by specifying the IP address 1 From the computer Applications folder or from the dock open System Preferences 2 Click Printers Scanners The list of printers appears on the left of the window 3 Under the list of printers click the plus ...

Страница 66: ...button Add the WSD printer manually using the Add Printer Wizard 4 Click Close To install a WSD printer using the Add Printer Wizard 1 At your computer click Start then select Devices and Printers 2 To launch the Add Printer Wizard click Add a Printer 3 Click Add a network wireless or Bluetooth printer 4 In the list of available devices select the one you want to use then click Next 5 If the print...

Страница 67: ...This chapter includes Supported Paper 68 Loading Paper 72 Printing on Special Paper 81 4 Paper and Media Xerox WorkCentre 6515 Color Multifunction Printer 67 User Guide ...

Страница 68: ... Recommended Media A list of paper and media recommended for your printer is available at www xerox com rmlna Recommended Media List United States www xerox com rmleu Recommended Media List Europe Ordering Paper To order paper or other media contact your local reseller or visit www xerox com office WC6515supplies General Paper Loading Guidelines Do not overfill the paper trays Do not load paper ab...

Страница 69: ... and other media properly contributes to optimum print quality Store paper in dark cool relatively dry locations Most paper is susceptible to damage from ultraviolet and visible light Ultraviolet light from the sun and fluorescent bulbs is particularly damaging to paper Reduce the exposure of paper to strong lights for long periods of time Maintain constant temperatures and relative humidity Avoid...

Страница 70: ...148 mm 4 1 x 5 8 in A5 148 x 210 mm 5 8 x 8 3 in A4 210 x 297 mm 8 3 x 11 7 in 215 x 315 mm 8 5 x 12 4 in DL Envelope 110 x 220 mm 4 33 x 8 66 in C6 Envelope 114 x 162 mm 4 5 x 6 38 in Postcard 102 x 152 mm 4 x 6 in 127 x 178 mm 5 x 7 in Statement 140 x 216 mm 5 5 x 8 5 in Executive 184 x 267 mm 7 25 x 10 5 in 203 x 254 mm 8 x 10 in Letter 216 x 279 mm 8 5 x 11 in Folio 216 x 330 mm 8 5 x 13 in Le...

Страница 71: ...k 106 176 g m Supported Custom Paper Sizes Tray Number Paper Sizes Tray 1 Minimum 76 x 148 mm 3 x 5 8 in Maximum 216 x 356 mm 8 5 x 14 in Tray 2 Minimum 76 x 191 mm 3 x 7 5 in Maximum 216 x 356 mm 8 5 x 14 in Bypass Tray Minimum 76 x 127 mm 3 x 5 in Maximum 216 x 356 mm 8 5 x 14 in 2 Sided Printing DN model only Minimum 140 x 210 mm 5 5 x 8 3 in Maximum 216 x 356 mm 8 5 x 14 in Xerox WorkCentre 65...

Страница 72: ...ngth 75 Loading Paper in Trays 1 and 2 77 Setting the Tray Mode 80 Loading Paper in the Bypass Tray 1 Open the bypass tray If the bypass tray is loaded with paper already remove any paper that is a different size or type 2 Pull out the extension tray for larger sizes 72 Xerox WorkCentre 6515 Color Multifunction Printer User Guide ...

Страница 73: ... stuck together and reduces the possibility of jams Note To avoid jams and misfeeds do not remove paper from its packaging until you are ready to use it 5 Load the paper in the tray Load hole punched paper with the holes to the left For 1 sided printing load Letterhead or pre printed paper face up with the top edge going into the printer first Xerox WorkCentre 6515 Color Multifunction Printer 73 U...

Страница 74: ...ze setting then from the list select the size To select a paper type touch the current paper type then from the list select the type To save the settings touch OK 8 If no prompt appears when paper is loaded set the paper type and size a At the printer control panel press the Home button b Touch Device Paper Trays c To open the Bypass Tray menu touch the Bypass Tray icon It is displayed in the top ...

Страница 75: ...ter pull out the tray until it stops lift the front of the tray slightly then pull it out 3 Set Up the Tray To compress the tray for shorter paper hold the back of the tray with one hand With the other hand press the release latch at the front of the tray then push the ends inward until they latch To extend the tray for longer paper hold the back of the tray with one hand With the other hand press...

Страница 76: ...he paper tray Note If the tray is extended for Legal size paper the tray protrudes when it is inserted into the printer 4 Load paper into the tray before inserting it back into the printer For details refer to Loading Paper into Trays 1 and 2 on page 77 76 Xerox WorkCentre 6515 Color Multifunction Printer User Guide ...

Страница 77: ...lightly then pull it out 2 Adjust the paper length and width guides to fit the paper size 3 Flex the sheets back and forth and fan them then align the edges of the stack on a level surface This procedure separates any sheets that are stuck together and reduces the possibility of jams Xerox WorkCentre 6515 Color Multifunction Printer 77 User Guide ...

Страница 78: ... back of the tray For 2 sided printing load letterhead face down with the top of the paper toward the back of the tray Note Do not load paper above the maximum fill line Overfilling the tray can cause the printer to jam 5 Adjust the paper length and width guides until they touch the edges of the paper 6 Slide the tray back into the printer 78 Xerox WorkCentre 6515 Color Multifunction Printer User ...

Страница 79: ...ce Paper Trays c In the Paper Trays menu touch the desired tray d To configure the printer to prompt you to set the paper type and size when paper is loaded touch Tray Mode then touch Fully Adjustable e To dedicate the tray for a paper size type or color touch Tray Mode then touch Dedicated To select a paper or envelope size touch the current size setting then from the list select the size To sele...

Страница 80: ...aded in the Bypass Tray It also sets the Bypass Tray as the default tray for all print jobs without a specified tray 6 To save the setting touch OK 7 To return to the Home screen press the Home button To configure the Tray 1 and 2 Tray Mode 1 At the printer control panel press the Home button 2 Touch the Device Paper Trays 3 Touch the desired tray 4 Touch Tray Mode 5 Touch the desired mode Fully A...

Страница 81: ...struction of the envelopes If you do not get the desired results try another envelope brand Maintain constant temperatures and relative humidity Store unused envelopes in their packaging to avoid excess moisture and dryness which can affect print quality and cause wrinkling Excessive moisture can cause the envelopes to seal before or during printing Remove air bubbles from the envelopes before loa...

Страница 82: ...o the edges of the tray Notes Do not load more than five envelopes in the Bypass Tray If you do not load envelopes in the bypass tray right after they have been removed from the packaging they can bulge To avoid jams flatten the envelopes 82 Xerox WorkCentre 6515 Color Multifunction Printer User Guide ...

Страница 83: ...ight For Monarch or DL envelopes do one of the following If the envelopes wrinkle try another option Load Envelopes with the short edge going into the printer first flaps down and flaps to the right Load Envelopes with the print side up flaps open and down and the bottom of the envelope going into the printer first Xerox WorkCentre 6515 Color Multifunction Printer 83 User Guide ...

Страница 84: ... down and the bottom of the envelope going into the printer first Load Envelopes with the print side up flaps closed and down and going into the printer first Note When you load envelopes with the flaps open in the print driver select Portrait Landscape or Rotated Landscape as needed to have them print correctly In the print driver use Rotate Image 180 Degrees to flip the image if needed 84 Xerox ...

Страница 85: ...gs touch OK 5 If no prompt appears when paper is loaded set the paper type and size a At the printer control panel press the Home button b Touch Device Paper Trays c To open the Bypass Tray menu touch the Bypass Tray icon It is displayed in the top position before the numbered trays d To select a paper or envelope size touch the current size setting then from the list select a size e To select a p...

Страница 86: ...ay slightly then pull it out 2 Adjust the paper length and width guides as illustrated 3 Load envelopes in the trays with the flaps closed flap side down and the short edge leading into the printer Note Do not load more than 20 envelopes 4 Slide the tray back into the printer 86 Xerox WorkCentre 6515 Color Multifunction Printer User Guide ...

Страница 87: ...labels from the bypass tray or Tray 1 Guidelines for Printing Labels Use labels designed for laser printing Do not use vinyl labels Do not feed a sheet of labels through the printer more than once Do not use dry gum labels Print only on one side of the sheet of labels Use full sheet labels only Store unused labels flat in their original packaging Leave the sheets of labels inside the original pack...

Страница 88: ...ct the size To select a paper type touch the current paper type then from the list select the type To save the settings touch OK 5 If no prompt appears when paper is loaded set the paper type and size a At the printer control panel press the Home button b Touch Device Paper Trays c To open the Bypass Tray menu touch the Bypass Tray icon It is displayed in the top position before the numbered trays...

Страница 89: ...l it stops lift the front of the tray slightly then pull it out 2 Adjust the paper length and width guides as illustrated 3 Load labels in the tray face up Note Do not load paper above the maximum fill line Overfilling can cause paper jams Xerox WorkCentre 6515 Color Multifunction Printer 89 User Guide ...

Страница 90: ...is loaded touch Tray Mode then touch Fully Adjustable e To dedicate the tray for a paper size type or color touch Tray Mode then touch Dedicated To select a paper or envelope size touch the current size setting then from the list select the size To select a paper type touch the current paper type then from the list select the paper type To select a paper color touch the current paper color then fr...

Страница 91: ...e packages in the shipping carton until ready to use Remove all other paper from the tray before loading glossy cardstock Load only the amount of glossy cardstock you are planning to use Do not leave glossy cardstock in the tray when you are finished printing Replace unused cardstock in the original wrapper and seal Rotate stock frequently Long periods of storage in extreme conditions can cause gl...

Страница 92: ......

Страница 93: ...ludes Printing Overview 94 Selecting Printing Options 95 Printing from a USB Flash Drive 102 Printing Features 103 Using Custom Paper Sizes 116 5 Printing Xerox WorkCentre 6515 Color Multifunction Printer 93 User Guide ...

Страница 94: ...panel specify the size color and type 3 Access the print settings in your software application For most software applications press CTRL P for Windows or CMD P for Macintosh 4 Select your printer 5 Access the print driver settings by selecting Properties or Preferences for Windows or Xerox Features for Macintosh The title of the button can vary depending on your application 6 Modify the print driv...

Страница 95: ...rences become the default setting Printing options that are set from within the software application are temporary The application and the computer do not save the settings after the application is closed Print Driver Help Xerox print driver software Help information is available from the Printing Preferences window Click the Help button in the bottom left corner of the Printing Preferences window...

Страница 96: ...mon printing options and save them so that you do not have to change them every time you print For example if you want to print on both sides of the paper for most jobs specify 2 sided printing in Printing Preferences To select default printing options 1 Navigate to the list of printers on your computer For Windows Vista click Start Control Panel Hardware and Sound Printers For Windows Server 2008...

Страница 97: ...e printer Properties dialog box click the Advanced tab 4 On the Advanced tab click Printing Defaults 5 Make your selections on the print driver tabs as needed then click Apply 6 To save the settings click OK Saving a Set of Commonly Used Printing Options for Windows You can define and save a set of options so that you can apply them to future print jobs To save a set of printing options 1 With the...

Страница 98: ...a name for the printing options then click OK to save the set of options in the Presets list 6 To print using these options select the name from the Presets list UNIX and Linux Printing The Xerox Print Driver package provides tools for you to manage printers connected in UNIX and Linux environments The Xerox print drivers provide a GUI based driver dialog for printer feature selections You can sel...

Страница 99: ...downloads 8 To install the Xerox Print Driver package a Open the package with your OS package manager b To install using a command line utility change to the directory where you downloaded the file To run the installer type the appropriate command line utility for your operating system For example Red Hat rpm U filename rpm Debian based Linux dpkg i filename deb AIX rpm U filename rpm HPUX filenam...

Страница 100: ...mmand to locate the PPD files 3 Follow the instructions that are included with the PPD Adding the Printer 1 Verify that the CUPS daemon is running 2 Open a Web browser and type http localhost 631 admin then click Enter or Return 3 For User ID type root For password type the root password 4 Click Add Printer and follow the onscreen prompts to add the printer to the CUPS printer list Printing with C...

Страница 101: ...s a software feature that enables users to print from mobile devices without requiring a print driver You can use Mopria to print from your mobile device to Mopria enabled printers Notes Mopria and all of its required protocols are enabled by default Ensure that you have the latest version of the Mopria Print Service installed on your mobile device You can obtain a free download from the Google Pl...

Страница 102: ...ent select the additional documents then touch OK 6 Select the paper supply quantity output color and 2 sided printing options 7 Touch Print 8 When you are finished remove the USB Flash drive To print from a USB Flash drive that is already inserted in the printer 1 If the USB Flash drive is already in the USB memory port press the Home button 2 Touch USB 3 Touch Print from USB Note If this feature...

Страница 103: ...aper Options for Printing 110 Printing Multiple Pages to a Single Sheet 110 Printing Booklets 111 Print Quality 111 Image Options 111 Printing Watermarks 112 Scaling 113 Lightness 113 Contrast 113 Printing Mirror Images 113 Selecting Job Completion Notification for Windows 114 Using Special Pages 114 Xerox WorkCentre 6515 Color Multifunction Printer 103 User Guide ...

Страница 104: ...ress the Home button To view print or delete jobs 1 At the printer control panel press the Home button 2 To view a list of active and completed jobs touch Jobs 3 To view a list of specific job types touch an option To view Saved Jobs touch Saved Jobs To print the job touch the job enter the quantity then touch OK To delete the job touch the Trash icon then touch Delete To view Personal jobs touch ...

Страница 105: ... your printer then open the print driver For Windows click Printer Properties Depending on your application the title of the button varies For Macintosh in the Print window click Copies Pages then select Xerox Features 3 For Job Type select Saved Job 4 Select other desired printing options and click OK To release a Saved Job 1 At the printer control panel press the Home button 2 Touch Jobs 3 To vi...

Страница 106: ...osh in the Print window click Copies Pages then select Xerox Features 3 For Job Type select Secure Print 4 Select other desired printing options and click OK To release a Secure Print job At the printer control panel press the Home button 1 Touch Jobs 2 To view Secure Jobs touch Personal Secure Jobs 3 Touch your folder 4 Enter the passcode number then touch OK 5 Select an option To print a Secure ...

Страница 107: ...s or CMD P for Macintosh 2 Select your printer then open the print driver For Windows click Printer Properties Depending on your application the title of the button varies For Macintosh in the Print window click Copies Pages then select Xerox Features 3 For Job Type select Personal Print 4 Select other desired printing options and click OK To release a Personal Job 1 At the printer control panel p...

Страница 108: ...rint settings For most software applications press CTRL P for Windows or CMD P for Macintosh 2 Select your printer then open the print driver For Windows click Printer Properties Depending on your application the title of the button varies For Macintosh in the Print window click Copies Pages then select Xerox Features 3 For Job Type select Sample Set 4 Select other desired printing options and cli...

Страница 109: ... Print This option prints on one side of the media Use this option when printing on envelopes labels or other media that cannot be printed on both sides 2 Sided Print This option prints the job on both sides of the paper to allow binding on the long edge of the paper The following illustrations show the result for documents with portrait and landscape orientations respectively 2 Sided Print Flip o...

Страница 110: ...long bottom side up 3 Click OK Selecting Paper Options for Printing There are two ways to select the paper for your print job You can let the printer select which paper to use based on the document size paper type and paper color you specify You can also select a specific tray loaded with the desired paper Printing Multiple Pages to a Single Sheet When printing a multiple page document you can pri...

Страница 111: ...ge images to shift outward slightly when folded You can select a value from zero to 1 point Gutter Creep Print Quality Print quality modes Standard print quality mode 600 x 600 dpi Enhanced print quality mode 1200 x 1200 dpi Image Options Image options controls the way the printer uses color to produce your document The Windows PostScript and the Macintosh drivers provide the widest range of color...

Страница 112: ...e the image in increments of 1 To define the angle of the image on the page specify the position option or to rotate the image left or right by increments of 1 use the arrows To define the location of the image on the page specify the position option or to move the image in each direction in increments of 1 use the arrows 6 Under Layering select how to print the watermark Print in Background print...

Страница 113: ...maller than the output size extra space appears around the page image Manually Scale scales the document by the amount entered in the percentage box below the preview image Lightness The Lightness feature allows you to adjust the overall lightness or darkness of the text and images in your printed job 1 To adjust the lightness on the Image Options tab move the slider to the right to lighten or to ...

Страница 114: ...er sources for the cover pages that are different from the source used for the body of a document For example you can use your company letterhead for the first page of a document You can also use heavyweight paper for the first and last pages of a report You can use any applicable paper tray as the source for printing cover pages Select one of these options for printing cover pages No Covers does ...

Страница 115: ...es You want five pages to print on only one side of a special paper and the remainder of the pages printed 2 sided on regular paper You can use exception pages to print the job In the Add Exceptions window you can set the characteristics of the exception pages and select the alternate paper source Pages Specifies the page or range of pages that use the exception page characteristics Separate indiv...

Страница 116: ...e application click File Print and select your printer 3 In the Print dialog box click Properties 4 On the Paper Output tab use the Paper Size drop down list to select the desired custom size Note If you are printing on custom size paper define the custom size in the printer properties before printing 5 From the Paper Type drop down list select the paper type 6 Select any other desired options the...

Страница 117: ... click the Printing Options tab 2 For Paper click the arrow then select Other Size Advanced Paper Size Output Paper Size New 3 In the New Custom Paper Size window enter the height and width of the new size 4 To specify the units of measurement at the bottom of the window click the Measurements button then select Inches or Millimeters 5 To save in the Name field type a title for the new size then c...

Страница 118: ...ons 1 At the printer control panel press the Home button 2 Touch Device Paper Trays 3 Touch the desired tray for your custom size paper 4 Touch the current size setting then from the list touch Custom 5 In the Custom Paper Size screen enter the height and width of the new size 6 To save the setting touch OK 7 To return to the Home screen press the Home button 118 Xerox WorkCentre 6515 Color Multif...

Страница 119: ...This chapter includes Making Copies 120 Copy Settings 122 Advanced Copy Settings 126 6 Copying Xerox WorkCentre 6515 Color Multifunction Printer 119 User Guide ...

Страница 120: ...Lift the single pass duplex automatic document feeder then place the original document face down in the upper left corner of the document glass Use the single pass duplex automatic document feeder for multiple or single pages Remove any staples and paper clips from the pages Insert the original documents face up in the automatic document feeder with the top of the page entering the feeder first Ad...

Страница 121: ...tic Document Feeder accommodates the following original sized documents Width 139 7 216 mm 5 5 8 5 in Length 139 7 356 mm 5 5 14 in Weight 60 125 g m Follow these guidelines when loading original documents into the duplex automatic document feeder Load original documents face up so that the top of the document enters the feeder first Place only loose sheets of undamaged paper in the duplex automat...

Страница 122: ...tains color you can create copies in full color or in black and white Note This setting returns to its default after the copy job is complete To modify the default setting refer to Modifying the Copy Default Settings on page 126 To select color or black and white copying 1 At the printer control panel press the Home button 2 Touch Copy 3 Touch Output Color 4 Select an option Auto Detect The device...

Страница 123: ...h Copy 3 Touch Paper Supply 4 Touch a selection Collating Copies You can automatically collate multi page copy jobs For example when making three 1 sided copies of a six page document the copies are printed in this order 1 2 3 4 5 6 1 2 3 4 5 6 1 2 3 4 5 6 Uncollated copies print in the following order 1 1 1 2 2 2 3 3 3 4 4 4 5 5 5 6 6 6 To select a collating option 1 At the printer control panel ...

Страница 124: ...lowing Auto Use this option to allow the printer to determine the original document type Text Use this setting for black and white or colored text Text Photo Printed Use this setting for documents with text and photographs printed on paper Photocopied Use this setting for photocopied documents that include text and photographs Photograph Use this setting for documents that include photographs and ...

Страница 125: ...formation on the screen Custom Presets The Custom option allows you to specify the height and width of the area to scan The Preset options specify the area to scan when it matches a standard paper size 5 Touch OK Specifying the Orientation of the Original Use the Original Orientation option to specify the layout of the original documents that you desire the printer to scan The device uses the info...

Страница 126: ...Touch Enter Preset Name and using the keypad enter the preset name 7 Touch Next 8 Select an icon that best suits the preset being created 9 Touch Done Notes The preset is stored within the Preset feature To delete a saved preset refer to Customizing the Copy App on page 127 Modifying the Default Copy Settings The printer uses the default copy settings on all copy jobs unless you change the setting...

Страница 127: ... 3 Scroll to the bottom and touch Customize 4 Touch Feature List For logged in users a window appears asking you to confirm that the changes are for a guest or for you 5 Touch the desired option 6 To hide a Copy App feature follow the instructions that appear on the screen To delete a saved preset 1 At the printer control panel press the Home button 2 Touch Copy 3 Scroll to the bottom and touch Cu...

Страница 128: ......

Страница 129: ... User Home Folder 133 Scanning to an Email Address 134 Scan to Desktop 135 Scanning to a Shared Folder on a Network Computer 136 Scanning Images into an Application on a Connected Computer 139 For reference Installation and Setup Overview on page 38 7 Scanning Xerox WorkCentre 6515 Color Multifunction Printer 129 User Guide ...

Страница 130: ...stination for the scanned image at the printer The printer supports the following scanning functions Scan original documents to an email address Scan original documents to a USB Flash drive Scan original documents to your home folder Scan original documents to a computer using WSD Scan original documents to a shared network location using SMB and FTP transfer protocols Import scanned images into a...

Страница 131: ...matic Document Feeder Guidelines on page 121 Loading Documents for Scanning Position the original document as shown Document Glass Lift the document feeder cover then place the original document face down in the upper left corner of the document glass Single Pass Duplex Automatic Document Feeder Insert original documents face up with the top of the page entering the feeder first Adjust the paper g...

Страница 132: ...c file name touch the attachment file name enter a new name using the touch screen keypad then touch Enter 7 To save the scanned document as a specific file format touch the attachment file format then select the desired format 8 Adjust scanning features as needed 9 To begin the scan press Scan The printer scans your images to the folder that you specified 10 If you are scanning from the document ...

Страница 133: ...ument feeder 2 At the printer control panel press the Home button 3 To log in to the printer touch Log In 4 Enter your user name then touch Next 5 Enter your password then touch OK 6 To scan to a home folder select an option Touch Scan To On the Scan To screen touch Home Touch My Folder 7 To save the scanned document as a specific file name touch the attachment file name enter a new name using the...

Страница 134: ...cument as a specific file name touch the attachment file name enter a new name using the touch screen keypad then touch Enter 6 To save the scanned document as a specific file format touch the attachment file format then select the desired format 7 Adjust scanning options as needed 8 To change the subject line from Email Features touch Subject enter a new subject line using the touch screen keypad...

Страница 135: ... 263 To Scan to Desktop 1 Load the original document on the document glass or into the duplex automatic document feeder 2 At the printer control panel press the Home button 3 Touch Scan to Desktop 4 To select a destination touch the computer address 5 To begin the scan press Scan The Windows Fax and Scan application opens on your PC desktop The image file of your scan is saved to the Scanned Docum...

Страница 136: ... Sharing a Folder in Macintosh OS X Version 10 7 and Later 1 From the Apple menu select System Preferences 2 From the Internet Wireless menu select Sharing 3 From the Service menu select File Sharing 4 Under Shared Folders click the plus icon 5 Browse to the folder that you want to share on the network then click Add 6 To modify access rights for your folder select the folder The groups activate 7...

Страница 137: ...mple to save scanned files to a shared folder named scans type scans Document Path Enter the path of the folder on the SMB server For example to save the scanned files to a folder named colorscans inside the scans folder type colorscans Login Name Enter your computer user name Password Enter your computer login password Retype Password Enter your login password again 4 To save your network informa...

Страница 138: ...er a new name using the touch screen keypad then touch Enter 7 To save the scanned document as a specific file format touch the attachment file format then select the desired format 8 Adjust scanning options as needed 9 To begin the scan press Scan 10 If you are scanning from the document glass when prompted to finish touch Done or to scan another page touch Add Page Note If you are scanning a doc...

Страница 139: ...cations including Office 2007 do not support this feature 1 Load the original document on the document glass or in the duplex automatic document feeder 2 At your computer open the application into which you want to scan the image 3 In the application select the menu item to acquire the image 4 From the Paper Source menu in Windows or from the Scan From menu on a Macintosh computer select one of th...

Страница 140: ... Scan This setting scans only one side of the original document or image and produces 1 sided output files 2 Sided Scan This setting scans both sides of the original document or image 2 Sided Scan Rotate Side 2 This setting scans both sides of the original document or image and rotates the second side by 180 degrees 9 To select the resolution to scan the image click Resolution then select an optio...

Страница 141: ...mage is stored in the default Scanned Documents folder or in a folder that you selected Scanning from Windows Control Panel 1 Load the original document on the document glass or in the duplex automatic document feeder 2 On your computer select Start Devices and Printers 3 From the Devices and Printers window right click the printer icon then select Start Scan 4 Select the paper source for your ori...

Страница 142: ......

Страница 143: ...ding a Delayed Fax 148 Sending a Cover Sheet with a Fax 149 Sending a Fax From Your Computer 150 Printing a Secure Fax 152 Polling a Remote Fax Machine 153 Sending a Fax Manually 154 Printing a Fax Activity Report 155 Editing the Address Book 156 Configuring Fax Defaults and Settings 161 8 Faxing Xerox WorkCentre 6515 Color Multifunction Printer 143 User Guide ...

Страница 144: ...ou use the fax you must configure the Fax Settings to make it compatible with your local connection and regulations The Fax Settings include optional features you can use to configure the printer for faxing For details on Fax Settings and Fax Default Settings refer to Configuring Fax Defaults and Settings on page 161 Phone Line Compatibility The fax function works best with an analog phone line Vo...

Страница 145: ...tomatic Document Feeder Guidelines on page 121 Loading Documents for Faxing Position the original document as shown Document Glass Lift the feeder cover then place the original document face down in the upper left corner of the document glass Single Pass Duplex Automatic Document Feeder Insert original documents face up with the top of the page entering the feeder first Adjust the paper guides so ...

Страница 146: ...ngs as needed To adjust brightness touch Lighten Darken then adjust as needed Darken light original images such as pencil images and lighten dark images such as halftone images from newspapers or magazines To scan both sides of your original document touch 2 Sided Scanning then touch 2 Sided 4 Touch Send 5 If you are scanning from the document glass when prompted to finish touch Done or to scan an...

Страница 147: ...button To create fax presets 1 At the printer control panel press the Home button then touch Fax 2 Add recipients as needed for the selected fax job 3 Adjust settings as needed for the selected fax job 4 Touch Save 5 Select Save as New Preset 6 Enter the name of the new preset then touch Next 7 Choose an icon for the new preset then touch Done 8 To return to the Home screen press the Home button T...

Страница 148: ...needed For details refer to Sending a Fax from the Printer on page 146 3 Touch Delay Send 4 To set the Delay Send time from the Delay Send screen touch Specific Time Specify the time for the printer to send the fax then touch OK 5 Touch Send The fax is scanned and saved then sent at the time you specified 6 If you are scanning from the document glass when prompted to finish touch Done or to scan a...

Страница 149: ...redefined comment or create another comment For details refer to Adding Predefined Comments on page 149 6 Select a comment then touch OK 7 Touch Send 8 If you are scanning from the document glass when prompted to finish touch Done or to scan another page touch Add Page Note If you are scanning a document from the automatic document feeder a prompt does not appear 9 To return to the Home screen pre...

Страница 150: ...rties 4 On the Printing Options tab from the Job Type list select Fax 5 In the Fax window do one or more of the following Click the Add Recipient button type the recipient name and fax number add other information then click OK Add new recipients as needed Click the Add From Phonebook button In the Add From Phonebook window click the arrow then select a phonebook from the list Select names from th...

Страница 151: ...tings select Fax Setting The title of the button can vary depending on your application 4 Modify fax settings as needed For more information click the Help button 5 Click Print 6 Do one or more of the following Enter the recipient name and fax number then click Add Click Look Up Address Book select recipients from the local Address Book then click Add Click Look Up Device Address Book select recip...

Страница 152: ...iguring Fax Defaults at the Control Panel on page 163 To print a secure fax 1 At the printer control panel press the Home button then touch Jobs 2 Touch Personal Secure Jobs 3 Touch your assigned private folder 4 At the prompt enter the passcode then press OK 5 Select a job to print or touch Print All 6 To return to the Home screen press the Home button 152 Xerox WorkCentre 6515 Color Multifunctio...

Страница 153: ...idden in the fax menu change the Fax App settings For details refer to Configuring Fax App Settings at the Control Panel on page 164 2 To toggle Polling from Off to On touch the Polling toggle button 3 Enter the fax number of the fax machine that you want to poll To enter a fax number manually using the touch screen keypad touch Enter Fax Number To add a number from the fax address book touch the ...

Страница 154: ... fax number at the top of the screen touch Fax 3 Modify fax settings as needed 4 Touch Dial 5 To enter a fax number use the touch screen keypad Note To insert a pause as needed touch the Special Characters icon then touch Dial Pause To enter longer pauses touch Dial Pause multiple times 6 To send the fax touch Scan 7 If you are scanning from the document glass when prompted to finish touch Done or...

Страница 155: ...ity Report 1 At the printer control panel press the Home button 2 Touch Device Apps Fax 3 Touch Activity Report 4 To return to the Home screen press the Home button Xerox WorkCentre 6515 Color Multifunction Printer 155 User Guide ...

Страница 156: ...At the printer control panel press the Home button 2 Touch Address Book 3 Touch the plus icon then select Add Contact 4 To enter a name touch the Enter First Name Enter Last Name or Enter Company field then to move to the next field touch Next When finished touch Enter 5 To add a fax number touch Add Fax enter a fax number then touch OK 6 To save the contact touch OK 7 To return to the Home screen...

Страница 157: ... contact 7 To save the group touch OK 8 To return to the Home screen press the Home button To edit groups 1 At the printer control panel press the Home button 2 Touch Address Book 3 From the address book select a group then touch Edit 4 To add group members touch Add Member 5 To add a contact from the Favorites or Contacts menu select a contact 6 To add more group members touch Add Member and sele...

Страница 158: ...us icon then enter a number 7 To save the contact click OK To edit contacts 1 At your computer open a Web browser In the address field type the IP address of the printer then press Enter or Return 2 In the Embedded Web Server click Address Book 3 From the Address Book select a contact 4 To edit contact information perform the following steps a Click the contact name or contact information then edi...

Страница 159: ...8 To save the group click OK To edit groups 1 At your computer open a Web browser In the address field type the IP address of the printer then press Enter or Return 2 In the Embedded Web Server click Address Book 3 Within the address book select a group 4 To add group members a For Members click the plus icon b In the Add Members window click the check box for each desired member c To save the cha...

Страница 160: ...ve the contact as a Global Favorite for the contact name touch the Star icon b To remove the contact from the Favorite list for a selected feature for the selected feature touch the Star icon c To save changes touch OK 6 To return to the Home screen press the Home button Managing Favorites in the Embedded Web Server 1 In the Embedded Web Server click Address Book 2 Select a contact 3 To make the c...

Страница 161: ...of the business or individual sending the fax Telephone number of the sending machine Date and time of the transmission The first time that the printer is powered on the Installation Wizard runs The Installation Wizard process guides you through initial configuration of the printer and includes configuration of Fax settings and defaults There are four areas to configure in Fax Settings Fax Line Se...

Страница 162: ...ess Enter or Return Note If you do not know the IP address for your printer refer to Finding the IP Address of Your Printer on page 33 2 In the Embedded Web Server log in as a system administrator For details refer to Logging In as the Administrator on page 265 3 Click Apps Fax 4 From General Settings and Policy select a report Confirmation Report You can print a report that confirms when your fax...

Страница 163: ...Touch Secure Fax Receive b To toggle Secure Fax Receive from Off to On touch the Secure Fax Receive toggle button c Enter a 4 digit passcode then touch OK 4 To set incoming call handling select one of the following To set the printer to receive all incoming calls as faxes touch Receive Mode Immediately Auto Answer Fax then touch OK To answer calls manually touch Receive Mode Manually Answer Fax th...

Страница 164: ...rol Panel 1 At the printer control panel press the Home button then touch Fax Note To display the menu without entering a fax number at the top of the screen touch Fax 2 To hide or show features in the Fax menu touch Customize Feature List then make a selection To hide a feature for the desired feature touch the Eye icon To signify that the feature is hidden a line appears across its Eye icon To s...

Страница 165: ...hapter includes Cleaning the Printer 166 Adjustments and Maintenance Procedures 176 Ordering Supplies 182 Moving the Printer 186 9 Maintenance Xerox WorkCentre 6515 Color Multifunction Printer 165 User Guide ...

Страница 166: ... and gently wipe the stain off CAUTION Do not spray detergent directly on the printer Liquid detergent could enter the printer through a gap and cause problems Never use cleaning agents other than water or mild detergent Cleaning the Scanner Clean the scanner about once a month when anything is spilled on it or when debris or dust collect on any of the surfaces Keep the feed rollers clean to ensur...

Страница 167: ...th water 4 Clean the document glass A and the CVT glass B to its left Note For best results use Xerox Glass Cleaner to remove marks and streaks 5 Wipe the white underside of the document cover until it is clean and dry Xerox WorkCentre 6515 Color Multifunction Printer 167 User Guide ...

Страница 168: ...mirrored glass the white plastic strip and the rollers If dirt is difficult to remove moisten a soft cloth with a small amount of neutral detergent then wipe the printer parts dry with a soft cloth CAUTION To prevent damage to the film around the glass do not press heavily on the mirrored glass 168 Xerox WorkCentre 6515 Color Multifunction Printer User Guide ...

Страница 169: ...Maintenance 8 Close the Second Side Scanning Access Cover 9 Close the Document Cover Xerox WorkCentre 6515 Color Multifunction Printer 169 User Guide ...

Страница 170: ...paper jams or replacing a toner cartridge inspect the inside of the printer before closing the printer covers and doors Remove any remaining pieces of paper or debris For details refer to Clearing Paper Jams on page 199 Remove any dust or stains with a dry clean cloth WARNINGS Never touch a labeled area on or near the heat roller in the fuser You can get burned If a sheet of paper is wrapped aroun...

Страница 171: ...ff as best as you can If some toner remains on your clothes use cool water not hot to rinse off the toner If toner gets on your skin wash it off with cool water and a mild soap If you get toner in your eyes wash it out immediately with cool water and consult a doctor 1 Power off the printer 2 Open the right side door 3 To unlock the waste cartridge pinch the latch Xerox WorkCentre 6515 Color Multi...

Страница 172: ...lls keep the openings facing up Notes Be careful not to spill toner when handling the waste cartridge After removing the waste cartridge do not touch the area shown in the illustration 5 Place the removed waste cartridge on a level surface with the openings facing up 172 Xerox WorkCentre 6515 Color Multifunction Printer User Guide ...

Страница 173: ...e on its side or with the openings facing down 6 Remove the cleaning rod from inside the printer 7 Insert the cleaning rod into one of the four cleaning holes until it stops then pull out the rod Repeat this two more times Xerox WorkCentre 6515 Color Multifunction Printer 173 User Guide ...

Страница 174: ...g rod to its original location 10 To reinsert the waste cartridge lower the bottom of the cartridge into position To lock the cartridge into place push the top forward until the latch clicks into place 11 Close the right side door 174 Xerox WorkCentre 6515 Color Multifunction Printer User Guide ...

Страница 175: ...oggy clean the color density sensors 1 Power off the printer For details refer to Turning the Printer On and Off on page 52 2 Lift the rear door release and pull open the door 3 Use a dry cotton swab to clean the color density sensors 4 Close the rear door Xerox WorkCentre 6515 Color Multifunction Printer 175 User Guide ...

Страница 176: ...e You must adjust the color registration any time the printer is moved If you are having printing problems adjust the color registration Performing a Color Registration Adjustment A color registration adjustment occurs every time a new toner cartridge is installed You can run this adjustment at other times as needed To perform a color registration adjustment 1 At the printer control panel press th...

Страница 177: ... onscreen instructions 7 When finished touch Close 8 To exit the menu touch X 9 To return to the Home screen press the Home button Scan Color Consistency Use the Scan Color Consistency procedure to adjust scanned colors that appear incorrect or for composite grays that look neutral This procedure prints a Calibration Chart that you load into the automatic document feeder The printer scans that pag...

Страница 178: ...adjusting side 1 touch Adjusted Side then touch Side 1 To select a sample registration page for adjusting both sides touch Adjusted Side then touch Side 2 6 Specify the consecutive number of sample pages to print a Touch Print Settings b To increase or decrease the number of sample pages for Quantity touch Plus or Minus then touch OK 7 To print the sample pages touch Print Sample 8 When printing i...

Страница 179: ... the registration touch Lead Side Registration a To adjust the side to side registration for Side Registration touch Plus or Minus b To adjust the top to bottom registration for Lead Registration touch Plus or Minus For reference position the chart so that Side 1 or Side 2 dots are at the bottom of the page For Lead Registration a positive value shifts the image down the page For Side Registration...

Страница 180: ...ed off the paper increase the temperature for the paper you are using If the toner is blistered or mottled decrease the temperature for the paper you are using To adjust the fuser 1 At the printer control panel press the Home button 2 Touch Device Support Fuser Temperature Adjustment 3 To select the paper type touch Paper Type then touch the name of the paper type in the list 4 To increase or decr...

Страница 181: ...nd toner on prints To perform a Developer and Transfer Roller Cleaning procedure 1 At the printer control panel press the Home button 2 Touch Device Support Developer Transfer Roller Cleaning 3 To perform a Developer and Transfer Roller Cleaning touch Start 4 At the successfully completed prompt touch Close 5 To exit the menu touch X 6 To return to the Home screen press the Home button Xerox WorkC...

Страница 182: ...naccurate To ensure print quality the toner cartridge has been designed to cease functioning at a predetermined point CAUTION Use of toner other than genuine Xerox Toner can affect print quality and printer reliability Xerox Toner is the only toner designed and manufactured under strict quality controls by Xerox for specific use with this printer Routine Maintenance Items Routine maintenance items...

Страница 183: ...ates and Canada Coverage could vary outside these areas Please contact your Xerox representative for details Viewing Printer Supply Status You can check the status and percentage of life remaining for your printer supplies at the control panel or from the Embedded Web Server To view printer supply status in the Embedded Web Server 1 At your computer open a Web browser In the the address field type...

Страница 184: ... vacuum cleaner to remove spills Electric sparks inside the vacuum cleaner can cause a fire or explosion If you spill a large volume of toner contact your local Xerox representative WARNING Never throw a toner cartridge into an open flame Remaining toner in the cartridge can catch fire and cause burn injuries or an explosion Replacing a Toner Cartridge A message appears on the control panel when a...

Страница 185: ...ession count details for the printer The current counts for color black and white and combined total impressions appear Meter Readings track the total number of images and pages that are printed for the life of the printer You cannot reset Meter Readings For details refer to Billing Meters Usage Counters on page 35 Xerox WorkCentre 6515 Color Multifunction Printer 185 User Guide ...

Страница 186: ...the printer If the optional 550 Sheet Feeder is not fixed to the printer securely it could fall to the ground and cause injury Follow these instructions when moving the printer 1 Power off the printer then disconnect the power cord and other cables from the back of the printer WARNING To prevent electric shock never touch the power plug with wet hands When removing the power cord ensure that you p...

Страница 187: ...ntenance 3 Close the Bypass Tray 4 Remove any paper or other media from the output tray 5 If the output tray extension is extended close it Xerox WorkCentre 6515 Color Multifunction Printer 187 User Guide ...

Страница 188: ...he paper wrapped and away from humidity and dirt 8 If the optional 550 Sheet Feeder is installed unlock then uninstall it before you move the printer 9 Lift and carry the printer as shown in the illustration 188 Xerox WorkCentre 6515 Color Multifunction Printer User Guide ...

Страница 189: ...ackage the printer properly for shipment can result in damage not covered by the Xerox Warranty Service Agreement or Total Satisfaction Guarantee The Xerox Warranty Service Agreement or Total Satisfaction Guarantee do not cover damage to the printer caused by improper moving After moving the printer 1 Reinstall any parts that you removed 2 Reconnect the printer to the cables and power cord 3 Plug ...

Страница 190: ......

Страница 191: ...This chapter includes General Troubleshooting 192 Paper Jams 197 Getting Help 221 10 Troubleshooting Xerox WorkCentre 6515 Color Multifunction Printer 191 User Guide ...

Страница 192: ... turned on At the printer control panel press the Power Wake button For details refer to Turning the Printer On and Off on page 52 The power cord is not plugged into the outlet correctly Power off the printer and plug the power cord securely into the outlet Something is wrong with the outlet connected to the printer Plug another electrical appliance into the outlet and check if it operates properl...

Страница 193: ... the Status LED is blinking amber follow the instructions on the control panel to clear the error If the error persists contact your Xerox representative The printer is out of paper Load paper into the tray A toner cartridge is empty Replace the empty toner cartridge No control panel indicators are lit Power off the printer confirm that the power cord is plugged in correctly to the printer and the...

Страница 194: ... to a slower printing mode For example the printer could be set to print on Heavyweight paper It takes more time to print on certain types of special paper Ensure that the paper type is set properly in the driver and at the printer control panel For details refer to Print Speed on page 305 The printer is in Power Saver mode It takes time for printing to start when the printer is coming out of Powe...

Страница 195: ...ur printer model is not configured with automatic 2 sided printing Ensure that your printer supports automatic 2 sided printing For details refer to Printer Configurations and Options on page 298 Incorrect setting In the print driver Paper Output tab select Properties 2 Sided Print Printer is Making Unusual Noises Probable Causes Solutions There is an obstruction or debris inside the printer Power...

Страница 196: ...ing in a cold room that is heated quickly Probable Causes Solutions The printer has been sitting in a cold room Allow the printer to operate for several hours at room temperature The relative humidity of the room is too high Reduce the humidity in the room Move the printer to a location where the temperature and relative humidity are within the operating specifications 196 Xerox WorkCentre 6515 Co...

Страница 197: ...ed If a sheet of paper is wrapped around the heat roller do not try to remove it immediately Switch off the printer immediately and wait 40 minutes for the fuser to cool Try to remove the jam after the printer has cooled If the error persists contact your Xerox representative CAUTION Do not attempt to clear any paper jams using tools or instruments which can damage the printer permanently The foll...

Страница 198: ...n undamaged paper Avoid paper that is curled torn moist creased or folded To separate the sheets before loading into the tray fan the paper Observe the paper tray fill line never overfill the tray Adjust the paper guides in all trays after inserting the paper A guide that is not properly adjusted can cause poor print quality misfeeds skewed prints and printer damage After loading the tray at the c...

Страница 199: ... Jams from the Tray 1 Area 203 Clearing Paper Jams from the Tray 2 Area 206 Clearing Paper Jams from the Fuser Area 208 Clearing Paper Jams from the Duplex Automatic Document Feeder 1 Open the Top Cover and remove any paper 2 If paper is jammed in the Single Pass Duplex Automatic Document Feeder open the Document Cover Xerox WorkCentre 6515 Color Multifunction Printer 199 User Guide ...

Страница 200: ... Scanning Access Cover then remove any jammed paper 4 Close the Second Side Scanning Access Cover 5 Close the Document Cover then reload the document in the Single Pass Duplex Automatic Document Feeder 200 Xerox WorkCentre 6515 Color Multifunction Printer User Guide ...

Страница 201: ...e Pass Duplex Automatic Document Feeder Guidelines on page 121 Clearing Paper Jams from the Bypass Tray To resolve the error displayed on the control panel you must clear all paper from the paper path 1 Remove any paper from the Bypass Tray 2 Grasp both sides of the Bypass Tray then pull it straight out of the printer 3 Remove Tray 1 from the printer Xerox WorkCentre 6515 Color Multifunction Print...

Страница 202: ...ray Mode is set to Fully Adjustable the printer prompts you to set the paper type and size a If the paper size and type are correct touch OK b If the paper size or type are incorrect change the settings To select a sheet size touch the current size setting then from the list select the size To select a paper type touch the current paper type then from the list select the type To save the settings ...

Страница 203: ...size setting then from the list select a size e To select a paper type touch the current paper type then from the list select a paper type f To save the setting touch OK g To return to the Home screen press the Home button Clearing Paper Jams from the Tray 1 Area To resolve the error displayed on the control panel you must clear all paper from the paper path 1 Remove any paper from the Bypass Tray...

Страница 204: ...he tray and any remaining paper jammed in the printer 5 Insert Tray 1 into the printer then push it all the way in Note If the tray is extended for legal size paper the tray protrudes when it is inserted into the printer 204 Xerox WorkCentre 6515 Color Multifunction Printer User Guide ...

Страница 205: ... when paper is loaded touch Tray Mode then touch Fully Adjustable e To dedicate the tray for a paper size type or color touch Tray Mode then touch Dedicated To select a paper or envelope size touch the current size setting then from the list select the size To select a paper type touch the current paper type then from the list select the paper type To select a paper color touch the current paper c...

Страница 206: ... clear all paper from the paper path 1 Pull out Tray 2 until it stops 2 To remove the tray lift the front of it slightly then pull it out of the printer 3 Remove any crumpled paper from the tray and any remaining paper jammed at the front of the printer 206 Xerox WorkCentre 6515 Color Multifunction Printer User Guide ...

Страница 207: ...aper Trays menu touch the desired tray d To configure the printer to prompt you to set the paper type and size when paper is loaded touch Tray Mode then touch Fully Adjustable e To dedicate the tray for a paper size type or color touch Tray Mode then touch Dedicated To select a paper or envelope size touch the current size setting then from the list select the size To select a paper type touch the...

Страница 208: ...control panel clear all paper from the paper path 1 Lift the rear door release and pull open the door 2 To open the paper guide on the top of the fuser lift the paper guide tab 3 Remove any jammed paper from the back of the printer 208 Xerox WorkCentre 6515 Color Multifunction Printer User Guide ...

Страница 209: ...Troubleshooting 4 Close the paper guide on the fuser 5 Close the rear door Xerox WorkCentre 6515 Color Multifunction Printer 209 User Guide ...

Страница 210: ...he feed rollers For details refer to Cleaning the Printer on page 166 Paper Misfeeds Probable Causes Solutions The paper is not correctly positioned in the tray Remove the misfed paper and reposition it properly in the tray Adjust the paper guides in the tray to match the size of the paper The paper tray is too full Remove some of the paper Do not load paper past the fill line The paper guides are...

Страница 211: ...d envelopes long edge feed ensure that you specify landscape orientation in the print driver Paper Jam Message Stays On Probable Causes Solutions Some paper remains jammed in the printer Recheck the media path and make sure that you have removed all of the jammed paper One of the printer doors is open Check the doors on the printer Close any door that is open Note Check for and remove torn pieces ...

Страница 212: ...int quality the toner print drum cartridges for many devices are designed to cease functioning at a predetermined point Grayscale images printed with the composite black setting increment the color pages counter because color consumables are used Composite black is the default setting on most printers Controlling Print Quality Various factors can affect the quality of the output of your printer Fo...

Страница 213: ...se strips Padded envelopes Plastic media Transparencies Ensure the paper type selected in your print driver matches the paper type on which you are printing If you have the same size paper loaded in more than one tray ensure that the proper tray is selected in the print driver Store your paper and other media properly for optimum print quality For details refer to Paper Storage Guidelines on page ...

Страница 214: ...e paper with a recommended size and type and confirm that your control panel and print driver settings are correct For details refer to Supported Paper on page 68 The paper type is heavier or thicker than the paper type selection Ensure that the proper paper is loaded in the paper tray Choose a heavier paper type at the control panel and in the print driver Use a lighter paper or paper type The bi...

Страница 215: ...oller or the exposed end of the transfer belt Fingerprints can cause print quality issues The toner cartridges are not Xerox toner cartridges Ensure that the toner cartridges meet specifications and replace them if necessary For details refer to Consumables on page 182 Vertical black or color streaks or multiple colored streaks or lines Streaks in only one color The toner cartridges are not Xerox ...

Страница 216: ...at the rear cover is closed and locked Condensation inside the printer causes partial blanks or creased paper Power on the printer and leave it on for at least one hour to get rid of the condensation For assistance go to the Xerox Support website at www xerox com office WC6515support Vertical blanks appear The LED lenses are blocked Clean the LED lenses For details refer to Cleaning the LED Lenses...

Страница 217: ... the paper The humidity is too high Reduce the humidity in the room or move the printer to a new location Spots or lines appear at regular intervals on the prints One or more of the components in the paper path is marking the paper 1 Print the Repeating Defects pages At the control panel touch Device Support Support Pages Repeating Defects 2 To determine the cause measure the distance between the ...

Страница 218: ...s refer to Cleaning the Scanner on page 166 Spots present in copies taken from the document glass There is debris on the document glass When scanning the debris creates a spot on the image Clean all glass surfaces with a lint free cloth Image is too light or too dark Adjust the lighten darken setting Colors are inaccurate Adjust color settings and confirm that the correct Original Type is set Perf...

Страница 219: ...t glass The text in the document is too light Adjust the resolution There is a problem with the telephone connection Verify that the telephone line is working then send the fax again There is a problem with the fax machine of the caller Make a copy to verify that your printer is operating correctly If the copy was printed correctly have the recipient verify the condition of the receiving fax machi...

Страница 220: ...er supply in the printer does not match the document size sent Confirm the original size of the documents Documents could be reduced based on the available paper supply in the printer Faxes cannot be received automatically The printer is set to receive faxes manually Set the printer to automatic reception The memory is full Load paper if it is empty and then print the faxes stored in the memory Th...

Страница 221: ...hen a fault condition occurs a message appears on the control panel to inform you of the problem Fault messages warn you about printer conditions that prevent the printer from printing or degrade printing performance If more than one fault occurs only one is displayed on the control panel Using the Integrated Troubleshooting Tools Your printer has a printable set of reports Two of them the Demo Pa...

Страница 222: ...viewing the usage readings to return to the Home screen press the Home button Online Support Assistant The Online Support Assistant is a knowledge base that provides instructions and troubleshooting help to solve your printer problems You can find solutions for print quality problems paper jams software installation issues and more To access the Online Support Assistant go to www xerox com office ...

Страница 223: ...r downloads www xerox com office WC6515support Information Pages Print from the control panel For details refer to Information Pages on page 32 Order supplies for your printer www xerox com office WC6515supplies A resource for tools and information including interactive tutorials printing templates helpful tips and customized features to meet your individual needs www xerox com office businessreso...

Страница 224: ......

Страница 225: ...inting Policies from the Embedded Web Server 252 Setting Up Scanning 260 Configuring Security Settings Using the Embedded Web Server 264 Configuring Secure Settings Using the Control Panel 275 Configuring User Roles and Access Permissions 276 Managing Certificates 289 Configuring Remote Services Upload 293 11 System Administrator Functions Xerox WorkCentre 6515 Color Multifunction Printer 225 User...

Страница 226: ...ecting to a Wireless Network Using the Control Panel 228 Setting Up the Printer for Wireless LAN WPA2 Enterprise 228 Configuring Wi Fi Direct 229 Disabling Wireless Networking 230 Assigning the IP Address Manually 231 Changing the IP Address Using the Embedded Web Server 232 NFC 232 226 Xerox WorkCentre 6515 Color Multifunction Printer User Guide ...

Страница 227: ... 265 3 Click Connectivity 4 For Connections click Wi Fi 5 In the SSID field enter the network SSID name 6 To select the Network Type from the menu select Infrastructure or AdHoc Note The Infrastructure network type provides the greatest selection of security options AdHoc provides only WEP encryption in most networks 7 To select Encryption for Security Settings select the appropriate security opti...

Страница 228: ...ate Authorities within the category For details refer to Verifying the Digital Certificate Purpose on page 291 3 Configure WPA2 Enterprise For details refer to Configuring WPA2 Enterprise Authentication on page 228 Configuring WPA2 Enterprise Authentication Note WPA Enterprise settings are unique for each network For details on your settings contact your network administrator 1 At your computer op...

Страница 229: ... Enable toggle button 6 For Group Role select an option Group Owner a To set the printer as Group Owner for a Wi Fi Direct group for Group Role select Group Owner Note A Wi Fi Direct group is similar to a wireless access point b In the DHCP Server area for IP Address use the default or type a new IP Address c For IP Address Lease Time use the default or type a value in minutes d In the Group Owner...

Страница 230: ...abling Wireless Networking From the Embedded Web Server Note Wireless networking is available only on printers with the optional Wireless Network Adapter installed 1 At your computer open a Web browser In the address field type the IP address of the printer then press Enter or Return Note If you do not know the IP address for your printer refer to Finding the IP Address of Your Printer on page 33 ...

Страница 231: ...IP address dynamically To avoid having the IP address reassigned provide the printer an address at the higher end of the range that the device or router allows For example if your computer has IP address 192 168 1 2 and your device allows IP addresses to 192 168 1 255 select an address between 192 168 1 200 and 192 168 1 254 Note It is recommended when setting a static IP address that at the same ...

Страница 232: ...ress disconnects the Embedded Web Server 10 To reconnect to the Embedded Web Server in the address field of the Web browser type the new IP address of the printer 11 Press Enter or Return The Embedded Web Server opens NFC Near field communication NFC is a technology that enables devices to communicate when they are within 10 centimeters of each other You can use NFC to obtain the network interface...

Страница 233: ... the Embedded Web Server 238 Cloning Printer Settings 239 Resetting the Printer 239 Setting Up a Proxy Server 240 Setting Up the Network Address Book 240 Adding or Editing Contacts in the Address Book in the Embedded Web Server 241 Adding or Editing Contacts in the Address Book at the Control Panel 242 Configuring Alerts 242 Configuring Email Alerts 243 Configuring PDL Settings from the Embedded W...

Страница 234: ... on page 265 3 Click Permissions Login Logout Settings 4 Select a login method Simple Passwords are not required Local Passwords are required Network A remote server handles login authentication Device User Accounts are used only for personalization and permissions Convenience Log in with a magnetic strip card Device User Accounts are used only for personalization and permissions 5 To select the S...

Страница 235: ...r mode for Low Power Timeout click current value then type the desired timeout in minutes 4 To set the time delay before the printer enters Sleep mode for Sleep Timeout click current value then type the desired timeout in minutes Note The sum of the two timeouts is within 60 minutes 5 To set Auto Power Off click Auto Power Off To power off the device after all timeouts complete select On click cur...

Страница 236: ...e Server Synchronization for SNTP click Edit To enable or disable Time Server Synchronization click the toggle button Note The check mark on the toggle button indicates the setting is enabled Type the Time Server Address To set the amount of time between time synchronizations for Time Synchronization Interval click the current value then type a value in hours To save SNTP settings click OK 9 To sa...

Страница 237: ... a system administrator For details refer to Logging In as the Administrator on page 265 3 Click System Timeouts 4 For Device Website Timeout type a number in minutes 5 Click OK Setting the Default Device Control Panel Screen 1 At your computer open a Web browser In the address field type the IP address of the printer then press Enter or Return 2 In the Embedded Web Server log in as a system admin...

Страница 238: ...ay is set to the highest priority To configure the tray settings 1 At your computer open a Web browser In the address field type the IP address of the printer then press Enter or Return Note If you do not know the IP address for your printer refer to Finding the IP Address of Your Printer on page 33 2 In the Embedded Web Server click Home 3 In the Trays area click the desired tray 4 To configure t...

Страница 239: ... file does not delete it from the computer c To install the selected clone file click Install 5 To create a clone file a Select the parameters to clone from this printer To select individual parameters to clone from this printer select the desired parameter To choose all settings select Select Clear All To clear all settings clear Select Clear All b Click Create c If prompted save the clone file t...

Страница 240: ...rver click the Proxy Server toggle button 6 To select if your system uses common or different proxy servers click Proxy Setup If your setup uses a common proxy server select Common Proxy If your setup uses different proxy servers select Different Proxies As needed click the Enable Proxy Server toggle buttons 7 To set up a proxy server click Setup If your proxy server uses automatic configuration s...

Страница 241: ...mple if you want the scanned files saved to a folder named scans type scans Note FTP networks do not require a name for shared directories Document Path Enter the path of the folder on the SMB server For example if you want the scanned files saved to a folder named colorscans inside the scans folder type colorscans Login Name Enter your computer user name Password Enter your computer login passwor...

Страница 242: ...tton To edit contacts 1 At the printer control panel press the Home button 2 Touch Address Book 3 From the Address Book touch a contact name then touch Edit 4 To change contact information touch the information that you want to update edit as needed then touch OK 5 To save your contact changes touch OK 6 To return to the Home screen press the Home button Configuring Alerts 1 At your computer open ...

Страница 243: ...efer to Logging In as the Administrator on page 265 3 On the Home page for Supplies click Details 4 For Options click Email Alerts 5 For Email Alerts type the email address for the recipient Note A check mark on the toggle button indicates that the setting is enabled 6 To enable or disable an email alert for the alert type click the toggle button 7 Click OK Configuring PDL Settings from the Embedd...

Страница 244: ...type a number To select the maximum custom paper size length for Custom Paper Size Length type a number To set the default output color click Output Color then select an option To allow automatic color output based on the original document select Auto Detect To set the default printing option for 2 sided printing click 2 Sided then select an option To configure the printer not to print blank pages...

Страница 245: ...Web Server log in as a system administrator For details refer to Logging In as the Administrator on page 265 3 Click System PDL Settings 4 Click PDF 5 Configure the following settings as needed To specify the protocol used to construct the PDF output click Decomposer then select an option To set the limit for number of printed pages for Print Quantity type a number Note A check mark on the toggle ...

Страница 246: ...5 To specify the default paper size for the output click Paper Size then select a paper size 6 Click OK Viewing Version Information for a PDL Protocol 1 At your computer open a Web browser In the address field type the IP address of the printer then press Enter or Return 2 In the Embedded Web Server log in as a system administrator For details refer to Logging In as the Administrator on page 265 3...

Страница 247: ...including settings for power saver mode alerts touch screen security and printing defaults Configuring the Power Saver Modes You can set the time the printer spends idle in ready mode before the printer transitions to a lower power level To configure power saver settings 1 At the printer control panel press the Home button 2 Touch Device General Power Saver 3 Touch the Timer that you want to chang...

Страница 248: ...ormat then touch the date format that you want to use 7 To show time in 24 hour format touch the Use 24 Hour Clock toggle button 8 To save the settings touch OK 9 To return to the Home screen press the Home button Setting the Measurement Units 1 At the printer control panel press the Home button 2 Touch Device General Measurements 3 To select an option for units touch Units then touch Millimeters ...

Страница 249: ...the percentage of life remaining that triggers a Drum Cartridge alert touch Drum Cartridge Level then select a percentage 7 To set Drum Cartridge alerts select an option To display an alert message when the Drum Cartridge life is getting low touch the Drum Cartridge Reorder toggle button To display an alert message when the Drum Cartridge life is low touch the Drum Cartridge Near End of Life toggl...

Страница 250: ...paper settings at the control panel The Tray Priority feature determines the order in which the printer selects the tray for a print job when you have not specified one Tray Priority also determines how the printer selects another tray when a paper tray runs out in the middle of a job Priority 1 indicates that the tray is set to the highest priority To configure the paper tray settings 1 At the pr...

Страница 251: ...er the power is turned off The Reset to Factory Defaults feature erases all settings and returns the printer to original factory state All jobs presets Apps and device settings are reset When complete the printer restarts then displays the Install Wizard To reset the printer to factory defaults 1 At the printer control panel press the Home button 2 Touch Device Resets Reset to Factory Defaults 3 A...

Страница 252: ... Legal Size Original Documents 1 At your computer open a Web browser In the address field type the IP address of the printer then press Enter or Return Note If you do not know the IP address for your printer refer to Finding the IP Address of Your Printer on page 33 2 In the Embedded Web Server log in as a system administrator For details refer to Logging In as the Administrator on page 265 3 Clic...

Страница 253: ...not know the IP address for your printer refer to Finding the IP Address of Your Printer on page 33 2 In the Embedded Web Server log in as a system administrator For details refer to Logging In as the Administrator on page 265 3 Click System Defaults and Policies 4 For Paper Supply click Custom Paper Names 5 To give a custom name to a paper type for the Custom Paper Type type a name 6 After you ha...

Страница 254: ...administrator For details refer to Logging In as the Administrator on page 265 3 Click Jobs 4 Click Policies 5 For Conceal Job Names select an option 6 Click OK 7 Click Restart Now Configuring Stored Print Job Settings 1 At your computer open a Web browser In the address field type the IP address of the printer then press Enter or Return 2 In the Embedded Web Server log in as a system administrato...

Страница 255: ...Note The system requires that the number is a multiple of 256 6 Click OK 7 Click Restart Now Setting Policies for Allowed Print Job Types 1 At your computer open a Web browser In the address field type the IP address of the printer then press Enter or Return Note If you do not know the IP address for your printer refer to Finding the IP Address of Your Printer on page 33 2 In the Embedded Web Serv...

Страница 256: ...job can proceed Letter A4 Substitution This option allows the printer to substitute a loaded media that is of similar size 6 Click OK 7 Click Restart Now To Enable a Paper Type and Size Confirmation Prompt for the Bypass Tray 1 At your computer open a Web browser In the address field type the IP address of the printer then press Enter or Return Note If you do not know the IP address for your print...

Страница 257: ...anual Resume 6 Click OK 7 Click Restart Now Setting Print Job Policies for When a Paper Jam Occurs 1 At your computer open a Web browser In the address field type the IP address of the printer then press Enter or Return Note If you do not know the IP address for your printer refer to Finding the IP Address of Your Printer on page 33 2 In the Embedded Web Server log in as a system administrator For...

Страница 258: ...se to print a banner page from a print driver for Allow Print Driver to Override click the toggle button Note A check mark on the toggle button indicates that the feature is enabled To allow the printer to print a banner page sent by the client for Detect Client Banner Pages click the toggle button 6 Click OK 7 Click Restart Now Configuring Report Settings Setting the Output Tray for Reports 1 At ...

Страница 259: ...ess for your printer refer to Finding the IP Address of Your Printer on page 33 2 In the Embedded Web Server log in as a system administrator For details refer to Logging In as the Administrator on page 265 3 Click System Defaults and Policies 4 For Report Settings click Job Deletion Report 5 To allow the job deletion report to print select On 6 Click OK Xerox WorkCentre 6515 Color Multifunction P...

Страница 260: ... Address Book entry If you are scanning to an FTP server in the Embedded Web Server add the FTP server as an Address Book entry For the Address Book entry assign the required folder permissions If you are scanning to an email address in the Embedded Web Server configure the email server If the printer is connected using a USB cable you cannot scan to an email address a network location or to a fol...

Страница 261: ... FTP click the plus icon then enter the following information Nickname Enter the name that you want to appear in the Address Book Type Select the network connection type IP Address Host Name Port Enter the IP address or host name of your FTP server then enter the default port number In the next field enter the default port number for FTP 21 or select a number from the range provided Document Path ...

Страница 262: ...contact your network administrator For Outgoing SMTP Port Number type the default port number required for the SMTP server or select a number from the range provided Note Common default port numbers for SMTP include 25 465 and 587 7 As needed for your environment select a Connection Security protocol 8 As needed for your environment select an Outgoing SMTP Authentication type Note Ensure that the ...

Страница 263: ... In the address field type the IP address of the printer then press Enter or Return Note If you do not know the IP address for your printer refer to Finding the IP Address of Your Printer on page 33 2 In the Embedded Web Server click Connectivity Note If this feature does not appear log in as a system administrator For details refer to Logging In as the Administrator on page 265 3 For Protocols cl...

Страница 264: ...tication 269 Configuring the Network Authentication 270 Configuring an LDAP Authentication System 271 Configuring an SMB Authentication System 271 Configuring a Kerberos Authentication System 272 Configuring IP Address Filtering 272 Configuring SSL Settings in the Embedded Web Server 273 Enabling HTTPS Communication 274 Configuring SMTP Domain Filtering 274 USB Port Security 274 Use security setti...

Страница 265: ... printer refer to Finding the IP Address of Your Printer on page 33 2 At the top of the page click Log In 3 Click admin 4 Type the administrator password then click Log In The default password is 1111 Opening the Security Menu 1 At your computer open a Web browser In the address field type the IP address of the printer then press Enter or Return 2 In the Embedded Web Server log in as a system admi...

Страница 266: ...s click the Limit Login Attempts of System Administrator toggle button b To set the maximum number of failed login attempts allowed before the administrator login is disabled in the Failed Login Attempt Limit field type a number 5 Click OK To configure more advanced security settings 1 In the Embedded Web Server access the Advanced Security Menu For details refer to Accessing the Advanced Security...

Страница 267: ...At your computer open a Web browser In the address field type the IP address of the printer then press Enter or Return 2 In the Embedded Web Server log in as a system administrator For details refer to Logging In as the Administrator on page 265 3 Click Permissions 4 For Guest Accounts click Edit then select Device User Role 5 For Control Panel Permissions select Custom Permissions then click Setu...

Страница 268: ...rs Directory Services 4 For IP Address Host Name Port enter the IP address or DNS name for the LDAP server then enter the port number for LDAP 5 Configure the optional LDAP server information as needed a In the Search Directory Root field using Base DN format type the root path of the search directory For example DC xerox DC net b Select the type of LDAP Server c Type the Login Name and Password u...

Страница 269: ...DAP then click LDAP User Mappings 5 In the User Name field type a user name then click Search 6 If Network Authentication is enabled the Home field appears The Home field indicates the location of the user personal directory The system administrator defines the default for homeDirectory when the user account is created 7 If incorrect information is shown in the User Mapping fields as required chan...

Страница 270: ...e Locks Ensure that Network Authentication is enabled For details refer to Configuring Secure Settings on page 267 To access the authentication system 1 At your computer open a Web browser In the address field type the IP address of the printer then press Enter or Return 2 In the Embedded Web Server log in as a system administrator For details refer to Logging In as the Administrator on page 265 3...

Страница 271: ...m the required configuration then click OK 7 When the LDAP configuration is finished click Done Configuring an SMB Authentication System Before using servers for authentication configure the settings in the Embedded Web Server To configure an SMB authentication system 1 At your computer open a Web browser In the address field type the IP address of the printer then press Enter or Return 2 In the E...

Страница 272: ...ss Filtering 1 At your computer open a Web browser In the address field type the IP address of the printer then press Enter or Return 2 In the Embedded Web Server log in as a system administrator For details refer to Logging In as the Administrator on page 265 3 Click System Security 4 Click IP Address Filtering 5 For IP Address Filtering to enable an Internet Protocol click its associated toggle ...

Страница 273: ...nfigure the SSL Settings 1 At your computer open a Web browser In the address field type the IP address of the printer then press Enter or Return 2 In the Embedded Web Server log in as a system administrator For details refer to Logging In as the Administrator on page 265 3 Click System Security 4 For Network Security click SSL TLS Settings 5 Select one or more protocols from the list of SSL and T...

Страница 274: ... Security 4 For Network Security click Domain Filtering To allow specific domains select Allow Specific Domains Type the domains to allow To block specific domains select Block Specific Domains Type the domains to block To disable domain filtering select Off 5 Click OK USB Port Security To prevent unauthorized access to the printer through the USB port on the front of the printer disable the port ...

Страница 275: ...thentication is configured users swipe a pre programmed identification card at the control panel The printer compares the user credentials to the information stored on the Convenience Authentication server For details refer to the documentation provided with your authentication software Xerox WorkCentre 6515 Color Multifunction Printer 275 User Guide ...

Страница 276: ... In the Embedded Web Server log in as a system administrator For details refer to Logging In as the Administrator on page 265 3 In the Embedded Web Server click Permissions Login Logout Settings 4 To change the options for the selected login method click Edit 5 To change the login method to another login method a Click Select b Select options as needed c Click OK d To confirm the change at the pro...

Страница 277: ...ions 3 For Guest Access select Edit 4 Select Device User Role 5 For Control Panel Permissions or Device Website Permissions select a role from the list 6 To assign permissions to specific Apps a Click Custom Permissions then click Setup b Select an App then configure permissions as needed c Click OK d Click Close 7 Click OK To configure printing permissions for a guest user 1 At your computer open...

Страница 278: ... 8 Click OK Adding a User Account 1 At your computer open a Web browser In the address field type the IP address of the printer then press Enter or Return 2 In the Embedded Web Server click Permissions 3 For User Accounts click Add 4 For User Name type a user name 5 Type then retype a Password 6 Click Add The new user account appears in the User Accounts list Adding a Photo to a User Account 1 At ...

Страница 279: ...t a role from the list 7 To assign permissions to specific Apps a Click Custom Permissions then click Setup b Select an App then configure permissions as needed c Click OK d Click Close 8 Click OK Changing Printing Permissions for a User 1 At your computer open a Web browser In the address field type the IP address of the printer then press Enter or Return Note If you do not know the IP address fo...

Страница 280: ...ss field type the IP address of the printer then press Enter or Return Note If you do not know the IP address for your printer refer to Finding the IP Address of Your Printer on page 33 2 In the Embedded Web Server log in as a system administrator For details refer to Logging In as the Administrator on page 265 3 Click Permissions 4 For User Accounts select a user account 5 For Personalizations cl...

Страница 281: ...ck Permissions 4 For Email From Address click Edit 5 Type the email address 6 Click OK Deleting a User Account 1 At your computer open a Web browser In the address field type the IP address of the printer then press Enter or Return Note If you do not know the IP address for your printer refer to Finding the IP Address of Your Printer on page 33 2 In the Embedded Web Server log in as a system admin...

Страница 282: ...ter or Return Note If you do not know the IP address for your printer refer to Finding the IP Address of Your Printer on page 33 2 In the Embedded Web Server log in as a system administrator For details refer to Logging In as the Administrator on page 265 3 Click Permissions 4 Click Roles 5 Select Device User Roles 6 For Device User Roles click the plus icon 7 Select an option To start with the de...

Страница 283: ...ed Note When you select Custom Permissions click Setup then configure the settings as needed 8 Click OK Adding Members to a Device User Role 1 At your computer open a Web browser In the address field type the IP address of the printer then press Enter or Return Note If you do not know the IP address for your printer refer to Finding the IP Address of Your Printer on page 33 2 In the Embedded Web S...

Страница 284: ...r from a custom role adds the user to the Basic User role Deleting a Device User Role 1 At your computer open a Web browser In the address field type the IP address of the printer then press Enter or Return Note If you do not know the IP address for your printer refer to Finding the IP Address of Your Printer on page 33 2 In the Embedded Web Server log in as a system administrator For details refe...

Страница 285: ...browser In the address field type the IP address of the printer then press Enter or Return Note If you do not know the IP address for your printer refer to Finding the IP Address of Your Printer on page 33 2 In the Embedded Web Server log in as a system administrator For details refer to Logging In as the Administrator on page 265 3 Click Permissions 4 Click Roles 5 Select Printing User Roles 6 Fo...

Страница 286: ...hen you select Custom Permissions more print settings appear Configure the settings as needed 8 Click OK Adding Members to a Printing User Role 1 At your computer open a Web browser In the address field type the IP address of the printer then press Enter or Return Note If you do not know the IP address for your printer refer to Finding the IP Address of Your Printer on page 33 2 In the Embedded We...

Страница 287: ...om a custom role this action adds the user to the Basic Printing User role Deleting a Printing User Role 1 At your computer open a Web browser In the address field type the IP address of the printer then press Enter or Return Note If you do not know the IP address for your printer refer to Finding the IP Address of Your Printer on page 33 2 In the Embedded Web Server log in as a system administrat...

Страница 288: ...ng the IP Address of Your Printer on page 33 2 Log in as a system administrator For details refer to Logging In as the Administrator on page 265 3 In the Embedded Web Server click Permissions 4 Click Roles then select Setup LDAP Permissions Groups 5 Select an LDAP server then click OK 6 On the Permissions page click Roles then select Edit LDAP Groups 7 For LDAP Groups click the plus icon 8 In the ...

Страница 289: ... data Information about the owner of the certificate The certificate serial number and expiration date The name and digital signature of the certificate authority CA that issued the certificate A public key A purpose defining how the certificate and public key can be used There are three types of certificates Device Certificate A certificate for which the printer has a private key and the purpose ...

Страница 290: ...cates for your printer Before You Begin Before you can manage certificates configure SSL For details refer to Configuring SSL settings on page 273 Creating a Security Certificate Note To import a certificate ensure that HTTP SSL TLS communication is enabled For details refer to Enabling HTTPS Communication on page 274 1 At your computer open a Web browser In the address field type the IP address o...

Страница 291: ...to the certificate file to import To confirm reenter the password Note A password is required only for PKCS 12 certificates 9 To import the file click Import 10 When the process completes click Close Verifying the Digital Certificate Purpose 1 At your computer open a Web browser In the address field type the IP address of the printer then press Enter or Return 2 In the Embedded Web Server log in a...

Страница 292: ...tes 5 Select the certificate that you want to delete 6 Click Delete 7 At the prompt click Delete 8 Click Close Exporting a Digital Certificate 1 At your computer open a Web browser In the address field type the IP address of the printer then press Enter or Return 2 In the Embedded Web Server log in as a system administrator For details refer to Logging In as the Administrator on page 265 3 Click S...

Страница 293: ... 5 To enable a Proxy Server for Proxy Server click the toggle button Note A check mark on the toggle button indicates that the setting is enabled 6 To set the configuration type click Setup and select an option If your proxy server uses automatic configuration select Automatic If your proxy server uses a configuration script select Configuration Script Type the URL to locate the configuration scri...

Страница 294: ...or Schedule Upload type the time for the billing data and supplies data to upload to the Xerox Remote Services data center Note Enter the time using a 24 hour clock format 6 To download billing data and supplies data to a csv file click Download Data Note Look for the csv file in your Downloads folder 7 Click OK Enabling Email Notifications for Remote Services 1 At your computer open a Web browser...

Страница 295: ...n 2 In the Embedded Web Server log in as a system administrator For details refer to Logging In as the Administrator on page 265 3 Click System Remote Services Upload 4 For Remote Services click Disable 5 For Who is disabling select an option 6 Type the reason for disabling Remote Services Upload 7 Click Disable Xerox WorkCentre 6515 Color Multifunction Printer 295 User Guide ...

Страница 296: ......

Страница 297: ...onfigurations and Options 298 Physical Specifications 300 Environmental Specifications 303 Electrical Specifications 304 Performance Specifications 305 A Specifications Xerox WorkCentre 6515 Color Multifunction Printer 297 User Guide ...

Страница 298: ...twork Connectivity Wireless Network Adapter Standard Features Print Speed Standard and Enhanced modes up to 30 ppm 2 Sided Print speed Standard mode up to 20 images per minute Enhanced mode up to 20 images per minute Print Resolution Standard mode 600 x 600 dpi Enhanced mode 600 x 600 x 8 dpi from the print driver which prints at 1200 x 2400 dpi Paper Capacity Bypass Tray Tray 1 Optional 550 Sheet...

Страница 299: ...9 x 355 6 mm 8 5 x 14 in File Formats JPEG TIFF PDF PDF A XPS Supported Scanning Scan to Desktop WSD Scan to SMB Scan to FTP Scan to Email Scan to USB Flash drive Control Panel 5 inch LCD touch screen and keypad navigation Connectivity USB 2 0 USB 3 0 USB Flash drive Ethernet 10 100 1000 Base TX Wireless network connectivity with an IEEE802 11 n g b compliant Wireless Network Adapter Standard only...

Страница 300: ...ll Models with the Optional 550 Sheet Feeder Width 420 mm 16 5 in 420 mm 16 5 in Depth 506 mm 19 9 in 506 mm 19 9 in Height 500 mm 19 7 in 650 mm 25 6 in Weight 31 kg 68 lb 38 kg 84 lb Standard Configuration Configuration with Optional 550 Sheet Feeder 300 Xerox WorkCentre 6515 Color Multifunction Printer User Guide ...

Страница 301: ...ptional 550 Sheet Feeder All Models with the Optional 550 Sheet Feeder Width 870 mm 34 3 in 870 mm 34 3 in Depth 1264 mm 49 8 in 1264 mm 49 8 in Height 751 mm 29 6 in 901 mm 35 5 in Clearance Requirements Xerox WorkCentre 6515 Color Multifunction Printer 301 User Guide ...

Страница 302: ...Specifications Clearance Requirements with Optional 550 Sheet Feeder 302 Xerox WorkCentre 6515 Color Multifunction Printer User Guide ...

Страница 303: ...e humidity at 15 28ºC 59 82ºF Notes Under extreme environmental conditions such as 10 C and 85 relative humidity printing defects can occur due to condensation in the printer Print quality can be affected when operating near the limits for both temperature and humidity Elevation For optimum performance use the printer at elevations below 3100 m 10 170 ft Xerox WorkCentre 6515 Color Multifunction P...

Страница 304: ...ucing product energy consumption helps combat smog acid rain and long term changes to the climate by decreasing the emissions that result from generating electricity ENERGY STAR settings are preset on Xerox equipment at the factory to switch to Power Saver modes after 10 minutes from the last copy or print Germany Blue Angel RAL the German Institute for Quality Assurance and Labeling has awarded t...

Страница 305: ...fect print speed Print mode The fastest print modes are Standard and Enhanced Paper size Letter 8 5 x 11 in prints slightly faster than A4 210 x 297 mm Larger sizes reduce print speeds Paper type and weights For faster printing use paper weights of 105 g m or less The maximum print speed for 1 sided printing is 30 ppm on Letter size paper and 28 6 ppm on A4 size paper The maximum print speed for 2...

Страница 306: ......

Страница 307: ...s appendix includes Basic Regulations 308 Copy Regulations 313 Fax Regulations 316 Material Safety Data Sheets 320 B Regulatory Information Xerox WorkCentre 6515 Color Multifunction Printer 307 User Guide ...

Страница 308: ...ence in which case the user will be required to correct the interference at his her own expense If this equipment does cause harmful interference to radio or television reception which can be determined by turning the equipment off and on the user is encouraged to try to correct the interference by one or more of the following measures Reorient or relocate the receiving antenna Increase the separa...

Страница 309: ... EU Energy Related Products Directive specifically the Lot 4 study on Imaging Equipment This requires manufacturers to improve environmental performance of in scope products and supports the EU action plan on energy efficiency In scope products are Household and Office equipment that meet the following criteria Standard monochrome format products with a maximum speed less than 66 A4 images per min...

Страница 310: ...ce environmental impact Details on the ENERGY STAR program and models qualified to ENERGY STAR can be found at the following website www energystar gov index cfm fuseaction find_a_product showProductGroup pgw_code IEQ For additional information on energy or other related topics go to www xerox com about xerox environment enus html or www xerox co uk about xerox environment engb html Power Consumpt...

Страница 311: ... lifecycle based environmental certification This certification indicates that a product has undergone rigorous scientific testing exhaustive auditing or both to prove its compliance with stringent third party environmental performance standards Germany Blendschutz Das Gerät ist nicht für die Benutzung im unmittelbaren Gesichtsfeld am Bildschirmarbeitsplatz vorgesehen Um störende Reflexionen am Bi...

Страница 312: ... Directive 99 5 EC Operation of this device is subject to the following two conditions 1 this device may not cause harmful interference and 2 this device must accept any interference received including interference that may cause undesired operation Changes or modifications to this device not specifically approved by the Xerox Corporation may void the user s authority to operate this equipment 312...

Страница 313: ...e stamp this may be done provided the reproduction of the document is performed for lawful purposes Postage Stamps canceled or uncanceled For philatelic purposes Postage Stamps may be photographed provided the reproduction is in black and white and is less than 75 or more than 150 of the linear dimensions of the original Postal Money Orders Bills Checks or Drafts of money drawn by or upon authoriz...

Страница 314: ... Badges Identification Cards Passes or Insignia carried by military personnel or by members of the various Federal Departments such as FBI Treasure and so on unless photograph is ordered by the head of such department or bureau Reproducing the following is also prohibited in certain states Automobile Licenses Drivers Licenses Automobile Certificates of Title The preceding list is not all inclusive...

Страница 315: ...ed for the purpose of revenue by the Government of Canada or of a province or by the government of a state other than Canada Documents registers or records kept by public officials charged with the duty of making or issuing certified copies thereof where the copy falsely purports to be a certified copy thereof Copyrighted material or trademarks of any manner or kind without the consent of the copy...

Страница 316: ...ible modular jack that is also compliant Refer to the installation instructions for details You can safely connect the printer to the following standard modular jack USOC RJ 11C using the compliant telephone line cord with modular plugs provided with the installation kit Refer to the installation instructions for details The Ringer Equivalence Number REN is used to determine the number of devices ...

Страница 317: ... be used on party lines Connection to party line service is subject to state tariffs Contact the state public utility commission public service commission or corporation commission for information Your office could have specially wired alarm equipment connected to the telephone line Make sure that the installation of this Xerox equipment does not disable your alarm equipment If you have questions ...

Страница 318: ... Finland Lithuania Spain France Luxembourg Sweden Germany Malta United Kingdom This product has been tested to and is compliant with TBR21 OR ES 103 021 1 2 3 or ES 203 021 1 2 3 technical specifications for terminal equipment for use on analog switched telephone networks in the European Economic Area If you have problems with your product contact your local Xerox representative This product can b...

Страница 319: ...ll tinkle or noise and cause a false answer condition If you encounter such problems do not contact the Telecom Faults Service 6 DTMF tones dialing is the preferred method because it is faster than pulse decadic dialing and is readily available on almost all New Zealand telephone exchanges WARNING No 111 or other calls can be made from this device during a mains power failure 7 This equipment may ...

Страница 320: ...a information regarding your printer go to North America www xerox com msds European Union www xerox com environment_europe For the Customer Support Center phone numbers go to www xerox com office worldcontacts 320 Xerox WorkCentre 6515 Color Multifunction Printer User Guide ...

Страница 321: ...This appendix includes All Countries 322 North America 323 European Union 324 Other Countries 326 C Recycling and Disposal Xerox WorkCentre 6515 Color Multifunction Printer 321 User Guide ...

Страница 322: ...these materials is fully consistent with global regulations applicable at the time that the product was placed on the market For recycling and disposal information contact your local authorities Perchlorate Material This product may contain one or more Perchlorate containing devices such as batteries Special handling may apply For more information go to www dtsc ca gov hazardouswaste perchlorate 3...

Страница 323: ...rox representative 1 800 ASK XEROX to determine if this Xerox product is part of the program For more information about Xerox environmental programs visit www xerox com environment or for recycling and disposal information contact your local authorities Xerox WorkCentre 6515 Color Multifunction Printer 323 User Guide ...

Страница 324: ...n facilities free of charge Please contact your local disposal authority for information In some member states when you purchase new equipment your local retailer may be required to take back your old equipment free of charge Please ask your retailer for information Professional Business Environment Application of this symbol on your equipment is confirmation that you must dispose of this equipmen...

Страница 325: ... old products and batteries please contact your local municipality your waste disposal service or the point of sale where you purchased the items Penalties may be applicable for incorrect disposal of this waste in accordance with national legislation Business Users in the European Union If you wish to discard electrical and electronic equipment please contact your dealer or supplier for further in...

Страница 326: ...Recycling and Disposal Other Countries Please contact your local waste management authority to request disposal guidance 326 Xerox WorkCentre 6515 Color Multifunction Printer User Guide ...

Отзывы: