background image

Loading Paper

Chapter 4: Paper Loading and Orientation

4-15

3

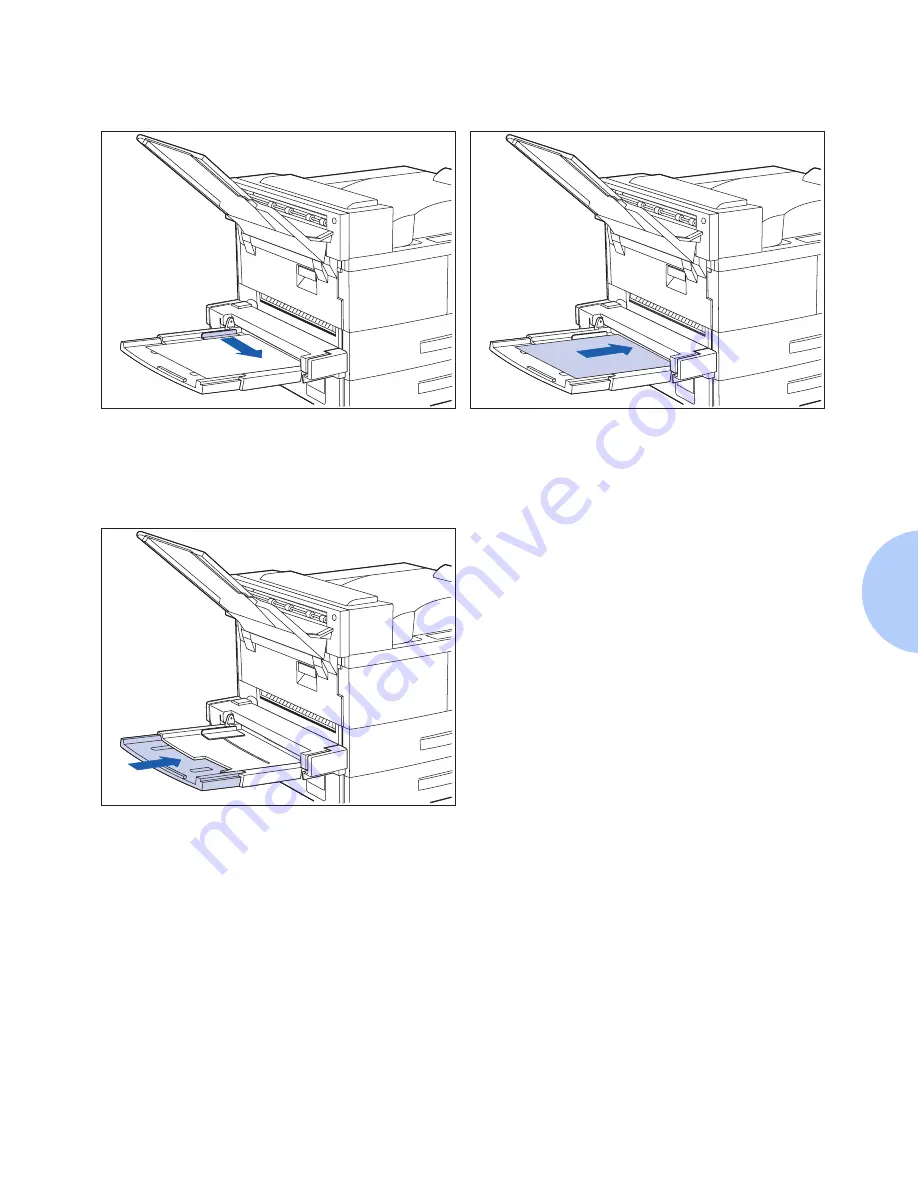
Push the paper guide to slightly touch the 
paper stack (to ensure contact with the 
paper sensor).

4

Push the paper as far as it can go into the 
printer.

5

When finished printing from the Bypass 
Feeder, remove any remaining paper 
from the tray and push back the extension 
tray (if necessary), as paper will be fed 
from the Bypass Feeder if it is selected in 
the tray sequence.

Содержание DocuPrint N24

Страница 1: ...The Xerox DocuPrint N24 N32 and N40 Network Laser Printers User Guide Version 1 8...

Страница 2: ...are trademarks of Microsoft Corporation Univers is a trademark of Linotype AG or its subsidiaries WordPerfect is a trademark of Corel Corporation Centronics is a trademark of Centronics Corporation M...

Страница 3: ...t I Read 1 6 Printer Components 1 7 Installing Your Printer 1 9 Printing a Configuration Sheet 1 11 Chapter 2 Printer Management Software and Drivers 2 1 Using CentreWare DP with the DocuPrint N40 2 2...

Страница 4: ...er Size Type Mismatch 4 21 Duplex Two Sided Printing 4 22 Print Orientation and Control Panel Settings 4 23 Chapter 5 Clearing Jams and Jam Recovery 5 1 Paper Jams 5 2 What Causes a Paper Jam 5 2 Clea...

Страница 5: ...int N24 N32 and N40 User Guide TOC 3 Chapter 7 Troubleshooting 7 1 Diagnostic Message Display 7 2 Printer Operation Problems 7 3 Chapter 8 References 8 1 Further References 8 2 Appendix A CE Declarati...

Страница 6: ...TOC 4 DocuPrint N24 N32 and N40 User Guide...

Страница 7: ...1 Introduction 1 2 User Documentation Road Map 1 3 Hardcopy User Documentation in the Box 1 3 Your N40 CD Which Comes in the Box 1 4 How Much of This Book Must I Read 1 6 Printer Components 1 7 Insta...

Страница 8: ...DocuPrint N40 when referring to these printers And it refers to all features not found on the base printer as options It identifies two different configurations for the DocuPrint N40 The tabletop con...

Страница 9: ...40 Quick Installation Guide QIG which shows you how to get the printer up and running 2 This N24 N32 and N40 User Guide UG which provides you with the basic information needed to use your printer More...

Страница 10: ...r Guide SAG 4 The 2 000 Sheet Finisher documentation 5 A procedure to upgrade your printer software The System Administrator Guide on this CD contains the following information should you require it 1...

Страница 11: ...In addition to the N40 product CD you are also provided with an N40 Printer Management Software CD This CD contains various pieces of Xerox provided Client Software as well as documentation for this s...

Страница 12: ...2 Printer Management Software and Drivers Instructions on using the Control Panel Chapter 3 Using the Control Panel Paper specifications loading paper and duplex printing Chapter 4 Paper Loading and O...

Страница 13: ...onents Front View 1 Face up Output Bin 2 Door A 3 50 Sheet Bypass Feeder 4 Door B 5 Face down Output Bin 6 Power switch 7 Control Panel 8 Front cover 9 Paper Tray 1 10 Paper Tray 2 Rear View 1 Power r...

Страница 14: ...ion with options Front View 1 10 bin Mailbox Collator 2 Face up Output Bin 3 Duplex Module 4 100 Envelope Feeder 5 2 500 Sheet Feeder with Paper Trays 3 4 and 5 Figure 1 3 Customer replaceable compone...

Страница 15: ...B shows how to install the DocuPrint N40 Toner Cartridge and Maintenance Kit Appendix C shows how to install and remove the 2 500 Sheet Feeder Duplex Module 10 bin Mailbox Collator 100 Envelope Feeder...

Страница 16: ...More detailed information about installation can also be found in your CentreWare DP Users Manual contained on the Printer Management Software CD that comes with your DocuPrint N40 Please remember to...

Страница 17: ...printer is configured is to print a Configuration Sheet The following operator sequence from the DocuPrint N40 Control Panel will cause a Configuration Sheet to be printed 1 Press Menu Up or Menu Down...

Страница 18: ...Printing a Configuration Sheet 1 12 DocuPrint N24 N32 and N40 User Guide...

Страница 19: ...nt Software and Drivers C h a p t e r 2 Using CentreWare DP with the DocuPrint N40 2 2 DocuPrint N40 PCL Emulation Printer Drivers 2 4 DocuPrint N40 PostScript Printer Drivers 2 5 Driver Features 2 6...

Страница 20: ...1 lists CentreWare DP key features and benefits For more specific information about CentreWare DP use and operation see The CentreWare DP User Guide Table 2 1 CentreWare DP key features and benefits F...

Страница 21: ...Management Software and Drivers 2 3 CentreWare Sun OS Solaris Services are also available to allow you to set up queues and also contain your N40 drivers for Sun OS Solaris All the CentreWare software...

Страница 22: ...N40 supports the PCL printer drivers listed in Table 2 2 To take full advantage of all the printer s features when printing PCL jobs install the appropriate DocuPrint N32 PCL emulation printer driver...

Страница 23: ...full advantage of all the printer s features when printing PostScript jobs install the appropriate DocuPrint N40 printer drivers s Table 2 3 DocuPrint N40 PostScript printer drivers Environment Printe...

Страница 24: ...Output bin selection Duplex selection Paper size orientation and media Number of copies Collating Table 2 4 on page 2 7 lists a general overview of features supported by the DocuPrint N40 drivers Act...

Страница 25: ...Windows NT 4 0 Uni Y N N N Y N N PS Windows 3 1x Custom Y Y Y Y Y Y Y Windows 95 Custom Y Y Y Y Y Y Y Windows NT 3 5 1 Uni Y N N N N N N Windows NT 4 0 Custom Y Y Y Y Y N Y MAC PS N N N N N N N OS 2...

Страница 26: ...Print N40 CentreWare software depending on your software environment In addition your System Administrator also has the capability to download drivers directly to your workstation Configuring Your Dri...

Страница 27: ...Chapter 3 Using the Control Panel 3 1 Using the Control PanelC h a p t e r 3 Control Panel Features 3 2 The Display 3 3 Menu Options 3 4...

Страница 28: ...provides the means for changing printer settings and printer defaults to control how the DocuPrint N40 operates As shown in Figure 3 1 your printer s Control Panel will either have icons and text or i...

Страница 29: ...he display Ready This message appears whenever the printer is online and ready to accept print jobs The display will also show Processing when processing data Waiting when waiting for more data 2 It p...

Страница 30: ...Print N40 menus Details of all the available settings for the variables in these menus are contained in Chapter 3 of the System Administrator Guide In addition Chapter 3 of the System Administrator Gu...

Страница 31: ...Address Res IP Address Subnet Mask Default Gateway Port Timeout Speed6 Novell PDL Novell Mode Frame Type Polling Interval PServer Name Primary Server NDS Tree NDS Context Config Sheet Demo Page PCL F...

Страница 32: ...Menu Options 3 6 DocuPrint N24 N32 and N40 User Guide...

Страница 33: ...5 Loading Paper 4 6 Using Trays 1 2 and 3 if installed 4 7 Using Trays 4 and 5 in the 2 500 Sheet Feeder 4 11 Using the 50 Sheet Bypass Feeder 4 14 Using the 100 Envelope Feeder 4 19 Automatic Tray S...

Страница 34: ...0 supports paper weights as follows 17 28 lbs 64 105 g m2 via paper trays 17 57 lbs 64 190 g m2 A6 via the 50 Sheet Bypass Feeder 17 24 lbs 64 90 g m2 with duplex The optional 2 500 Sheet Feeder suppo...

Страница 35: ...d Orientation 4 3 Paper with special coating Paper unable to withstand a temperature of 150 C 302 F Thermal paper Carbon paper Paper with paper fasteners ribbons tape etc attached Heavily textured pap...

Страница 36: ...in Mailbox Collator A3 297x420 mm A4 210x297 mm A5 148x210 mm A6 105x148 mm Statement 5 5x8 5 140x216 mm Executive 7 25x10 5 184x267 mm Letter 8 5x11 216x279 mm Folio 8 5x13 216x330 mm Legal 8 5x14 21...

Страница 37: ...roper storage ensures optimum print quality and trouble free printer options Store the paper on a flat surface in a relatively low humidity environment Avoid storing paper in such a way as to cause wr...

Страница 38: ...et Feeder see page 4 11 The 50 Sheet Bypass Feeder in the printer see page 4 14 The optional 100 Envelope Feeder see page 4 19 Do not attempt to load paper during printing into a tray that is currentl...

Страница 39: ...e section Selecting Paper page 4 2 for acceptable paper sizes and weights 1 Pull out the tray Tray 1 is shown above until it stops 2 Prepare a stack of paper making sure the tops of the sheets are ali...

Страница 40: ...for orientation Do not stack paper above the indicated mark 6 Adjust the side guide to the paper length 7 Align the edges of the paper stack 8 Adjust the width guide to the paper width Make sure the g...

Страница 41: ...n the paper size slot on the front of the tray 10 Push the tray all the way back into the printer until it latches Figure 4 1 Trays 1 2 3 paper orientation long edge feed Top View 1 Duplex printing 2...

Страница 42: ...Top View 1 Duplex printing 2 Simplex printing Load the following paper sizes with the short edge on the left leading into the printer Legal Folio Ledger A3 The paper in this illustration looks like le...

Страница 43: ...in the optional 2 500 Sheet Feeder hold up to 1 000 sheets of 20 lb 80 g m2 paper each in A4 Letter and Executive size only The following procedure uses Tray 4 as an example but can be used for Tray...

Страница 44: ...ocuPrint N24 N32 and N40 User Guide 3 Place paper in the tray against the left side refer to Figure 4 3 on page 4 13 for orientation Slide back the stop Do not stack paper above the indicated mark 4 P...

Страница 45: ...View Tray 4 1 Duplex printing 2 Simplex printing Load the following sizes with the long edge on the left leading into the printer Letter Executive A4 Top View Tray 5 1 Duplex printing 2 Simplex print...

Страница 46: ...2 paper Refer to the section Selecting Paper page 4 2 for acceptable media sizes and weights 1 If necessary pull out the extension tray to fit the length of paper to be used 2 Place the paper along th...

Страница 47: ...k to ensure contact with the paper sensor 4 Push the paper as far as it can go into the printer 5 When finished printing from the Bypass Feeder remove any remaining paper from the tray and push back t...

Страница 48: ...nd N40 User Guide Figure 4 4 50 Sheet Bypass Feeder paper orientation long edge feed Top View 1 Simplex printing 2 Duplex printing Load the following paper sizes with the long edge leading into the pr...

Страница 49: ...and Orientation 4 17 Figure 4 5 50 Sheet Bypass Feeder paper orientation short edge feed Top View 1 Simplex printing 2 Duplex printing Load the following paper sizes with the short edge leading into...

Страница 50: ...velope orientation1 Top View 1 Envelope 2 DL Envelope 3 C5 Envelope 1 Some PostScript applications require that the envelopes be loaded with the return address corner on the right side of the stack an...

Страница 51: ...ope sizes 1 Prepare a stack of envelopes making sure all flaps are closed and the envelopes are not stuck together 2 Lift the envelope stopper and insert the stack with the flap side up and the long e...

Страница 52: ...ing for the correct paper size and type If the paper size and type specified in your software application does not match the size paper loaded in the current paper tray the printer automatically searc...

Страница 53: ...to load the requested paper size and type in the appropriate tray After the tray is loaded printing continues If the request is for paper that is not configured in the printer you are prompted to load...

Страница 54: ...page 4 16 for the proper orientation of drilled paper and letterhead when printing duplex Table 4 2 Paper sizes that can be used with the Duplex Module Paper Size Weight A3 297 x 420 mm 17 lb 64 g m2...

Страница 55: ...enu to the appropriate setting see Figure 4 7 The Duplex settings for both PCL and PostScript are as follows Duplex Off Duplex Short Edge or Duplex Long Edge Figure 4 7 Duplex binding orientation and...

Страница 56: ...Duplex Two Sided Printing 4 24 DocuPrint N24 N32 and N40 User Guide...

Страница 57: ...C h a p t e r 5 Paper Jams 5 2 What Causes a Paper Jam 5 2 Clearing Paper Jams 5 2 Clearing Area A No Duplex Module 5 7 Clearing Area A With Duplex Module 5 9 Clearing Area B 5 12 Clearing Area C 5 1...

Страница 58: ...reprinted when the jam is cleared and printing resumes What Causes a Paper Jam Paper jams occur most often when The paper stock does not meet specification See Chapter 4 Paper Loading and Orientation...

Страница 59: ...ea A No Duplex Module page 5 7 Then reseat Tray 1 Clear Area B Reset Tray 2 A paper jam has occurred in Area B Use the procedure Clearing Area B page 5 12 Then reseat Tray 2 Clear Area C Reset Tray 4...

Страница 60: ...and C Use one of the following procedures to clear Area A Clearing Area A No Duplex Module page 5 7 Clearing Area A With Duplex Module page 5 9 Then use the procedure Clearing Area B page 5 12 to cle...

Страница 61: ...use one of the following procedures to clear Area A Clearing Area A No Duplex Module page 5 7 Clearing Area A With Duplex Module page 5 9 Then use the procedure Clearing Area B page 5 12 to clear Are...

Страница 62: ...uplex Module page 5 15 Paper Jam Clear Env Feeder The printer cannot feed from the Envelope Feeder ACTION Open the Envelope Feeder and remove any jammed envelopes Paper Jam Clear Tray 5 A paper jam ha...

Страница 63: ...m from Area A when the Control Panel display reads Clear Area A and the printer does not have the Duplex Module installed 1 Remove the Face up Bin by lifting it up and out 2 Open Door A 3 Remove any j...

Страница 64: ...f it becomes difficult to pull out the paper locate the green knob at the same time press it in and turn it until the paper is adequately out and easy to pull Never touch the Fuser area where a label...

Страница 65: ...Area A when the Control Panel display reads Clear Area A and there is a Duplex Module installed on the printer 4 Close Door A then reattach the Face up Bin If the Control Panel message indicates an A...

Страница 66: ...aper until it is completely removed B If the paper is jammed in the Fuser area remove it carefully without touching the Fuser If it becomes difficult to pull out the paper locate the green knob at the...

Страница 67: ...y 5 11 C If the paper jammed in Area A is below the Fuser remove it by pulling it away from the printer 4 Close Door A then close the Duplex Module If the Control Panel message indicates an Area B jam...

Страница 68: ...the 2 500 Sheet Feeder when the Control Panel display reads Clear Area C 1 Open Door B and remove any jammed paper For easier access to Door B you can fold up the 50 Sheet Bypass Feeder shown at left...

Страница 69: ...ng Jams and Jam Recovery 5 13 Clearing Area D Follow the procedure below to clear a paper jam from Area D Mailbox Collator when the Control Panel display reads Clear Area D 1 Open Door D 2 Remove any...

Страница 70: ...Reset Tray 5 1 Open Door C and remove any jammed paper Then close Door C 2 Open and remove Tray 3 by lifting the tray from the front Carefully pull out any jammed paper Reseat the paper then replace a...

Страница 71: ...below to clear a paper jam from the Duplex Module when the Control Panel display reads Clear Duplx Unit 1 Open the Duplex Module 2 Open the inside cover of the Duplex Module 3 Remove any jammed paper...

Страница 72: ...Paper Jams 5 16 DocuPrint N24 N32 and N40 User Guide...

Страница 73: ...ter 6 Replacing Your Toner Cartridge 6 1 Replacing Your Toner Cartridge C h a p t e r 6 Replacing the Toner Cartridge 6 2 Standard Configuration 6 3 Duplex Configuration 6 6 About the Maintenance Kit...

Страница 74: ...label on the back of the left front cover of the printer and in the Toner Cartridge box Do not expose the Toner Cartridge to direct sunlight or artificial light for more than 15 minutes Overexposure...

Страница 75: ...cing Your Toner Cartridge 6 3 Standard Configuration Follow this procedure to replace the Toner Cartridge on a standard configuration printer 1 Open Door A 2 Open the front cover which is spring loade...

Страница 76: ...in the packaging 4 Remove the new Toner Cartridge from its package and pull out the protective paper sheet from the drum shutter 5 Hold the Toner Cartridge horizontally and gently shake it 5 to 6 time...

Страница 77: ...Gently pull the sealing tape straight out in the direction of the arrow If the tape is pulled out at an angle it may break 8 Close the front cover and Door A When closing Door A follow the instruction...

Страница 78: ...lled 1 Open the Duplex Module by pulling on its latch 2 Open Door A 3 Open the front cover The printer s front cover is spring loaded and will not stay open You must hold it open or else it will shut...

Страница 79: ...e horizontally and gently shake it 5 to 6 times to evenly distribute the toner inside 7 Hold the amber handle with one hand and gently push the Toner Cartridge all the way into the printer Do not touc...

Страница 80: ...N32 and N40 User Guide 9 Close the front cover and Door A When closing Door A do not use the latch on the cover Instead follow the instruction label on the cover for the correct location at which to p...

Страница 81: ...ay when to install this kit Instructions for installing this kit are in Appendix B of the DocuPrint N40 System Administrator Guide The Maintenance Kit is comprised of three items Fuser Cartridge Bias...

Страница 82: ...About the Maintenance Kit 6 10 DocuPrint N24 N32 and N40 User Guide...

Страница 83: ...Chapter 7 Troubleshooting 7 1 Troubleshooting C h a p t e r 7 Diagnostic Message Display 7 2 Printer Operation Problems 7 3...

Страница 84: ...these messages are diagnostic messages which appear when there is a problem with the DocuPrint N40 Chapter 6 of the DocuPrint N40 System Administrator Guide also contains a discussion of Print Quality...

Страница 85: ...en etc 3 If the port parallel or network the printer is connected to is disabled enable it Check the Configuration Sheet for the port you are using to see if the Port Enable item in the appropriate In...

Страница 86: ...rror in your command sequence operator A missing downloaded font A mismatched printer option against your host formatting Command errors may be identified by looking at your input file You can determi...

Страница 87: ...s not print and an error page was not printed the job may require additional memory A PostScript or PCL job fails to print 1 Check that PostScript is installed also check that you are using a DocuPrin...

Страница 88: ...Printer Operation Problems 7 6 DocuPrint N24 N32 and N40 End User Guide...

Страница 89: ...Chapter 8 References 8 1 References C h a p t e r 8...

Страница 90: ...res and Options Chapter 1 of the DocuPrint N40 System Administrator Guide Memory Considerations Chapter 1 of the DocuPrint N40 System Administrator Guide Extended Paper Handling Capabilities Chapter 2...

Страница 91: ...re Detailed Network Environment Technical Information The DocuPrint N40 Technical Information Guide on the N40 CD DocuPrint N40 Support Information The DocuPrint N40 Support Brochure or your warranty...

Страница 92: ...Further References 8 4 DocuPrint N24 N32 and N40 User Guide...

Страница 93: ...Appendix A CE Declaration A 1 CE Declaration A p p e n d i x A This Appendix contains the CE Declaration which only applies to European Countries...

Страница 94: ...CE Declaration A 2 DocuPrint N24 N32 and N40 User Guide...

Страница 95: ...CE Declaration Appendix A CE Declaration A 3...

Страница 96: ...CE Declaration A 4 DocuPrint N24 N32 and N40 User Guide...

Страница 97: ...7 Paper orientation 4 16 to 4 18 Paper sizes supported 4 4 A A3 size paper Dimensions 4 4 Supported trays bins 4 4 A4 size paper Dimensions 4 4 Supported trays bins 4 4 A5 size paper Dimensions 4 4 S...

Страница 98: ...Duplex printing Also see Duplex Module Control Panel settings 4 23 Long edge feed Landscape orientation 4 23 Portrait orientation 4 23 Paper orientation 50 Sheet Bypass Feeder 4 16 4 17 Trays 1 2 and...

Страница 99: ...4 13 Tray 5 4 11 to 4 13 Orientation 50 Sheet Bypass Feeder 4 16 to 4 18 Tray 1 4 9 to 4 10 Tray 2 4 9 to 4 10 Tray 3 4 9 to 4 10 Tray 4 4 13 Tray 5 4 13 Selecting for use 4 2 Sizes supported 10 bin M...

Страница 100: ...Capacity 4 4 Loading 4 7 to 4 10 Location on printer 1 7 Paper orientation 4 9 to 4 10 Paper sizes supported 4 4 Tray 3 Capacity 4 4 Loading 4 7 to 4 10 Location on printer 1 8 Paper orientation 4 9 t...

Отзывы: