


SETTING THE SYSTEM CONFIGURATION
XEROX DOCUPRINT 92C IPS GUIDE TO CONFIGURING AND MANAGING THE SYSTEM
4-23
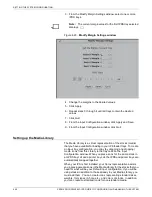
Manual PQA button
When you click this button, the system prints a one-page sample.
This initiates an automatic print quality adjustment if needed.
While the PQA is in progress, a PQA status window displays, giving
status messages on the adjustment. When the PQA is complete, the
window disappears.
Figure 4-12. PQA status window example
Note:
Setting the extraction color to a color other than black will
help the printer to initialize the “adjusting color” process during a
PQA.
Содержание DocuPrint 92C IPS
Страница 1: ...Xerox DocuPrint 92C IPS Guide to Configuring and Managing the System Version 7 1 August 2000 721P89180...
Страница 8: ...TABLE OF CONTENTS viii XEROX DOCUPRINT 92C IPS GUIDE TO CONFIGURING AND MANAGING THE SYSTEM...
Страница 12: ...INTRODUCTION xii XEROX DOCUPRINT 92C IPS GUIDE TO CONFIGURING AND MANAGING THE SYSTEM...
Страница 56: ...SETTING UP THE PRINTER CONTROLLER 3 14 XEROX DOCUPRINT 92C IPS GUIDE TO CONFIGURING AND MANAGING THE SYSTEM...
Страница 132: ...INDEX INDEX 6 XEROX DOCUPRINT 92C IPS GUIDE TO CONFIGURING AND MANAGING THE SYSTEM...


