background image

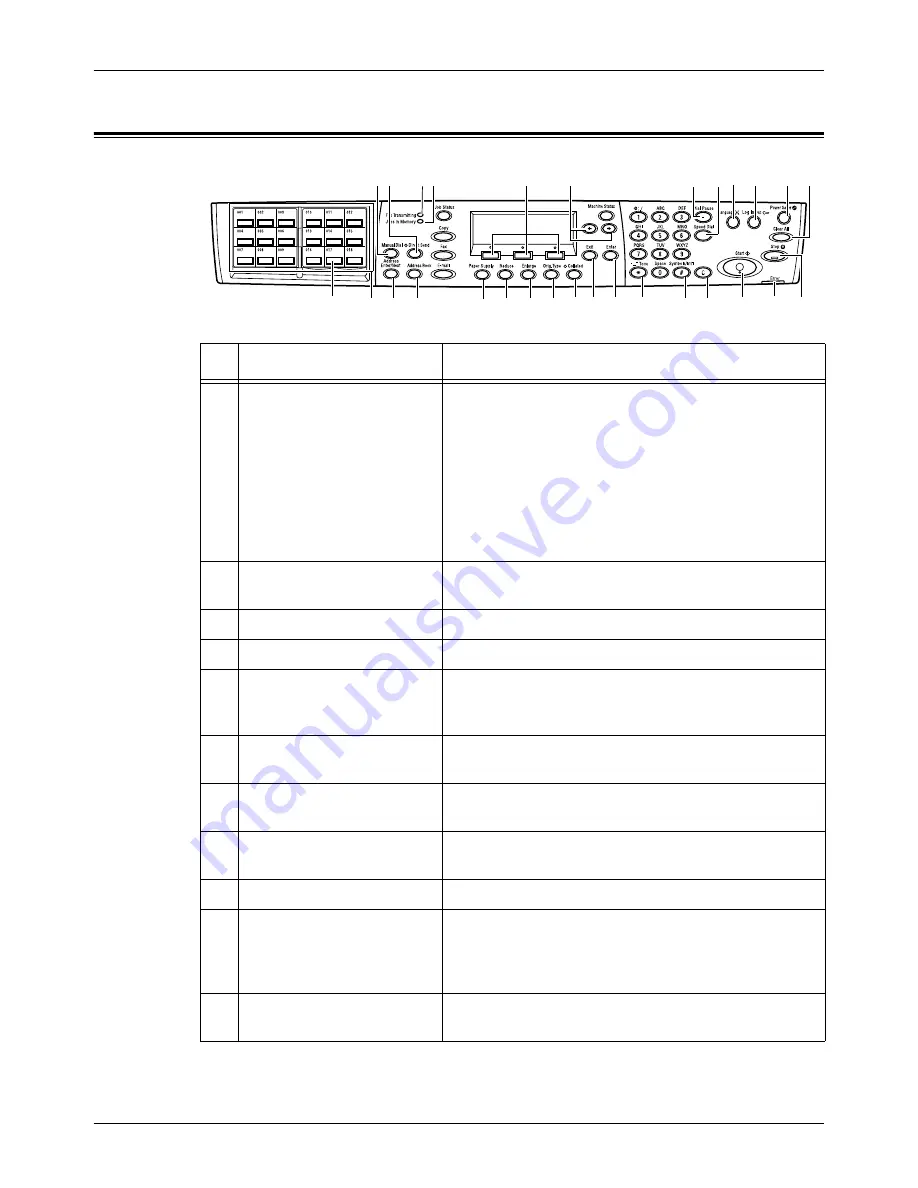
System Controls 

Xerox CopyCentre/WorkCentre 118 Quick Reference Guide

29

System Controls

Button/Indicator

Function

1

<Manual Dial>

Allows you to send and receive documents manually.
This button works only for faxing with the document 
feeder; When the document is loaded into the feeder, 
you can press the button only for sending. When the 
document is not loaded into the feeder, you can press 
the button only for receiving.

NOTE: 

Press the <Manual Dial> button before setting 

the recipient or functions. Pressing the <Manual Dial> 
button resets the specified recipient and set functions.

2

<Direct Send>

Allows you to use the direct send feature. Refer to 
Direct Send in the Fax chapter on User Guide.

3

<Fax Transmitting>

Indicates that data is being transmitted or received.

4

<Jobs in Memory>

Indicates there is data stored in the machine.

5

<Select>

Allows you to select options displayed on the screen. 
Each press of the <Select> button moves you up one 
option.

6

<

I

><

J

>

Use these buttons to switch between screens. You can 
also use them to move the cursor in the entry field.

7

<Dial Pause>

Enters a pause in a telephone number when 
transmitting a fax.

8

<Speed Dial>

Allows you to specify the fax number or e-mail address 
using Speed Dial codes.

9

<Language>

Changes the language displayed on the screen.

10

<Log In/Out>

Allows you to log in to the machine as the Key Operator, 
and change the default settings. You can also register a 
destination in the Address Book, a Fax Program, or a 
bulletin board. Refer to Setups chapter on User Guide.

11

<Power Saver> (Green light) Indicates whether the machine is in the power saver 

mode. Also allows you to cancel this mode.

1 2

7

6

27

5

3 4

9 10

11 12

28

25 24

26

23 22 21 20 19

18

17 16

15

13

8

29

14

Содержание Copycentre C118

Страница 1: ......

Страница 2: ......

Страница 3: ...ies of your device A customer documentation CD was supplied with your product The CD provides a User Guide including full instructions for optional configurations such as Fax It also includes a System...

Страница 4: ...sequent editions of the documentation For the latest information go to www xerox com Products Subject To Ordinary Export Regulations An export of this product is strictly limited in accordance with La...

Страница 5: ...tion 12 Maintenance Information 13 Ozone Safety Information 13 For Consumables 14 Radio Frequency Emissions 14 Product Safety Certification 14 Regulatory Information 15 CE Mark 15 For FAX Function 15...

Страница 6: ...1 Load the Documents 45 2 Select the Features 47 3 Enter the Quantity 48 4 Start the Copy Job 48 5 Confirm the Copy Job in the Job Status 49 Stop the Copy Job 49 Copying Features 50 Paper Supply 50 R...

Страница 7: ...ray 71 Auto Tray Switching 72 Storing and Handling Paper 72 Supported Paper Sizes and Types 72 Supported Paper Sizes 73 Supported Paper Types 75 8 Maintenance 77 Ordering Supplies 77 Cleaning the Mach...

Страница 8: ...d 4 2 4 are Optional 90 Paper Jams in Tray 5 Bypass Tray 90 Document Jams 90 Paper Jams in the Document Feeder Cover 90 Paper Jams in the Document Exit 91 Troubleshooting Tables 93 Fault Codes 98 Outp...

Страница 9: ...at the Xerox Welcome Center A local representative telephone number may have been provided when the product was installed For convenience and future reference please record the telephone number in the...

Страница 10: ...bottom of the paper facing the front and back of the document feeder When loading paper long edge feed into a paper tray place the paper with one of the long edges on the left hand side and one of the...

Страница 11: ...mation about cleaning the document glass refer to the Maintenance chapter on page 77 Paper Supply page 50 Warnings Warnings are statements that alert you to the possibility of personal harm For exampl...

Страница 12: ...read the following instructions carefully before operating the product and refer to them as needed to ensure the continued safe operation of your product The safety and environment testing and perfor...

Страница 13: ...the electrical outlet Always use materials specified for this product The use of other materials may result in poor performance and may create a hazardous situation Do not use aerosol cleaners they ma...

Страница 14: ...ducts set by government national and international agencies as a Class 1 laser product It does not emit hazardous light as the beam is totally enclosed during all phases of customer operation and main...

Страница 15: ...mechanical interlock devices Never operate the equipment if you notice unusual noises or odors Disconnect the power cord from the electrical outlet and contact your local Xerox Fuji Xerox Service Rep...

Страница 16: ...rated in a commercial environment This equipment generates uses and can radiate radio frequency energy and if not installed and used in accordance with the customer documentation may cause harmful int...

Страница 17: ...be limited or special mitigation measures taken WARNING This is a Class A product In a domestic environment the product may cause radio frequency interference in which case the user may be required to...

Страница 18: ...art of the product identifier that has the format US AAAEQ TXXXX The digits represented by are the REN without a decimal point e g 03 is a REN of 0 3 For earlier products the REN is separately shown o...

Страница 19: ...plier Any repairs or alterations made by the user to this equipment or equipment malfunctions may give the telecommunications company cause to request the user to disconnect the equipment Users should...

Страница 20: ...x will invalidate its certification Regulatory Information for RFID This product generates 13 56 MHz using an Inductive Loop System as a radio frequency identification system device RFID This system i...

Страница 21: ...rox Corporation has determined that this product meets the Environmental ChoiceM guidelines for energy efficiency Environment Canada established the Environmental ChoiceM program in 1988 to help consu...

Страница 22: ...LIABILITY OR TORT INCLUDING NEGLIGENCE OR OTHERWISE ARISING IN ANY WAY OUT OF THE USE OF THIS SOFTWARE EVEN IF ADVISED OF THE POSSIBILITY OF SUCH DAMAGE OpenSSL Copyright 1998 2003 The OpenSSL Projec...

Страница 23: ...the following conditions are adhered to The following conditions apply to all code found in this distribution be it the RC4 RSA lhash DES etc code not just the SSL code The SSL documentation included...

Страница 24: ...be changed i e this code cannot simply be copied and put under another distribution license including the GNU Public License Illegal Copies USA Congress by statute has forbidden the reproduction of th...

Страница 25: ...nduction Papers that bear any of the following Registrant s information Earnings or Income Dependency Status Court Record Previous military service Physical or mental condition Exception United States...

Страница 26: ...public officials charged with the duty of making or issuing certified copies thereof where the copy falsely purports to be a certified copy thereof 9 Copyrighted material or trademarks of any manner...

Страница 27: ...grams visit www xerox com environment html If your product is not part of the Xerox program and you are managing its disposal please note that the product may contain lead and other materials whose di...

Страница 28: ...1 Before Using the Machine 26 Xerox CopyCentre WorkCentre 118 Quick Reference Guide...

Страница 29: ...scribed here visit the Xerox web site or contact your Xerox Sales Representative Identifying the Machine Components The following diagram shows the standard and optional components of the machine Conf...

Страница 30: ...of the document to be scanned automatically Duplex Kit Allows you to make double sided copies For more information on how to make double sided copies refer to 2 Sided in the Copy chapter on page 54 T...

Страница 31: ...ceived 4 Jobs in Memory Indicates there is data stored in the machine 5 Select Allows you to select options displayed on the screen Each press of the Select button moves you up one option 6 I J Use th...

Страница 32: ...e 19 Enter Determines any changed settings or entered values 20 Exit Returns to the previous screen without acquiring any changed settings or entered values 21 Collated Provides a quick way of using t...

Страница 33: ...tor is lit for more than hour all stored documents will be deleted After charging for 30 hours the machine is able to keep stored documents for an hour NOTE Wait at least 20 seconds between powering t...

Страница 34: ...re operates in the following two modes Low Power Mode Sleep Mode NOTE If the active tray runs out of paper when printing and remains untouched or the tray is pulled out from the machine and remains ou...

Страница 35: ...refer to Power Saver in the Setups chapter on User Guide Changing the Default Time Settings This section describes how to change the default time settings such as Auto Clear Power Saver and Scanning...

Страница 36: ...on about the machine There are six mode buttons on the machine Copy Fax E Mail Log In Out Job Status Machine Status NOTE Depending on the configuration there may be three mode buttons on the machine L...

Страница 37: ...features refer to Fax chapter on page 57 E mail Use this button to access the optional E mail function used for sending e mails The E mail mode contains three screens which provide access to the E ma...

Страница 38: ...tton on the control panel 2 Press the I or J button to switch between screens 3 Press the Job Status button at any time to exit For more information refer to the following Current page 36 All Jobs pag...

Страница 39: ...s to view the job attributes on the next screen Details Displays the job attributes You can cancel or eject the job from each screen using the Cancel or Eject options Machine Status Use this button to...

Страница 40: ...een Print Job Displays the error information of print jobs Select a job from the list using the Select buttons and select Details to view the job attributes on the next screen Consumables This screen...

Страница 41: ...F Code for fax as well as e mail addresses for e mail in numerical order of Speed Dial code Fax Program Prints detailed information for each Fax Program The list includes the program name the setting...

Страница 42: ...em Solving chapter on page 95 Error History Report Prints information of up to the latest 50 errors that occurred in the machine For Error code refer to Fault Codes in the Problem Solving chapter on p...

Страница 43: ...u can also view the machine Serial Number 1 Select Billing Meter on the Machine Status screen using the Select button 2 Press the Enter button Serial No Displays the Serial Number of the machine Total...

Страница 44: ...the size and settings of the PDF file to be printed PCL Paper Tray Select the paper tray to use for printing Paper Size Select the paper size for printing Bypass Size Select the paper size for Tray 5...

Страница 45: ...ine To enable this feature you need to log in as the Key Operator and change the default setting of Auditron Mode from Off to On The Key Operator can change the password or account limits for copy pri...

Страница 46: ...ress the Enter button Recycled Paper The use of recycled paper in the machine benefits the environment with no degradation in performance Xerox recommends recycled paper with 20 post consumer content...

Страница 47: ...input areas are as follows Document feeder for single or multiple documents Document glass for single documents or bound originals NOTE The document glass cover will be fitted in the non document feed...

Страница 48: ...ed Size Originals on page 56 1 Before loading the documents into the document feeder ensure they are in good condition and remove all staples and paper clips 2 Insert the documents neatly into the doc...

Страница 49: ...port CVT glass is the narrow strip of glass located at the left hand side of the document glass When documents are fed from the document feeder they pass over the CVT glass to scan the images into mem...

Страница 50: ...ation about available Copy features refer to Copying Features on page 50 3 Enter the Quantity The maximum copy quantity is 99 1 Use the numeric keypad on the control panel to enter the number of copie...

Страница 51: ...Job Status button on the control panel to display the Job Status screen The queued copy job will be displayed If there is no copy job in progress the following message is displayed No Active Jobs Sto...

Страница 52: ...he available paper trays are displayed on the screen together with the media size and the orientation preset for each tray When the paper tray is selected the paper type in the tray is displayed on th...

Страница 53: ...r J button to switch between screens to display the required paper size 3 Select the required option 4 Press the Enter button Presets Allows you to select a paper size for Tray 5 bypass tray After you...

Страница 54: ...way of using this feature 100 Makes copies the same size as the document Auto Automatically reduces enlarges the image of the document to fit on the paper size selected Presets Allows you to select a...

Страница 55: ...splay Original Type on the Copy screen 2 Select Original Type using the Select button 3 Select the required option 4 Press the Enter button NOTE The Orig Type button on the control panel provides a qu...

Страница 56: ...NOTE The double sided copy option can only be used with the Plain paper type 1 Press the I or J button to display 2 Sided on the Copy screen 2 Select 2 Sided using the Select button 3 Select the requ...

Страница 57: ...ct the required option 4 Press the Enter button NOTE The Collated button on the control panel provides a quick way of using this feature Auto Automatically applies either Collated or Uncollated for so...

Страница 58: ...Mixed Size Originals This feature allows you to load different size documents in the document feeder The document feeder must be used for this feature NOTE When you use this feature the width of the d...

Страница 59: ...w to load documents using the document feeder or document glass When scanning a document in the form of sheet or multiple documents as a stack use the document feeder When scanning a document that is...

Страница 60: ...on how to select the scan size refer to Scan Size on User Guide NOTE The long page scan feature is only available when using the document feeder This feature allows you to scan up to 1000 mm 39 4 inch...

Страница 61: ...d correct destinations Using the numeric keypad on the control panel Using Address Book refer to Address Book on User Guide Using Speed Dial refer to Speed Dial on User Guide Using One Touch Dial refe...

Страница 62: ...tination before the power loss For example if the transmission of a 7 page document is interrupted when the sixth page of the document is being sent the machine sends all seven pages when the power is...

Страница 63: ...een press the Exit or Job Status button 3 If the job to be canceled is displayed on the Current screen select Stop Delete using the Select button If not go to step 4 4 Press the J button to display th...

Страница 64: ...4 Fax 62 Xerox CopyCentre WorkCentre 118 Quick Reference Guide...

Страница 65: ...he Documents The following steps explain how to load documents using the document feeder or document glass When scanning a document in the form of sheet or multiple documents as a stack use the docume...

Страница 66: ...pter on User Guide NOTE The document glass cannot automatically detect the document width less than A4 SEF 202 mm such as post card and A5 SEF When you load a document with a width less than A4 SEF se...

Страница 67: ...ed Dial on User Guide Using One Touch Dial refer to One Touch Dial on User Guide 1 Specify e mail destinations by entering addresses using the alphanumeric keypad on the control panel You can send a d...

Страница 68: ...on page 36 Stop the E mail Job Follow the steps below to manually cancel an activated e mail job 1 Press the Stop button on the control panel to cancel the current e mail job 2 If required press the...

Страница 69: ...structions on installing the print driver refer to the documentation in the CentreWare CD ROM When you select the machine as the printer the associated print screen is displayed on the PC Select the P...

Страница 70: ...ments that contain blank pages Draft Mode Prints the text and graphics in gray rather than black thus reducing the amount of toner used UNIX and Macintosh Information about print features for UNIX and...

Страница 71: ...r sizes and media types for each tray refer to Supported Paper Sizes on page 73 and Supported Paper Types on page 75 For information on the acceptable range of paper sizes and capacity for each tray r...

Страница 72: ...ed with plain paper Tray 2 3 and 4 can be loaded with a variety of different media stock When changing the type of stock in the tray refer to Supported Paper Types on page 75 For more information abou...

Страница 73: ...is identical to the paper stock loaded 1 Load the paper neatly into Tray 5 bypass tray making sure that the paper stack is in the center of the tray and that the print side is facing downward Tray 5 b...

Страница 74: ...rator access must be set to On for Auto Tray and target trays and priorities must be specified For more information refer to Auto Tray and Tray Priority in the Setups chapter on User Guide When not in...

Страница 75: ...148 105 X O X X O X X O X B6 SEF 128 5 182 X O X X O X X O X 5 5 8 5 SEF 139 7 215 9 X O O X O O O O O 5 5 8 5 LEF 215 9 139 7 X O X X O X X O X A5 SEF 148 210 O O O O O O X O O A5 LEF 210 148 X O X...

Страница 76: ...C5 Envelope LEF 229 162 X O X X O X X O X Commercial 10 Enve lope LEF 241 3 104 8 X O X X O X X O X Paper Size Tray 1 4 Tray 5 Bypass Tray Duplex Kit Width Not available 89 to 297 mm 3 5 to 11 7 Not a...

Страница 77: ...ion when paper curls or other printing problems occur due to high temperature in the fuser unit when it sets toner on the paper If you select Label Heavyweight 1 or Heavyweight 2 load the paper LEF If...

Страница 78: ...7 Paper and Other Media 76 Xerox CopyCentre WorkCentre 118 Quick Reference Guide...

Страница 79: ...of the machine may not be at its optimum level Use the drum toner cartridge recommended for this product Cleaning the Machine Proper maintenance is important for the smooth operation of any equipment...

Страница 80: ...and Output Trays Use a cloth moistened with water to clean the document feeder output trays paper trays and the outside areas of the machine Replacing the Drum Cartridge The drum cartridge is a custo...

Страница 81: ...that the new cartridge is the correct one specified for the machine Recycling the Drum Cartridge The drum cartridge is designed to be re manufactured To recycle used drum cartridges return them to Xe...

Страница 82: ...ge in position as shown and using the handle slide it into the machine until it clicks 4 Pull out the cartridge tape completely without breaking it 5 Push the cartridge again so that it is correctly p...

Страница 83: ...000 pages the screen will display a message stating that the cartridge needs to be replaced When ordering a new cartridge use the following table to determine the correct reorder code for your machin...

Страница 84: ...ng the New Toner Cartridge 1 Remove the new toner cartridge from the box 2 Shake the cartridge up and down about 5 times gently to loosen up the toner inside 3 Place the cartridge in position as shown...

Страница 85: ...bleshooting Tables on page 93 and apply the appropriate solution as described Also refer to the fault codes displayed on the screen in the Machine Status mode Refer to Fault Codes on page 98 for an ex...

Страница 86: ...though the first five pages were already received You can use the Power Off Report to check the unprinted pages from such interruptions Refer to Report Settings in the Setups chapter on User Guide NO...

Страница 87: ...aper jam occurred NOTE When removing jammed paper make sure that no bits of paper are left in the machine since they could cause more jams or overheat the paper If a piece of paper is stuck in a hidde...

Страница 88: ...he orientation of the documents Check the maximum fill line in the tray to make sure the paper tray is not overloaded Do not use media that is torn wrinkled or folded Paper Jams in Cover A Follow the...

Страница 89: ...ecessary and then open Cover A while lifting up the release lever 2 If the jammed paper is inside the fuser unit lower the green lever A2 in the direction of the arrow to open the fuser unit cover 3 I...

Страница 90: ...1 Open Cover B while lifting up the release lever 2 Remove the jammed paper 3 Close Cover B until it latches NOTE Firmly press the center of the cover when closing it Paper Jams in Cover C Follow the...

Страница 91: ...while lifting up the release lever 3 Remove the jammed paper inside the duplex kit 4 Close Cover D until it latches 5 Close Tray 5 bypass tray Paper Jams in Exit Follow the steps below to clear paper...

Страница 92: ...in Tray 5 Bypass Tray Follow the steps below to clear paper jams in Tray 5 bypass tray 1 Remove the jammed paper in Tray 5 bypass tray Document Jams If a document jams in the document feeder the machi...

Страница 93: ...ams in the Document Exit on page 91 3 If a document jams under the inner cover while using the DADF pull up the lever to open the inner cover 4 Remove the jammed document slowly while holding the inne...

Страница 94: ...Pull up the knob to open the document feeder cover completely 2 Lift up the document feeder tray in the direction as shown 3 Remove the jammed document slowly while holding the document feeder tray 4...

Страница 95: ...e Machine Status screen after pressing the Machine Status button on the control panel and check the contents displayed on the screen The machine makes a squealing noise after it powers off Between 3 t...

Страница 96: ...ings if necessary and press the Start button to restart the job Load the correct sized paper in the selected tray Any scanned data is discarded so load the document on the document feeder specify the...

Страница 97: ...toner cartridge is new the toner may not be dispensed Repeat the job Check that the seal tape has been removed from the new drum cartridge Reinstall the drum cartridge and the toner cartridge Replace...

Страница 98: ...Replace the toner cartridge Missing characters Load fresh paper Replace the drum cartridge Replace the toner cartridge Gloss variations coining Check the quality of the documents If the document has...

Страница 99: ...tead remove the paper combine the additional paper with the paper from the tray and then reload the tray Check that paper tray guides are locked into position against the paper Check that the settings...

Страница 100: ...ailable from deleting and printing the stored job The fax communication finishes with an error message Press the Machine Status button and select the Error Information to check the error status Refer...

Страница 101: ...rom a fax number to an e mail address or the content of the Speed Dial number set for the E mail destination has been changed from an e mail address to a fax number Check the content and specify the d...

Страница 102: ...ne or the telephone line If the error cannot be resolved contact the Xerox Welcome Center 7604xx 7605xx 7607xx 7608xx 7609xx 77xxxx 7704xx Check the remote machine or the telephone line If the error c...

Страница 103: ...xx 9209xx 95xxxx 9508xx Check the remote machine or the telephone line If the error cannot be resolved contact the Xerox Welcome Center 9509xx 96xxxx 9608xx Check the remote machine or the telephone l...

Страница 104: ...elcome Center B203xx B204xx B205xx B207xx B4xxxx B401xx Turn the power off and on If the error cannot be resolved contact the Xerox Welcome Center B402xx B403xx B404xx B405xx B407xx B408xx B409xx B5xx...

Страница 105: ...the documents S10013 The short page document has jammed Open the document feeder cover remove the documents S10014 The document has jammed Open the document feeder cover and remove the documents S100...

Страница 106: ...rectly Also check that the DNS server is set correctly 016 504 POP3 server name is not set correctly when e mail was transmitted Check if the POP3 server was set correctly Also check that the DNS serv...

Страница 107: ...peed mode 016 753 A password entered for the direct print is incorrect Enter a password correctly 016 754 The machine could not print the PDF file because it contains objects that are compressed using...

Страница 108: ...to print 081 702 A fax transmission parameter was wrong Check the settings of the print driver 081 703 Insufficient memory while transmitting a fax Split the document lower the resolution or delete th...

Страница 109: ...E3 1 Paper jam is occurred in the exit Refer to Paper Jams on page 85 E3 6 Paper jam is occurred in the exit Refer to Paper Jams on page 85 E8 2 Paper jam is occurred in the duplex kit Refer to Paper...

Страница 110: ...w the following information the nature of the problem the serial number of the machine the fault code if any as well as the name and location of your company Follow the steps below to look up the seri...

Страница 111: ...set for Output Document Jams 1 Remove the jammed document according to the displayed message 2 Sort the output and remove white papers if they exist 3 Check the number of output printed last If the n...

Страница 112: ...10 Appendix 110 Registered Data such as Forms Registered data such as forms are stored in volatile memory Therefore the data will be lost if the power supply to the machine is interrupted...

Страница 113: ...Collated output 56 Consumables 38 Control Panel 27 Copy 45 2 Sided 54 features 50 Lighten Darken 52 Mixed Size Originals 56 Multiple Up 53 Original Type 53 Output 55 paper supply 50 Procedure 45 Reduc...

Страница 114: ...pe 53 Original type button 30 Output 55 Output Quality 107 P Paper and Other Media 69 Paper Jams 85 bypass tray 90 Cover A 86 Cover B 88 Cover C 88 Cover D 89 Document Feeder Cover 90 exit 89 91 paper...

Страница 115: ...Xerox CopyCentre WorkCentre 118 Quick Reference Guide 113 Tray 1 to 4 28 Tray 2 27 Tray 3 27 Tray 4 27 28 Tray 5 27 Troubleshooting Tables 93 U Uncollated output 56 X Xerox Welcome Center 7 108...

Страница 116: ...11 Index 114 Xerox CopyCentre WorkCentre 118 Quick Reference Guide...

Отзывы: