manualshive.com logo in svg
background image

Xerox

®

 ColorQube

®

 8700/8900

Software Upgrade

1. Introduction

Before upgrading a Xerox ColorQube 8700/8900 to 071.161.203.xxxxx, 

ensure the current system software version is 071.160.xxx.xxxxx.  

To view the current version, press 

Machine Status

, then touch 

Machine Information

 on the printer control panel or see the 

Software Versions section of a printed Configuration Report.
Please read these entire instructions before proceeding  

with the upgrade. This procedure may take up to 1.5 hours.  

The ColorQube is not available during the upgrade. It should be 

noted that any pending or saved jobs (including jobs saved for 

reprint, delayed print, secure print, or scan to mailbox) will be  

deleted and removed from the device.

2. Requirements

•  1 empty USB Flash drive, 1Gb or greater
•  CQ_8700_8900_To_ConnectKey_GM_Upgrade.zip  

file downloaded from 

Firmware

 section of 

www.support.xerox.com/support/colorqube-8700/downloads


or 

www.support.xerox.com/support/colorqube-8900/downloads

3. Instructions

3.1. 

Prepare USB Flash drive:

3.1.1.  Ensure that drive is formatted for FAT32 file system.
3.1.2.  Insert empty USB Flash drive into desktop PC.
3.1.3.  Extract the contents of the downloaded CQ_8700_8900_

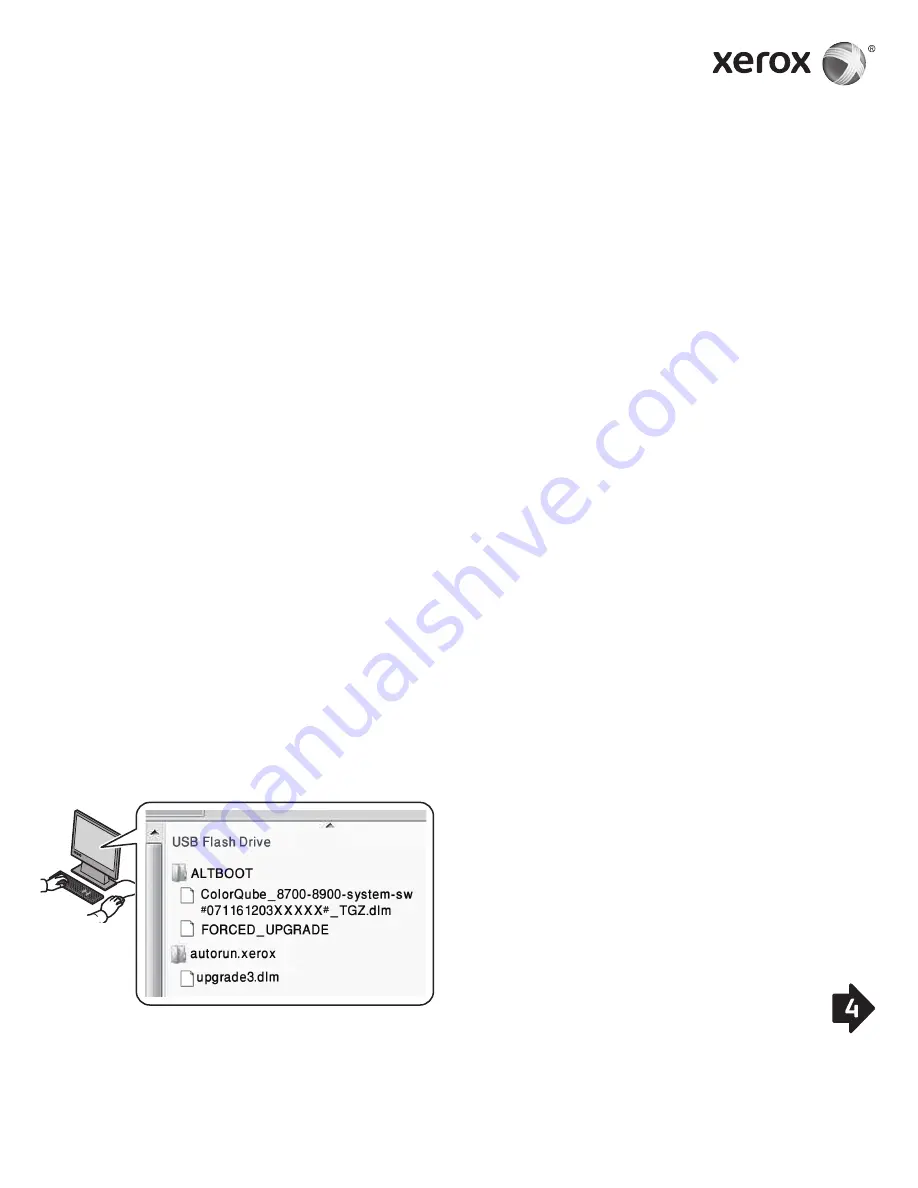
To_ConnectKey_GM_Upgrade.zip to USB Flash drive. 

Ensure that the ‘ALTBOOT’ and ‘autorun.xerox’ folders are 

on the Root directory of the Flash drive. If these two folders 

are located inside of another file folder on the USB Flash 

drive, then move the two folders to the Root directory of  

the Flash drive.


WARNING: 

DO NOT MODIFY ANY FILES ON USB DRIVE.

3.1.4.  Safely remove USB drive from desktop PC. 

3.2. 

Backup Settings On ColorQube (as needed):

3.2.1.  Manually backup the printer address book using 

CentreWare Internet Services as in Section 4.1. Although 

this step is optional, all address book information is lost if 

not properly backed up and restored.

3.2.2.  Create clone file using CentreWare Internet Services 

as in Section 4.2. Although this step is optional, all 

printer settings, including XSA accounting information, 

connectivity settings, scan settings, and others is reset to 

defaults if not properly backed up and restored.

3.3. 

Perform Upgrade:

3.3.1.  Power off ColorQube using button in back of printer.
3.3.2.  Insert USB Flash drive into available USB port on  

ColorQube.

3.3.3.  Power ColorQube on.
 

WARNING

: DO NOT REMOVE USB DRIVE UNTIL 

PROMPTED TO DO SO.

3.3.4.  Within 5 minutes, the touch screen will display the  

progress of the software upgrade.


NOTE

: The printer may reboot before the software upgrade 

screen appears on the touch screen.

3.3.5.  The update can take up to 30 minutes.
 

NOTE

: If the upgrade fails, follow the on-screen instructions 

to try again or download CQ_8700_8900_To_ConnectKey_

GM_Upgrade.zip again from Xerox.com and return to  

Step 3.1.

3.3.6.  When prompted, remove the USB Flash drive, then reboot 

the printer by pressing 0 on the control panel. It may take 

up to 20 seconds to for the reboot to occur.

3.3.7.  The printer reboots several times during the disk encryption. 

When the 

Software Upgrade 

report and 

Configuration 

Report 

print, the ColorQube is ready for use. This can take 

up to 30 minutes.

3.4. 

Restore ColorQube Settings (as needed):

3.4.1.  Manually restore printer address book if it was backed up 

from Step 3.2.1. Instructions in Section 4.3.

3.4.2.  Manually restore printer clone file from Step 3.2.2. 

Instructions in Section 4.4.

3.5. 

To take advantage of all the latest printer features, please 

visit xerox.com for the most current driver upgrades.

www.xerox.com/office/CQ8700support 

 www.xerox.com/office/CQ8900support

604E95160f1 Rev A

Содержание ColorQube 8700

Страница 1: ...ng CentreWare Internet Services as in Section 4 1 Although this step is optional all address book information is lost if not properly backed up and restored 3 2 2 Create clone file using CentreWare In...

Страница 2: ...ange on the page This is OK The information is blank in the printer address book until updated or entered 4 3 8 At the bottom of the page select Import 4 3 9 A progress bar appears on the page until t...

Страница 3: ...besoins 3 2 1 Faites une sauvegarde manuelle du carnet d adresses de l imprimante l aide des Services Internet CentreWare conform ment la section 4 1 Cette tape est facultative mais vous risquez de p...

Страница 4: ...fichier 4 3 5 Pour s lectionner le fichier AddressBook csv partir de la sauvegarde cliquez sur Choisir le fichier selon les besoins 4 3 6 Gardez Virgule hex 2C comme S parateur d enregistrements 4 3 7...

Страница 5: ...2 1 Eseguire manualmente il backup della rubrica della stampante utilizzando CentreWare Internet Services come mostrato nella sezione 4 1 Sebbene questo passaggio sia facoltativo tutte le informazioni...

Страница 6: ...backup selezionare Scegli file se necessario 4 3 6 Lasciare Delimitatore record con il valore Virgola hex 2c 4 3 7 Selezionare Carica file NOTA tra un aggiornamento e l altro sono stati aggiunti alcu...

Страница 7: ...f sichern 3 2 1 Das Druckeradressbuch mithilfe von CentreWare Internet Services wie in Abschnitt 4 1 erl utert manuell sichern Dieser Schritt ist zwar optional es wird jedoch darauf hingewiesen dass s...

Страница 8: ...w hlen 4 3 5 Auf Datei ausw hlen klicken um die Datei AddressBook csv der zuvor erfolgten Sicherung auszuw hlen 4 3 6 Die Einstellung Komma hex 2C f r Datensatz Trennzeichen beibehalten 4 3 7 Datei ho...

Страница 9: ...de seguridad de la libreta de direcciones de la impresora mediante Servicios de Internet de CentreWare como se describe en la secci n 4 1 Aunque este paso es opcional se perder toda la informaci n de...

Страница 10: ...seleccionar el archivo AddressBook csv de copia de seguridad seleccione Seleccionar archivo seg n proceda 4 3 6 Deje Delimitador de registros como Comma hex 2c 4 3 7 Seleccione Cargar archivo NOTA se...

Страница 11: ...figura es de backup na ColorQube conforme necess rio 3 2 1 Fa a o backup manual do cat logo de endere os da impressora utilizando os Servi os de Internet do CentreWare conforme a Se o 4 1 Embora esta...

Страница 12: ...a selecionar o arquivo AddressBook csv do backup selecione Escolher arquivo conforme necess rio 4 3 6 Deixe o Delimitador de registro como V rgula hex 2c 4 3 7 Selecione Carregar arquivo NOTA v rios c...

Страница 13: ...e ColorQube naar behoefte 3 2 1 Maak een handmatige backup van het adresboek van de printer met gebruik van CentreWare Internet Services zie stap 4 1 Deze stap is optioneel maar u moet u er rekening m...

Страница 14: ...and selecteren 4 3 6 Laat Scheidingsteken records staan als Komma hex 2c 4 3 7 Selecteer Bestand uploaden OPMERKING Er zijn in de loop van de verschillende versies verschillende velden aan het adresbo...

Страница 15: ...a ut USB minnet ur datorn 3 2 Inst llningar f r s kerhetskopiering p ColorQube alltefter behov 3 2 1 S kerhetskopiera skrivarens adressbok manuellt med hj lp av CentreWare Internet Services s som besk...

Страница 16: ...tskopierade filerna v lj Choose File V lj fil efter behov 4 3 6 L t Record Delimiter Postavgr nsare vara of r ndrat Comma hex 2c 4 3 7 V lj Upload File Skicka fil ANM RKNING Flera nya f lt har lagts t...

Страница 17: ...2 Ta sikkerhetskopi av ColorQube innstillingene etter behov 3 2 1 Ta en manuell sikkerhetskopi av skriverens adressebok ved hjelp av CentreWare Internett tjenester som beskrevet i punkt 4 1 Dette trin...

Страница 18: ...fil til h yre p siden 4 3 5 Velg Velg fil for velge filen AddressBook csv fra sikkerhetskopien 4 3 6 Behold innstillingen Komma hex 2C for Skilletegn 4 3 7 Velg Last opp fil MERK Det er lagt til fler...

Страница 19: ...revet ud af den station re pc 3 2 Sikkerhedskopiering af indstillinger p On ColorQube om n dvendigt 3 2 1 Sikkerhedskopi r manuelt printerens adresseb ger vha CentreWare Internet Services som beskreve...

Страница 20: ...csv filen fra sikkerhedskopiering skal du v lge V lg fil hvis det er n dvendigt 4 3 6 Bevar Angiv begr nsning som Komma hex 2c 4 3 7 V lg Upload fil BEM RK Der er blevet f jet mange andre felter til...

Страница 21: ...urvallisesti tietokoneesta 3 2 Varmuuskopioi ColorQuben asetukset tarpeen mukaan 3 2 1 Varmuuskopioi manuaalisesti tulostimen osoitteisto CentreWare Internet Services sivustolla kohdassa 4 1 annettuje...

Страница 22: ...in k ytt tunnuksella 4 3 4 Valitse sivun oikeasta reunasta Tuo tiedostosta 4 3 5 Valitse Valitse tiedosto ja valitse varmuuskopioitu AddressBook csv tiedosto 4 3 6 J t tietue erottimeksi Pilkku hex 2C...

Страница 23: ...zip Firmware www support xerox com support colorqube 8700 downloads www support xerox com support colorqube 8900 downloads 3 3 1 USB 3 1 1 FAT32 3 1 2 USB 3 1 3 CQ_8700_8900_To_ConnectKey_GM_Upgrade z...

Страница 24: ...6 AddressBook csv 4 2 4 2 1 CentreWare IS http IP ColorQube 8700 8900 4 2 2 4 2 3 4 2 4 4 2 5 4 2 6 cloning dlm 4 3 4 3 1 CentreWare IS http IP ColorQube 8700 8900 4 3 2 4 3 3 4 3 4 4 3 5 AddressBook...

Страница 25: ...ho po ta e 3 2 Z lohujte nastaven p stroje ColorQube podle pot eby 3 2 1 Ru n z lohujte adres tisk rny pomoc slu by CentreWare Internet Services podle pokyn uveden ch v sti 4 1 Tento krok je voliteln...

Страница 26: ...ose File Zvolit soubor a vyberte z lo n soubor AddressBook csv 4 3 6 V poli Record Delimiter Odd lova z znam ponechejte nastaven Comma hex 2c rka hex 2c 4 3 7 Vyberte polo ku Upload File Odeslat soubo...

Страница 27: ...onaj operacj tworzenia kopii zapasowej ksi ki adresowej drukarki za pomoc aplikacji CentreWare Internet Services zgodnie z instrukcj w rozdziale 4 1 Mimo e krok ten jest opcjonalny w przypadku niepraw...

Страница 28: ...powiednio polecenia Choose File Wybierz plik 4 3 6 W polu Record Delimiter Ogranicznik rekordu pozostaw opcj Comma hex 2c Przecinek hex 2c 4 3 7 Wybierz polecenie Upload File Przeka plik UWAGA Pomi dz...

Страница 29: ...s gi ment st a ColorQube be ll t sair l ha sz ks ges 3 2 1 A 4 1 es r szben ismertetett m don manu lisan k sz tsen biztons gi m solatot a nyomtat c mjegyz k r l a CentreWare Internet Services haszn la...

Страница 30: ...nt s sor n k sz tett AddressBook csv f jl kiv laszt s hoz v lassza a Choose File F jl v laszt sa lehet s get 4 3 6 A Record Delimiter Rekordelv laszt be ll t s rt k t hagyja v ltozatlanul Comma hex 2c...

Страница 31: ...Hizmetleri kullanarak manuel olarak yedekleyin Her ne kadar bu iste e ba l bir ad m olsa da yedekleme ve geri y kleme i lemleri d zg n bir ekilde yap lmazsa t m adres defteri bilgileri kaybolur 3 2 2...

Страница 32: ...4 3 6 Record Delimiter i Kay t Ay r c Comma hex 2c olarak b rak n 4 3 7 Upload File Dosya Y kle se in NOT S r mler aras nda yaz c Adres Defterine bir ok ek alan eklenmi tir Bu alanlar sayfada turuncu...

Страница 33: ...wnloads www support xerox com support colorqube 8900 downloads 3 3 1 flash USB 3 1 1 FAT32 3 1 2 flash USB 3 1 3 CQ_8700_8900_ To_ConnectKey_GM_Upgrade zip flash USB ALTBOOT autorun xerox flash flash...

Страница 34: ...neral Setup 4 2 5 Clone 4 2 6 cloning dlm 4 3 4 3 1 CentreWare Internet Services ColorQube Web http ColorQube 8700 8900 ip address 4 3 2 Address Book 4 3 3 4 3 4 Import From File 4 3 5 AddressBook csv...

Страница 35: ...3 1 USB 3 1 1 FAT32 3 1 2 USB PC 3 1 3 CQ_8700_8900_To_ConnectKey_GM_ Upgrade zip USB ALTBOOT autorun xerox USB USB 3 1 4 PC USB 3 2 ColorQube 3 2 1 CentreWare Internet 4 1 3 2 2 CentreWare Internet 4...

Страница 36: ...1 Web ColorQube CentreWare Internet http ColorQube 8700 8900 IP 4 2 2 4 2 3 4 2 4 4 2 5 4 2 6 cloning dlm 4 3 4 3 1 Web ColorQube CentreWare Internet http ColorQube 8700 8900 IP 4 3 2 4 3 3 4 3 4 4 3...

Отзывы: