background image

Phaser® 7400 Color Printer

A-4

Operational Guidelines

Do not block or cover the slots and openings on the printer. The printer may overheat 
without adequate ventilation.

For optimum performance, use the printer at elevations below 2,000 m (6,562 ft.).

Do not place the printer near a heat source.

Do not place the printer in direct sunlight to avoid exposure of light-sensitive components 
when the doors are open.

Do not place the printer in line with the cold air flow from an air conditioning system.

Place the printer on a level, solid non-vibrating surface with adequate strength for the 
weight of the printer. It should be within 2° of horizontal with all four feet in solid contact 
with the surface. The base printer weight without any packaging materials is 
approximately 80 kg (176 lb.).
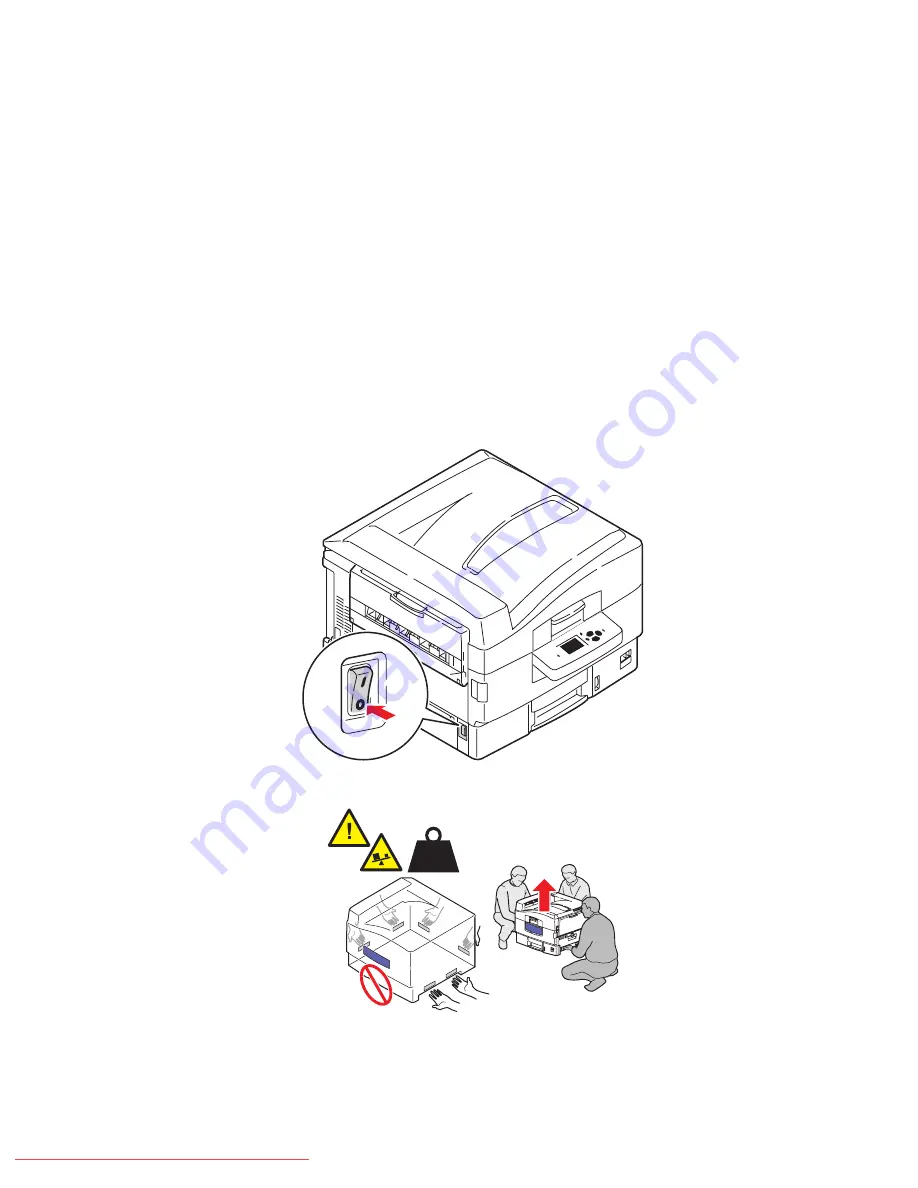
Moving the Printer

Turn off the printer and disconnect all power cables before moving the printer.

7400-188

80 kg

176 lb.

7400-009

Downloaded From ManualsPrinter.com Manuals

Содержание 7400DN - Phaser Color LED Printer

Страница 1: ...kershandleiding Guia do Usu rio Gu a del usuario Benutzerhandbuch Guida dell utente Guide d utilisation c o l o r p r i n t e r User Guide www xerox com office support Phaser 7400 Downloaded From Manu...

Страница 2: ...ration in the United States and or other countries Hoefler Text was designed by the Hoefler Type Foundry IBM and AIX are trademarks of International Business Machines Corporation in the United States...

Страница 3: ...Network Basics Overview of Network Setup and Configuration 2 2 Setting Up the Network 2 3 Choosing a Connection Method 2 3 Connecting via Ethernet Recommended 2 3 Connecting via USB 2 4 Configuring t...

Страница 4: ...idual Job Windows 3 25 Selecting Printing Options for an Individual Job Macintosh 3 27 Printing on Both Sides of the Paper 3 29 Automatic 2 Sided Printing Guidelines 3 29 Binding Edge Options 3 30 Sel...

Страница 5: ...the Printer 5 2 Cleaning the LEDs 5 3 Adding Staples 5 5 Emptying the Punch Waste Box 5 10 Ordering Supplies 5 12 Consumables 5 12 Routine Maintenance Items 5 12 When to Order Supplies 5 12 Recycling...

Страница 6: ...Printer 1 1 This chapter includes Parts of the Printer on page 1 2 Printer Configurations on page 1 6 Control Panel on page 1 8 More Information on page 1 12 Printer Features Downloaded From ManualsPr...

Страница 7: ...page 1 3 Internal Components on page 1 4 Options on page 1 5 Front Right View 1 Top cover handle 2 Control panel 3 Tray 2 4 Front door 5 Tray 2 paper level gauge 6 Paper catcher 7 Top output tray outp...

Страница 8: ...Rear Left View 1 Power cord receptacle 2 Door D when optional duplex unit installed 3 Door E 4 Left side output tray 5 Power switch 6 USB connection 7 Ethernet 10 100 Base T connection 1 2 4 3 5 7400...

Страница 9: ...1 Imaging Unit basket handle 2 Fuser 3 LED bars 4 Toner Cartridges and Imaging Units Cyan Magenta Yellow and Black 5 Toner Cartridge 6 Imaging Unit 1 Imaging Unit basket lifted 2 Transfer Unit 3 2 4...

Страница 10: ...isher lower output tray 5 Door F 6 Door I 7 Finisher upper output tray output delivered faceup or facedown 8 Door H 9 Punch waste box 10 Door G 11 Tray 3 550 Sheet Feeder 12 Trays 4 6 1650 Sheet High...

Страница 11: ...hoto Print Quality Mode Available Configurations The Phaser 7400 Color Printer is available in five configurations Printer Configurations Features 7400N 7400DN 7400DT 7400DX 7400DXF Hard Drive Optiona...

Страница 12: ...00DXF printer Finisher The finisher provides stapling saddle stapling and hole punching for a variety of paper and media It is available with either a 2 3 hole punch 110 V finisher or a 4 hole punch 2...

Страница 13: ...1 10 Control Panel Features The control panel Displays the printer s operating status for example Printing Ready to Print printer errors and warnings Prompts you to load paper order and replace suppli...

Страница 14: ...atus messages and menus 3 Cancel button Cancels the current print job 4 Back button Returns to the previous menu item 5 Up Arrow button Scrolls upward through the menus 6 Down Arrow button Scrolls dow...

Страница 15: ...ion about your printer do the following 1 On the control panel select Information and then press the OK button 2 Select Information Pages and then press the OK button 3 Select Configuration Page or Su...

Страница 16: ...the sampler pages select the appropriate Postscript Setup settings for the default print quality mode and color correction from the Printer Setup menu on the control panel To print the color sampler...

Страница 17: ...d Documentation CD ROM www xerox com office 7400support Quick Start Tutorials Videos www xerox com office 7400support www xerox com office 7400support Recommended Media List www xerox com office 7400s...

Страница 18: ...owing information User manuals and video tutorials Solutions to troubleshooting problems Printer and supplies status Supplies ordering and recycling Answers to frequently asked questions Default print...

Страница 19: ...Network on page 2 3 Configuring the Network Address on page 2 5 Installing the Printer Drivers on page 2 9 This chapter provides basic information about setting up and connecting to your printer See...

Страница 20: ...to automatically set the printer s IP address if the printer is connected to an established TCP IP network You can also manually set the printer s IP address on the control panel Macintosh systems Ma...

Страница 21: ...ormation about CentreWare IS click the Help button in CentreWare IS to go to the CentreWare IS Online Help Network Connection Depending on your particular setup the following hardware and cabling is r...

Страница 22: ...have Microsoft Windows 98 SE Windows Me Windows XP or Windows 2000 Macintosh users must use Mac OS 9 x and higher USB Connection A USB connection requires a standard A B USB cable This cable is not i...

Страница 23: ...address 192 168 1 3 Another device can have the address 192 168 1 4 Generally Macintosh computers use either TCP IP or the EtherTalk protocol to talk to a networked printer For Mac OS X systems TCP IP...

Страница 24: ...edded web server For complete information about CentreWare IS click the Help button in CentreWare IS to go to the CentreWare IS Online Help After setting the printer s IP address you can modify TCP IP...

Страница 25: ...P You must have DHCP enabled on the printer for DDNS to function Your network s DHCP server must also support Dynamic DNS updates through option 12 or option 81 support See your network administrator...

Страница 26: ...ly setting the IP address overrides DHCP and AutoIP Alternatively if you are in a small office with a single PC and use a dialup modem connection you can manually set the IP address 1 On the control p...

Страница 27: ...mended to take full advantage of your system s custom features and genuine Adobe PostScript Default printer driver PCL Driver Web only The Printer Command Language driver can be used for applications...

Страница 28: ...ser To create a desktop USB printer 1 Insert the Software and Documentation CD ROM into the CD ROM drive 2 Use the Desktop Printer Utility to create a desktop USB printer The utility is located in the...

Страница 29: ...on the Macintosh hard drive open the Applications folder and then open the Utilities folder 3 Click the Add icon in the Printer List window and then select Bonjour from the drop down menu 4 Select th...

Страница 30: ...ading Paper on page 3 8 Selecting Printing Options on page 3 24 Printing on Both Sides of the Paper on page 3 29 Printing on Specialty Media on page 3 32 Choosing Output Options on page 3 50 See also...

Страница 31: ...r change them as required Caution Setting the appropriate paper type improves print quality and avoids damage to the printer 3 From the application access the Print dialog box and select printing opti...

Страница 32: ...nsparencies and other specialty media is not covered by the Xerox warranty service agreement or Total Satisfaction Guarantee The Total Satisfaction Guarantee is available in the United States and Cana...

Страница 33: ...k cool relatively dry locations Most paper items are susceptible to damage from ultraviolet UV and visible light UV radiation which is emitted by the sun and fluorescent bulbs is particularly damaging...

Страница 34: ...s For more detailed information about supported paper and other media print the Paper Tips page 1 On the control panel select Information and then press the OK button 2 Select Information Pages and th...

Страница 35: ...25 x 10 5 in Letter 8 5 x 11 in US Folio 8 5 x 13 in Legal 8 5 x 14 0 in Tabloid 11 0 x 17 0 in Tabloid Extra 12 0 x 18 0 in A6 105 x 148 mm A5 148 x 210 mm A4 210 x 297 mm A3 297 x 420 mm SRA3 320 x...

Страница 36: ...mm 3 95 12 90 in Height 148 457 mm 5 85 18 00 in Executive 7 25 x 10 5 in Letter 8 5 x 11 in US Folio 8 5 x 13 in Legal 8 5 x 14 0 in Tabloid 11 0 x 17 0 in Tabloid Extra 12 0 x 18 0 in A6 Tray 2 only...

Страница 37: ...prepunched paper 64 105 g m2 17 28 lb Bond 22 39 lb Cover Heavy plain paper letterhead 106 128 g m2 29 34 lb Bond 40 47 lb Cover Thin card stock 129 188 g m2 35 50 lb Bond 48 69 lb Cover Thick card st...

Страница 38: ...ay 1 MPT 1 Open Tray 1 MPT by pulling out on the handle and then unfold the tray extensions 2 Load the paper or other media with the long edge against the roller as shown in the following illustration...

Страница 39: ...page towards the back of the printer Prepunched holes should enter the printer last For more information see Printing on Both Sides of the Paper on page 3 29 Do not load more than 50 transparencies 3...

Страница 40: ...ress the OK button to use the current tray setup If you loaded a new size or type of paper in the tray do the following a Select Change setup and then press the OK button b Select the appropriate pape...

Страница 41: ...ulling out on the handle and then unfold the tray extensions 2 Load the paper or other media with the short edge against the roller as shown in the following illustrations For single sided printing pl...

Страница 42: ...hed holes should be towards the back of the printer For more information see Printing on Both Sides of the Paper on page 3 29 Caution Do not load paper or media past the fill line indicated on the tra...

Страница 43: ...you loaded a new size or type of paper in the tray do the following a Select Change setup and then press the OK button b Select the appropriate paper type and then press the OK button c Select the pa...

Страница 44: ...list 3 Select Manual Feed and then click OK to save the driver settings 4 Submit your print job 5 When prompted by the control panel remove the paper from Tray 1 MPT 6 Load the appropriate paper for y...

Страница 45: ...b Bond 40 47 lb Cover Thin card stock 129 188 g m2 35 50 lb Bond 48 69 lb Cover Thick card stock 189 216 g m2 51 57 lb Bond 70 80 lb Cover Transparencies Tray 2 only See also Supported Paper Sizes and...

Страница 46: ...d side paper guides to match the size of the paper Note When the paper guides are adjusted correctly there may be a small space between the paper and the guides 3 Fan the paper to release sheets that...

Страница 47: ...e tray Prepunched holes should be on the right side of the tray For automatic 2 sided printing insert side one faceup with the top of the paper at the back of the tray Prepunched holes should be on th...

Страница 48: ...en press the OK button c Select Change setup and then press the OK button d Select the appropriate paper type and then press the OK button Caution Setting the appropriate paper type improves print qua...

Страница 49: ...ould be printed single sided from Tray 2 only To load paper or other media in Trays 2 6 1 Pull out the tray 2 If necessary adjust the length and side paper guides to match the size of the paper Note W...

Страница 50: ...short edge towards the right side of the tray as shown in the following illustrations For single sided printing insert the side to be printed facedown with the top of the page on the right side of the...

Страница 51: ...with the top of the page on the right side of the tray Prepunched holes should be towards the back of the tray For more information see Printing on Both Sides of the Paper on page 3 29 5 Push the tray...

Страница 52: ...the OK button d Select the appropriate paper type and then press the OK button Caution Setting the appropriate paper type improves print quality and avoids damage to the printer e For Tray 2 select t...

Страница 53: ...trol all of your print jobs unless you override them specifically for a job For example if you want to use automatic 2 sided printing for most jobs set this option in printer settings 1 Click Start se...

Страница 54: ...erver 2003 you can save current printing options with a distinctive name and apply them to other print jobs Select either the Paper Quality Output Options or TekColor tab and then press the Saved Sett...

Страница 55: ...Hole punching Paper destination TekColor tab Color corrections Black white conversion Windows 98 SE or Windows Me Setup tab Paper type size and tray selection Orientation Automatic 2 sided printing Pr...

Страница 56: ...printer settings click the applicable saved preset in the Presets list 3 Click Print to print the job See the following table for specific printing options Macintosh PostScript Driver Settings Operat...

Страница 57: ...lity Print quality Image smoothing Job Types Secure prints personal prints proof prints and saved prints Advanced Options Paper destination Paper types Offset collated sets Separation pages Finishing...

Страница 58: ...ic two sided printing is available from all trays Before printing a two sided document verify the following requirements You must have a Phaser 7400DN Phaser 7400DT Phaser 7400DX or Phaser 7400DXF pri...

Страница 59: ...the roller and the top of the page towards the back of the printer Short Edge Feed Insert side one facedown with the short edge against the roller and the top of the page entering the printer first T...

Страница 60: ...ect the Layout tab 2 Select either Flip On Long Edge or Flip On Short Edge under Print On Both Sides Duplex Windows NT 4 x 1 Select the Page Setup tab 2 Select either Flip on Long Edge or Flip on Shor...

Страница 61: ...pecialty media contact your local reseller or go to www xerox com office supplies Caution Damage caused by using unsupported paper transparencies and other specialty media is not covered by the Xerox...

Страница 62: ...d out on the handle and then unfold the two extensions 2 Insert the transparencies into the tray and adjust the paper guides to match the size of the transparencies Place the long edge of the transpar...

Страница 63: ...he OK button a Select Phaser 35 Series Transparency as the paper type and then press the OK button b Select the appropriate transparency size and then press the OK button 4 In the printer driver selec...

Страница 64: ...the length and side paper guides to fit the transparency size Note When the paper guides are adjusted correctly there may be a small space between the transparencies and the guides 3 Insert transpare...

Страница 65: ...per and then press the OK button b Select Change setup and then press the OK button c Select Phaser 35 Series Transparency as the paper type and then press the OK button d Select the appropriate trans...

Страница 66: ...an cause the envelopes to seal before or during printing Avoid padded envelopes purchase envelopes that lie flat on a surface Remove air bubbles from the envelopes before loading by setting a heavy bo...

Страница 67: ...pes Insert envelopes flap side down so the top of the envelope enters first For C4 envelopes fold and tuck the envelope flaps into the envelopes Insert envelopes flap side down so the bottom of the en...

Страница 68: ...K button a Select Envelope as the paper type and then press the OK button Note If you are printing on unusually light or heavy envelopes select Light Envelopes or Heavy Envelopes For more information...

Страница 69: ...els flat in their original packaging Leave the sheets of labels inside the original packaging until ready to use Return any unused sheets of labels to the original packaging and reseal it Do not store...

Страница 70: ...e to be printed faceup with the top of the sheet entering the printer first Caution Do not load paper or media past the fill line indicated on the tray Overloading the tray may cause jams 3 Adjust the...

Страница 71: ...can be printed from Tray 1 MPT It should be printed on one side only To order paper transparencies or other specialty media contact your local reseller or go to www xerox com office supplies Guidelin...

Страница 72: ...Media Phaser 7400 Color Printer 3 43 Printing Glossy Paper from Tray 1 MPT 1 Open Tray 1 MPT by pulling up and out on the handle and then unfold the two extensions 7400 094 1 2 3 Downloaded From Manua...

Страница 73: ...printer Do not load more than 50 sheets 3 When the control panel prompts you to confirm the type and size of paper in the tray select Change setup and then press the OK button a Select Glossy Paper as...

Страница 74: ...paper paper that is more than 457 mm 18 in long must be printed from Tray 1 MPT Custom size envelopes must be printed from Tray 1 MPT Printing Custom Size Paper from Tray 1 MPT 1 Open Tray 1 MPT by p...

Страница 75: ...ting place the side to be printed faceup with the top of the page towards the back of the printer For 2 sided printing place side one facedown with the top of the page towards the back of the printer...

Страница 76: ...it and then press the OK button If you are using a new custom size set the custom width and custom height a Select New Custom Size and then press the OK button b Use the Up Arrow and Down Arrow button...

Страница 77: ...er from Tray 2 1 Pull out the tray 2 If necessary adjust the length and side paper guides to fit the paper size Note When the paper guides are adjusted correctly there may be a small space between the...

Страница 78: ...value for the custom width and then press the OK button c Use the Up Arrow and Down Arrow buttons to select the value for the custom height and then press the OK button 3 When you submit your print j...

Страница 79: ...end output to the finisher to be punched and or stapled Use the following guidelines to choose which output tray to use for your print jobs Top Output Tray Factory default Use for all paper and media...

Страница 80: ...more Delivers paper less than 457 mm 18 in long facedown delivers longer paper card stock and specialty media faceup Operating System Steps Windows 98 SE Windows Me Windows 2000 Windows XP Windows Se...

Страница 81: ...in the left side output tray Selecting Offsetting from the Printer Driver To select offsetting for a specific print job Operating System Steps Windows 2000 Windows XP Windows Server 2003 1 Select the...

Страница 82: ...sheets can be stapled Dual Inserts two staples in each set of copies Up to 50 sheets can be stapled The stapled edge must be at least 148 mm 5 83 in long Saddle Staples and folds each set of copies al...

Страница 83: ...river None Print copies are not punched 2 Holes When the 2 3 hole punch is installed two holes are punched in the paper 3 Holes When the 2 3 hole punch is installed three holes are punched in the pape...

Страница 84: ...NT 4 x 1 Select the Output Options tab 2 Select the number of holes from the Hole Punching drop down list 3 Select Finisher Output Tray from the Paper Destination drop down list Mac OS 9 or Mac OS X...

Страница 85: ...haser 7400 Color Printer 4 1 This chapter includes Controlling the Quality of Your Prints on page 4 2 Solving Print Quality Problems on page 4 5 Print Quality Downloaded From ManualsPrinter com Manual...

Страница 86: ...Quality Mode Type of Print Job Standard General purpose mode for crisp bright color prints at high speed Recommended for most office use and quick prints Enhanced High quality mode for fine lines and...

Страница 87: ...the Print dialog box select Image Quality from the drop down list 2 Select a print quality mode from the Print Quality drop down list TekColor Correction Description Automatic Applies the best color c...

Страница 88: ...the TekColor tab 2 Select the desired color correction Some of the color corrections are grouped under Office Color or Press Match Mac OS 9 x 1 In the Print dialog box select General 2 Select TekColo...

Страница 89: ...k Lines or Smudges in One Color Problem Print a copy of the color test pages to determine whether the problem is in one color or more than one color 1 On the control panel select Troubleshooting and t...

Страница 90: ...n the top cover Caution Do not leave the top cover open for more than 10 minutes without covering the imaging units as damage could result Use the dark bag that came with the imaging unit or opaque pa...

Страница 91: ...lied with each new toner cartridge or with a soft clean cloth 3 Visually inspect the toner cartridges and imaging units and remove any foreign material 4 If the problem persists after cleaning the LED...

Страница 92: ...the toner cartridge installed 6 To avoid toner spills hold the imaging unit in an upright position Slide the cover away from the shiny coating at the bottom of the unit and lift it high enough to visu...

Страница 93: ...that the paper is properly loaded in the tray and the correct paper type is selected in the Paper Tray Setup menu See Loading Paper on page 3 8 If the problem persists 1 On the control panel select T...

Страница 94: ...d then press the OK button 7 Select Print Quality Issues and then press the OK button 8 Select Remove Print Smears and then press the OK button Five cleaning pages will run through the printer 9 Repea...

Страница 95: ...er 7400 Color Printer 4 11 12 Grasp the imaging unit basket handle and lift up the basket 13 Inspect the transfer unit If you see excess toner on the transfer unit replace it 7400 056 7400 241 Downloa...

Страница 96: ...elect the TekColor tab click the More Options button and then adjust the Lightness level 3 If the problem continues calibrate the colors using the procedures on the Color Calibration Tutorial page To...

Страница 97: ...rint Quality Problems and then press the OK button 3 Select Repeating Defects and then press the OK button The Repeating Defects page prints 4 Follow the instructions on the page to measure the distan...

Страница 98: ...the OK button 2 Select the tray you are using and then press the OK button 3 Select Change Setup and then press the OK button 4 Select Special as the paper type and then press the OK button 5 Select C...

Страница 99: ...nel select Paper Tray Setup and then press the OK button 2 Select the tray you are using and then press the OK button 3 Select Change Setup and then press the OK button 4 Select Special as the paper t...

Страница 100: ...Color Printer 4 16 Color Misregistration Problem Color has shifted outside of the expected print area or has been superimposed over another color area Solution 1 Turn the printer off 7400 213 7400 188...

Страница 101: ...he top cover Caution Do not leave the top cover open for more than 10 minutes without covering the imaging units as damage could result Use the dark bag that came with the imaging unit or dark paper a...

Страница 102: ...Problems Phaser 7400 Color Printer 4 18 3 Inspect the four LED bars for any foreign material 4 Visually inspect the imaging units and remove any foreign material 7400 160 7400 161 Downloaded From Manu...

Страница 103: ...Solving Print Quality Problems Phaser 7400 Color Printer 4 19 5 Close the top cover 6 Turn the printer on 7400 065 7400 187 Downloaded From ManualsPrinter com Manuals...

Страница 104: ...Verify that the tray is set to the correct paper size 5 If the problem continues use the Calibrate Margins page to shift the print area on the paper The print area appears as a dashed rectangle on th...

Страница 105: ...tying the Punch Waste Box on page 5 10 Ordering Supplies on page 5 12 Moving and Repacking the Printer on page 5 14 See also Maintenance video tutorials at www xerox com office 7400support Replacing s...

Страница 106: ...the Printer To remove stains clean the outside of the printer using a soft damp cloth moistened with a mild neutral detergent Do not spray detergent directly onto the printer Warning To prevent electr...

Страница 107: ...the top cover Caution Do not leave the top cover open for more than 10 minutes without covering the imaging units as damage could result Use the dark bag that came with the imaging unit or opaque pap...

Страница 108: ...ter 5 4 2 Move the LED shutter to the right and clean the four LED bars using the cleaning pad supplied with each new toner cartridge or with a soft clean cloth 3 Close the top cover 7400 201 7400 065...

Страница 109: ...es Phaser 7400 Color Printer 5 5 Adding Staples 1 Open Door J on the front of the finisher 2 Grasp the handle and pull the stapler out of the finisher 7400 084 7400 034 Downloaded From ManualsPrinter...

Страница 110: ...ess the staple cartridge rotate the small knob at the top clockwise until it stops 4 Squeeze the tabs on each side of the staple unit and then lift and pull the staple unit out of the stapler 7400 138...

Страница 111: ...staple unit where it is labeled Push and then lift the part that was released 6 Remove the empty staple cartridge 7 Slide a new staple cartridge into the staple unit and pull the tab to release the pa...

Страница 112: ...Printer 5 8 8 Push down the top of the staple unit until you hear it click 9 Squeeze the green tabs on the side of the staple unit and then replace the unit in the stapler 7400 195 7400 036 Downloaded...

Страница 113: ...Adding Staples Phaser 7400 Color Printer 5 9 10 Push the stapler back into the finisher and close Door J 7400 037 Downloaded From ManualsPrinter com Manuals...

Страница 114: ...5 10 Emptying the Punch Waste Box 1 Press the button at the top of the finisher near Door J and slide the finisher away from the finisher base 2 Remove the punch waste box 3 Empty the waste box 7400 0...

Страница 115: ...ptying the Punch Waste Box Phaser 7400 Color Printer 5 11 4 Insert the punch waste box into its position in the finisher 5 Close the finisher 7400 039 7400 074 Downloaded From ManualsPrinter com Manua...

Страница 116: ...ce Items Fuser Imaging Units Cyan Magenta Yellow Black Transfer Unit Waste Toner Cartridge When to Order Supplies The control panel displays a warning when the supply nears its replacement time Verify...

Страница 117: ...tisfaction Guarantee do not cover damage malfunction or degradation of performance caused by use of non Xerox supplies or the use of Xerox supplies not specified for this printer The Total Satisfactio...

Страница 118: ...h as pushing the printer over a raised door threshold or across a parking lot can damage the printer Preparing the Printer for Shipment Repack the printer using the original packing material and boxes...

Страница 119: ...hapter includes Clearing Paper Jams on page 6 2 Getting Help on page 6 63 See also Print Quality on page 4 1 Troubleshooting video tutorials at www xerox com office 7400support Troubleshooting Downloa...

Страница 120: ...ion see User Safety on page A 1 Preventing Jams To reduce the frequency of paper jams follow the guidelines and instructions in the Printing Basics chapter of this guide It includes information about...

Страница 121: ...6 19 Jam at Door B or Misfeed at Tray 2 on page 6 24 Jam at Door C or Misfeed at Trays 3 6 on page 6 27 Jam at Door D on page 6 30 Jam at Door E on page 6 33 Jam Under Imaging Units Follow these steps...

Страница 122: ...r 7400 Color Printer 6 4 2 Grasp the handle of the imaging unit basket and lift the basket 3 If jammed paper is present under the imaging units carefully remove it 7400 056 7400 057 Downloaded From Ma...

Страница 123: ...ng Paper Jams Phaser 7400 Color Printer 6 5 4 Lower the imaging unit basket back into the locked position 5 Slowly lower the top cover into place 7400 064 7400 065 Downloaded From ManualsPrinter com M...

Страница 124: ...Printer 6 6 6 If the jam persists fold in the Tray 1 MPT tray extensions and close the tray 7 Pull up on the release lever to open Door A on the right side of the printer 7400 254 1 2 3 7400 040 Downl...

Страница 125: ...ng Paper Jams Phaser 7400 Color Printer 6 7 8 Carefully remove the jammed paper 9 Close Door A 10 If you closed Tray 1 MPT open it 7400 041 7400 042 7400 094 1 2 3 Downloaded From ManualsPrinter com M...

Страница 126: ...nce Follow these steps to clear the jam 1 Lift the latch on the front of the printer to open the top cover Caution Avoid touching or handling the LED bars 2 Move the fuser locking lever to the right t...

Страница 127: ...by the handle and lift the fuser out of the printer Warning Do not touch the sides of the fuser they may be hot 4 Place the fuser on a flat surface 5 If jammed paper is present inside the printer rem...

Страница 128: ...the two jam release levers on the fuser and then carefully pull out the jammed paper Note The jam release levers may be loose b If the jam release levers are open press the levers back to the locked...

Страница 129: ...Phaser 7400 Color Printer 6 11 d If paper is jammed inside the fuser remove it e Close the fuser roller cover 7 Reinsert the fuser into the printer 7400 257 7400 258 7400 168 Downloaded From ManualsP...

Страница 130: ...Paper Jams Phaser 7400 Color Printer 6 12 8 Move the fuser locking lever to the left to the locked position 9 Slowly lower the top cover into place 7400 169 7400 065 Downloaded From ManualsPrinter com...

Страница 131: ...1 If the printer has a finisher press the lower lever on the front of the finisher base and slide the finisher away from the printer 2 Press the release button on the left side of the printer to open...

Страница 132: ...duplex unit by holding Door D and pressing down on the release levers on either side of the door 4 Push in and lift the tab on the first inside cover If jammed paper is present in the duplex unit remo...

Страница 133: ...Push in and lift the tab on the second inside cover If jammed paper is present in the duplex unit remove it 6 Pull the tab forward on each cover to lock the covers in their original positions 7400 049...

Страница 134: ...7 If the jam persists do the following a Pull the duplex unit out of the printer b If paper is jammed in the duplex unit remove it c If paper is jammed inside the printer remove it 7400 259 7400 260 7...

Страница 135: ...g Paper Jams Phaser 7400 Color Printer 6 17 d Replace the duplex unit in the printer 8 Lift Door D and slide the duplex unit back into the printer 7400 262 7400 052 Downloaded From ManualsPrinter com...

Страница 136: ...Clearing Paper Jams Phaser 7400 Color Printer 6 18 9 If the printer has a finisher slide it back into place 7400 053 Downloaded From ManualsPrinter com Manuals...

Страница 137: ...9 Jam at Door A or Misfeed at Tray 1 MPT Follow these steps to clear the jam 1 If paper is jammed in Tray 1 MPT remove it 2 Fold in the Tray 1 MPT tray extensions and close the tray 7400 054 7400 254...

Страница 138: ...Color Printer 6 20 3 Pull up on the release lever to open Door A on the right side of the printer 4 If jammed paper is present carefully remove it 5 Close Door A 7400 040 7400 041 7400 042 Downloaded...

Страница 139: ...Phaser 7400 Color Printer 6 21 6 If you closed Tray 1 MPT open it 7 If the jam persists do the following a Open Door B on the right side of the printer 7400 094 1 2 3 7400 066 Downloaded From Manuals...

Страница 140: ...Paper Jams Phaser 7400 Color Printer 6 22 b If jammed paper is present carefully remove it c If the paper guide is still in position pull it down 7400 240 7400 263 Downloaded From ManualsPrinter com...

Страница 141: ...Clearing Paper Jams Phaser 7400 Color Printer 6 23 d If jammed paper is present carefully remove it e Close Door B 7400 264 7400 070 Downloaded From ManualsPrinter com Manuals...

Страница 142: ...rinter 6 24 Jam at Door B or Misfeed at Tray 2 Follow these steps to clear the jam 1 Open Door B on the right side of the printer 2 If jammed paper is present carefully remove it 7400 066 7400 240 Dow...

Страница 143: ...Phaser 7400 Color Printer 6 25 3 If the paper guide is still in position pull it down 4 If jammed paper is present carefully remove it 5 Close Door B 7400 263 7400 264 7400 070 Downloaded From Manuals...

Страница 144: ...out Tray 2 and remove the jammed paper 7 Verify that the paper is properly loaded in the tray and that the paper guides are adjusted to fit the paper 8 Push the tray back into the printer See also Loa...

Страница 145: ...Jam at Door C or Misfeed at Trays 3 6 Follow these steps to clear the jam 1 Open Door C for the indicated tray and all of the trays above it 2 If jammed paper is present carefully remove it 7400 182 7...

Страница 146: ...Door C 4 If the jam persists pull out the indicated tray and remove the jammed paper 5 Verify that the paper is properly loaded in the tray and that the paper guides are adjusted to fit the paper 740...

Страница 147: ...Clearing Paper Jams Phaser 7400 Color Printer 6 29 6 Push the tray back into the printer See also Loading Paper in Trays 2 6 on page 3 16 7400 181 Downloaded From ManualsPrinter com Manuals...

Страница 148: ...to clear the jam 1 If the printer has a finisher press the lower lever on the front of the finisher base and slide the finisher away from the printer 2 Press the release button on the left side of the...

Страница 149: ...Clearing Paper Jams Phaser 7400 Color Printer 6 31 3 Carefully remove the jammed paper 4 Close Door D 7400 045 7400 136 Downloaded From ManualsPrinter com Manuals...

Страница 150: ...Clearing Paper Jams Phaser 7400 Color Printer 6 32 5 If the printer has a finisher slide it back into place 7400 053 Downloaded From ManualsPrinter com Manuals...

Страница 151: ...these steps to clear the jam 1 If the printer has a finisher press the lower lever on the front of the finisher base and slide the finisher away from the printer 2 If the left side output tray is clos...

Страница 152: ...g Paper Jams Phaser 7400 Color Printer 6 34 3 Open Door E and carefully remove the jammed paper 4 Close both Door E and the left side output tray 7400 223 7400 224 Downloaded From ManualsPrinter com M...

Страница 153: ...Clearing Paper Jams Phaser 7400 Color Printer 6 35 5 If the printer has a finisher slide it back into place 7400 053 Downloaded From ManualsPrinter com Manuals...

Страница 154: ...er Punch Unit on page 6 43 Jam Inside Finisher on page 6 46 Jam at Finisher Entrance on page 6 52 Jam at Finisher Door G on page 6 54 Jam at Finisher Door H on page 6 59 Jam at Finisher Stapler or Fin...

Страница 155: ...ing Paper Jams Phaser 7400 Color Printer 6 37 2 Open Door G on the left inside of the finisher 3 If jammed paper is present carefully remove it 7400 088 7400 089 Downloaded From ManualsPrinter com Man...

Страница 156: ...Phaser 7400 Color Printer 6 38 4 Close Door G 5 Close the finisher 6 If the jam persists do the following a Open Door J on the front of the finisher 7400 090 7400 083 7400 084 Downloaded From Manuals...

Страница 157: ...00 Color Printer 6 39 b Turn the lower knob clockwise to eject any jammed paper c Remove the paper d Grasp the handle and pull the stapler out of the finisher 7400 085 7400 086 7400 034 Downloaded Fro...

Страница 158: ...learing Paper Jams Phaser 7400 Color Printer 6 40 e If jammed paper is present carefully remove it f Push the stapler back into the finisher 7400 244 7400 242 Downloaded From ManualsPrinter com Manual...

Страница 159: ...400 Color Printer 6 41 g Close Door J Jam at Finisher Upper Output Tray Follow these steps to clear the jam 1 If paper is jammed in the finisher output tray remove it 7400 087 7400 079 Downloaded From...

Страница 160: ...ng Paper Jams Phaser 7400 Color Printer 6 42 2 Open Door H at the top of the finisher 3 Carefully remove the jammed paper 4 Close Door H 7400 080 7400 081 7400 082 Downloaded From ManualsPrinter com M...

Страница 161: ...Printer 6 43 Jam at Finisher Punch Unit Follow these steps to clear the jam 1 Press the button on the front of the finisher near Door J and slide the finisher away from the finisher base 7400 093 Down...

Страница 162: ...Printer 6 44 2 Rotate the wheel on the top left inside of the finisher Align the arrow tab on the wheel with the mark on the finisher 3 Open Door H at the top of the finisher 7400 091 7400 080 Downlo...

Страница 163: ...Clearing Paper Jams Phaser 7400 Color Printer 6 45 4 Carefully remove the jammed paper 5 Close Door H 6 Close the finisher 7400 081 7400 082 7400 083 Downloaded From ManualsPrinter com Manuals...

Страница 164: ...lor Printer 6 46 Jam Inside Finisher Follow these steps to clear the jam 1 Press the button at the top of the finisher near Door J and slide the finisher away from the finisher base 7400 093 Downloade...

Страница 165: ...Clearing Paper Jams Phaser 7400 Color Printer 6 47 2 Open Door F on the left side of the finisher base 3 Carefully remove the jammed paper 7400 071 7400 072 Downloaded From ManualsPrinter com Manuals...

Страница 166: ...Clearing Paper Jams Phaser 7400 Color Printer 6 48 4 Close Door F 5 Close the finisher 7400 073 7400 083 Downloaded From ManualsPrinter com Manuals...

Страница 167: ...lor Printer 6 49 6 Press the lower lever on the front of the finisher base and slide the finisher away from the printer 7 Open Door I on the right side of the finisher base 7400 043 7400 075 Downloade...

Страница 168: ...Clearing Paper Jams Phaser 7400 Color Printer 6 50 8 Remove the jammed paper 9 Close Door I 7400 076 7400 077 Downloaded From ManualsPrinter com Manuals...

Страница 169: ...Clearing Paper Jams Phaser 7400 Color Printer 6 51 10 Slide the finisher back into place 7400 053 Downloaded From ManualsPrinter com Manuals...

Страница 170: ...er Entrance Follow these steps to clear the jam 1 Press the lower lever on the front of the finisher base and slide the finisher away from the printer 2 Remove the jammed paper from the finisher entra...

Страница 171: ...Clearing Paper Jams Phaser 7400 Color Printer 6 53 3 Slide the finisher back into place 7400 053 Downloaded From ManualsPrinter com Manuals...

Страница 172: ...or Printer 6 54 Jam at Finisher Door G Follow these steps to clear the jam 1 Press the button at the top of the finisher near Door J and slide the finisher away from the finisher base 7400 093 Downloa...

Страница 173: ...ring Paper Jams Phaser 7400 Color Printer 6 55 2 Open Door G on the right side of the finisher 3 If jammed paper is present carefully remove it 7400 088 7400 089 Downloaded From ManualsPrinter com Man...

Страница 174: ...Phaser 7400 Color Printer 6 56 4 Close Door G 5 Close the finisher 6 If the jam persists do the following a Open Door J on the front of the finisher 7400 090 7400 083 7400 084 Downloaded From Manuals...

Страница 175: ...ring Paper Jams Phaser 7400 Color Printer 6 57 b Grasp the handle and pull the stapler out of the finisher c Carefully remove the jammed paper 7400 034 7400 244 Downloaded From ManualsPrinter com Manu...

Страница 176: ...Clearing Paper Jams Phaser 7400 Color Printer 6 58 d Push the stapler back into the finisher e Close Door J 7400 242 7400 087 Downloaded From ManualsPrinter com Manuals...

Страница 177: ...er 7400 Color Printer 6 59 Jam at Finisher Door H Follow these steps to clear the jam 1 Open Door H at the top of the finisher 2 Carefully remove the jammed paper 7400 080 7400 081 Downloaded From Man...

Страница 178: ...400 Color Printer 6 60 3 If the jammed paper is difficult to remove press the button on the front of the finisher near Door J and slide the finisher away from the finisher base 7400 093 Downloaded Fro...

Страница 179: ...lor Printer 6 61 4 Rotate the wheel on the top left inside of the finisher Align the arrow tab on the wheel with the mark on the finisher 5 Carefully remove the jammed paper 7400 091 7400 081 Download...

Страница 180: ...Clearing Paper Jams Phaser 7400 Color Printer 6 62 6 Close Door H 7 Close the finisher 7400 082 7400 083 Downloaded From ManualsPrinter com Manuals...

Страница 181: ...1 13 Control Panel Messages The control panel provides you with information and troubleshooting help When an error or warning condition occurs the control panel displays a message informing you of the...

Страница 182: ...a Service Request with Xerox Customer Support To access PhaserSMART Technical Support 1 Open your browser and go to www phaserSMART com 2 Enter your printer s IP address in the browser window 3 Follow...

Страница 183: ...r your printer includes online Technical Support Recommended Media List Knowledge Base driver downloads documentation video tutorials and much more www xerox com office 7400support Supplies for your p...

Страница 184: ...on cord or power strip Verify that the printer is plugged into an outlet that is capable of providing the correct voltage and power Review the printer s electrical specification with an electrician if...

Страница 185: ...ou can maintain or service behind these covers Note Leave the printer on for optimum performance it does not pose a safety hazard The following are hazards to your safety The power cord is damaged or...

Страница 186: ...n an area where there is adequate space for ventilation operation and servicing The recommended minimal spacing is Overhead Clearance 60 96 cm 24 0 in above the printer without the finisher 60 96 cm 2...

Страница 187: ...nents when the doors are open Do not place the printer in line with the cold air flow from an air conditioning system Place the printer on a level solid non vibrating surface with adequate strength fo...

Страница 188: ...not open the doors Do not move the printer Printer Supplies Use the supplies specifically designed for your printer The use of unsuitable materials may cause poor performance and a possible safety ha...

Страница 189: ...e caution or draws attention to a particular component See the manual s for information Avoid pinching fingers in the printer Use caution to avoid personal injury Hot surface on or in the printer Use...

Страница 190: ...2 color sampler pages 1 11 colors adjusting 4 3 all colors too light or too dark 4 12 description 4 3 light or dark lines appear in one color 4 5 shifted or superimposed over another color 4 16 confi...

Страница 191: ...ole puncher 3 54 stapler 3 53 fonts PostScript and PCL 1 6 format IP address 2 6 front stapling option 3 53 fuser ordering supplies 5 12 fusing incomplete 4 15 G getting help PhaserSMART 1 12 6 64 Pri...

Страница 192: ...entrance 6 8 jam at finisher Door G 6 54 jam at finisher Door H 6 59 jam at finisher entrance 6 52 jam at finisher punch unit 6 43 jam at finisher stapler or finisher saddle stapler 6 36 jam at finis...

Страница 193: ...rrection 4 3 offsetting output 3 52 operating systems printer drivers 2 9 operational safety A 3 ordering supplies 5 12 output options 3 50 hole punching 3 54 offsetting output 3 52 output tray guidel...

Страница 194: ...ter 2 10 Xerox Support Centre 1 13 printing 2 sided document 3 29 basics 3 2 binding edge options 3 30 custom size paper 3 45 envelopes 3 37 glossy paper 3 42 job options Macintosh 3 27 job options Wi...

Страница 195: ...ling options from the printer driver 3 54 staple orientation 3 53 stapling options 3 53 supported paper types 3 53 storing paper guidelines 3 4 supplies recycling 5 13 6 65 safety A 5 when to order 5...

Страница 196: ...problems 4 5 Technical Support 1 12 U unacceptable paper and media 3 4 upgrades printer upgrade kits 1 7 USB connection 2 4 using host names with Domain Name Service DNS 2 7 W waste punch box emptying...

Отзывы: