background image

RJ-901C/RJ-900C


Maintenance Manual

5 Self-Diagnosis Mode

5-57

(6)  Mechanical Parameter

This menu updates the mechanical position parameters. Setting items are as follows:

Top distance

Bottom distance

Side margin

P_REAR sensor position

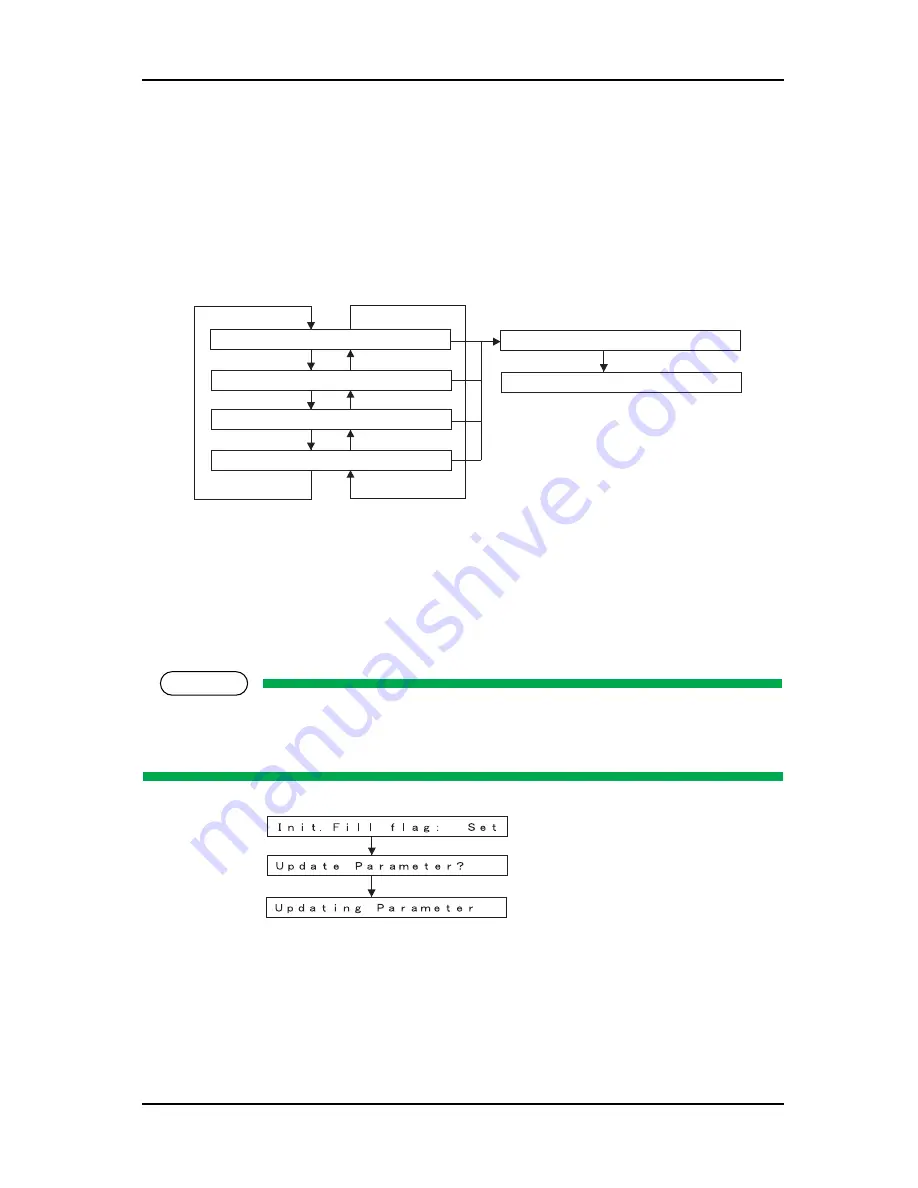
(7)  Ink Parameter

This updates the ink parameter. The available options are as follows.

Set: Ink not charged

Reset: Ink charged

NOTE

Selecting "Set" in the Ink Parameter Update Menu will terminate the self-diagnosis mode. When 
activated in the normal mode, the plotter performs initial charging.
When selecting "Set", be sure to install the cartridge.

Previous menu

Previous menu

㨀㨛㨜ޓ㧸㨑㨚㨓㨠㨔㧦

Next menu

Previous menu

Next menu

Previous menu

Next menu

Next menu

㧮㨛㨠㨠㨛㨙㧦

㧿㨕㨐㨑㧦

㧾㨑㨍㨞㧿㨑㨚㧚㧦

㨁㨜㨐㨍㨠㨑㧼㨍㨞㨍㨙㨑㨠㨑㨞㧫

㨁㨜㨐㨍㨠㨕㨚㨓㧼㨍㨞㨍㨙㨑㨠㨑㨞

When any parameter has been changed

㧟㧚㧜

㧟㧚㧜

㧟㧚㧜

㧝㧣㧚㧜

[Enter]

key

[Enter] key

When any parameter 
has been changed

[Enter] key

[Enter] key

Содержание 7142

Страница 1: ...Xerox 7142 Wide Format Printer User Guide 1 i Xerox 7142 Wide Format Printer Service Manual Version 1 0 June 2007 701P46713...

Страница 2: ...ftware programs which are displayed on the screen such as icons screen displays looks etc Printed in the United States of America XEROX The Document Company and all Xerox product names mentioned in th...

Страница 3: ...registered trademarks or product names of Centronics Data Computer Corporation Windows95 Windows98 Windows98SE Windows NT4 0 Windows2000 Windows XP and MS DOS are registered trademarks or product name...

Страница 4: ...ailure is found in the system or in the materials and workmanship of the product the seller produced However if the cause of failure is uncertain decide the action after due mutual consultation 2 The...

Страница 5: ...both operators of the plotter and maintenance personnel 2 Product Overview Explains the features part names and functions of the plotter 3 Specifications Explains the specifications of the plotter 4...

Страница 6: ...are used in this manual for easier understanding of the information Symbol Meaning Contains important information and useful tips on the operation of the product Indicates useful tips for operating or...

Страница 7: ...ation Labels 1 9 1 5 2 Locations and Types of Operation Labels 1 10 2 Product Overview 2 1 Introduction 2 2 2 2 Features 2 2 2 3 Part Names and Functions 2 3 2 3 1 Front Section 2 4 2 3 2 Rear Section...

Страница 8: ...terface Card NIC Cooling Fan 4 16 4 3 2 Removing Board Bracket 4 18 4 3 3 Replacing Main Board Assembly 4 21 4 3 4 Replacing Power Board Assembly 4 22 4 3 5 Replacing Inlet Assembly 4 24 4 4 Replaceme...

Страница 9: ...g CR Board Assembly 4 64 4 10 2 Replacing Ink Tube 4 65 4 10 3 Replacing CR Tape Wire 4 68 5 Self Diagnosis Mode 5 1 Introduction 5 4 5 2 Preparation 5 4 5 2 1 Preparations on Machine 5 4 5 2 2 Starti...

Страница 10: ...n Menu 5 52 5 8 2 Parameter Update Menu 5 52 5 9 Endurance Running Menu 5 60 5 9 1 CR Motor Endurance Menu 5 62 5 9 2 PF Motor Endurance Menu 5 63 5 9 3 Cutter Endurance Menu 5 64 5 9 4 Head Lock Endu...

Страница 11: ...y Position Adjustment 7 23 7 5 1 Jigs and Tools 7 23 7 5 2 Adjustment Procedure 7 23 7 6 CR Belt Tension Adjustment 7 25 7 7 Head Alignment Adjustment Horizontal Height 7 26 7 8 Head Alignment Adjustm...

Страница 12: ...mission 9 32 9 3 Troubleshooting Without Error Messages 9 33 9 3 1 Initial Operation Problems 9 33 9 3 2 Media Feed Problems 9 42 9 3 3 Printing Problems 9 46 9 3 4 Noise Problems 9 64 9 3 5 Media Cut...

Страница 13: ...2 1 2 Warnings Cautions and Notes 1 2 1 3 Important Safety Instructions 1 3 1 4 Warning Labels 1 6 1 4 1 Handling the Warning Labels 1 6 1 4 2 Locations and Types of Warning Labels 1 7 1 5 Operation...

Страница 14: ...on this manual when installing operating or maintaining the equipment 1 2 Warnings Cautions and Notes Safety terms in this manual and the contents of warning labels attached to the plotter are catego...

Страница 15: ...ing over and causing injury Do not cover the ventilation hole of your plotter with cloth such as a blanket or table cloth Doing so could obstruct ventilation and cause fire Do not place the plotter in...

Страница 16: ...d remove the power cable and wait for 5 minutes or more before taking it out this will discharge the residual electrical charge of the electrolytic capacitor Touching the board before the capacitor di...

Страница 17: ...ure there is sufficient space around the plotter when performing maintenance work Maintenance must be done by more than two person for the following work When disassembling or reassembling the product...

Страница 18: ...contents thoroughly before maintenance operation 1 4 1 Handling the Warning Labels Make sure to note the following when handling the warning labels NOTE Make sure that all warning labels can be recog...

Страница 19: ...ance Manual 1 Safety Instructions 1 7 1 4 2 Locations and Types of Warning Labels The locations of warning labels are shown below Table 1 2 List of Warning Labels No Warning label type 1 T fence handl...

Страница 20: ...01C RJ 900C Maintenance Manual 1 8 2 Front cover open close caution 3 Cutter caution 4 Waste fluid box full caution 5 Ink replacement caution 6 Scroller desorption caution Table 1 2 List of Warning La...

Страница 21: ...s Learn the instructions and the attaching positions before operation 1 5 1 Handling the Operation Labels Make sure to note the following when handling the operation labels NOTE Make sure that all ope...

Страница 22: ...ntenance Manual 1 10 1 5 2 Locations and Types of Operation Labels The locations of operation labels are shown below Table 1 3 List of Operation Labels No Operation label type 1 Roll media setting Ope...

Страница 23: ...ctions 1 11 2 Cut media setting Operation manual Setting Cut Media 3 Cutter replacement Operation manual Replacing Cutter 4 Ink arrangement Operation manual Replacing Ink Cartridges Table 1 3 List of...

Страница 24: ...1 Safety Instructions RJ 901C RJ 900C Maintenance Manual 1 12...

Страница 25: ...view 2 1 Introduction 2 2 2 2 Features 2 2 2 3 Part Names and Functions 2 3 2 3 1 Front Section 2 4 2 3 2 Rear Section 2 5 2 3 3 Operation Panel 2 6 2 4 Plotter Status 2 9 2 4 1 Normal 2 9 2 4 2 Setup...

Страница 26: ...pply system with cartridge separated from print head For this separation you do not have to concern about getting your hands stained with ink while replacing ink For black ink commonly used for line d...

Страница 27: ...ance Manual 2 Product Overview 2 3 2 3 Part Names and Functions Part names and functions are explained below NOTE For the directions described in this document refer to the following figure Rear Upper...

Страница 28: ...of the plotter and other functions 3 Front cover This cover keeps the operator safe from the drive parts of the plotter while it is operating This is opened closed when replacing the cutter or paper i...

Страница 29: ...inlet For inserting the power cable plug 2 Network interface connector Connector to connect a network interface cable 3 USB cable connector Connector to connect USB cable 4 Scroller receiver The scro...

Страница 30: ...on Panel The operation panel is used to set operational conditions display the status of the plotter and set other functions The names and functions of the operation keys and status lamps are explaine...

Страница 31: ...etes 1 file of remaining data During reception analysis Deletes the data that has been already received analyzed and ignores 1 file of data received after that During ink drying time wait status Relea...

Страница 32: ...11 Roll lamp Green On The media loaded in the plotter is set to roll media Off The media loaded in the plotter is set to cut media 12 Sheet lamp Green On The media loaded in the plotter is set to cut...

Страница 33: ...are usually made on the plotter driver or application but can also be made using the operation panel TIP Operation manual 2 4 3 Self Diagnosis Function Indicates that each settings concerning printin...

Страница 34: ...2 Product Overview RJ 901C RJ 900C Maintenance Manual 2 10...

Страница 35: ...1 Introduction 3 2 3 2 Product Specifications 3 2 3 3 Interface Specifications 3 7 3 3 1 USB Interface Specifications 3 7 3 3 2 Network Interface Specifications 3 8 3 4 Options Supplies List 3 8 3 4...

Страница 36: ...outer diameter 2 inch 100 mm or less 150 mm or less 3 inch 100 mm or less 150 mm or less Maximum loadable media length Cut media 1200 mm 47 2 in 1600 mm 63 0 in Roll media 50 m 164 0 ft Maximum loada...

Страница 37: ...C 50F to 35 C 95F 20 to 80 with no condensation Plotting accuracy warranty range 15 C 59F to 28 C 82 4F 40 to 60 with no condensation Rate of change 2 C hour or less 5 hour or less Storage environment...

Страница 38: ...pi 360 720dpi 360 720dpi Plot direction Bidirectional Bidirectional Bidirectional Bidirectional Bidirectional Ink amount Black Ink drying time 30 sec 60 sec 0sec 60sec 0sec 0sec Head height Paper qual...

Страница 39: ...r Ink drying time 60 sec 120 sec 0sec 90sec 0sec Head height Paper quality Color Plot image quality Drawing Drawing Drawing Drawing Photo Plot resolution 720 720dpi 720 720dpi 720 720dpi 720 720dpi 72...

Страница 40: ...nk drying time 90 sec 120 sec 0sec 120sec 0sec Head height Paper quality Color Plot image quality Drawing Drawing Drawing Photo Photo Plot resolution 720 720dpi 720 720dpi 1440 1440dpi 1440 1440dpi 14...

Страница 41: ...ications Interface Universal Serial Bus Specifications Revision 2 0 Universal Serial Bus Device Class Definition for Plotting Devices Version 1 1 Data format NRZI Transmission speed 11Mbps USB1 1 480M...

Страница 42: ...k type Ethernet IEEE802 3 Network I F 10BASE T 100BASE TX Auto switching RJ 45 connector twist pair cable MDI MDI X Auto switching Corresponding protcol TCP IP ARP RARP ICMP Name Model Sales units Opt...

Страница 43: ...es NOTE For more information about the following items contact your local dealer Ink Cartridges Roll Media Cut Media Cleaning Wiper and Cleaning Cloth Replacement cutter blade Problems occurred with d...

Страница 44: ...g and cause fire Keep the plotter away from humid and dusty areas Failure to do so may result in electrical shock or fire 1 Installation Environment Requirements Choose a place for plotter installatio...

Страница 45: ...ently from what you expect Places where sudden changes in temperature and humidity are expected even though the condition is within the range specified Places where direct sunlight or excessive lighti...

Страница 46: ...stand should have enough loading capacity NOTE For the plotter and the optional stand refer to 3 2 Product Specifications p 3 2 Do not use RJ 900C without optional stand b a d c e a 450mm 17 7 inch b...

Страница 47: ...2 8 Removing Scroller Receiver L R 4 14 4 3 Replacement of Board Base Section Components 4 16 4 3 1 Replacing Connector Panel Network Interface Card NIC Cooling Fan 4 16 4 3 2 Removing Board Bracket 4...

Страница 48: ...47 4 7 2 Replacing Pump Cap Assembly 4 52 4 7 3 Replacing Cleaner Head Cleaning Wiper 4 53 4 7 4 Replacing Flushing Box Assembly 4 54 4 8 Replacement of Ink Supply Section Components 4 55 4 8 1 Repla...

Страница 49: ...s connected to the machine Otherwise the machine may be damaged CAUTION The components in the machine can be disassembled only if so instructed in this manual Do not disassemble the frame components a...

Страница 50: ...4 Parts Replacement RJ 901C RJ 900C Maintenance Manual 4 4 Rear Upper Lower Right Front Left...

Страница 51: ...external covers must be removed This section describes the procedure to remove covers Table 4 1 Cover Component List No Part name 1 L side cover 2 Front cover 3 Media guide F 4 R side cover 5 Waste f...

Страница 52: ...sure lever cap retaining screw M4 10 P tight binding black 1pce 3 Remove the waste fluid cassette 4 Remove the R side cover outer screw tapping screw M4 8 S tight cup 2pcs 5 Open the front cover No Pa...

Страница 53: ...de cover rear screw tapping screw M4 12 S tight cup 2pcs 8 Return the pressure lever forward and remove the R side cover to the upper right direction 9 Replace the parts inside the product 10 To reass...

Страница 54: ...ire FFC to the connector of operation panel unit always pull or push the wire perpendicularly to the connector Pulling or pushing the wire slantwise may damage short break the terminals in the connect...

Страница 55: ...screw M4 12 P tight binding black 2pcs 2 Remove the L side cover rear screw tapping screw M4 8 S tight cup 2pcs 3 Remove the L side cover right screw tapping screw M4 8 S tight cup 2pcs No Part name 1...

Страница 56: ...anual 4 10 4 Remove the L side cover roll receiver side screw tapping screw M4 12 P tight binding black 1pcs 5 Remove the L side cover 6 To reassemble the unit reverse the removal procedure No Part na...

Страница 57: ...L Side Cover p 4 9 1 Remove the ink cartridge 2 Remove the I H cover rear screw tapping screw M4 8 S tight cup 2pcs 3 Remove the I H cover side scroller receiver side screw tapping screw M4 12 P tight...

Страница 58: ...2 Remove the front cover by pulling it toward the direction of the arrow shown below NOTE Do not remove the front cover by force It may damage or deform the resin 3 Replace the parts inside the produc...

Страница 59: ...ith spring washer and flat washer M3 5 2pcs 2 Remove the top cover rear side retaining screw pan head screw with spring washer and flat washer M3 5 The number of screws varies depending on models RJ 9...

Страница 60: ...901C 7pcs RJ 900C 11pcs 2 Remove the media guide R2 by pulling it backward 3 Replace the parts inside the product 4 To reassemble the unit reverse the removal procedure 4 2 8 Removing Scroller Receiv...

Страница 61: ...ment 4 15 3 Remove the scroller receiver L retaining screw tapping screw M3 6 S tight cup 2pcs 4 Remove the scroller receiver R 5 To reassemble the unit reverse the removal procedure No Part name 1 Sc...

Страница 62: ...s on it with bare hands Doing so may cause electrostatic discharge and damage the elements 4 3 1 Replacing Connector Panel Network Interface Card NIC Cooling Fan 1 Replacing NIC 1 Remove the bracket n...

Страница 63: ...g Fan 5V 1 Remove the cooling fan 5V connector 2 Remove the fan bracket screw tapping screw M3 6 S cup 2pcs 3 Remove the cooling fan screw pan head screw with spring washer and flat washer M3 20 2pcs...

Страница 64: ...the connectors resulting in a breakdown of the on board elements Table 4 3 Connectors to Main Board Assembly No Connector No of pins Color Connect to Remarks 1 J1 14 White Power board assembly 2 J5 FF...

Страница 65: ...assembly Table 4 3 Connectors to Main Board Assembly Continued No Connector No of pins Color Connect to Remarks J17 J15 J8 J7 J43 J16 J18 J24 J28 J29 J2 J41 J39 J37 J35 J33 J12 J32 J5 J44 J34 J36 J40...

Страница 66: ...lamps four points that retaining the assembly to the frame 5 Remove the board bracket retaining screws tapping screw M3 6 S tight cup 5pcs 6 Slide the board bracket to the right then lift from the fro...

Страница 67: ...arts Media guide R2 4 2 7 Removing Media Guide R2 p 4 14 Connector panel 4 3 1 Replacing Connector Panel Network Interface Card NIC Cooling Fan p 4 16 Board bracket 4 3 2 Removing Board Bracket p 4 18...

Страница 68: ...ling the power board take the side of the board To avoid a short circuit do not place the power board assembly directly on conductive objects NOTE Before replacing the power board assembly remove the...

Страница 69: ...00C Maintenance Manual 4 Parts Replacement 4 23 3 Replace the power board assembly 4 To reassemble the unit reverse the removal procedure No Part name 1 Power board assembly 2 Power board assembly scr...

Страница 70: ...2 7 Removing Media Guide R2 p 4 14 1 Removing Cooling Fan 24V 1 Remove the screw retaining the cooling fan 24V pan head machine screw M 4 30 2pcs 2 Remove the cooling fan 24V cable connector 3 Replac...

Страница 71: ...ng fan assembly sealing surface and cable pulling direction is specified Install it with the sealing surface facing up 2 Replacing Inlet Assembly 1 Remove the connectors from the inlet assembly 2 Remo...

Страница 72: ...bly match the corresponding color connectors 4 4 Replacement of PF Driving Section Components 4 4 1 Replacing PF Motor Assembly NOTE Before replacing parts in the PF motor assembly remove the followin...

Страница 73: ...on the pulley center section of the PF motor assembly 5 Perform adjustments by following the instructions in 7 2 Adjustment Item p 7 3 4 4 2 Replacing PF_ENC Assembly NOTE Before replacing parts in t...

Страница 74: ...2 Adjustment Item p 7 3 4 4 3 Replacing PF_ENC Scale NOTE Before replacing parts in the PF_ENC scale assembly remove the following parts L side cover 4 2 3 Removing L Side Cover p 4 9 1 Remove the EN...

Страница 75: ...ing the PF scale note the following Do not damage or bend the PF scale Do not touch the peripheral surface of the PF scale Make sure that no double sided tape remains on the slit mounting flange 4 Per...

Страница 76: ...Removing L Side Cover p 4 9 1 Detach the CR motor assembly connector from the cable connector 2 Take the CR motor assembly cable off the clamp 3 Release the CR locker by pushing it with your finger t...

Страница 77: ...procedure 9 Perform adjustments by following the instructions in 7 2 Adjustment Item p 7 3 4 5 2 Replacing CR_HP Sensor NOTE Before replacing parts in the CR_HP sensor assembly remove the R side cove...

Страница 78: ...Replace the CR_HP sensor 5 To reassemble the unit reverse the removal procedure 6 Perform adjustments by following the instructions in 7 2 Adjustment Item p 7 3 4 5 3 Replacing Lever Sensor NOTE Befor...

Страница 79: ...val procedure 4 5 4 Replacing T Fence NOTE Before replacing the T fence remove the following covers R side cover 4 2 1 Removing R Side Cover p 4 6 L side cover 4 2 3 Removing L Side Cover p 4 9 1 Remo...

Страница 80: ...not to damage or break the T fence 3 Remove the T fence from the CR rail frame R hook on the R frame side then pull it out toward the direction of the arrow in the diagram 4 Replace the T fence 5 Fol...

Страница 81: ...the fence guide 8 Install the T fence spring to the T fence spring hook on the L frame side 9 Perform adjustments by following the instructions in 7 2 Adjustment Item p 7 3 No Part name 1 T fence 2 C...

Страница 82: ...ff the CR motor assembly pulley on the L frame side 4 Remove the CR driven pulley 5 Remove the CR driven pulley shaft from the CR driven pulley 6 To reassemble the unit reverse the removal procedure N...

Страница 83: ...e Cover p 4 6 4 2 6 Removing Top Cover p 4 13 1 Perform ink discharge operation to discharge ink entirely from the ink paths TIP 5 5 13 Head Cleaning Menu p 5 45 2 Release the CR locker by pushing it...

Страница 84: ...tapping screw M3 8 S tight cup 2pce pan head screw with spring washer and flat washer M3 8 W sems 1 7 Remove the cable cover No Part name 1 Cable cover L screw M3 8 pan head screw with spring washer...

Страница 85: ...al 10 Remove the eight damper assemblies connected to the print head that needs to be replaced with a flat head driver or other tools CAUTION Do not press the transparent film on the damper assembly w...

Страница 86: ...left protruding part then pry out the damper assembly To avoid residual ink leakage place the removed damper on a rag 11 Remove the damper locating material retaining screw pan head screw with spring...

Страница 87: ...of the FFC tape wire differs between head side and the CR board side Make sure to attach the tape wire in the appropriate orientation 15 Replace the print head 16 To reassemble the unit reverse the r...

Страница 88: ...ining screw pan head screw with spring washer and flat washer M3 8 W sems 2pcs 4 Remove the cutter holder assembly from the carriage 5 Replace the parts 6 To reassemble the unit reverse the removal pr...

Страница 89: ...e opening the cutter holder assembly upper tab push out the cutter solenoid assembly from the cutter holder assembly bottom with a flat head driver or other tools then remove it 5 Remove the cutter so...

Страница 90: ...he cutter cap and the CR lock kicker push down the cutter cap and the CR lock kicker together to install them onto the cutter holder Make sure to join the cutter cap and the CR lock kicker Otherwise w...

Страница 91: ...s 1pce 3 Detach the cable from the three clamps 4 Remove the CR_ENC assembly 5 To reassemble the unit reverse the removal procedure 4 Replacing P_EDGE Sensor Assembly 1 Remove the cutter holder assemb...

Страница 92: ...4 Parts Replacement RJ 901C RJ 900C Maintenance Manual 4 46 3 Detach the cable from the three clamps 4 Remove the P_EDGE sensor assembly 5 To reassemble the unit reverse the removal procedure...

Страница 93: ...parameters Waste Ink or Cleaning 6 3 1 Counter Display Menu p 6 3 Before replacing the parts in the pump cap assembly remove the following parts R side cover 4 2 1 Removing R Side Cover p 4 6 Ink hold...

Страница 94: ...mm NOTE If the ink holder is shifted more than necessary the tube may be come off Do not shift the ink holder more than the length specified 3 Remove the cable above the maintenance base 1 from the cl...

Страница 95: ...the clamp 5 Remove the flushing box assembly 4 7 4 Replacing Flushing Box Assembly p 4 54 6 Remove the Lock bracket retaining screw Tapping screw M3x6 S tight cup 1pce No Part name 1 Clamp 1 2 Clamp 2...

Страница 96: ...phase sensor connector 8 Remove the maintenance base 2 retaining screw tapping screw M3 x 6 S tight cup 6pcs No Part name 1 Wiper phase sensor connector 2 Pump unit No Part name 1 Maintenance base 2 r...

Страница 97: ...ste fluid guide retaining screw tapping screw M3 x 6 S tight cup 2pcs 11 To reassemble the unit reverse the removal procedure No Part name 1 Waste fluid guide tube 2 Waste fluid guide No Part name 1 W...

Страница 98: ...p 4 54 Maintenance base assembly 4 7 1 Removing Maintenance Base Assembly p 4 47 Ink holder cover 4 2 4 Removing Ink Holder I H Cover p 4 11 1 Remove the screw retaining the pump cap assembly to the m...

Страница 99: ...replacing the cleaner head remove the following covers R side cover 4 2 1 Removing R Side Cover p 4 6 1 Remove the cleaner head upward with tweezers from the cleaner head holder 2 Replace the cleaner...

Страница 100: ...ner head is located to the observer s right side Insert the cleaner head into the holder to the full depth securely 4 7 4 Replacing Flushing Box Assembly 1 Remove the screw retaining the flushing box...

Страница 101: ...move the following covers R side cover 4 2 1 Removing R Side Cover p 4 6 I H cover 4 2 4 Removing Ink Holder I H Cover p 4 11 4 8 1 Replacing Ink Holder I H Assembly 1 Perform ink discharge operation...

Страница 102: ...ping screw M3 10 S cup 2pcs 6 Replace the I H assembly NOTE The components of the different color I H assembly are compatible each other except the following parts Incompatible parts Ink sensor assemb...

Страница 103: ...ink ID sensor assembly cable from the hooks 2 pieces on the back of the I H assembly 2 Remove the screw retaining the ink ID sensor to the IC holder mounting plate tapping screw M3 6 S cup 2 3 Remove...

Страница 104: ...and slide it sideways see the directions of the arrows then remove the cartridge frame assembly 5 Remove the screw retaining the ink NOT sensor to the I H assembly M2 8 S tight binding 1pce No Part n...

Страница 105: ...dure When reassembling the unit note the following sensor fastening torque Ink NOT sensor Slight overtorque may damage the parts Gradually torque the sensor to avoid tightening it too much Ink END sen...

Страница 106: ...ws 4 2 1 Removing R Side Cover p 4 6 4 2 3 Removing L Side Cover p 4 9 1 Remove the screw retaining the sensor cover L R to the frame tapping screw M3 6 S tight cup 1pce per cover The diagram below sh...

Страница 107: ...4 61 3 Detach the cable from the cover L R sensor cable retaining clamp The diagram below shows the cover R sensor 4 Replace the cover sensor assembly 5 To reassemble the unit reverse the removal pro...

Страница 108: ...head machine screw M4 5 2pcs then remove the fan duct 4 Remove the suction fan assembly retaining screw pan head screw with spring washer and flat washer M4 40 polished 1 pan head machine screw M4 8...

Страница 109: ...main board assembly 2 Take the P_REAR sensor assembly cable off the clamp 3 Remove the screw retaining the PE sensor plate to the frame tapping screw M3 6 S tight cup 1pce 4 Remove the screw retainin...

Страница 110: ...s to the CR board assembly connector always pull or push the cables perpendicularly to the connector Pulling or pushing the wire slantwise may damage short break the terminals in the connectors result...

Страница 111: ...unit reverse the removal procedure 4 10 2 Replacing Ink Tube NOTE Before replacing the ink tube remove the following covers R side cover 4 2 1 Removing R Side Cover p 4 6 I H cover 4 2 4 Removing Ink...

Страница 112: ...rge ink entirely from the ink paths 2 Remove the tube clamps 3 points 3 Remove the tube film guide retainers 3 points 4 Remove the CR board cover Up to step 4 in 4 6 1 Replacing Print Head p 4 37 5 Re...

Страница 113: ...Remove the bearer mounting material and the bearer fixing material 2 Replacing Ink Tube 1 Loosen the joint screw M7 connecting the ink tube and the F branch No Part name 1 Bearer mounting material sc...

Страница 114: ...edure 4 10 3 Replacing CR Tape Wire NOTE Before replacing the CR tape wire remove the following covers R side cover 4 2 1 Removing R Side Cover p 4 6 L side cover 4 2 3 Removing L Side Cover p 4 9 I H...

Страница 115: ...ape wires off the clamps nearby the main board then pull them out through the R frame cable inlet 3 Take the CR tape wire off the clamp one point nearby the R frame cable inlet I H assembly side No Pa...

Страница 116: ...lder retaining screw pan head screw with spring washer and flat washer M3 6 2pcs then remove the bearer holder 5 Remove the tube holder 1 and the tube holder 2 No Part name 1 Tube holder 2 2 Bearer ho...

Страница 117: ...the unit reverse the removal procedure When connecting the CR cable note the following The CR cable has three layers Make sure to match the corresponding connector numbers Remove or insert the CR cab...

Страница 118: ...4 Parts Replacement RJ 901C RJ 900C Maintenance Manual 4 72...

Страница 119: ...s Items in Self Diagnosis Menu 5 8 5 4 Inspection Menu 5 9 5 4 1 Memory Size Menu 5 10 5 4 2 Version Menu 5 11 5 4 3 Operation Panel Menu 5 12 5 4 4 Sensor Menu 5 13 5 4 5 Encoder Menu 5 16 5 4 6 Fan...

Страница 120: ...tion Menu 5 46 5 5 15 Feed Pitch Check Menu 5 46 5 5 16 Solid Print Menu 5 48 5 6 Cleaning Menu 5 49 5 7 Sample Printing Menu 5 50 5 8 Parameter Menu 5 51 5 8 1 Parameter Initialization Menu 5 52 5 8...

Страница 121: ...RJ 901C RJ 900C Maintenance Manual 5 Self Diagnosis Mode 5 3 5 9 9 Media Feed Menu 5 69...

Страница 122: ...parations on Machine Before starting up the self diagnosis function perform the following preparations 1 Setting Printing Media Set a roll media for adjustment NOTE In the self diagnosis menu display...

Страница 123: ...on mode or the self diagnosis menu mode press Power key to turn the plotter off 2 While holding down Backward feed key Forward feed key and Printing mode key in the operation panel simultaneously pres...

Страница 124: ...ey or Back key in the operation panel to select the menu Then press Enter key to confirm the mode to be diagnosed The selected item is accepted If the item has a sub menu the sub menu is displayed 2 W...

Страница 125: ...ntenance Manual 5 Self Diagnosis Mode 5 7 4 To quit the diagnosis press Cancel key in the operation panel The system returns to an upper hierarchy of the diagnosis menu 5 To exit the self diagnosis me...

Страница 126: ...erforms sample printing necessary for adjustment 5 7 Sample Printing Menu p 5 50 Parameter Menu Configures various adjustment parameters 5 8 Parameter Menu p 5 51 Endurance Running Menu Performs endur...

Страница 127: ...unctions of the operation panel keys LCD and LED 5 4 3 Operation Panel Menu p 5 12 Sensor Displays the status of the following sensors CR_ORG sensor Cover sensor Lever sensor Head slide sensor Waste f...

Страница 128: ...u Previous menu Next menu Previous menu Next menu Previous menu Previous menu Previous menu Next menu Next menu Next menu Next menu Previous menu Previous menu Next menu Next menu Ram Capacity Menu Ve...

Страница 129: ...of DIP switches of main board assembly Revision of main board assembly TIP Settings for the DIP switch on the main board assembly are displayed as follows ON 0 OFF 1 Switch No 1 LSB Switch No 2 MSB P...

Страница 130: ...s Cancel key twice 2 LCD Check The entire LCD screen is filled in black The function to check for any missing dots are available 3 LED Check The following LEDs light up in order The LCD displays the n...

Страница 131: ...p 4 31 2 Cover sensor Open Close 3 Lever sensor Up Down 4 5 3 Replacing Lever Sensor p 4 32 4 Head slide Low High 5 Waste fluid box sensor ON OFF 6 P_EDGE sensor 0 to 255 7 11 1 P_EDGE Sensor Sensitiv...

Страница 132: ...sor Waste fluid box sensor For the ink ID sensor installed ink cartridge type is displayed using the following ID numbers 0 Cleaning liquid or shipping liquid 1 Dye based ink CMY 2 Dye based ink K 3 U...

Страница 133: ...nsor Y Ink NOT Sensor Ink END Sensor Pump Phase Next menu Next menu Next menu Next menu Next menu Next menu Next menu Next menu Next menu Next menu Next menu Next menu Next menu Next menu Next menu Ne...

Страница 134: ...hexadecimal number 5 4 6 Fan Menu This menu is used to check if the fans operate normally by turning them ON and OFF If this operation is selected the fans operate as follows Suction fan Turns to ON...

Страница 135: ...owing components Waste fluid box capacity Number of CR motor activation cycles Number of PF motor activation cycles Number of printed copies Number of cleaning cycles Pump count number of pump wheel c...

Страница 136: ...dot Head M1 Fire Unit Mdot Head M2 Fire Unit Mdot Head Y1 Fire Unit Mdot Head Y2 Fire Unit Mdot Frequency of cutting media Frequency of the cutter solenoid moving down Frequency of the lock solenoid m...

Страница 137: ...de CPU error The serious error history menu indicates the history up to 32 3 Error Initialization This menu is used to initialize the serious error history 5 4 8 Head Waveform Menu This menu is used t...

Страница 138: ...enu Previous menu Next menu Next menu Next menu Previous menu Next menu Previous menu Next menu Previous menu Previous menu Next menu Next menu Previous menu Next menu Previous menu Previous menu Prev...

Страница 139: ...stment must be performed as necessary 5 5 5 Head Slant Check Menu 2 p 5 29 CW adjustment Prints out a printing to adjust uni direction CW direction printing between nozzles Low 1 PG Low 3 peak wavefor...

Страница 140: ...ents Reference Previous menu Next menu Previous menu Next menu Previous menu Previous menu Previous menu Next menu Next menu Next menu Next menu Previous menu Next menu Previous menu Next menu Next me...

Страница 141: ...High 2 Previous menu Previous menu Previous menu Previous menu Previous menu Previous menu Previous menu Previous menu Previous menu Previous menu Previous menu Previous menu Next menu Next menu Next...

Страница 142: ...ion at left edge of the media The plotter determines the media setting reference position during first detection of media left edge Therefore the media that is not set correctly may cause errors as be...

Страница 143: ...to the rank input selection menu 2 When Input with QR Code is Selected Check that the operation panel displays Input QR code Enter the QR code from QR code reader 3 When Input with Operation Panel is...

Страница 144: ...s necessary 2 After media is set the machine prints out head nozzle check patterns in the following modes 1 pass unidirectional PF 360 dpi CR 360 dpi 3 Check the printed head nozzle check patterns for...

Страница 145: ...order of A to H 4 If any abnormal conditions are found in the ink discharge status of the head nozzles perform cleaning TIP 5 5 15 Feed Pitch Check Menu p 5 46 5 After cleaning make the machine print...

Страница 146: ...a is set the machine prints out head slant check patterns in the following modes 1 pass Uni D PF 360 dpi CR 360 dpi 3 Check the printed head slant check patterns Checking items are as follows Head sla...

Страница 147: ...a sample printing to check for head slant in the vertical direction To perform head slant check follow the steps below 1 Set media as necessary 2 After media is set the machine prints out head slant...

Страница 148: ...he vertical slant adjusting tab to the right E Move the vertical slant adjusting tab to the left 4 If any head slant is found perform mechanical adjustment TIP 7 8 Head Alignment Adjustment Slant p 7...

Страница 149: ...ead height PG 1 value using 3 peak waveform CW adjustment Low 2 CW adjustment for low head height PG 1 value using 6 peak waveform CW adjustment High 1 CW adjustment for high head height PG 2 value us...

Страница 150: ...5 32 3 Check the printed CW adjustment check patterns for the following points The following shows a case for CW adjustment Low 1 Print the patterns in the order of A B A C A D A E A F A G A H A 1 1...

Страница 151: ...he performed adjustment items 1 1 CW adjustment Low 1 1 2 CW adjustment Low 2 2 1 CW adjustment High 1 2 2 CW adjustment High 2 For CW adjustment Low 2 High 1 and High 2 perform adjustment using the s...

Страница 152: ...ase for CW adjustment Low 1 Media set Head Gap change Finish media initialization Finish printing If media is not set If the head height alignment does not meet the specification of the adjustment ite...

Страница 153: ...ust the setting value so that performance of each row becomes average Adjustment items are shown in the tables below The actual procedure is as follows 1 Set media as necessary 2 After media is set th...

Страница 154: ...ow 2 High 1 and High 2 perform adjustment using the same procedure Detail on B is as follows Make an adjustment so that the size of the gap A below is smaller than the half size of the dot 4 If any ab...

Страница 155: ...ameters are changed make sure to update the parameters Next menu Next menu Media set Finish printing If media is not set Ex Bi D Adjustment Low1 Adjustment printing Previous menu Previous menu Enter k...

Страница 156: ...for low head height PG 1 value using 3 peak waveform CCW adjustment Low 2 CCW adjustment for low head height PG 1 value using 6 peak waveform CCW adjustment High 1 CCW adjustment for high head height...

Страница 157: ...rection B Adjust the setting value so that the printed dots are aligned at this connecting point C The number shows the performed adjustment items 1 3 CCW adjustment Low 1 1 4 CCW adjustment Low 2 2 3...

Страница 158: ...umed center position A Assumed Center Position B Media set Head Gap change Finish media initialization Finish printing If media is not set If the head height alignment does not meet the specification...

Страница 159: ...esolution parameter in the firmware The actual procedure is as follows 1 Set media as necessary 2 After media is set the machine prints out band feed correction patterns in the following modes Length...

Страница 160: ...ment patterns and cuts the media in the following modes Black 1 pass unidirectional 360 dpi 3 Check the printed top bottom adjustment patterns for the following points Top distance Bottom distance Sid...

Страница 161: ...gins follow the steps below 1 Set media as necessary NOTE For P_REAR sensor position adjustment cut media is used Set A3 or A4 cut sheet in the longitudinal direction P_REAR sensor position adjustment...

Страница 162: ...test printings Nozzle check Prints head nozzle check patterns Nozzle check steps Prints head nozzle check patterns of lines only Adjustment parameters Prints setting values for each adjustment item Er...

Страница 163: ...ion panel to determine the Head Cleaning Menu 2 Remove all ink cartridges 3 Press Enter key in the operation panel to discharge ink 4 After ink is discharged install the head cleaning jig 5 Press Ente...

Страница 164: ...In this menu a function to confirm media feed amount for the one band is available No adjustment can be made on this menu To check the feed pitch follow the steps below 1 Set media as necessary 2 Sele...

Страница 165: ...nance Manual 5 Self Diagnosis Mode 5 47 4 Pattern 1 is printed as shown below A A Media feed direction 1 inch Previous menu Previous menu Previous menu Next menu Next menu Next menu Finish Printing or...

Страница 166: ...d B Previous menu Previous menu Next menu Previous menu Previous menu Next menu Next menu Next menu Press Setting value or Setting value key to specify color to check Press Setting value or Setting va...

Страница 167: ...ormal Performs normal cleaning Powerful Executes main suction part of normal cleaning with 10 times as many steps Initial ink charge Performs initial ink charge Economy ink charge Performs economy ink...

Страница 168: ...iagnosis Items in Sample Printing Menu Diagnosis item Contents Nozzle check Prints head nozzle check patterns Nozzle check Prints head nozzle step check patterns Adjustment variables Prints out the se...

Страница 169: ...owing items Table 5 14 Diagnosis Items in Parameter Menu Diagnosis item Contents Reference Update Updates the adjustment parameters 5 8 2 Parameter Update Menu p 5 52 Initialization Initializes the ad...

Страница 170: ...on of all items 5 8 2 Parameter Update Menu This menu updates the adjustment parameters The parameters that can be updated through this menu are as follows Head rank CW adjustment Printing position al...

Страница 171: ...ameter update menu High1 CCW Adjustment parameter update menu High2 CW Adjustment parameter update menu High2 CW Adjustment parameter update menu Low2 Print Position Adjustmet parameter update menu Pa...

Страница 172: ...parameter update menu Ink ID Mask parameter update menu Serial Number update menu Dot Control parameter update menu Enter key Cancel key Enter key Cancel key Enter key Cancel key Enter key Cancel key...

Страница 173: ...nting position alignment parameters Previous menu Previous menu Previous menu Previous menu Previous menu Previous menu Previous menu Previous menu Next menu Next menu Next menu Next menu Next menu Ne...

Страница 174: ...parameters 5 Media Feed Distance This updates the media feed distance parameters Previous menu If any parameter has been changed Previous menu Next menu Previous menu Next menu Previous menu Next men...

Страница 175: ...ble options are as follows Set Ink not charged Reset Ink charged NOTE Selecting Set in the Ink Parameter Update Menu will terminate the self diagnosis mode When activated in the normal mode the plotte...

Страница 176: ...he ink ID K ink Pigment CMY ink Dye Reset Cancels the ink ID mask 9 Serial Number Entry This is for entering the serial number When any parameter has been changed Enter key Enter key Previous menu Nex...

Страница 177: ...for pigments available CMY ink 6 peak waveform for dyes available VSD4d Bk ink the first half of the 6 peak waveform for pigments and micro vibration available CMY ink 6 peak waveform for dyes and mi...

Страница 178: ...PF Motor Endurance Menu p 5 63 Cutter Performs media cut 5 9 3 Cutter Endurance Menu p 5 64 Head lock Performs head lock operation lock free continuous 5 9 4 Head Lock Endurance Menu p 5 65 Pump Drive...

Страница 179: ...mp Motor Endurance Menu General Endurance Menu Endurance Running Check Menu Next menu Previous menu Next menu Previous menu Next menu Previous menu Next menu Previous menu Next menu Previous menu Next...

Страница 180: ...ndurance running cycles is set to 1 the carriage continuously repeats endurance running until cancel input is given from the operation panel The maximum counter value for endurance running cycles is 9...

Страница 181: ...ning until cancel input is given from the operation panel The maximum counter value for endurance running cycles is 99999999 up to 8 digit number If the number of cycles exceeds the maximum value the...

Страница 182: ...age continuously repeats endurance running until cancel input is given from the operation panel The minimum configurable feeding amount is 50mm The maximum counter value for endurance running cycles i...

Страница 183: ...number of endurance running cycles is set to 1 the carriage continuously repeat endurance running until cancel input is given from the operation panel The maximum counter value for endurance running c...

Страница 184: ...he maximum counter value for endurance running cycles is 99999999 up to 8 digit number If the number of cycles exceeds the maximum value the counter is reset to 0 Table 5 20 Set Items in Pump Motor As...

Страница 185: ...peration can be performed according to the value set The available settings are shown below TIP If the number of endurance running cycles is set to 1 the carriage continuously repeats endurance runnin...

Страница 186: ...oking until cancel input is given from the operation panel The maximum counter value for endurance running cycles is 99999999 up to 8 digit number If the number of cycles exceeds the maximum value the...

Страница 187: ...can feed media into the plotter frontward or backward The mechanical initialization should be done if it is not performed yet Previous menu Previous menu Previous menu Previous menu Previous menu Prev...

Страница 188: ...5 Self Diagnosis Mode RJ 901C RJ 900C Maintenance Manual 5 70...

Страница 189: ...6 2 Operations in Maintenance Mode2 6 2 6 2 1 Starting Up the Maintenance Mode2 6 2 6 2 2 Operating Maintenance Mode2 6 2 6 3 Maintenance Menu 6 3 6 3 1 Counter Display Menu 6 3 6 3 2 Counter Initiali...

Страница 190: ...ntenance mode2 as well as provides the list of available diagnosis items 6 2 1 Starting Up the Maintenance Mode2 To use the maintenance mode2 you must first call up the maintenance menu on the operati...

Страница 191: ...ateMenu Updates the life counter 6 3 3 Counter Update Menu p 6 7 Counter Print Prints the life counter values 6 3 4 Counter Print Menu p 6 9 MediaFeed Feeds media into the plotter frontward or backwar...

Страница 192: ...counter of the CR motor PF Motor Displays the life counter of the PF motor PUMP Displays the life counter of the pump unit HEAD K1 K2 Displays the life counter of the head nozzle K HEAD C1 C2 Displays...

Страница 193: ...Next menu Previous menu Next menu Previous menu Next menu Next menu Ink consumption K counter Ink consumption C counter Ink consumption M counter Ink consumption Y counter Life counter of the cutter...

Страница 194: ...mask Waste Ink Initializes the waste ink amount counter Head Error Releases serious errors caused by head overcurrent Ink Initializes the ink amount counter All Initializes the life counter NVRAM Ini...

Страница 195: ...enu are as follows Previous menu Previous menu Next menu Previous menu Next menu Previous menu Next menu Previous menu Next menu Previous menu Next menu Previous menu Next menu Previous menu Next menu...

Страница 196: ...dates the CR motor life counter values PF Motor Updates the PF motor life counter values Pump Updates the pump unit life counter values Head K1 K2 Updates the head unit K life counter Head C1 C2 Updat...

Страница 197: ...dia Feed Menu This menu feeds media into the plotter frontward or backward The mechanical initialization should be performed if it is not performed yet Previous menu Next menu Previous menu Next menu...

Страница 198: ...6 Maintenance Mode2 RJ 901C RJ 900C Maintenance Manual 6 10...

Страница 199: ...are Installation 7 14 7 3 6 Sending Parameters 7 18 7 4 PF Speed Reduction Belt Tension Adjustment 7 20 7 4 1 Jigs and Tools 7 20 7 4 2 Adjustment Procedure 7 20 7 5 PF Encoder Assembly Position Adjus...

Страница 200: ...nce Manual 7 2 7 10 PG Height Adjustment 7 31 7 10 1 Jigs and Tools 7 31 7 10 2 Adjustment Procedure 7 31 7 11 Media Sensor Sensitivity Adjustment 7 32 7 11 1 P_EDGE Sensor Sensitivity Adjustment 7 33...

Страница 201: ...4 Jigs and Tools p 10 7 7 2 Adjustment Item This section describes the adjustment items required in part replacement procedures When you adjust or replace any of the maintenance parts listed in Table...

Страница 202: ...HeadNozzle Check Menu p 5 26 3 Head slant check horizontal 5 5 4 Head Slant Check Menu 1 p 5 28 4 Head slant check vertical 5 5 5 Head Slant Check Menu 2 p 5 29 5 Head slant adjustment horizontal 7 7...

Страница 203: ...adjustment 5 5 10 Top and Bottom Adjustment Menu p 5 42 8 P_REAR sensor position adjustment 5 5 11 P_REAR Sensor Position Adjustment Menu p 5 43 9 Media sensor sensitivity adjustment 7 11 Media Sensor...

Страница 204: ...Menu p 5 44 P_EDGE sensor assembly 1 Media sensor sensitivity adjustment 7 11 Media Sensor Sensitivity Adjustment p 7 33 2 Top bottom adjustment 5 5 10 Top and Bottom Adjustment Menu p 5 42 P_REAR se...

Страница 205: ...12 Test Printing Menu p 5 44 Sub platen assembly 1 Cutter endurance operation check 5 9 7 General Endurance Menu p 5 68 T fence 1 CR encoder inspection 5 4 5 Encoder Menu p 5 16 2 Repeatability adjust...

Страница 206: ...CR Belt Tension Adjustment p 7 25 2 CR encoder inspection 5 4 5 Encoder Menu p 5 16 3 Cutter holder assembly mounting position adjustment 7 8 Head Alignment Adjustment Slant p 7 28 4 P_EDGE sensor adj...

Страница 207: ...Head slant check vertical 5 5 5 Head Slant Check Menu 2 p 5 29 12 Head slant adjustment horizontal 7 7 Head Alignment Adjustment Horizont al Height p 7 26 13 Head slant adjustment vertical 7 7 Head Al...

Страница 208: ...on the main board assembly stores various parameters for the system operation The available backup parameters are as follows Panel setting parameters Mechanism adjustment parameters Main board unique...

Страница 209: ...de MUTOH Maintenance Engineer Assistant to users because the software enables upload of plotter internal parameters to PCs CAUTION For the IP address use the default value as much as possible If you w...

Страница 210: ...Right click Local Area Connection and select Properties 5 Click OK to finish the setting 3 Double click Internet Protocol TCP IP 4 In IP address input any value of 192 168 1 1 to 192 168 1 252 or 192...

Страница 211: ...d PC via hub use a straight cable NOTE If waiting for command is not displayed follow the steps below If IP address that is not default is displayed on the board releasing Back key will display IP192...

Страница 212: ...the PC from the existing main board assembly To download backup parameters follow the steps below 1 Click Parameter Receive 2 In the Parameter receive check window click OK Installation will start 3...

Страница 213: ...the main board assembly Updating the firmware CAUTION Installing wrong firmware may disable plotter startup In this case reinstallation with special jig is required Pay careful attention to the trans...

Страница 214: ...llation to the plotter is not completed Never power off the plotter during the operation 2 Select a file to be transferred from the folder where the firmware is saved and click Open 3 In the Firm inst...

Страница 215: ...TION While the LCD display is in the Erasing to Comparing status the power key is disabled In this situation never disconnect the plug of the plotter Doing so may disable plotter startup which will re...

Страница 216: ...ubleshooting instructions To stop the buzzer press any key except for the power key once Pressing the key once again will return the LCD display to waiting for command and only the Power LED on 3 If t...

Страница 217: ...3 4 Receiving Parameters p 7 14 Firmware installation 7 3 5 Firmware Installation p 7 15 1 Click Parameter Send 2 When the Select of send parameter file window opens select the parameter file to be tr...

Страница 218: ...d completed window is displayed writing to plotter also finishes If writing to plotter finishes successfully the LCD displays the following Transfer complete Buzzer sounds three times and only Power L...

Страница 219: ...tension Using PF belt tension adjustment jig adjust the PF encoder position and the PF belt tension 7 4 1 Jigs and Tools The jigs and tools required for PF speed reduction belt tension adjustment are...

Страница 220: ...f PF belt tension adjusting jig indicates 40 0 0 5N and then tighten the screw CAUTION During the operation note the following points The PF speed reduction belt tension specification is 40 0 2 0N Sin...

Страница 221: ...r assembly After replacing the PF encoder adjust the PF encoder position with a jig 7 5 1 Jigs and Tools The jigs and tools required for PF encoder assembly position adjustment are as follows Caliper...

Страница 222: ...the PF encoder assembly 4 Turn the scale around to check that the scale does not swing toward the speed reduction pulley from the center of the encoder gap If it swings adjust the PF encoder assembly...

Страница 223: ...ont of the plotter of the graduation alignment pointer with the center line of graduations on the driven pulley base CAUTION To align the graduation alignment pointer with the center line of driven pu...

Страница 224: ...g the steps below NOTE Before starting adjustment remove the following parts CR board cover 4 6 1 Replacing Print Head p 4 37 Cable cover R 4 6 1 Replacing Print Head p 4 37 1 Start the system in self...

Страница 225: ...RJ 901C RJ 900C Maintenance Manual 7 Adjustment 7 27 3 Move the head adjusting cam lever to adjust head slant No Part name 1 Head adjusting cam 2 Head mounting plate 1 2...

Страница 226: ...the following parts CR board cover 4 6 1 Replacing Print Head p 4 37 Cable cover R 4 6 1 Replacing Print Head p 4 37 1 Start the system in self diagnosis function mode and print the adjustment pattern...

Страница 227: ...r height 7 9 1 Jigs and Tools The following jigs and tools are required for cutter holder height adjustment Cutter holder height adjusting jig adjust to 5mm rear of slot 7 9 2 Adjustment Procedure To...

Страница 228: ...w driver by inserting it through the gap in I H assembly 2 Attach the cutter positioning jig near right side of the retaining screw of media guide L NOTE Before starting work tentatively tighten the c...

Страница 229: ...ition the cutter holder so it is 5 2mm above the platen While making sure that the part indicated by a circle in the figure is sustained fasten the tentatively tightened screw fully and determine the...

Страница 230: ...ools are required for carriage height distance from the platen check PG height checking step gauge TIP 10 4 Jigs and Tools p 10 7 7 10 2 Adjustment Procedure Follow the steps below to adjust the plate...

Страница 231: ...ty of media sensor P_EDGE sensor P_REAR sensor NOTE When you adjust the sensor sensitivity note the following Any ambient light such as sun light or room light does not interfere with the sensor Hold...

Страница 232: ...Procedure To adjust the P_EDGE sensor follow the steps below 1 Sets the standard media 2 Start up the self diagnosis function TIP 5 2 2 Starting Up p 5 4 3 Select Check Test from the self diagnosis m...

Страница 233: ...wise Sensitivity decreases Trimmer R369 Rough adjustment Trimmer R372 Fine adjustment 10 Remove the standard media then move the paper edge sensor to the position 20 mm apart from the media set positi...

Страница 234: ...or follow the steps below 1 Sets the standard media 2 Start up the self diagnosis function TIP 5 2 2 Starting Up p 5 4 3 Select Check Test from the self diagnosis menu 4 Select Test Sensor from the in...

Страница 235: ...ustment 7 37 8 Remove the standard media 9 Check that the value displayed in the operation panel is 210 230 10 Remove the standard media 11 Check that the value displayed in the operation panel is 40...

Страница 236: ...7 Adjustment RJ 901C RJ 900C Maintenance Manual 7 38...

Страница 237: ...01C RJ 900C Maintenance Manual 8 Maintenance 8 1 8 Maintenance 8 1 Introduction 8 2 8 2 Periodical Services 8 3 8 3 Part Life Information 8 4 8 4 Lubrication Bonding 8 6 8 5 Transportation of Plotter...

Страница 238: ...electric shock or damage to the electric circuit Unplug the cables connected to the plotter Failure to do so could result in damage to the plotter CAUTION Make sure there is sufficient space around t...

Страница 239: ...ming Check point Action Media guide L Sub platen front surface Several times per year Media dust accumulation Foreign objects Damages Clean it NOTE If ink deposits are present remove them with a dampe...

Страница 240: ...nt parts References Cutter Approx 2 000 sheets Not displayed By pressing Enter key when replacing thecounter to the new one Cutter replaced by users Waste fluid tank Warning at 900 000 times of counti...

Страница 241: ...ble At the next warning CR cable besides above 4 5 1 CR Motor Assembly p 4 30 4 5 5 Replacing CR Driven Pulley p 4 36 4 10 2 Replacing Ink Tube p 4 65 4 10 3 Replacing CR Tape Wire p 4 68 PF motor Cou...

Страница 242: ...EM 60L Front cover support pin L Apply to the top cover contacting surface Dow Corning Asia Ltd EM 60L CR section CAT5004 00 Cursor guide Apply to the front surface Mitsubishi Super multi dia tetrat...

Страница 243: ...power OFF 2 Verify that the plotter is in normal state 3 Remove all ink cartridges 4 Turn off the plotter 5 The operation panel shows Transport Mode and the plotter begins ink discharging operation 6...

Страница 244: ...8 Maintenance RJ 901C RJ 900C Maintenance Manual 8 8...

Страница 245: ...mmand Errors 9 17 9 2 5 Errors Requiring Reboot 9 18 9 2 6 Error Messages During File Transmission 9 32 9 3 Troubleshooting Without Error Messages 9 33 9 3 1 Initial Operation Problems 9 33 9 3 2 Medi...

Страница 246: ...9 2 Troubleshooting with Error Messages This section describes the messages displayed in normal operation and upon an error occurrence as well as how to correct the error The available messages are as...

Страница 247: ...RJ 901C RJ 900C Maintenance Manual 9 Troubleshooting 9 3 9 2 1 Operation Status This section describes the message contents check items and recovery actions for normal operation...

Страница 248: ...ctly connect cover sensor assembly cables to main board assembly connector J117 4 3 3 Replacing Main Board Assembly p 4 21 3 Does pressure lever move smoothly Lubricate pressure cam 8 4 Lubrication Bo...

Страница 249: ...ingCR Board Assembly p 4 64 2 Is P_REAR sensor assembly under media guide R connected correctly Securely connect it to main board assembly connector J114 4 3 3 Replacing Main Board Assembly p 4 21 3 C...

Страница 250: ...n failed 1 Is P_EDGE sensor assembly cable at head connected correctly Securely connect it to CR board assembly connector J211 4 10 1 ReplacingCR Board Assembly p 4 64 2 Is P_REAR sensor under media g...

Страница 251: ...sed by user s inappropriate media setting instruct correct media setting procedure 2 Is suction fan judged as normal when checked through Test Fan of self diagnosis function Check connection of follow...

Страница 252: ...board assembly connector J132 If LCD displays as chattering sensor may be damaged Replace lever sensor assembly 4 3 3 Replacing Main Board Assembly p 4 21 4 5 3 Replacing Lever Sensor p 4 32 4 Is P_RE...

Страница 253: ...eck item No 5 4 When setting cutter after removing cutter spring does cutter lower to lower end by its own weight When it lowers Cutter spring may be defective Replace cutter spring referring to explo...

Страница 254: ...3 ReplacingCR Tape Wire p 4 68 b Replace solenoid assembly with new one Check by connecting connectors directly If solenoid goes up down replace solenoid assembly 4 6 2 Replacing Cutter Holder Assembl...

Страница 255: ...or J115 K1 Connector J116 K2 Connector J120 C Connector J121 M Connector J122 Y 4 3 3 Replacing Main Board Assembly p 4 21 3 For the ink color that is displayed as Ink Near End or Ink End switch ink s...

Страница 256: ...econnect following connectors Connector J115 K1 Connector J116 K2 Connector J120 C Connector J121 M Connector J122 Y 4 3 3 Replacing Main Board Assembly p 4 21 4 For the ink color that is displayed as...

Страница 257: ...erates normally from Ink Not of self diagnosis function If detection does not operate normally replace following parts Ink sensor assembly Main board assembly Ink ID sensor assembly 4 8 1 Replacing In...

Страница 258: ...n machine OFF Turn it ON again and check if the same message appears If the message appears Refer to the action in check item No 2 2 Waste ink in waste fluid box reaches full level Replace waste fluid...

Страница 259: ...on at the same time The error can be cancelled by removing the error causes After that the machine will restart its operation 10 Out of memory DIMM 64MB Memory is insufficient for data analysis printi...

Страница 260: ...e main board assembly 4 3 3 Replacing Main Board Assembly p 4 21 2 I 15 2 error command Overrun error 3 I 15 3 error command Online parity error 4 I 05 error command Sum check error 5 I 07 error comma...

Страница 261: ...and being analyzed is not defined in applicable command mode 1 Attempt communication using PC and cable on hand 2 Is there any error statement in printing data 3 Does the symptom remain the same even...

Страница 262: ...grams When any of the above conditions occurs the machine follows the steps shown below before stopping its operation 1 Turn OFF the driving system power automatically 2 Flash all lamps in the operati...

Страница 263: ...error Abnormal condition in command border Or TLB exception in data load or command fetch 4 E 016 error CPU Err 03 Data border exception TLB exception store error Abnormal condition in data border Or...

Страница 264: ...mber of the plotter 2 Main board assembly may be defective Contact our customer support center Replace main board assembly 4 3 3 Replacing Main Board Assembly p 4 21 9 E 016 error CPU Err 08 System ca...

Страница 265: ...customer support center Replace main board assembly 4 3 3 Replacing Main Board Assembly p 4 21 14 E 016 error CPU Err 13 Trap exception error Trap occurs 15 E 016 error CPU Err 15 Floating point excep...

Страница 266: ...rror NVRAM Abnormal condition in NVRAM in main board assembly that memorizes product settings Main board assembly may be defective Replace main board assembly 4 3 3 Replacing Main Board Assembly p 4 2...

Страница 267: ...s to 50 or more from Life PF motor of self diagnosis function and check if X motor error occurs 3 Check Encoder PF from Test Encoder of self diagnosis function 4 Check if Main Power Board normally sup...

Страница 268: ...nction 4 Check if Main Power Board normally supplies DC24V 5 PF motor assembly may be defective 6 Main board assembly may be defective Check connection of following main board assembly connectors PF m...

Страница 269: ...gnosis function 4 Check if Main Power Board normally supplies DC24V 5 PF motor assembly may be defective 6 Main board assembly may be defective Check connection of following main board assembly connec...

Страница 270: ...ly supplies DC24V 5 PF motor assembly may be defective 6 Main board assembly may be defective Check connection of following main board assembly connectors PF motor cable assembly connector J107 PF_ENC...

Страница 271: ...50 or more from Life CR motor of self diagnosis function and check if Y motor error occurs Clean and lubricate CR rail roller guide Check connection of following connectors Main board CR motor assemb...

Страница 272: ...or deposit is too heavy Replace T fence a If NG Check following cable connection CR board assembly connector J210 b Replace following parts T fence CR motor assembly CR board assembly CR cable Replace...

Страница 273: ...rd assembly 4 3 3 Replacing Main Board Assembly p 4 21 12 E 074 error cover Abnormal condition in cover sensor 1 Check cover sensor from Sen Cover of self diagnosis function Check connection of cover...

Страница 274: ...4 64 Cancel head error 6 3 2 Counter Initialization Menu p 6 6 3 Main board assembly may be damaged Replace main board assembly 4 3 3 Replacing Main Board Assembly p 4 21 Cancel head error 6 3 2 Coun...

Страница 275: ...assembly 4 6 1 Replacing Print Head p 4 37 17 E 097 error NVRAM Abnormal condition in NVRAM Replace main board assembly 4 3 3 Replacing Main Board Assembly p 4 21 18 E 161 error Y life Carriage motor...

Страница 276: ...C has been pressed Transfer firmware again 3 Transfer failed Data timeout Communication time out occurred Check connection between plotter and PC After resolving problem transfer firmware again 4 Tran...

Страница 277: ...Unit p 4 8 2 Panel unit assembly may be damaged Replace panel unit assembly 4 2 2 Removing Operation Panel Unit p 4 8 3 Inlet assembly may be defective Replace inlet assembly 4 3 5 Replacing Inlet Ass...

Страница 278: ...2 Removing Operation Panel Unit p 4 8 6 Is operation panel unit assembly LCD damaged Replace panel board assembly 4 2 2 Removing Operation Panel Unit p 4 8 7 Main board assembly may be damaged Replac...

Страница 279: ...ormal when checked with specified cartridge securely inserted Detection of presence of ink from Sen Ink NOT Detection of presence of cartridge from Ink Not Follow the steps for the message K1K2CMY No...

Страница 280: ...shed 1 Are damper assembly ink tube and SUS pipe joint screws K1 K2 Y M C securely tightened Is O ring properly installed Remove head cover and check damper assembly Remove side cover L R andcartridge...

Страница 281: ...ransmission gear shaft damaged Replace maintenance base assembly 4 7 1 Removing Maintenance Base Assembly p 4 47 7 Does ink tube have bend scratch or leak Replace damaged ink tube and check if cleanin...

Страница 282: ...s on CR board assembly side and main board assembly side Is head cable inserted obliquely Is it locked securely Reconnect following connectors CR board assembly connector J201 J205 Main board assembly...

Страница 283: ...inserted obliquely Is it locked securely Reconnect following connectors Main board assembly J125 Operation panel unit assembly 4 3 3 Replacing Main Board Assembly p 4 21 9 Machine does not perform in...

Страница 284: ...talled 1 Are the following self diagnosis functions detected as normal when checked with specified cartridge securely inserted Detection of presence of ink from Sen Ink NOT Detection of presence of ca...

Страница 285: ...assembly J125 Operation panel unit assembly 4 3 3 Replacing Main Board Assembly p 4 21 3 Operation panel unit assembly may be damaged Replace panel unit assembly 4 2 2 Removing Operation Panel Unit p...

Страница 286: ...21 4 10 1 Replacing CR Board Assembly p 4 64 4 9 2 Replacing P_REAR Sensor Assembly p 4 63 4 6 2 Replacing Cutter Holder Assembly p 4 41 2 Media runs obliquely or meanders during media set initializa...

Страница 287: ...ation Manual 2 Does media guide have large distortion or foreign objects If media guide collects media dust or other foreign objects on it remove them Replace media guide 4 2 7 Removing Media Guide R2...

Страница 288: ...er Assembly p 4 41 3 Check sensor reflection amount from Sen PaperEdge AD of self diagnosis function Adjust with main board assembly trimmer R117 R119 Replace P_EDGE sensor assembly 7 11 1 P_EDGE Sens...

Страница 289: ...eplace operation panel unit assembly 4 2 2 Removing Operation Panel Unit p 4 8 7 Main board assembly may be defective Replace main board assembly 4 3 3 Replacing Main Board Assembly p 4 21 Table 9 10...

Страница 290: ...y 4 3 3 Replacing Main Board Assembly p 4 21 2 Media feed after printing is excessive 1 Is P_REAR sensor assembly judged as normal when checked through Test Sensor of self diagnosis function Reconnect...

Страница 291: ...transmission gear shaft damaged or poorly engaged during cleaning operation Replace maintenance base assembly 4 7 1 Removing Maintenance Base Assembly p 4 47 4 Nozzle plugging or ink splash is not eli...

Страница 292: ...5 2 Head Rank Input Menu p 5 25 6 Check if TF_ENC assembly and T fence contact with each other If they contact with each other adjust TF_ENC assembly and T fence positions If problem remains even aft...

Страница 293: ...sembly 4 10 3 Replacing CR Tape Wire p 4 68 5 Are damper assembly ink tube and SUS pipe joint screws K1 K2 C M Y securely tightened Is O ring properly installed Remove head cover and check damper asse...

Страница 294: ...Adj Input Rank of self diagnosis function 5 5 2 Head Rank Input Menu p 5 25 10 Is ink tube in ink system assembly bent Replace ink system assembly and check if cleaning operation causes ink inflow If...

Страница 295: ...y Is it locked securely Reconnect head cable 4 6 1 Replacing Print Head p 4 37 4 10 1 Replacing CR Board Assembly p 4 64 15 Is print head damaged Replace damaged print head 4 6 1 Replacing Print Head...

Страница 296: ...lace CR cable assembly 4 10 3 Replacing CR Tape Wire p 4 68 4 Is print head damaged Replace damaged print head assembly 4 6 1 Replacing Print Head p 4 37 5 CR board assembly may be malfunctioning Repl...

Страница 297: ...nused for 1 hour or more Then perform cleaning again and check printout Operation Manual 3 Is suction fan run as normal when checked through Test Fan of self diagnosis function Check connection of fol...

Страница 298: ...sory cleaning wiper cleaning cloth dampened with small amount of purified water After wiping cleaning wiper perform cleaning twice consecutively If cleaning wiper is sticky with ink replace it with a...

Страница 299: ...gears and transmission gear shaft damaged Replace maintenance base assembly 4 7 1 Removing Maintenance Base Assembly p 4 47 14 Is spring of ink system assembly detached or damaged If the part is deta...

Страница 300: ...judged as normal when checked with specified cartridge securely inserted Detection of presence of ink from Sen Ink NOT Detection of presence of cartridge from Ink Not Follow the steps for the message...

Страница 301: ...ssembly p 4 21 13 14 15 Many satellites unnecessary dots Shaggy plotout Uneven lines plotted with stains 1 Is working environment appropriate Use machine under specified environment 3 5 Choosing a Pla...

Страница 302: ...wiper cleaning cloth dampened with small amount of purified water After wiping cleaning wiper perform cleaning twice consecutively If cleaning wiper is sticky with ink replace it with a new one Operat...

Страница 303: ...maged replace ink system assembly 4 7 2 Replacing Pump Cap Assembly p 4 52 14 Is ink tube in ink system assembly bent Replace ink system assembly and check if cleaning operation causes ink inflow If i...

Страница 304: ...6 CR Belt Tension Adjustment p 7 25 4 Are Bi Directional printing positions aligned correctly AlignBi Directionalprinting positions 5 5 6 CW Adjustment p 5 31 5 Is CW adjustment inappropriate Perform...

Страница 305: ...n again 5 8 1 Parameter Initialization Menu p 5 52 19 Poor linearity in head scan direction straightness 1 Is suction fan run as normal when checked through Test Fan of self diagnosis function Check c...

Страница 306: ...PF driving pulley loose Replace PF motor assembly 4 4 1 Replacing PF Motor Assembly p 4 26 4 Is PF belt tension adjusted to specification Adjust PF speed reduction belt tension 2 Confirming Completion...

Страница 307: ...fence 4 5 4 Replacing T Fence p 4 33 6 Check if vertical lines plotted from Adj Black Slant are not connected even though nozzle check pattern from Adj Chk Nozzle of self diagnosis function is adjust...

Страница 308: ...nce 1 Abnormal noise is heard when media is suctioned 1 Are there any foreign objects or obstacles around rotating fin of suction fan assembly Remove obstacles and foreign objects 4 9 1 Replacing Suct...

Страница 309: ...s moving laterally 1 Does customer recognize ink discharge noise as abnormal noise Explain machine operations 2 Is abnormal noise caused by loose screw in covers Additionally tighten screws 4 2 Remova...

Страница 310: ...7 6 CR Belt Tension Adjustment p 7 25 9 Is abnormal noise heard from CR motor assembly Replace CR motor assembly 4 5 1 CR Motor Assembly p 4 30 4 Abnormal noise is heard during media feeding 1 Is PF s...

Страница 311: ...L Remove foreign objects 4 Are media guide L cutter groove and cutter blade parallel Perform adjustment 7 9Cutter Holder Height Adjustment p 7 29 5 Cutter may be defective Replace cutter 4 6 2 Replaci...

Страница 312: ...ssembly p 4 41 4 Are there any foreign objects attached on cutter groove and surface of media guide L part Remove foreign objects 5 Are media guide L part cutter groove and cutter blade parallel Perfo...

Страница 313: ...bly connector J201 J205 Main board assembly connector J110 J114 4 10 1 Replacing CR Board Assembly p 4 64 4 3 3 Replacing Main Board Assembly p 4 21 4 CR board assembly may be defective Replace CR boa...

Страница 314: ...guide L Remove foreign objects 4 Are media guide L cutter groove and cutter blade parallel Perform adjustment 7 9Cutter Holder Height Adjustment p 7 29 5 Media cannot be cut off in spite of normal cu...

Страница 315: ...cutter groove and cutter blade parallel Perform adjustment 7 9Cutter Holder Height Adjustment p 7 29 6 Cutter may be defective Replace cutter 4 6 2 Replacing Cutter Holder Assembly p 4 41 7 Cutting op...

Страница 316: ...5 stages If the plotter operates normally without using USB hub replace USB hub Instruct users to use USB hubs compliant with USB2 0 Hi Speed standard 4 Attempt communication with PC on hand Replace U...

Страница 317: ...nt 5 5 6 CW Adjustment p 5 31 2 Is adjustment of top bottom margin distance inappropriate between front sensor and head and between cutter and head Perform adjustment 5 5 11 P_REAR Sensor Position Adj...

Страница 318: ...CR Encoder from Test Encoder of self diagnosis function Move carriage in both directions and check the numeral value on LCD If the numeral value doesn t change normaly check main board assembly connec...

Страница 319: ...mware Installation p 7 15 4 Main board assembly may be damaged Replace main board assembly 4 3 3 Replacing Main Board Assembly p 4 21 Table 9 15 Symptoms Check Items and Actions No Event symptom Check...

Страница 320: ...sembly p 4 22 5 Check power supply voltage DC24V DC42V Replace power board assembly 4 3 4 Replacing Power Board Assembly p 4 22 6 Power board assembly may be defective Replace power board assembly 4 3...

Страница 321: ...anges 5 4 4 Sensor Menu p 5 13 3 Is waste fluid tube coming out of flushing box bent Reinstall it 4 7 4 Replacing Flushing Box Assembly p 4 54 5 Ink spills out of flushing box 1 Is flushing box clogge...

Страница 322: ...eplace ink tube 4 7 2 Replacing Pump Cap Assembly p 4 52 3 Print head main board assembly and CR board assembly may be defective Afterremovinginkcartridge check if each board operates properly 4 3 3 R...

Страница 323: ...7 11 4 Is any device of the same IP address as PC or plotter connected to hub Yes Disconnect the applicable device from network No Proceed to 5 5 Is plotter started in board manager mode and only POW...

Страница 324: ...nsfer Firmware size is too large Check if transferred firmware is an appropriate file Plotter repeats buzzer operation in short cycles as well as display of the message shown below on LCD All LEDs of...

Страница 325: ...RJ 901C RJ 900C Maintenance Manual 10 Appendix 10 1 10 Appendix 10 1 Introduction 10 2 10 2 Wiring Diagram 10 2 10 3 Maintenance Part List 10 2 10 4 Jigs and Tools 10 3 10 4 1 Required Tools 10 3...

Страница 326: ...anual 10 2 10 1 Introduction This chapter provides referential information such as service data and exploded views 10 2 Wiring Diagram For wiring diagram see information below TIP Separate sheet Wirin...

Страница 327: ...Generic product 4 Flat head driver Generic product 5 Longnose plier Generic product 6 Tweezers Generic product 7 Hex wrench opposite side 6mm Optional stand accessory Generic product Required only whe...

Страница 328: ...0 J201 FROM MAIN J11 TO HEAD CN2 TO HEAD CN1 J205 J204 J207 TO CR J204 TO CR J205 DC cable assembly CN301 CN301 CN001 Power board assembly Noise filter Noise filter cable assembly Noise filter FG cabl...

Страница 329: ...F 49133 Lock arm spring DF 48563 Lock bracket DF 49134 Lock arm assembly DF 49059 Suction fan cable 1 assembly DF 48625 Suction fan cable 2 assembly DF 48625 Pan head machine screw M4x5 Ni 3 MS 010400...

Страница 330: ...A0 Intermediate support spar DF 48549 Sliding support DF 48548 PF motor 2 DE 36625 2 DTCEMGV DE 36656 PF encoder mounting plate DF 49137 PF encoder A1 assembly DF 48631 Slit guide TB 30235 PF cover DE...

Страница 331: ...spring DF 49141 Absorbent H DF 49136 Head mounting plate DE 12574 Head adjusting cam DE 36573 Slant adjusting plate DE 22162 Backing plate DE 36572 Head frame spring DF 48675 Head tape wire DF 48619 T...

Страница 332: ...rial L DE 36529 Y rail side plate L DE 36538 Tapping screw M4 x 16 S tight cup MS 5204016A T fence spring DF 48596 Stop rubber BA TB 40010 CR motor assembly DE 36535 CR motor relay assembly DE 48622 A...

Страница 333: ...0 CR tape wire DF 48617 A1 DF 48618 A0 Ink tube DF 48678 A1 1 DF 48679 A1 2 DF 48680 A0 1 DF 48681 A0 2 Bearer holder DF 48696 Pan head screw with spring washer and flat washer M3 x 6 MS 0503006A Tube...

Страница 334: ...2 3 DF 42126 Joint screw M7 DF 42127 Joint screw M6 DE 49778 Cartridge pipe B DF 48684 Joint screw M6 DE 49778 Joint tube 2 3 DF 42126 O ring joint M7 DF 42128 Joint screw M7 DF 42127 Tapping screw M...

Страница 335: ...P tight cup MS 5903008A Tapping screw M3 x 6 S tight cup MS 5203006A Pump cap assembly DF 48652 Pan head screw with spring washer and flat washer M3 x 6 MS 0503006A Pan head screw with spring washer...

Страница 336: ...S tight cup MS 5203006A Pan head screw with spring washer and flat washer M3x8 Ni 3 MS 05030081 Platen DE 36523 Platen seal DE 48560 Hexagon socket head screw with spring washer and flat washer M3x6 N...

Страница 337: ...3 Cooling FAN relay A1 assembly DF 48726 Fan seal DF 48699 Clamp RMS 1VO DF 48558 A1 x 4 A0 x 7 Bush OLBT 13 DF 47186 Noise filter relay A1 assembly DF 48783 Noise filter FG cable assembly DF 48783 DC...

Страница 338: ...er receiver roller DF 48542 Scroller FG plate L DF 48544 Scroller receiver L DE 22131 Scroller receiver R DE 22130 Sensor cover R DE 22129 Sensor cover L DE 22128 Tapping screw M3 x 6 S tight cup MS 5...

Страница 339: ...m holder assembly DF 49075 Stay cap assembly DF 49074 Basket stay A0 assembly DF 48703 Basket stay A1 assembly DF 48702 Leg assembly A0 DE 12588 To Flame assembly Front To Flame assembly Book holder a...

Страница 340: ......

Страница 341: ......

Отзывы: