background image

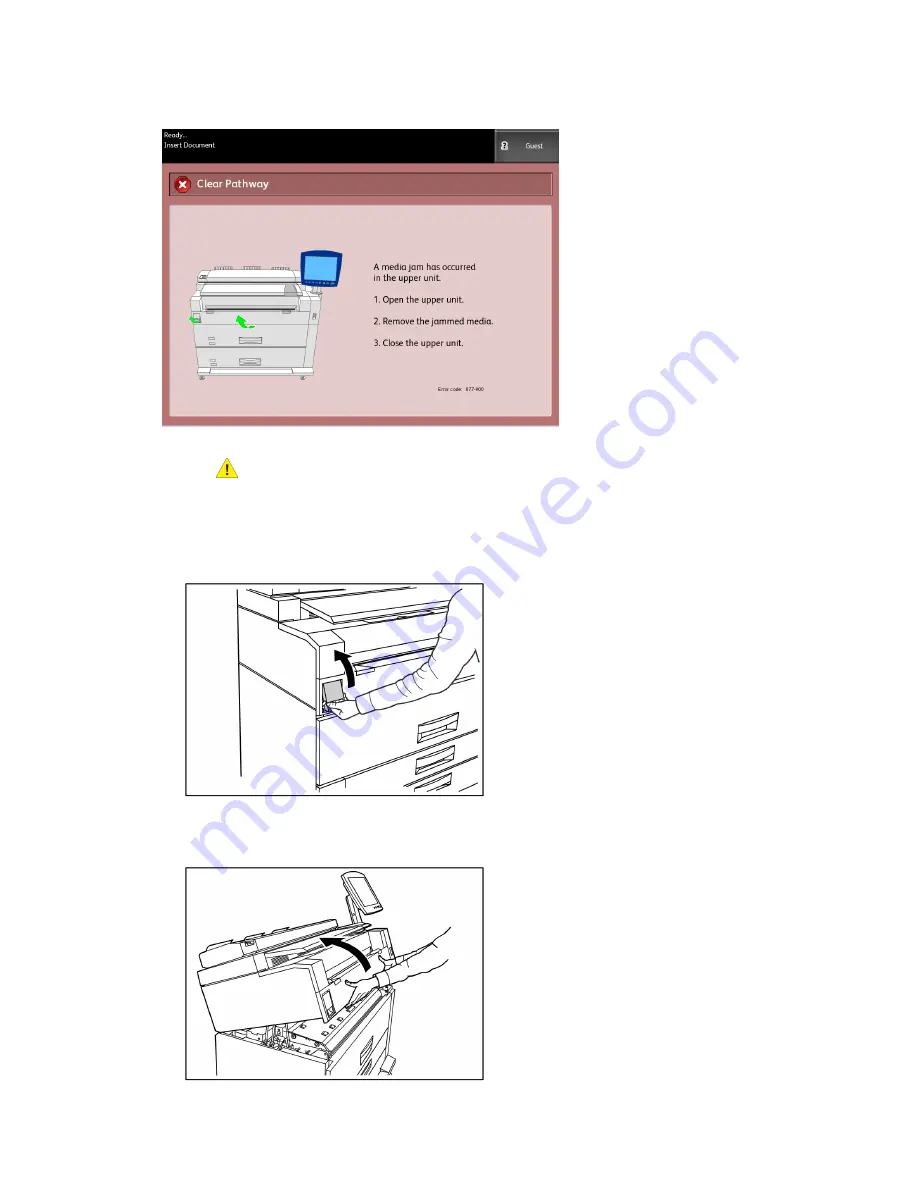
WARNING

Do not touch any of the high temperature components in the machine when
removing paper jams. Take care not to get your fingers caught.

1. Lift up the Upper Unit Release Latch.

2. Use both hands to lift up the Upper Unit.

Xerox

®

 6279

®

 Wide Format Solution

6-16

Printer User Guide

Problem Solving

Содержание 6279

Страница 1: ...Xerox 6279 Wide Format Solution Printer User Guide FreeFlow Accxes Print Server V15 0 August 2010 701P50912...

Страница 2: ...registered United States trademarks Microsoft Windows is a trademark of Microsoft Corporation in the United States and or other countries Adobe PostScript PostScript 3 and PostScript Logo are trademar...

Страница 3: ...ng the System On Off 1 13 Using the Power Saver Feature 1 13 System Power On Procedure 1 14 System Power Off Procedure 1 15 Shutdown from the User Interface 1 16 Shutdown from Web Printer Management T...

Страница 4: ...ring System Administration Mode 3 2 Login Options 3 2 Exiting System Administration Mode 3 4 General Administration Settings 3 4 Setting the Date and Time 3 5 Changing the Administrator Password 3 5 J...

Страница 5: ...ngs 4 2 Print Reports Tab 4 4 Print Reports 4 5 From the User Interface 4 5 From Web Printer Management Tool 4 6 Configuration Test Sample Report Printer 4 7 Setup Test Print Sample Report Printer Set...

Страница 6: ...s in Manual Feed in Shelf Bypass 6 13 Paper Jams in the Upper Unit 6 15 Paper Jams in the Fuser 6 18 7 Appendix 7 1 Space Electrical and Environmental Requirements 7 1 Specifications 7 3 Options 7 10...

Страница 7: ...6279 Wide Format Printer and the functions of its major components You will see the following information Machine Components Language Powering the System On Off Using the Power Saver Feature Checking...

Страница 8: ...s of the Xerox 6279 Wide Format Solution with the FreeFlow Accxes Print Server See the table on the following page for details describing the numbered call out items on the drawings above Xerox 6279 W...

Страница 9: ...lp e g for jam clearance Touch screen 4 Contains selection buttons and print services access Control Panel 5 Used to power the machine on and off Printer Power Switch 6 A dual roll media drawer that f...

Страница 10: ...o check that the Circuit Breaker is functional Circuit Breaker Test Button 4 Open this door to access the Waste Toner Bottle and the Paper Heater Switch Waste Toner Bottle Door 5 WARNING Never touch a...

Страница 11: ...r View Description No Card Slide location may vary depending on Controller model 1 Cover Release Latch 2 Power Connector 3 Padlock Ring 4 Controller Back Panel Connectors This design may vary dependin...

Страница 12: ...Scanner to Controller provides status and image information USB Printer to Controller provides status and image information USB Power Module to Controller provides status of the front Power Switch an...

Страница 13: ...Clear Stop and Start buttons Control Panel Buttons Touch Screen Some capabilities of the User Interface are Media setup for roll media and the Manual Feed in Shelf System Parameter Setup Printing of...

Страница 14: ...ne is powered on or exits the Power Saver mode and when the machine exits the System Administration mode The screen below displays the copy scan features There is a scanner connected The following scr...

Страница 15: ...from Device Displays the Basic Copy tab Image Quality tab Advanced Settings tab and Recall tab Copy Allows users to store scanned jobs in a mailbox for later retrieval and printing Scan to Mailbox Al...

Страница 16: ...text This section of the keyboard is used to enter text Table 8 Keyboard layout Function Component Displays the characters entered on the numeric keypad Entry Area Use the cursor buttons to move to a...

Страница 17: ...es System Administrator and Job Accounting Login access Administrator access requires a secured password Job Accounting access requires an account name and User ID Guest access does not require a logi...

Страница 18: ...4 Select the appropriate radio button from the Date Format choices Imperial The date displays in the format MM DD YYYY International The date displays in the format DD MM YYYY 5 Select Save to close t...

Страница 19: ...fter a preset period elapses The machine transitions to the Sleep Mode from the Low Power Mode if the machine remains idle for an additional period NOTE Refer to the Timers section to learn how to cus...

Страница 20: ...machine in the Power Saver mode press the illuminated Power Saver button The button s indicator light extinguishes the Touch Screen displays the message Warming Up and the machine begins its warm up c...

Страница 21: ...edure CAUTION Powering down the system incorrectly may result in data corruption and a service call The system shutdown selection allows the Controller to power down correctly System Shutdown is perfo...

Страница 22: ...located on the Control Panel 2 Select the Administration tab 3 Select General Administration 4 If the Enter SA Password screen displays enter the System Administrator password then press Enter 5 Sele...

Страница 23: ...ntroller It is used to reboot the system when jobs in the print queue fail to process correctly Rather wait for the system to shut down 3 Move the printer Power Switch to the Off down position 1 17 Xe...

Страница 24: ...nd controller may be powered down Check the Circuit Breaker once a month for correct operation If you notice any unusual conditions contact your Xerox Customer Support Center The Procedure for checkin...

Страница 25: ...www xerox com in the US From the home page select Supplies Paper and Media Type For Wide Format Products NOTE A Load or Change Media Type selection will display on the UI if the Accxes Controller det...

Страница 26: ...m2 is a measure of a substance weight of a paper expressed in grams per square meter which does not depend on the number of sheets in the ream Roll Media Specifications Table 12 Roll Media Specificat...

Страница 27: ...eries A 8 5 B 11 C 17 D 22 E 34 ANSI A 9 B 12 C 18 D 24 E 36 ARCH 1 A 9 B 12 15 D 24 30 ARCH 2 B1 B2 B3 B4 ISO B1 B2 B3 B4 JIS A0 A1 A2 A3 A4 JIS ISO A0 880mm A1 625mm A2 440mm A3 A4 SPECIAL A 1 A0 86...

Страница 28: ...d side of the machine Store the media on a flat surface to prevent curl Loading Roll Media A Load or Change Media Type selection will display on the UI if the Accxes Controller detects that the requir...

Страница 29: ...ction of the Media Size Label to release the roll from the shaft NOTE Pinching the Green Lever releases the spring tension lock making it possible for you to remove the shaft from the core 4 Slowly pu...

Страница 30: ...ing glue when removing the tape from a new roll wipe it clean This can cause misfeeds If the Media Roll is damaged trim the damaged edge with scissors before proceeding to the next step WARNING Be car...

Страница 31: ...ia Advance button corresponding to the Media Roll and release it to cut the lead edge and position the media into the feeder NOTE If you wish to cut a longer length of the roll press and hold the Medi...

Страница 32: ...rocedure below 1 Open the Media Drawer 2 If the lead edge of the media is folded or badly damaged in any way rewind the media on the roll from which the jam has occurred by rotating it towards you 3 P...

Страница 33: ...e button corresponding to the media roll and release it to cut the lead edge and position the media into the feeder NOTE If you wish to cut a longer length of the roll press and hold the Media Advance...

Страница 34: ...ia Tray towards you until it stops 2 Load the paper in the tray Do not fill above the Max Fill Line on the back of the tray 3 Squeeze the left and right paper guide levers and adjust the guides to mat...

Страница 35: ...Squeeze the rear Paper Guide Lever and adjust it to match the size of your paper 5 Push the Media Tray in gently until it stops 1 29 Xerox 6279 Wide Format Solution Printer User Guide Product Overvie...

Страница 36: ...ember that any time you change the size of the paper in a Media Tray or Drawer you have to update the Media Source located at Machine Info Media Status and Setup on the Touch Screen Refer to the Chapt...

Страница 37: ...ient workstation using Web Printer Management Tool or a network Printer Driver All Tab The contents of this tab is a list of all jobs in their various stages of completion Jobs are displayed whether s...

Страница 38: ...nter viewed and released using either Web Printer Management Tool or the User Interface Jobs can also be placed on hold from the same locations Jobs in the Hold Queue consume memory and disk space in...

Страница 39: ...e Job Information screen Whether you are submitting a reprint job with or without edits it is moved from the Reprint queue to the Active queue Reprint Jobs with Edits Perform the following to Reprint...

Страница 40: ...an customize one percentage value as desired Auto The ratio is automatically set up based on the original document size and the installed media size The document is copied to fit the currently selecte...

Страница 41: ...sets that are arranged in page order The originals in the set also can be mixed that is of different types text photo etc A maximum of 256 pages may be scanned in each collation job The factory defaul...

Страница 42: ...m the following 1 Select Job Information from the Services menu 2 Select the Reprint tab 3 Select the job s you wish to delete 4 Select the Remove Selected button NOTE Jobs removed from the list locat...

Страница 43: ...2 Select the Configuration Miscellaneous tabs 3 Ensure the Thumbnail Creation and Job Reprint Enable boxes are check marked 4 Notice the Job Reprint Policy pull down options and choose the desired out...

Страница 44: ...n Edit button where the user can Edit Job Options specific for printing and then submit the job to the designated remote printer The selected jobs disappear from the Reprint Queue and reappear in the...

Страница 45: ...ew Most of the features available using the Xerox 6279 Printer are accessible to all users Some features however are restricted to the System Administrator if the environments warrants it Those featur...

Страница 46: ...e Log In Out button on the Control Panel to access the System Administrator screen Login Options The Log In Out screen shown below allows the user or administrator to log in to the system in one of tw...

Страница 47: ...indicator at the top right corner to the User Interface displays the first 16 characters of the user ID and account ID NOTE You can also get to the Log In Out menu by pressing the user level box in th...

Страница 48: ...ss the System Administrator screen 2 Select System Administrator Log Out 3 Select Yes to confirm that you wish to log out The system will exit System Administration mode and the Guest icon will appear...

Страница 49: ...eral Administration screen to return to the Administration tab screen Changing the Administrator Password The following describes the procedure for changing the System Administrator password This is t...

Страница 50: ...llies the stored data from the networked devices When the management tool is set up an administrator sets up and provides the required IDs to the users If you are using the Account Management Tool for...

Страница 51: ...ices Menu Optional Users can either enter a valid user name and account ID or enter no characters when prompted for a user name and account ID to enter a generic account When the optional account is a...

Страница 52: ...e wrong hands It also prevents jobs from being deleted erroneously 1 Select Machine Information Administration tab General Administration 2 Select Configure Job Reprint The Job Reprint Options screen...

Страница 53: ...and ready to start printing during the power outage are placed in the Job Information Active queue If Job Reprint is enabled Copy Scan jobs that finished processing are automatically resubmitted for...

Страница 54: ...that sensitive materials are eliminated from the Accxes controller hard drive NOTE Immediate Image Overwrite cannot be enabled if either Job Reprint or Administrator Managed Queue features are enabled...

Страница 55: ...3 is written to the sectors containing temporary files IIO or to the entire spooling area of the disk ODIO hex value 0x97 ASCII 10 of the overwritten area is sampled to ensure Pattern 3 was properly w...

Страница 56: ...s on hold 1 Select Machine Info from the Services screen 2 Select General Administration 3 Select Enable Disable Administration Managed Queue 4 Select Enable 5 Select Save 6 Submit the print job 7 Loc...

Страница 57: ...ctory default setting for sound is On 1 Select the Services button on the Control Panel 2 Select the Machine Info button from the Services Menu screen The Machine Information Screen displays 3 Select...

Страница 58: ...res are defined on the following pages Low Power Sleep Features File Deletion Print Interrupt Low Power This setting is the amount of time that must elapse since the last user operation such as a butt...

Страница 59: ...out screen displays 4 Using either the scroll buttons or the numeric keypad select the desired setting and then select Save 5 Select Save on the Set Timeout Durations screen to return to the Control P...

Страница 60: ...tting for Sleep mode is 55 minutes 1 Select Control Panel from the Administration Tab 2 Select Configure Timers The Set Timeout Durations screen displays 3 Select Sleep Timeout from theTimers screen T...

Страница 61: ...out Durations screen to return to the Control Panel screen NOTE The Sleep Mode setting cannot be less than the Low Power Mode setting NOTE In European Markets the legally mandated EMC directive is to...

Страница 62: ...mer can be set between 0 and 99 minutes The default value for this feature is 5 minutes 1 Select Control Panelfrom the Administration tab 2 Select Configure Timers The Set Timeout Durationsscreen disp...

Страница 63: ...ut The File Deletion Timeout screen displays 4 Using either the scroll buttons or the numeric keypad select the desired setting and then select Save 5 Select Save on the Set Timeout Durations screen t...

Страница 64: ...h corner of the screen until it moves to the next corner It will touch all four corners 7 Once the symbol moves to all four corners the user interface prompts you to touch anywhere on the screen to sa...

Страница 65: ...elect Machine Info from the Services menu 5 Select the Administration tab 6 Select Network Setup NOTE The network settings can also be setup using the Web Printer Management Tool Refer to the Xerox Fr...

Страница 66: ...at nn nnn nn nnn 4 Select Enter Setting up IP Gateway 1 Select the Services button on the Control Panel followed by Machine Info Administration Tab Network Setup 2 Select Gateway from the Network Setu...

Страница 67: ...tion you can utilize the Dynamic Host Configuration Protocol DHCP option When this box is checked enabled the network interface utilizes the DHCP to acquire a temporary IP Address for the networked de...

Страница 68: ...rk page of Web Printer Management Tool will be enabled This allows the administrator to enter the Accxes Server host name he or she would like to associate with the resulting DHCP address via Dynamic...

Страница 69: ...ts Overview of Machine Information TheMachine Informationscreen allows the general users to access some information about the system without requiring a system administration password The Machine Info...

Страница 70: ...ia types Changing the setup for different media is accomplished here Refer to the About Media and Originals section in Chapter 2 for details To access the Media Status and Setup you start with Machine...

Страница 71: ...m Film Thickness Light Ordinary Heavy Size Installed currently loaded in the Roll Tray Status Amount Remaining Full Low Empty 4 Select the Media Series corresponding with the Media Source you intend t...

Страница 72: ...ll print the job on different media If you get a Media Mismatch error screen like the one shown above follow the instructions to resolve the media mismatch condition Print Reports Tab The Print Report...

Страница 73: ...ace or Web Printer Management Tool on your client workstation The Diagnostic Prints may be printed using the User Interface only You may not print them using Web Printer Management Tool NOTE Print Rep...

Страница 74: ...Test Print Scanner Test Print Only available for printers with scanner upgrades 6 Select Print The selected item will print From Web Printer Management Tool The Configuration reports can be obtained u...

Страница 75: ...rints the configuration data settings information and pen palettes information PostScript requires a license and will print a PostScript test page Configuration Test Sample Report Printer NOTE This re...

Страница 76: ...Setup Test Print Sample Report Printer Settings NOTE This report is a sample of what the printout will resemble Xerox 6279 Wide Format Solution 4 8 Printer User Guide Machine Information...

Страница 77: ...Pen Palette Sample Report NOTE This report is just a sample of what the printout will resemble 4 9 Xerox 6279 Wide Format Solution Printer User Guide Machine Information...

Страница 78: ...the printout will resemble Machine Configuration Tab The Machine Configuration tab will display configurations software versions and the availability of the component options as shown below Xerox 627...

Страница 79: ...Select the Services button on the Control Panel The Services Menu displays 2 Select Machine Info on the Services Menu 3 Select the Machine Configurationtab 4 11 Xerox 6279 Wide Format Solution Printe...

Страница 80: ...settings for the printer such as network settings to connect to a remote printer and control panel changes General Administration Change date and time settings job accounting shutdown and restart cha...

Страница 81: ...the Administrator password if required when selecting a feature For more detailed information about the Administration Tab refer to Chapter 3 System Administration 4 13 Xerox 6279 Wide Format Solution...

Страница 82: ...Xerox 6279 Wide Format Solution 4 14 Printer User Guide Machine Information...

Страница 83: ...he use of consumables not recommended by Xerox may impair image quality and machine performance Use only consumables recommended by Xerox for the machine Table 15 Replacing Consumables Expected Life Q...

Страница 84: ...umables and contact your Xerox Customer Support Center to place your orders Follow the disposal instructions for used toner and waste toner bottles Loading Toner If only a small amount of toner remain...

Страница 85: ...th the right side of the Toner Supply Port 5 Lower the left side of the Toner Cartridge and push the toner cartridge into the Toner Supply Port until it clicks 6 Slide the Toner Supply Lever to the le...

Страница 86: ...de the lever to the right aligning it with the triangular symbol 9 Remove the Toner Cartridge by pulling it up 10 Close the Toner Supply Port Cover Dispose of used Toner Cartridges as instructed in yo...

Страница 87: ...bottles regarding safe handling and disposal TIP When replacing the Waste Toner Bottle toner may spill and dirty the floor We recommend placing paper on the floor beforehand 1 Make sure that the mach...

Страница 88: ...Toner Bottle by gently lifting the bottle up and pulling it out toward you then pulling the bottle down 5 Cover the hole of the removed Waste Toner Bottle with the provided cap TIP Dispose of the use...

Страница 89: ...place Otherwise the machine may not detect that the bottle is in place 7 Close the Waste Toner Bottle Door 8 Move the Upper Unit Release Lever toward you TIP This lever must be pulled toward you befor...

Страница 90: ...nt thinner other volatile liquids on the machine These substances may discolor deform or crack covers CAUTION Cleaning the machine with an excessive amount of water may cause the machine to malfunctio...

Страница 91: ...oubleshooting recommended in the pages below then contact your Xerox Customer Support Center If you think a problem is occurring with the machine check the machine status and the following table WARNI...

Страница 92: ...oot the system to see if that corrects the problem If the condition does not improve contact your Service Representative Media jams occur frequently Check for and remove loose pieces of media from ins...

Страница 93: ...ith new media Select the media size series and the media type that match the media that is loaded in the machine Open the upper unit of the machine or slide out the media drawer or tray to remove any...

Страница 94: ...r Internal components may have become soiled The print has black dots Contact your Xerox Customer Support Center Internal components may have become soiled The print has black lines White dots appear...

Страница 95: ...nner if necessary Contact your Xerox Customer Support Center There may be an internal machine error The entire paper area is printed black Contact your Xerox Customer Support Center There may be an in...

Страница 96: ...tem will shut down if the problem is not fixed The lower priority errors are clay colored Paper Jams If paper jams occur the machine stops an alarm sounds and an error message displays on the Touch Sc...

Страница 97: ...tely and contact your Xerox Customer Support Center CAUTION Do not touch the components inside the machine Doing so can cause print defects Paper Jam Display The location where a paper jam has occurre...

Страница 98: ...out the Media Drawer for Rolls 1 and 2 media If you have a four roll configuration and the paper jam is in Drawer 2 gently pull out the Media Drawer for Rolls 3 and 4 media Xerox 6279 Wide Format Sol...

Страница 99: ...ver back to its closed position 3 If the lead edge of the media is folded or badly damaged in any way unload it manually a Rewind the media on the roll from which the jam has occurred by rotating it t...

Страница 100: ...nce the paper and cut the lead edge NOTE If you wish you cut a longer amount of paper press and hold down the Media Advance button until is cuts the desired amount NOTE The front button advances and c...

Страница 101: ...til it latches Paper Jams in Tray 3 or Tray 4 If your machine has cut sheet trays installed and a jam occurs remove the jammed paper and reload the paper in the cut sheet trays in accordance with the...

Страница 102: ...t the top media tray drawer for Tray 3 or the bottom media tray for Tray 4 2 Remove the jammed paper 3 Gently push in the media tray to close it Xerox 6279 Wide Format Solution 6 12 Printer User Guide...

Страница 103: ...elf by following the procedure below 1 If the jammed paper is visible in the Manual Feed in Shelf pull it out toward you to remove it NOTE Avoid damaging the paper Make sure no pieces of paper remain...

Страница 104: ...se the Upper Unit 3 Use both hands to open the Upper Unit 4 Pull the jammed media slowly toward you to remove it 5 Gently remove the paper taking care not to tear it If the paper is torn make sure to...

Страница 105: ...to touch only the green part of the lever 7 Firmly close the Upper Unit until it latches Paper Jams in the Upper Unit Remove paper jams in the Upper Unit by following the procedure below 6 15 Xerox 6...

Страница 106: ...e components in the machine when removing paper jams Take care not to get your fingers caught 1 Lift up the Upper Unit Release Latch 2 Use both hands to lift up the Upper Unit Xerox 6279 Wide Format S...

Страница 107: ...nd remove any torn pieces of media Remaining fragments can cause future jams and image quality defects 4 Pull the green Upper Unit Release Lever forward 5 Gently lower the Upper Unit firmly into place...

Страница 108: ...Paper Jams in the Fuser Follow the procedure below to remove paper jams in the Fuser 1 Lift up the Upper Unit Release Latch Xerox 6279 Wide Format Solution 6 18 Printer User Guide Problem Solving...

Страница 109: ...the green lever Components are hot Take care not to get your fingers caught 4 While holding the Fuser Door open pull the jammed paper out the back NOTE Take care not to tear the paper If the paper is...

Страница 110: ...5 Close the Fuser Door 6 Pull the green Upper Unit Release Lever forward 7 Firmly push down the Upper Unit to close it Xerox 6279 Wide Format Solution 6 20 Printer User Guide Problem Solving...

Страница 111: ...consumables replacement and maintenance of your Xerox 6279 Wide Format Solution with FreeFlow Access Print Server Your Xerox representative will provide the necessary support to install your printer...

Страница 112: ...132 3347mm Depth Table 19 Machine Dimensions 55 1 1400mm with UI Height 61 1550mm with UI Width 33 3 847mm with Controller Depth Table 20 Machine Weight Ship Weight Weight 659 lb 299 kg 537 lb 244 kg...

Страница 113: ...ide Format Solution Printer with FreeFlow Accxes Table 23 Xerox 6279 Wide Format Solution Printer Specifications Xerographic LED Process imaging Dry development single component Development method OPC...

Страница 114: ...500 353mm JIS B B1 B2 B3 728 515 364mm Special A 1 A0 880mm A1 620mm A2 440mm A3 297mm Special A 2 A0 860mm A1 620mm A2 435mm A3 ANSI E 34 D 22 C 17 B 11 ARCH 1 E 36 D 24 C 18 B 12 ARCH 2 30 24 15 12...

Страница 115: ...100 m Bond Tracing Paper Film T Bond Roll 18 20 lb 60 110 gsm Bond Tray 18 20 lb 90 112 gsm 4 mil 18 lb 60 110 gsm 90 112 gsm 75 100 m Bond Tracing Paper Film T Bond Manual Feed in Shelf The table be...

Страница 116: ...9 19 4 15 8 11 4 9 0 NA 19 8 16 9 12 0 9 6 NA 20 0 16 0 12 2 9 2 NA US Media Size Arch A Arch B Arch C Arch D Arch E ANSI A ANSI B ANSI C ANSI D ANSI E EO Media Size ISO Sizes A4 A3 A2 A1 A0 9D minute...

Страница 117: ...VRF Versatec Data Standards Xerox Emulation 150 C4 JPEG Standard Data Formats Adobe PostScript 3 PDF 1 7 DWF BMP JPEG 2000 PNG GIF DGN Optional Data Formats XP Server 2003 XP x64 Server 2003 x64 Vist...

Страница 118: ...Power Voltage selection switch with settings for 115V or 220V Input voltage controller Table 31 Power Consumption UI 115V 15A or less Controller 115V 15A or less Printer 208 240V 13 2A or less Mode 4...

Страница 119: ...A B C D E Original Size 25 32 4 50 64 7 100 ANSI E 32 4 50 64 7 100 129 4 ANSI D 50 64 7 100 129 5 200 ANSI C 64 7 100 129 4 200 258 8 ANSI B 100 129 4 200 258 8 400 ANSI A Table 35 Magnification A B...

Страница 120: ...XM 2 Cut Sheet Tray 18 24 max See Specifications for standard and optional data formats and printer drivers Client Tools The following are the principal client tools available for use with your machin...

Страница 121: ...and users and for tracking print copy and scan usage for several FreeFlow Accxes based printers Xerox Wide Format FreeFlow Accxes Account Management Tool AMT See the FreeFlow Accxes Software Tools Cu...

Страница 122: ...on and off Failure to power the machine on and off correctly may damage the machine memory and cause malfunctions CAUTION Do not leave the Upper Unit open for more than ten minutes Doing so may result...

Страница 123: ......

Страница 124: ......

Отзывы: