background image

U

SING

 P

RINT

 M

ATERIALS

3.

3

3

Type and Capacities   

Guidelines for Paper and Special Materials

When selecting or loading paper, envelopes, or other special 

material, keep these guidelines in mind:
• Attempting to print on damp, curled, wrinkled, or torn paper 

can cause paper jams and the poor print quality.

• Use only high quality copier grade paper for the best print 

quality. 

• Avoid paper with embossed lettering, perforations, or a 

texture that is too smooth or too rough. Paper jams may 

occur.

• Store paper in its ream wrapper until you are ready to use. 

Place cartons on pallets or shelves, not on the floor. Do not 

place heavy objects on top of the paper, whether it is 

packaged or unpackaged. Keep it away from moisture, or 

other conditions that can cause it to wrinkle or curl.

• Store unused materials at temperatures between 15 

o

C and 

30 

o

C (59 

o

F to 86 

o

F). The relative humidity should be 

between 10 % and 70 %.

• During storage, you should use moisture-proof wrap, such as 

any plastic container or bag, to prevent dust and moisture 

from contaminating your paper.

• Load special paper types one sheet at a time.
• Only use materials specifically recommended for use in laser 

printers.

• To prevent special materials, such as transparencies and label 

sheets from sticking together, remove them as they prints 

out.

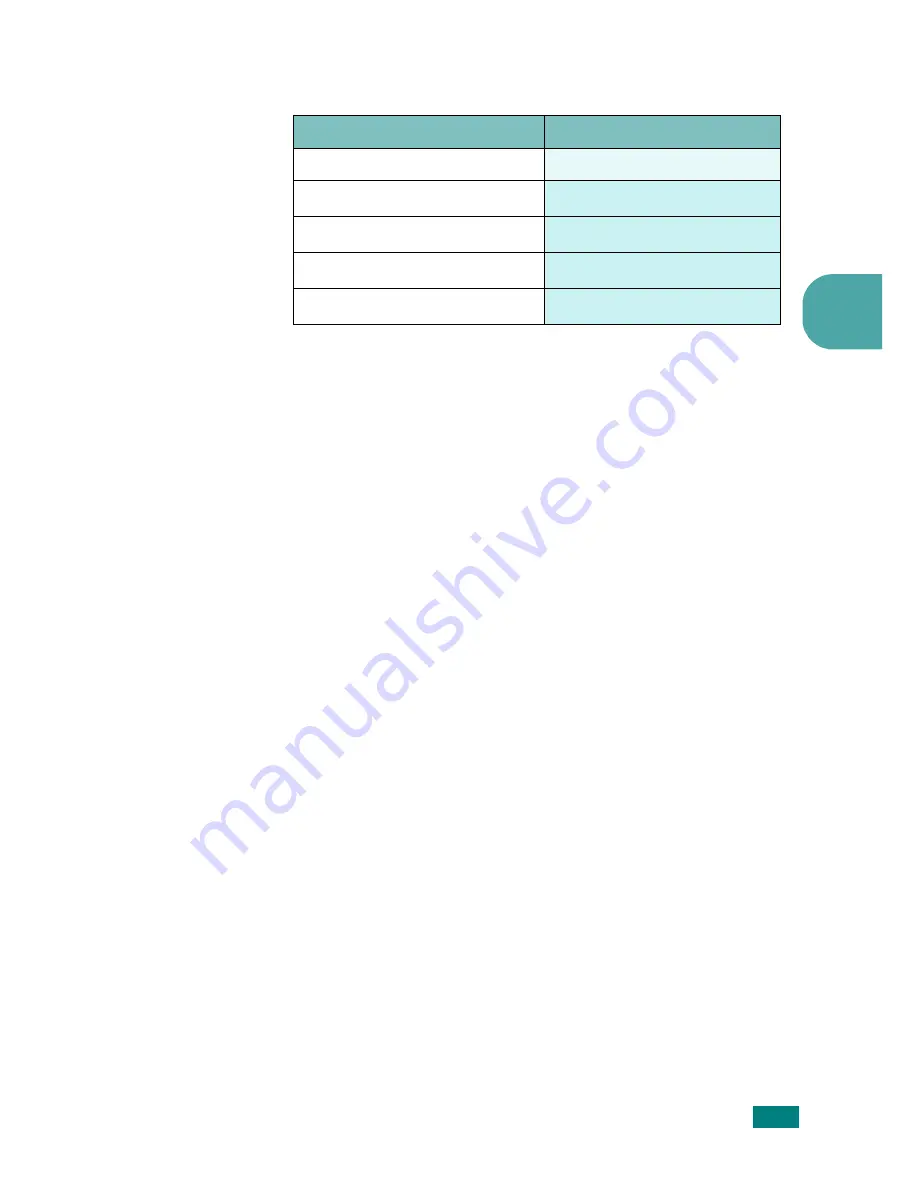
Paper Type

Capacity

a

a.  Maximum capacity may be reduced depending on the paper thickness.

Plain paper

150

Envelopes

b

b.  If you load more than one sheet, paper jams will occur. You must load only 

one sheet at a time in the tray.

1

Labels

b

1

Transparency films

b

1

Card stocks

b

1

Содержание 3117 - Phaser B/W Laser Printer

Страница 1: ......

Страница 2: ...cluded herein is subject to change without notice Xerox Corporation is not responsible for any damages direct or indirect arising from or related to use of this manual 2005 Xerox Corporation All right...

Страница 3: ...er Cartridge 2 4 Loading Paper 2 7 Connecting a Printer Cable 2 9 Turning the Printer on 2 10 Printing a Demo Page 2 11 Installing Printer Software 2 12 Chapter 3 USING PRINT MATERIALS Choosing Paper...

Страница 4: ...6 In the Paper Exit Area 5 7 In the Paper Feed Area 5 9 Around the Toner Cartridge 5 9 Tips for Avoiding Paper Jams 5 11 Solving Print Quality Problems 5 11 Print Quality Checklist 5 11 Solving Print...

Страница 5: ...le cart stand or table It may fall causing serious damage 7 Your machine should never be placed on near or over a radiator heater air conditioner or ventilation duct 8 Do not allow anything to rest on...

Страница 6: ...exhibits a sudden and distinct change in performance 14Adjust only those controls covered by the operating instructions Improper adjustment of other controls may result in damage and may require exte...

Страница 7: ...considered to be hazardous The laser system and printer are designed so there is never any human access to laser radiation above a Class I level during normal operation user maintenance or prescribed...

Страница 8: ...le manner Correct Disposal of This Product Waste Electrical Electronic Equipment Applicable in the European Union and other European countries with separate collection systems This marking shown on th...

Страница 9: ...ption which can be determined by turning the equipment off and on the user is encouraged to try to correct the interference by one or more of the following measures 1 Reposition the receiving antenna...

Страница 10: ...EC Approximation of the laws of the member states related to low voltage equipment January 1 1996 Council Directive 89 336 EEC 92 31 EEC approximation of the laws of the Member States related to elect...

Страница 11: ...10...

Страница 12: ...1 Introduction Congratulations on the purchase of your Printer This chapter includes Special Features Printer Driver Features Printer Components Understanding the Control Panel...

Страница 13: ...your document are magnified and printed across the selected sheet of paper After the document has printed trim off the white edges of each sheet Tape the sheets together to form a poster For details...

Страница 14: ...orientation and media type number of copies Table below lists a general overview of features supported by your printer drivers Feature Printer Driver Win 98 Me 2000 XP Linux Toner Save Y Y Print qual...

Страница 15: ...INTRODUCTION 1 4 Printer Components Front View Paper output tray Face down Control panel Top cover Output support Paper input tray Side guides Rear guide Toner cartridge Front cover...

Страница 16: ...INTRODUCTION 1 5 1 Rear View USB port Power receptacle Power switch...

Страница 17: ...or front cover or the empty toner cartridge See Troubleshooting Error Messages on page 5 17 If you press the button while the printer is receiving data the LED blinks red to cancel printing In Manual...

Страница 18: ...utton each time you load a sheet of paper in the tray when you select Manual Feed for Source from your software application For detailed information see Using Manual Feed Mode on page 3 7 Canceling pr...

Страница 19: ...nformation on setting up your printer This chapter includes Unpacking Installing the Toner Cartridge Loading Paper Connecting a Printer Cable Turning the Printer on Printing a Demo Page Installing Pri...

Страница 20: ...lowing items Notes If any items are missing or damaged notify your dealer immediately Components may differ from one country to another The appearance of the power cord is differ depending on the coun...

Страница 21: ...he area should be well ventilated and away from direct sunlight or sources of heat cold and humidity See the image below for clearance space Do not place the printer close to the edge of your desk or...

Страница 22: ...open Note Because the printer is very light it may be moved when you use it for example when opening closing the tray or installing removing the toner cartridge Be careful not to move the printer 2 Re...

Страница 23: ...y cloth and wash clothing in cold water Hot water sets toner into fabric Cautions To prevent damage do not expose the toner cartridge to light for more than few minutes Cover it with a piece of paper...

Страница 24: ...t the toner cartridge not to scratch against the printer 6 Close the front cover Make sure that the cover is securely closed If the cover is not firmly closed printing errors may occur when you print...

Страница 25: ...ch the rear guide and pull it out to extend the tray Note Because the printer is very light it may be moved when you use it for example when opening closing the tray or installing removing the toner c...

Страница 26: ...ttention not to overload paper Paper overloading may cause paper jams 5 Pinch the rear guide to adjust for the paper length and pinch the side guide and slide it to the left flush against the paper No...

Страница 27: ...onnecting the printer to the USB port of the computer requires a certified USB cable 1 Make sure that both the printer and the computer are turned off 2 Plug the USB printer cable into the connector o...

Страница 28: ...end into a properly grounded AC outlet and turn on the printer using the power switch Cautions The fusing area at the rear portion of the inside of your printer is hot when powered Be careful not to...

Страница 29: ...a Demo Page Print a demo page to make sure that the printer is operating correctly 1 Press and hold down the button on the control panel for about 2 seconds to print a demo page 2 The Demo page shows...

Страница 30: ...operating system Windows 98 Me 2000 XP The following table shows Windows requirements NOTE For Windows 2000 XP the system administrator should install the software Printer driver for Linux You can pr...

Страница 31: ...SETTING UP YOUR PRINTER 2 13...

Страница 32: ...e with this printer and how to properly load paper in the tray for the best print quality This chapter includes Choosing Paper and Other Materials Verifying the Output Location Loading Paper Printing...

Страница 33: ...ou can use any size paper that fits easily within the paper adjusters of the paper feeder Weight Your printer supports paper weight as follows 16 24 lbs 60 90 g m2 bond for the tray 16 43 lbs 60 165 g...

Страница 34: ...ed Keep it away from moisture or other conditions that can cause it to wrinkle or curl Store unused materials at temperatures between 15 o C and 30 oC 59 oF to 86 oF The relative humidity should be be...

Страница 35: ...mudging caused by fingerprints handle them and coated paper carefully To avoid fading do not expose the printed transparencies to prolonged sunlight Only use transparencies recommended for use in lase...

Страница 36: ...5 0 in long For preprinted paper Letterheads must be printed with heat resistant ink that will not melt vaporize or release hazardous emissions when subjected to the printer s fusing temperature of 2...

Страница 37: ...ve the pages so that the tray is not overloaded Loading Paper Proper paper loading helps prevent paper jams and ensure trouble free printing Do not remove the paper in the tray while a job is printing...

Страница 38: ...e up Adjust the paper guide against the print material without bending the paper 2 When you print a document you must select Manual Feed for Source from the software application and then select the co...

Страница 39: ...tray with the flap side down The stamp area is on the left side and the end of the envelope with the stamp area enters the printer first and center of the tray Cautions If you print 20 envelopes in s...

Страница 40: ...each other do not let the printed sheets stack up as they are printed out Place transparencies on a flat surface after removing them from the printer Do not use transparencies that are separating from...

Страница 41: ...Guide 5 Press the button to start feeding Canceling a Print Job There are two ways to cancel a print job To stop a print job from the Control Panel Press the button on the control panel The printer w...

Страница 42: ...Windows 2000 XP In Manual Feed mode you can t cancel a print job by pressing the button To cancel a print job in Manual Feed mode 1 Turn the printer off 2 Double click the icon at right bottom of the...

Страница 43: ...suggestions for maintaining the toner cartridge and the printer This chapter includes Maintaining the Toner Cartridge Using the Toner Save Mode Cleaning the Printer Consumables and Replacement Parts M...

Страница 44: ...not expose it to light for more than few minute Toner cartridge life expectancy The life of the toner cartridge depends on the amount of toner that print jobs require When printing text at 5 coverage...

Страница 45: ...u to finish the current print job before replacing the toner cartridge 1 Open the front cover 2 Pull the toner cartridge out and remove it from the printer Cautions Avoid reaching too far into the pri...

Страница 46: ...ets on your clothing wipe it off with a dry cloth and wash clothing in cold water Hot water sets toner into fabric 4 Reinsert the toner cartridge into the printer Ensure that the toner cartridge snaps...

Страница 47: ...ill extend the life of your toner cartridge and reduce your cost per page but will reduce print quality There are two ways to enable the Toner Save mode From the Control Panel Press the button on the...

Страница 48: ...vent or other strong substances can discolor or crack the cabinet Cleaning the Outside Wipe the outside surface of the printer with a soft clean lint free cloth You can dampen the cloth slightly with...

Страница 49: ...and the toner cartridge cavity Note To prevent damage to the toner cartridge do not expose it to light for more than few minute Cover it with a piece of paper if necessary Also do not touch the black...

Страница 50: ...TER 4 8 4 6 Reinsert the toner cartridge and close the cover Make sure that the cover is securely closed If it is not firmly closed printing errors may occur when you print 7 Plug in the power cord an...

Страница 51: ...orn parts The following items should be replaced after you have printed a specified number of pages See the table below To purchase the consumables and replacement parts contact Xerox dealer or the pl...

Страница 52: ...counter an error while using your printer This chapter includes Troubleshooting Checklist Solving General Printing Problems Clearing Paper Jams Solving Print Quality Problems Troubleshooting Error Mes...

Страница 53: ...it is printed correctly If there is a print quality problem go to Solving Print Quality Problems on page 5 11 Print a short document from a software application to verify that the computer and printe...

Страница 54: ...oading Paper on page 2 7 Install the toner cartridge See Installing the Toner Cartridge on page 2 4 If the problem persists contact your service representative The printer may be in Manual Feed mode A...

Страница 55: ...or 17 Letter pages per minute If using Windows 98 Me the Spooling Setting may be set incorrectly From the Start menu choose Settings and Printers Right click the your printer icon choose Properties cl...

Страница 56: ...print job that you know works Finally try a new printer cable The wrong printer driver was selected Check the application s printer selection menu to ensure that your printer is selected The software...

Страница 57: ...opened during a print job Paper that does not meet paper specifications has been used See Paper Specifications on page 6 3 Paper that is outside of the supported size range has been used See Paper Sp...

Страница 58: ...he paper is visible pull the paper straight out When you pull the jammed paper if there is resistance and the paper does not move immediately stop pulling Continue with the next step 2 Open the top co...

Страница 59: ...8 3 Loosen the paper if it is caught in the heat rollers Then pull the paper gently out 4 Close the inner cover and the top cover Printing resumes automatically Note Failed pages will not reprint Try...

Страница 60: ...he visible edge from the tray Make sure that all of the paper is properly aligned in the tray 2 Open and close the front or top cover to resume printing the document from failed pages Around the Toner...

Страница 61: ...MS 5 10 3 Gently pull the paper toward you 4 Check that there is no other paper in the printer 5 Reinstall the toner cartridge and close the front cover Your printer resumes printing the document from...

Страница 62: ...mix paper types in the input tray Use only recommended print media See Paper Specifications on page 6 3 Ensure that the recommended print side is facing up when loading paper into the input tray Solv...

Страница 63: ...de on page 4 6 The surface of the LSU part inside the machine may be dirty Clean the LSU See Cleaning the Inside on page 4 6 Contact a service representative Toner specs The paper may not meet specifi...

Страница 64: ...artridge and install a new one See Installing the Toner Cartridge on page 2 4 Toner smear Clean the inside of the printer See Cleaning the Inside on page 4 6 Check the paper type and quality See Paper...

Страница 65: ...ed page adjust the print resolution through your software application or the printer properties Misformed characters If characters are improperly formed and producing hollow images the paper stock may...

Страница 66: ...ck for leaking toner Clean the inside of the printer Black pages The toner cartridge may not be installed properly Remove the cartridge and reinsert The toner cartridge may be defective and need repla...

Страница 67: ...cifications See Paper Specifications on page 6 3 Horizontal stripes If horizontally aligned black streaks or smears appear The toner cartridge may be installed improperly Remove the cartridge and rein...

Страница 68: ...this problem occurs contact your service representative LED lights red Paper jam occurs To solve the problem see Clearing Paper Jams on page 5 6 The front cover is open Close the front cover Paper tr...

Страница 69: ...r messages Problem Possible Cause and Solution File in Use message appears during installation Exit all software applications Remove all software from the StartUp Group then restart Windows Reinstall...

Страница 70: ...the Printer Package detects such a conflict the conflicting option is changed to a No Choice value and you have to choose an option that does not conflict before being able to submit the changes I can...

Страница 71: ...d to make sure that you leave the LLPR option to its default Portrait setting to avoid unwanted rotations of the page that would result in a cropped output Some pages come out all white nothing is pri...

Страница 72: ...ur lpoptions file which is manipulated by the lpoptions command These options will always be used if not overridden by LLPR settings To get rid of all options for a printer run the following command r...

Страница 73: ...SOLVING PROBLEMS 5 22...

Страница 74: ...6 This chapter includes Printer Specifications Paper Specifications Specifications...

Страница 75: ...cle Monthly Up to 5 000 pages Weight 5 5 Kg including Toner Cartridge Package Weight Paper 1 2 kg Plastic 0 2 kg External Dimensions W x D x H 354 x 297 4 x 210 mm 13 9 x 11 7 x 8 3 in Operating Envir...

Страница 76: ...uide can cause the following problems Poor print quality Increased paper jams Premature wear on the printer Notes Some paper may meet all of the guidelines in this guide and still not produce satisfac...

Страница 77: ...2 bond for the paper tray 16 to 43 lb 60 to 165 g m2 bond for the manual feed mode 150 sheets of 20 lb 75 g m2 bond paper for the paper tray 1 sheet of paper for the manual feed mode Envelopes No 10 1...

Страница 78: ...he paper Ensure that any colored paper or preprinted forms use inks that are compatible with this fusing temperature 180 C or 372 F for 0 1 second Symptom Problem with Paper Solution Poor print qualit...

Страница 79: ...within 5 mm 0 02 in Cut Edge Conditions Cut with sharp blades with no visible fray Fusing Compatibility Must not scorch melt offset or release hazardous emissions when heated to 200 C 392 F for 0 1 se...

Страница 80: ...en not to purchase more paper than can be used in a short time about 3 months Paper stored for long periods may experience heat and moisture extremes which can cause damage Planning is important to pr...

Страница 81: ...3 3 paper load in tray 2 7 3 6 preprinted paper print 3 9 print demo page 2 11 printer cable connect 2 9 printer clean 4 6 problem Linux 5 19 windows 5 18 problem solving checklist 5 2 general 5 3 pa...

Страница 82: ......

Страница 83: ...Tab 8 Printer Tab 8 Using a Favorite Setting 9 Using Help 9 Chapter 3 ADVANCED PRINTING Printing Multiple Pages on One Sheet of Paper N Up Printing 10 Printing Posters 11 Printing a Reduced or Enlarg...

Страница 84: ...Host Computer 16 Setting Up a Client Computer 16 Chapter 5 USING YOUR PRINTER IN LINUX System Requirements 17 Installing the Printer Driver 18 Changing the Printer Connection Method 19 Uninstalling th...

Страница 85: ...e User Guide If your computer doesn t have Adobe Acrobat click on this option and it will automatically install Adobe Acrobat Reader for you Install Acrobat Reader If your computer doesn t have Adobe...

Страница 86: ...from various Windows applications The exact steps for printing a document may vary depending on the application program you are using Refer to the User s Guide of your software application for the exa...

Страница 87: ...am To make your changes permanent make them in the Printers folder The following procedure is for Windows XP For other Windows OS refer to the corresponding Windows User s Guide or online help 1 Click...

Страница 88: ...ize Source Make sure that Source is set to the corresponding paper tray Manual Feed is used when you print using special materials like envelopes and transparencies You have to load one sheet at a tim...

Страница 89: ...normal documents Light This setting is for bolder line widths or darker gray scale images Dark This setting is for finer line width higher definition in graphics and lighter gray scale images 1 2 3 4...

Страница 90: ...of a printed page until the printer signals that the page has successfully exited the printer If a paper jam occurs the printer will reprint the last page sent from the computer after you have cleared...

Страница 91: ...m from the Favorites drop down list The printer is now set to print according to the Favorites setting you selected To delete a Favorites item select it from the list and click Delete You can also res...

Страница 92: ...es on One Sheet of Paper N Up Printing You can select the number of pages to print on a single sheet of paper To print more than one page per sheet the pages will be reduced in size and arranged in th...

Страница 93: ...y an overlap in millimeters or inches to make it easier to pasting the sheets together 4 Click the Paper tab select the paper source size and type 5 Click OK and print the document You can complete th...

Страница 94: ...xt over an existing document For example you may want to have large gray letters reading DRAFT or CONFIDENTIAL printed diagonally across the first page or all pages of a document There are several pre...

Страница 95: ...atermark from the Watermark drop down list Editing a Watermark 1 To change the print settings from your software application access printer properties See Printing a Document on page 4 2 Click the Oth...

Страница 96: ...go or image 1 Create or open a document containing text or an image for use in a new page overlay Position the items exactly as you wish them to appear when printed as an overlay 2 To save the documen...

Страница 97: ...printing Select the overlay from the Overlay List box 6 If necessary click Confirm Page Overlay When Printing If this box is checked a message window appears each time you submit a document for print...

Страница 98: ...ed CD ROM Setting Up a Host Computer 1 Start Windows 2 From the Start menu select Printers and Faxes 3 Double click your printer driver icon 4 From the Printer menu select Sharing 5 Check the Share th...

Страница 99: ...and above Linux Mandrake 7 1 8 0 and above SuSE 6 4 7 0 7 1 and above Debian 2 2 and above Caldera OpenLinux 2 3 2 4 and above Turbo Linux 6 0 and above Slackware 7 0 7 1 and above Recommended Capacit...

Страница 100: ...mended or Expert and then click Continue Recommended is fully automated and does not require any interaction Expert installation allows you to select the install path or printing system 5 If you selec...

Страница 101: ...Method If you change the printer connection method from USB to parallel or vice versa while in use you must reconfigure your Linux printer by adding the printer to your system Take the following steps...

Страница 102: ...istrative tasks including adding and removing new printers and changing their global settings Regular users can also run it to easily inspect job queues examine printer properties and changing their l...

Страница 103: ...ens You will see the following six tabs at the top of the window General allows you to change the paper size the paper type the paper source the orientation of the documents enable the duplex feature...

Страница 104: ...21 Windows 6 paper type set Linux 21 Windows 6 poster print 11 power save set 8 print document 4 fit to page 12 from Windows 4 N up Windows 10 overlay 14 poster 12 scaling 11 watermark 12 printer prop...

Отзывы: