background image


Installation and Users Guide: XenData X1 Archive Appliance 


Page 8


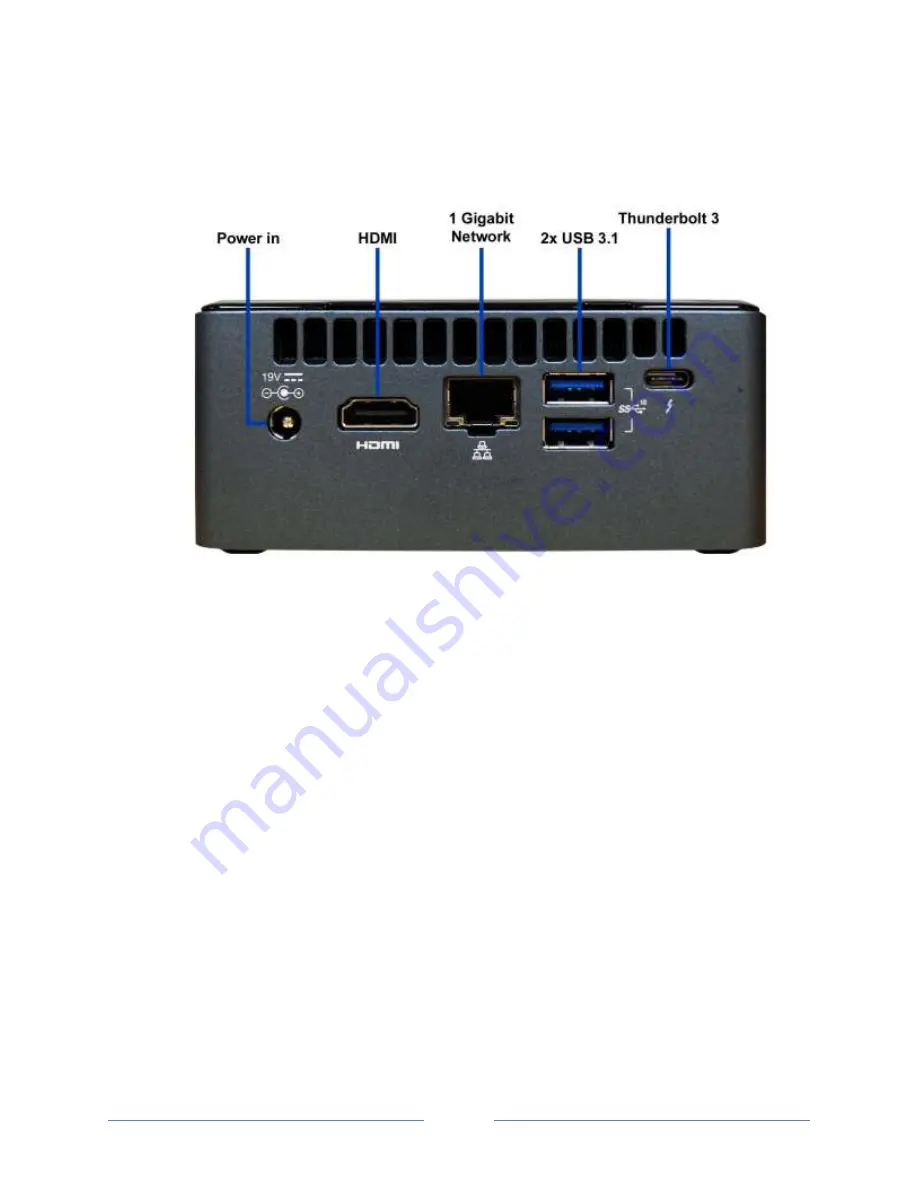
2.2   Rear 


Power in 

which connects to the supplied power brick. 

 
HDMI 

2.0a display port supporting 8 channel audio (7.1 surround sound) 

 
1 Gigabit Network

 port with RJ45 connectors 


2 x USB 3.1 

type-A ports


Thunderbolt 3 

USB Type-C port with data transfer up to 40 Gb/s 


Содержание X1

Страница 1: ...XenData X1 Archive Appliance for ODA Installation and Users Guide 2019 XenData Inc All rights reserved XenData is a trademark of XenData Limited Document last modified 27 December 2019...

Страница 2: ...cal Drives 1 3 Specification 2 Connections 2 1 Front 2 2 Rear 3 Installation 3 1 VESA Mounting Optional 3 2 Make Connections 3 3 Initial System Configuration 3 4 Setting Policies for Archiving to ODA...

Страница 3: ...local environmental regulations Failure to use the included power adapter shall violate regulatory compliance requirements and may expose the user to safety hazards Temperature This device is intende...

Страница 4: ...ded The archive volume appears locally as a single logical drive the X drive and there are multiple ways to write to and restore files from it Copy or move files locally to and from the X drive Share...

Страница 5: ...age 5 1 2 X1 Logical Drives The X1 has two logical drives which are illustrated below C is the Windows 10 system drive X is the ODA archive logical drive It contains the files held on the 1 92 TB mana...

Страница 6: ...560 Bluetooth Intel Bluetooth 5 0 USB connections 2 x USB 3 1 including one charging front mounted 2 x USB 3 1 rear mounted Thunderbolt connection 1 x Thunderbolt 3 USB Type C port with data transfer...

Страница 7: ...7 Chapter 2 Connections 2 1 Front USB 3 1 type A port USB 3 1 Powered type A port suitable for charging Audio headphone microphone jack On Off Switch which is used to apply or remove power to the appl...

Страница 8: ...8 2 2 Rear Power in which connects to the supplied power brick HDMI 2 0a display port supporting 8 channel audio 7 1 surround sound 1 Gigabit Network port with RJ45 connectors 2 x USB 3 1 type A ports...

Страница 9: ...or TV that supports a VESA mount Follow these instructions to attach and use the VESA bracket included with the X1 1 Using the four small black screws that were included in the X1 box attach the VESA...

Страница 10: ...ibed above and will then make arrangements with you for remote access to the X1 1 Connect all cables to the system as described in section 3 2 and then power on the system as described in section 4 1...

Страница 11: ...1 Archive Appliance Page 11 3 4 Setting Policies for Archiving to ODA Please refer to the XenData Archive Series Software User Manual 3 5 Configuring the XenData Alert Module Please refer to the XenDa...

Страница 12: ...e on off button 4 2 System Power Off For a system with one or more stand alone ODA tape drives please follow the procedure described below 1 If present unload any cartridges from the ODA drives This c...

Отзывы: