background image

3

Precautions


»

Please read and follow these instructions, and keep this manual in 
a safe place.


»

Back up your data before using this product in order to prevent 
loss of important data. Xcellon will not be responsible for any 
data loss.


»

Keep this product away from water and any flammable gases or 
liquids.


»

Use only the correct, recommended voltage.


»

Handle this product with care.


»

Clean this product with only a soft, dry cloth.


»

Keep this product away from children.


»

Do not store this product in direct sunlight or in extreme high or 
low temperatures.


»

All photos are for illustrative purposes only.

Содержание HDD-202

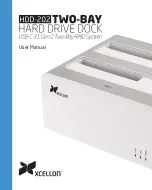
Страница 1: ...User Manual...

Страница 2: ...a variety of options when it comes to read write functions data storage and backup and are configured via the DIP switches located on the rear of the device The HDD 202 is equipped with a USB C port...

Страница 3: ...l not be responsible for any data loss Keep this product away from water and any flammable gases or liquids Use only the correct recommended voltage Handle this product with care Clean this product wi...

Страница 4: ...us LED blue purple red 5 HD 2 status LED blue purple red 6 Power LED blue Rear 7 Power button 8 DC power port 9 USB C port 10 Set button 11 RAID switches 12 Raid button instruction Also Included USB T...

Страница 5: ...before changing the RAID mode GUI 12 3 ON RAID1 12 3 ON SPAN 12 3 ON RAID0 12 3 ON PM 12 3 ON HD 1 HD 2 POWER HD 2 HD 1 WARNING Back up all data before changing the RAID mode RAID 0 1 2 3 ON RAID 1 1...

Страница 6: ...orresponds to your hard disk will blink purple The HDD 202 works with one drive or two In order to set up a RAID system you will need to install two drives If your disk drive has been formatted your c...

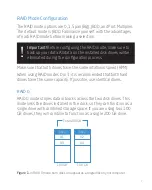
Страница 7: ...oth drives have the same rotational speed RPM When using RAID modes 0 or 1 it is recommended that both hard drives have the same capacity If possible use identical drives RAID 0 RAID 0 mode stripes da...

Страница 8: ...ubleshooting on page 16 Only one of the two drives is accessible in RAID 1 mode Figure 2 RAID 1 mode only one drive will appear on your computer When using RAID 0 and RAID 1 modes you can use disk dri...

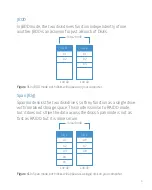
Страница 9: ...disk drives so they function as a single drive with combined storage space This mode is similar to RAID 0 mode but it does not stripe the data across the disks Span mode is not as fast as RAID 0 but...

Страница 10: ...ress and hold the Set button for ten seconds This will start the RAID setup procedure during which the HD status LEDs will blink purple intermittently 3 After ten seconds let go of the Set button At t...

Страница 11: ...safe to remove the device gently pull the disk drive out of the dock Mac 1 Click on the eject symbol next to the device s icon in the Finder 2 After the device disappears from the Finder gently pull t...

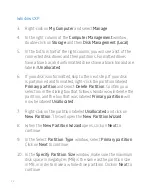
Страница 12: ...rtition labeled Primary partition and select Delete Partition Confirm your selection in the dialog box that follows Windows will delete the partition and the box that was labeled Primary partition wil...

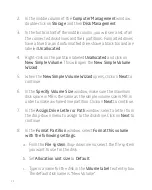
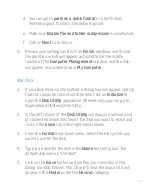
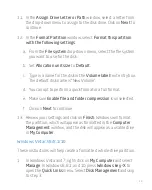
Страница 13: ...ame is New Volume d You can opt to perform a quick format or a full format e Make sure Enable file and folder compression is unselected f Click on Next to continue 13 Review your settings and click on...

Страница 14: ...Wizard opens click on Next to continue 6 In the Specify Volume Size window make sure the maximum disk space in MB is the same as the simple volume size in MB in order to make a whole drive partition...

Страница 15: ...g that the computer cannot read the disk Click on Initialize to open the Disk Utility application Alternatively you can go to Applications Utilities Disk Utility 2 In the left column of the Disk Utili...

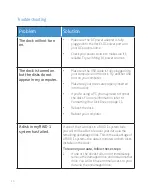
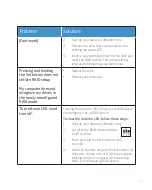
Страница 16: ...the dock If you re using a PC you may need to format the disks For more information refer to Formatting Your Disk Drive on page 11 Reboot the dock Reboot your computer A disk in my RAID 1 system has f...

Страница 17: ...rives in the newly reconfigured RAID mode Reboot the dock Reboot your computer The red error LED won t turn off Clearing the red error LED will clear your RAID setup and configure it as a JBOD system...

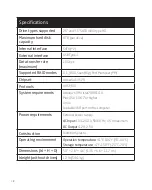
Страница 18: ...t Asmedia 1352R Protocols UASP BOT System requirements Windows XP Vista 7 8 8 1 10 Mac OS X 10 6 7 or higher Linux Available USB port on the computer Power requirements External power supply AC Input...

Страница 19: ...ge or defect caused by misuse neglect accident alteration abuse improper installation or maintenance EXCEPT AS PROVIDED HEREIN THE WARRANTY PROVIDER MAKES NEITHER ANY EXPRESS WARRANTIES NOR ANY IMPLIE...

Страница 20: ...GG2...
Отзывы: