background image

3.1.5 Taking Photographs 

You can also use this camcorder to take photos of the 
current scene.


1. From the standby screen, press the 

[MODE] 

button to 

enter Photo mode. 

2.


Press [OK] to button to take a photo. 

6


Photo made 

Snapshot during recording


3.1.6 The Photograph Sreen 

No.


Item


Descriptlon


1


l

til

l


Photograph mode


2


11m


Current setting 

video 

solution


3


Ili


Setting time photograph


4


13


Charging logo


5


Current date


6


mDJ


Rest photograph pieces


7


rmmD


Currenttime


1    2


1w

i   

ł

.P


Содержание NaviiGPS

Страница 1: ...Xblitz NAVIIGPS Cam recorder Kamera samochodowa...

Страница 2: ......

Страница 3: ...y cznie dedykowanej adowarki Nigdy nie demontuj ani nie pr buj samodzielnie naprawia urz dzenia Mo e to doprowadzi do zniszczenia kamery spowodowa pora enie pr dem a tak e przyczyni si do utraty gwara...

Страница 4: ...FullHD 1920x1080 30 kl sek Kolorowy wy wietlacz LCD o przek tnej 2 cali Szerokok tny obiektyw 140 stopni Funkcja automatycznego nagrywania w przypadku wykrycia kolizji Wsparcie dla kart microSDHC o po...

Страница 5: ...8 Numer seryjny 9 Przycisk zasilania w wy 10 Gniazdko karty pami ci 11 Wska nik zasilania LED 12 Wy wietlacz LCD 13 Przycisk MODE 14 Przycisk UP strza ka w g r 15 Przycisk DOWN strza ka w d 16 Przycis...

Страница 6: ...rzania wci nij kr tko aby szybko powr ci do poprzedniej funkcji wci ni cie i przytrzymanie pozwoli przewin szybko do ty u odtwarzane nagranie 2X 4X 8X ka de jednorazowe d u sze wci ni cie spowoduje uz...

Страница 7: ...gniazda w obudowie kamery a us yszysz klikni cie i uchwyt wskoczy na swoje miejsce Umie przyssawk uchwytu w wybranym miejscu na przedniej szybie auta Upewnij si czy przyssawka solidnie przylega do sz...

Страница 8: ...i godziny w ustawieniach urz dzenia Ustawianie daty i godziny wykonaj nast puj ce kroki w trybie oczekiwania standby Wci nij przycisk MODE aby wywo a menu OSD wci nij przycisk DOWN strza ka w d aby w...

Страница 9: ...ik video zostanie nadpisany najnowszym nagraniem NAGRYWANIE AWARYJNE W trybie nagrywania video wci nij przycisk DOWN strza ka w d aby uruchomi tryb nagrywania awaryjnego w g rnej cz ci ekranu pojawi s...

Страница 10: ...ie 9 Bie cy czas wykonanego nagrania 10 Czujnik ruchu uruchomiony lub wci ni ty przycisk DOWN nagranie zabezpieczone przed nadpisaniem 11 Wykrywanie ruchu 12 W trybie nagrywania przycisk MODE wykona z...

Страница 11: ...i DOWN aby wybra dane nagranie z listy plik w video a nast pnie wci nij przycisk OK aby odtworzy wybrane nagranie U yj przycisk w UP i DOWN aby wybra poprzednie lub nast pne nagranie W czasie odtwarza...

Страница 12: ...cie wykonaj nast puj ce czynno ci z poziomu video standby lub foto standby wci nij przycisk DOWN aby przej do listy nagra video lub listy plik w foto u yj przycisk w UP i DOWN aby wybra dany plik vid...

Страница 13: ...oducts Use his product will cause frequency energy radiation il not installed and used according to the manua may eause harmful interference for phone communications lfthisproductcauseharmfulinte eren...

Страница 14: ...ment and orbaltery by handling il overtothe applicable take back scheme for the recycling of electrical and electronic equipment and or battery For more information about recycling of his equipment an...

Страница 15: ...Notice Notes on lnstallation damage the nt film 5 on...

Страница 16: ...4 flames can cause...

Страница 17: ...camcorder 1920x1080 30fps 2 LCD color screen 140 degree wide angie full glass Iens Automatic Emergency recording for collision detection Support SDHC up to 64GB 1 2 Package details The package contai...

Страница 18: ...ption 1 Suction cup connect 2 USB I Power 3 HDMI 4 Reset 5 Speaker 6 Wide angle lens 7 Microphone 8 Serial No No Description 9 Power bu on 10 Card slot 11 LED indicatorPowerbu on 12 211 screen 13 Mode...

Страница 19: ...ction 15 Down button Playback button Protection files On play made it is a back selection button On play files short press is fasting speed 2X 4X 8X three grade long press one time skip one grade On p...

Страница 20: ...ard until it clicks inio place To remove the memory card Push to eject the memory card out of the slot Note 1 Do not remove orinsert the memory card when the devlce is powered on This may damage the m...

Страница 21: ...unt to Windshield 1 Attach the bracket to the device Slide it into the bracket holder until you hear a click 2 With the suction cup laying fiat position the suction cup on the windshield 3 Make sure t...

Страница 22: ...ust the device position 1 Loose the knob to swivel the device vertically 2 Loose the knob to swivel the device horizontally up to 360 3 Then tighten the knob to make sure the device is securely locked...

Страница 23: ...rgerto the cigarette lighter socket of your vehicle Once lhe vehicle engine is slarted the camcorder automatically powers on Note 1 The red LED lights up while the bartery is charging 2 Please take no...

Страница 24: ...matically turns on and start recording Once the vehicle engine shuts down the camcorder automatically saves the recording and turns off the powerwithin 10 seconds 2 4 2 Manua PowerOn Off To manually t...

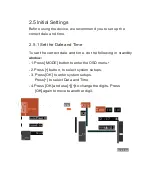
Страница 25: ...rect dale and time do the following in standby window 1 Press MODE button to enter the OSD menu 2 Press button to select system setups 3 Press OK to enter system setups Press to select Data and Time 4...

Страница 26: ...3 Recording Videos...

Страница 27: ...otected To stop the emergency made press the button Note 1 lf theG Sensor isenabled and a collision isdetected the dev ice will automatically tri gger the emergencyrecording 2 Theemergencyrecordingfil...

Страница 28: ...tion logo display green colour when GPSpositon sucessful 4 3 Charging logo 5 Current date 6 mmm iJ Rest recording time 7 Current time 8 Recordlng 9 Current already recorded time 10 GSENSOR start or pr...

Страница 29: ...button to enter Photo mode 2 Press OK to button to take a photo 6 Photo made Snapshot during recording 3 1 6 The PhotographSreen No Item Descriptlon 1 ltill Photograph mode 2 11m Current setting vide...

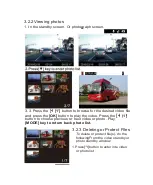
Страница 30: ...videos 1 In the standby screen Or photograph screen 2 a list 717 3 Press the t I ITI button to browse for the desired video file and press the Ol button to play the video Press the t f button to choos...

Страница 31: ...video file and press the OK button to play the video Press the I 1 button to choose prevlous or next video or photo Play MODE key to return back photo list 3 2 3 Deleting or Protect Files To delete o...

Страница 32: ...ding Lock current Unlock current protection file no have lock looo can bedeleted when cvcle recordino Lock all Protedall files willdisplaylock logo after pro ection willnotbecovered whenrecording Unlo...

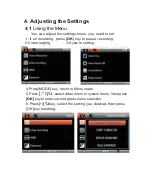
Страница 33: ...on recording press OK key to pause recording 2 Video setting 3 System setting _ _ o 4 Press MODE key return to Menu made 5 Press I TJ select video menu or system menu hen press OK key to enter second...

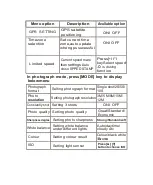
Страница 34: ...0P 1280 x720 30fps WVGA 884x4SO 30fps VGA 640x480 30fps Cycle recording time Setting each recording files recording time 3 min 5min 10min close WDR high brightness in weak light in the harshlight cond...

Страница 35: ...ODE key to display belowmenu Photograph format Selting photograph format Single shot 2S 5S 10S Photo resolution Setting photograph resolution 3M 5 M 8M 10M 12M Constantly shot Setting 3 shots ONI OFF...

Страница 36: ......

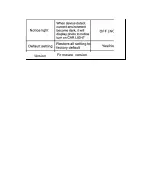
Страница 37: ...Version Firmware version...

Страница 38: ...ps HD 1280 x 720 30 ps WVGA B48x480 30fps VGA 640x480 30fps Format MOVH 264 Stili image Resolution 12M 4032 3024 Format DCF JPEG Exif 2 2 Snapshot Electronic shutter Auto 1 2 1 2000 sec GPS Build in...

Страница 39: ......

Страница 40: ......

Отзывы: