background image


Removing Virtual COM Ports 


Chapter 7                                                                  49 

C

C

h

h

a

a

p

p

t

t

e

e

r

r


7

7

:

:


R

R

E

E

M

M

O

O

V

V

I

I

N

N

G

G


V

V

I

I

R

R

T

T

U

U

A

A

L

L


C

C

O

O

M

M


P

P

O

O

R

R

T

T

S

S


The 

XTRALINK IP IPRS23202 Manager

 software 

Uninstall Virtual COM 

Port

 feature will remove a mapped COM port in the Device Manager of 

Windows 2000 and XP operating systems.


It may also be removed in the 

Device Manager of Windows 98, ME, NT, 2000, and XP.


Windows 98 

users also will find a 

Remove Virtual COM

 feature in the Programs file. 


Removing the Virtual COM port with XTRALINK 
IP IPRS23202 Manager  

Step1:

 From the Windows Desktop, click: 

Start 


Programs 

 Xantech


 XTRALINK IP IPRS23202 

MANAGER Servers 

  XTRALINK IP IPRS23202 Manager


Step 2:

 In the 

XTRALINK IP IPRS23202 Manager

 window click the 

Virtual COM List

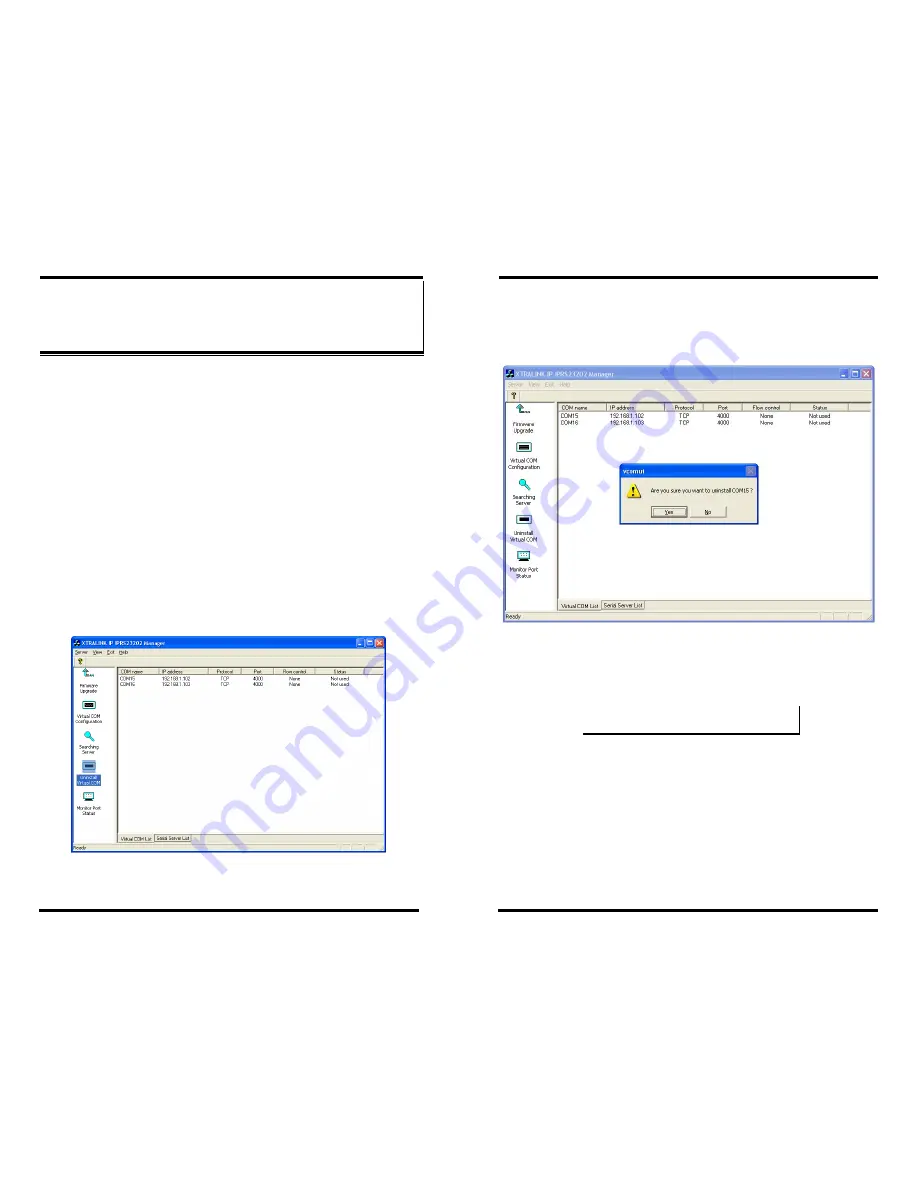
 tab. Highlight the mapped COM port 

number to be removed. 


Figure 45. 

 The XTRALINK IP IPRS23202 Manager Window


Removing Virtual COM Ports


50                                                                   Chapter 7 


Step 3:

 Click the 

Uninstall Virtual COM

 icon. The Manager will ask 

for conformation. Click 

OK

 to complete the uninstall 

procedure. 


Figure 46.  The vcomui Dialogue Box 

Removing the Virtual COM Port using Device 
Manager 

N

N

o

o

t

t

e

e

:

:


The screen shots were taken from a Windows XP operating system 

Step 1:

 From the Windows 

Desktop

 click: 

Start 

 Settings 

 Control Panel

.  

Step 2:

 Click the 

System

 icon when the manager window opens.  

Содержание XTRALINK IP

Страница 1: ...Second Floor Sylmar CA 91342 3573 Sales 800 843 5465 Fax 818 362 9506 X XT TR RA AL LI IN NK K I IP P M Mu ul lt ti i I In nt te er rf fa ac ce e E Et th he er rn ne et t X XT TR RA AL LI IN NK K I I...

Страница 2: ...100 Telfair Avenue Second Floor Sylmar CA 91342 3573 Sales 800 843 5465 Fax 818 362 9506 Xantech Corporation 13100 Telfair Avenue Second Floor Sylmar CA 91342 3573 Sales 800 843 5465 Fax 818 362 9506...

Страница 3: ...notice and does not represent a commitment on the part of Xantech Corporation Xantech shall not be liable for incidental or consequential damages resulting from the furnishing performance or use of t...

Страница 4: ...WARE 17 SOFTWARE INSTALLATION 17 Automatic Installation 17 Manual Installation 17 ii Table of Contents Updating an Existing Installation 19 Opening the XTRALINK IP IPRS23202 Manager 20 CHAPTER 4 USING...

Страница 5: ...SETTING SERVER PROPERTIES 59 CHAPTER 11 USING TELNET 62 CONFIGURATION USING TELNET 62 Navigating the Configuration Menu 64 CHAPTER 12 XTRALINK IP AND TECHNICAL DATA 66 APPENDIX A RS 232 CONNECTIONS 70...

Страница 6: ...gure 34 The Restart Dialogue Box 38 Figure 35 The Restarting Dialogue Box 39 Figure 36 The Server Search Dialogue Box 39 Figure 37 The Search XTRALINK IP IPRS23202 MANAGER Dialogue Box 39 Figure 38 Co...

Страница 7: ...iguration via the network using any web browser o Telnet allows configuration via the network by accessing the setup configuration menu o Console Mode allows configuration through an RS 232 serial por...

Страница 8: ...either TCP server or UDP server with a designated communication port number The virtual COM driver is the TCP or UDP client Paired Mode Paired Mode is also called serial tunneling In this mode any two...

Страница 9: ...INK IP IPRS23202 Manager software It will automatically search for any reachable XTRALINK IP DEVICES A list of all XTRALINK IP connected to the LAN will appear in the XTRALINK IP List window Step 2 Do...

Страница 10: ...ocol and the appropriate IP address determined in the last section Figure 4 Configuring the Virtual COM Port Check Communications Step 1 From the Windows Start menu run HyperTerminal Step 2 Configure...

Страница 11: ...ector DB 9M Indicator Lights Light Indication Power Red power is applied Link Yellow 10BaseT Ethernet connection established Green 100BaseTX Ethernet connection established Ready Flashing Green system...

Страница 12: ...as HyperTerminal When the XTRALINK IP enters Console Mode the Console Mode screen will appear in the HyperTerminal program window The serial port settings must be 8 N 1 at 9600 baud 12 Chapter 2 Figur...

Страница 13: ...t to the XTRALINK IP serial port or Serial Port 1 Upgrading also can be accomplished via the network connection using the XTRALINK IP IPRS23202 Manager software and a virtual COM port N No ot te e Ref...

Страница 14: ...xantech com 16 Chapter 2 XTRALINK IP Serial Port Connector Pin outs Pin outs for RS 232 RS 422 and RS 485 operation are shown below DB 9M Pin RS 232 Signal Name DTE RS 422 RS 485 1 Carrier Detect DCD...

Страница 15: ...Uninstall Virtual COM Ports Automatic Installation Step 1a Inserting the CD in the CD ROM should automatically launch the Install Shield Wizard Manual Installation Step 1b To manually start the softw...

Страница 16: ...e Opening the XTRALINK IP IPRS23202 Manager Step 5 If the XTRALINK IP is not already connected to the network or to the Ethernet port on the computer connect it Set all the DIP switches to the OFF pos...

Страница 17: ...puter Ethernet port Set all the DIP switches on the XTRALINK IP to the OFF position Figure 19 Ethernet Connection via a LAN USING XTRALINK IP IPRS23202 MANAGER 22 Chapter 4 Figure 20 Direct Ethernet C...

Страница 18: ...ort o Serial TX Displays the number of bytes of data sent to the serial device since the IP connection was established o Serial RX Displays the number of bytes of data received from the connected seri...

Страница 19: ...to each XTRALINK IP port IP Address Displays the IP Address for the XTRALINK IP All ports in a XTRALINK IP have the same IP address Protocol Displays the currently selected TCP or UDP mode for the XTR...

Страница 20: ...erties Window USING XTRALINK IP IPRS23202 MANAGER 28 Chapter 4 N No ot te e XTRALINK IP IPRS23202 Manager Navigation Use the mouse to select the property and parameters or Tab to move to the next prop...

Страница 21: ...RS23202 MANAGER Dialogue Box After that port has been updated you may want to re enter Server Properties to verify the changes have taken effect or to view change the configuration of other ports Each...

Страница 22: ...NK IP A new Server Name of up to 16 characters can be entered If more than one XTRALINK IP is connected on the LAN it is recommended that a new name be assigned to each When the XTRALINK IP IPRS23202...

Страница 23: ...window enter Ping xxx xxx xxx xxx IP address for the server to be confirmed The command will return the Ping results indicating 4 replies Figure 31 Pinging using the DOS command window Server Propert...

Страница 24: ...no value is entered into this field the server will not disconnect Connection Mode The Connection Mode field has three options Server Client and Client no heartbeat When Client or Client no heartbeat...

Страница 25: ...l port on the server RS 422 When this mode is selected and the server updated the selected serial port will become an RS 422 serial port on the server RS 485 When this mode is selected and the server...

Страница 26: ...een by tabbing through the list of screens on the left side of the window and highlighting Configuration Server Properties Configuration 40 Chapter 5 There are four options shown on the right side of...

Страница 27: ...erties Configuration Chapter 5 41 Figure 38 The Web Server Page N No ot te e If you leave any Web Server page without saving any changes you have made will be ignored Server Properties Configuration 4...

Страница 28: ...s which allows the software to open a connection with the serial port located anywhere on the LAN WAN When using the virtual COM port the XTRALINK IP is configured as a TCP or UDP Server Virtual COM P...

Страница 29: ...if used by the application program and serial hardware The XTRALINK IP must be set to match Installing Virtual COM Port 46 Chapter 6 Matching the XTRALINK IP and Virtual COM Port Settings The setting...

Страница 30: ...Click the Configuration or Port Settings tab This screen allows the settings to be changed if necessary Click Cancel to keep the existing settings Step 5 Click OK to change the settings Use Refresh in...

Страница 31: ...indows Desktop click Start Programs Xantech XTRALINK IP IPRS23202 MANAGER Servers XTRALINK IP IPRS23202 Manager Step 2 In the XTRALINK IP IPRS23202 Manager window click the Virtual COM List tab Highli...

Страница 32: ...ce Manager Window Step 4 Highlight XTRALINK IP IPRS23202 MANAGER COM to be removed and click the Action tab at the top of window then click Uninstall A confirm Device Removal window will appear Removi...

Страница 33: ...indow will appear Step 2 If using a direct connection to upload the firmware to the XTRALINK IP set the baud rate to 115200 for the fastest possible upload Step 3 Set the Serial Port field to upgrade...

Страница 34: ...232 crossover null modem cable Step 3 In the HyperTerminal Port Settings window set o Baud rate 9600 o Data bits 8 o Parity None o Stop bits 1 o Flow control None Click OK Step 4 Ensure all the DIP s...

Страница 35: ...e Configuration The restart message will appear Step 6 Select Yes to save changes This is necessary to write the settings to the server Using a Password If a password is used it must be entered before...

Страница 36: ...plorer type the IP Address of the XTRALINK IP into the address field near the top of the window and press the Enter key The following window will appear Figure 53 The Web Server Page Using the Web Ser...

Страница 37: ...plays the same configuration information shown in Console Mode and allows server properties to be configured N No ot te e See Chapter 5 for details on Server Properties Configuration Using Telnet Step...

Страница 38: ...le mode and the Server screen will appear Using Telnet 64 Chapter 11 Navigating the Configuration Menu There are six Telnet screens Server Network Serial Mode Operation Monitor and Configuration Tab B...

Страница 39: ...LINK IP module Power Supply 12 VDC 500mA tip positive sleeve negative Power Plug Area Dependent North America 120VAC 60Hz Europe United Kingdom 220 240VAC 50Hz Manual Paper copy of this manual PDF ava...

Страница 40: ...ulation XTRALINK IP IPRS23202 Manager Using Windows 98 ME 2000 XP or NT software Web Server Using a standard web browser such as Internet Explorer RS 232 Connections 68 Default Server Settings Server...

Страница 41: ...TI IO ON NS S XTRALINK IP DB 9 Pin outs in RS 232 Mode RS 232 Signal Name DTE RS 232 DB 9M Pin Carrier Detect In DCD 1 Receive Data In RXD 2 Transmit Data Out TXD 3 Data Terminal Ready Out DTR 4 Signa...

Страница 42: ...ct CD 1 1 CD Receive Data RD 2 2 RD Transmit Data TD 3 3 TD Data Terminal Ready DTR 4 4 DTR Signal Ground Common GND 5 5 GND Data Set Ready DSR 6 6 DSR Request to Send RTS 7 7 RTS Clear to Send CTS 8...

Страница 43: ...ttings The CD connection is needed by some terminal programs to simulate Carrier RS 422 Connections 74 A AP PP PE EN ND DI IX X B B R RS S 4 42 22 2 C CO ON NN NE EC CT TI IO ON NS S XTRALINK IP DB 9...

Страница 44: ...vides a common mode reference for the RS 422 Receiver and Transmitters N No ot te e The RS 422 mode can be used for full duplex 4 wire RS 485 operation provided that the XTRALINK IP is acting as a sol...

Страница 45: ...In Out DATA A 4 Signal Ground GND 5 Figure 71 DB 9 Pin out in RS 485 Mode N No ot te e Some RS 485 devices are marked opposite the RS 485 standard which defines the Data B line as positive relative to...

Страница 46: ...lue 4 5 Not used White Blue 5 6 RX Orange 6 7 Not used White Brown 7 8 Not used Brown 8 Figure 73 Pin out for a Standard Ethernet Cable Network Connections 80 Appendix D Crossover Ethernet Cable RJ 45...

Страница 47: ...81 Xantech Corporation 13100 Telfair Avenue Second Floor Sylmar CA 91342 3573 Sales 800 843 5465 Fax 818 362 9506 Xantech September 2004 Part No 08900795 Rev A 82...

Отзывы: