4
791-44
2. The high power mode may be used in installations where you mount the emitters on an adjacent
cabinet wall or door a short distance from the unit's sensor. Another instance is when you place an
emitter inside the device, but cannot place it close to the IR sensor. In such cases, you may need the
extra power of the high power mode to blast through printed circuit boards or around chassis
structures. In addition, when using the lower output 283 and 286 Blink IR's, you may need the high
power mode for some devices that have less sensitive IR sensors.
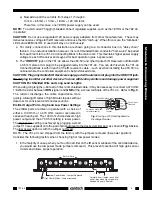
3. The resistors also provide current sharing to each emitter and allow the use of dual emitters in
combination with single emitters. You may, therefore, connect any combination of the 282, 283, 284,
& 286 series of emitters in the same system, such as that illustrated in Fig. 2, to drive the desired
number of devices.
When using less than 10 of the emitter ports, you may plug into any of them without regard to order.
Emitter Expansion
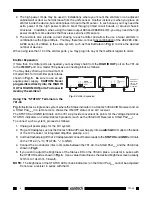
If more than 10 emitter ports are needed, you may daisy chain from the HIGH IR OUT port on the 791-44
to the IN/OUT port on a model 790 passive connecting block as follows:
You may daisy chain up to a maximum of
9 model 790's for 100 emitter ports total as
shown in Fig. 5. Be sure to use an ad-
equate power supply. CAUTION: Never
plug emitters directly into the HIGH IR
OUT or HIGH IN/OUTports. To do so will
destroy the emitters!
Using The "STATUS" Terminal on the
791-44
Fig. 6 illustrates a single zone system where the Status indicator on a Xantech 780-80 IR Receiver and on
a Smart Pad
2 or 3
in a remote room, shows the ON/OFF status of an A/V receiver.
The STATUS and GND terminals on the 791-44 provide convenient tie points for the voltage that drives
STATUS indicators on certain Xantech products (such as the 780-80 IR Receiver & Smart Pad
2 or 3
).
To connect such a system, proceed as follows:
1. Unplug all power plugs for the A/V system.
2. Plug a 12V adapter, such as the Xantech 786-00 Power Supply, into a
switched AC Outlet on the back
of the A/V receiver (or integrated amplifier, preamp, etc.).
3. Cut the attached plug off the 12V adapter and connect the two leads to the STATUS and GND terminals
on the 791-44 ("+" to STATUS, "–" to GND).
4. Connect the 4-conductor inter-room cable between the 791-44, the Smart Pad
2 or 3
and the 780-80 as
shown in Fig.6.
5. If you wish to adjust the brightness of the Status LED on the 780-80, place a resistor in series with
the STATUS lead as shown in Fig. 6. Use a value that achieves the desired brightness level (usually
1k Ohm to 10k Ohm, 1/8 watt).
NOTE: The brightness of the STATUS LEDs (bank indicators) on the Smart Pad
2 or 3
cannot be adjusted!
Do not use a resister in series with them!
HIGH
OUT
Connect to
additional
790's in the
same way,
if required.
+12 VDC
GND
E M I T T E R S
12 VDC
HIGH
IR
OUT
S
TAT
U
S
IR IN
IR
RCVR
791- 44
AMPLIFIED
CONNECTING BLOCK
®
S I G
G N D
E M I T T E R S
®
790
CONNECTING BLOCK
HIGH IR
IN / OUT
HIGH IR
GROUND
HIGH IR
IN / OUT
Fig. 5
Emitter Expansion


