background image

____________________________________________

 Options  9-9

sizes of 12.00" x 19.00" and 12.00" x 25.00" respectively. You can
still print the standard page sizes by using a software application and
entering the narrower sizes.

If you order the extra wide print option with your printer, it will be
installed before the printer ships. If you order this option later, the
printer must be returned to XANTÉ for installation.

To order later, contact XANTÉ Technical Support for an RMA
(Return Merchandise Authorization) number. Printers without RMA
numbers will not be accepted. You are responsible for shipping
costs. You can reach XANTÉ Technical Support at 800-926-8393 in
the US and Canada, at 95-800-926-8393 in Mexico, or at 334-342-
4846 elsewhere from 7:00 a.m. until 7:00 p.m. Central time Monday
through Thursday or 7:00 a.m. to 6:00 p.m. on Friday.

Resolution Upgrades

Your Accel-a-Writer 8200 comes standard with 600 x 600 dpi
resolution and enough RAM to handle this resolution.

Note:

Occasionally, a complex, large file or one with heavy
graphics may require more than standard memory to print.
This also varies depending on the chosen resolution, and
when printing on 18.50", 19.00", and 25.00" oversized
media, you will need more than standard memory. 

When you upgrade to higher resolutions, your printer memory
requirements will change. For example, 12 to 20 MB give you 600 x
600 dpi capability, 20 to 40 MB give you 800 x 800 dpi capability,
and 40 MB or more offers 1200 x 1200 dpi printing. See “RAM
Upgrades” later in this chapter for details on the optional memory
upgrades.

Содержание Accel-a-Writer 8200

Страница 1: ...r 9 Options Chapter Overview Paper Handling Options Optional Paper Feeder Optional Cassette Supporter Extra Wide Print Option Resolution Upgrades Installing Resolution Upgrades RAM Upgrades Installing...

Страница 2: ...9 2 Optionsbb ___________________________________________ Notes...

Страница 3: ...ssette However only one cassette can be used at a time unless you add the optional paper feeder which allows you to attach another 250 sheet cassette to the printer If you still need an even higher ca...

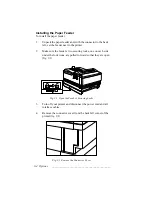
Страница 4: ...sure the feeder s two securing locks one on each side under the lock icons are pulled forward so that they are open fig 9 1 MANUAL READY ON LINE FORM FEED RESET TEST ENTER MENU TRAY SELECT Fig 9 1 Ope...

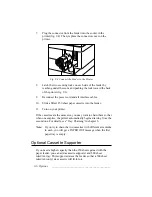
Страница 5: ...ou lift it 5 With someone s help lift the printer up and align it over the feeder fig 9 3 Paper Feeder Optional 250 Sheet Paper Cassette Letter or A4 Size Standard Optional MANUAL READY ON LINE FORM F...

Страница 6: ...r cassette into the feeder 11 Turn on your printer If the cassettes are the same size you may want to chain them so that when one empties the printer automatically begins drawing from the second one F...

Страница 7: ...ely 60 lbs 27 24 kg Have someone help you lift it 3 With the help of someone else lift the printer feeder unit up and align it over the supporter making sure the pegs on the supporter line up with the...

Страница 8: ...ch you will get a PAPER OUT message when the first paper tray is empty Extra Wide Print Option Your Accel a Writer 8200 offers two types of oversize printing capabilities for 19 00 and 25 00 size medi...

Страница 9: ...95 800 926 8393 in Mexico or at 334 342 4846 elsewhere from 7 00 a m until 7 00 p m Central time Monday through Thursday or 7 00 a m to 6 00 p m on Friday Resolution Upgrades Your Accel a Writer 8200...

Страница 10: ...phics and text files with more downloaded fonts When you add an optional resolution upgrade the RAM upgrades provide the extra memory necessary for higher resolution and oversized printing See Resolut...

Страница 11: ...r if it is open already and has media loaded remove the media FO RM FE ED ON LIN E MA NU AL RE AD Y READY IDLE AC TIV E RE Fig 9 6 Open the Fold Down Tray 4 Open the front cover by pulling up on the r...

Страница 12: ...rews securing the output tray to the printer fig 9 8 using the magnetized screwdriver and being careful not to drop the screws into the printer Remove the Two Output Tray Screws MANUAL READY ON LINE F...

Страница 13: ...tray s securing pegs fig 9 9 7 Disconnect the front panel cable by gently pulling the end of the cable out of the controller board connector fig 9 9 to free the output tray from the printer Then set...

Страница 14: ...using the magnetized screwdriver being careful not to drop any screws into the printer Then lift off the EMI shield and set it aside Fig 9 10 Remove the EMI Shield 9 Install the new RAM in the contro...

Страница 15: ...nd one 4 MB SIMMs the 16 MB SIMMs should be in Banks 1 and 2 and the 4 MB SIMM in Bank 3 Then if you purchase a 16 MB upgrade you should remove the 4 MB SIMM from Bank 3 and replace it with the 16 MB...

Страница 16: ...connector 45 90 Notch Fig 9 13 Installing a SIMM Caution A SIMM only fits in one direction Do not force a SIMM in place If it does not go in easily realign it making sure that the notched corner is d...

Страница 17: ...connect the end of the front panel cable to the printer s controller board fig 9 15 12 Replace the output tray making sure the pegs at the back of the tray seat in the holes on the printer Then replac...

Страница 18: ...ck the page for the amount of RAM listed Ethernet Upgrade The Ethernet upgrade is designed to support EtherTalk Novell NetWare print server and TCP IP protocols in an Ethernet environment on thinnet c...

Отзывы: