


13
the seat to the proper height. The seat post must be inserted to at least the “Minimum
Insertion” line. Move the quick release lever to the closed position. You should feel
considerable resistance while moving the lever. If not, re-open and tighten the lever, then
move it to the closed position. See the section in this manual regarding quick releases for more
detailed instructions. Adjust the seat to be centered in the clamp and generally level with the
ground, then re-tighten the seat fixing bolt before riding. Avoid riding the bike with a loose
seat.
**NOTE: Some models may be equipped with a suspension seat post. Some suspension seat
posts can be adjusted for stiffness using the preload adjustment screw. To make the
suspension stiffer, turn the 6mm Allen screw clockwise. To make the suspension softer, turn
the 6mm Allen screw counter-clockwise.
The seat post must be inserted so that the minimum insertion mark cannot be seen. The
quick release mechanism must be tightened securely to prevent a sudden shift of the seat
when riding. Failure to do this may cause loss of bicycle control.
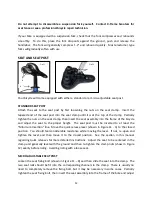
FRONT WHEEL
XB-210Li
Photos vary from actual bike
1. Make sure the brakes are loose enough to allow the brake
pads to move easily.
2. Place the front wheel into the fork drop outs as shown in
Figure 13.
3. Insert the quick release axle with nut (shown in Figure 14).
4. When the axle is in place, push lever down on the axle to
lock into place (shown in Figure 15.)
5. Spin the wheel to make sure it is centered and clears the
brake shoes. Tighten brakes if necessary.
XB-200Li
This unit does not have quick release axle. Front wheel can
be installed by axle and nut.
**IMPORTANT:
It is important to check the front wheel
connection to the bicycle. Failure to properly tighten may
cause the front wheel to dislodge.
Fig 13
Fig 14
Fig 15


