background image

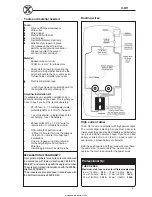
Tools and material needed

Tools:

Flat and Phillips screwdrivers
Wire cutter
Wire stripper
Electric drill with drills
Crimping tool
Digital multimeter or test lamp
Wire brush, scraper or a piece
of an abrasive sheet to remove
paint for a good ground connection
Grease to protect the ground
connection from corrosion

Material:

Speaker wire: minimum
12 AWG = 4 mm

2

  for subwoofers

Sheet metal screws for mounting the
amplifier to the amplifier board and the
amplifier board to the car + some extra
for fuse holder, amplifier ground etc.

Electrical insulation tape

½ inch thick plywood or particle board for
the amplifier to be mounted upon.

Amplifier installation kit:

If available,buy an amplifier installation kit. It
contains normally all you need. This is what you
have to buy if you buy the items separately

20- 25 feet = 6- 7.5 meter power cable,
preferably AWG 4 = 21 mm

or heavier

1 pc of fuseholder to install close to the
car b fuse 100 Ampere.

20 feet of AWG 15 = 1,5 mm

2

 wire for

remote turn on / off cable from radio.

RCA-cable for input from radio.
- 20 feet or 5 meter for trunk installations
-12 feet or 2 – 3 meter for under seat
installations
One min. 8 gauge ring crimp terminal
for the amplifier ground connection.
Wire ties
Insulating grommet or insulating tube

Routing wires

Stereo

head unit

3

Professional Tip:

THE DC-FEED

Maximum main fuse values for different cable sizes.

  6 mm

2

  (9 AWG)   :

25 A

10 mm

(7AWG)     :

40 A

 16 mm

(5AWG)    :

60 A

21 mm

2

 (4AWG)    :

100 A

 33 mm

2

 (2AWG)   :

150 A

42 mm

 (1AWG)    :

200 A

High current draw

The X-D11 is a mono amplifier with high power output.
The current draw is also high so you must make sure
that your vehicles power system (battery and alternator)
can provide all the power you need. If you have a bad
battery or alternator in can result in a poor sound or
even worse, a broken battery or alternator.

Both the positive wire and the ground wire must have
the same size. To avoid cable fire, be sure not to
oversize the main fuse value for the power wires.

X-D11

DECLARATION OF CONFORMITY

X-program amplifiers for vehicles are manufactured
in accordance with the EU directive EEC 95/54 (72/
245/EEC) and are marked with the approval number.
They are also marked in accordance with the WEEE-
directive 2002/96/EC.
The products are also produced in accordance with
the EU RoHS directive 2002/95/EC.

130.com.ua

Autogood products «130»

Содержание X-D11

Страница 1: ... SECURITY SYSTEMS Car alarms Bike alarms Mechanical blockers Immobilizers Sensors Accessories OPTIC AND LIGHT Xenon Bixenon Lamps LED Stroboscopes Optic and Headlights Washers Light rain sensors Accessories PARKTRONICS AND MIRRORS Rear parktronics Front parktronics Combined parktronics Rear view mirrors Accessories HEATING AND COOLING Seat heaters Mirrors heaters Screen wipers heaters Engine heate...

Страница 2: ...ontrols 5 Input level control 5 Crossovers 5 Phase control 5 Bass boost control 6 Speaker wiring Single amplifier system 6 Testing 6 Bridging two amplifiers 7 Professional tips 8 Specifications X PROGRAM X D11 Number of channels 1 Power output in 4 ohm 0 4 THD 1 x 400 W Max output in 2 ohm 0 7 THD 1 x 750 W Max output in 1 ohm 1 THD 1 x 1050 W All above output power ratings at 13 8 Volt Signal to ...

Страница 3: ...he battery terminal connections 3 Check the power lead fuse or circuit breaker If fuse damage continues inspect the power lead for short circuits 4 Check the amplifier protection fuses Are these broken change to new ones with the same value If short circuiting continues contact your local DLS dealer A fault may exist in the amplifier 5 To start the amplifier requires a remote voltage of 9 15 volt ...

Страница 4: ...r trunk installations 12 feet or 2 3 meter for under seat installations One min 8 gauge ring crimp terminal for the amplifier ground connection Wire ties Insulating grommet or insulating tube Routing wires Stereo head unit 3 Professional Tip THE DC FEED Maximum main fuse values for different cable sizes 6 mm2 9 AWG 25 A 10 mm2 7AWG 40 A 16 mm2 5AWG 60 A 21 mm2 4AWG 100 A 33 mm2 2AWG 150 A 42 mm2 1...

Страница 5: ...re ATC blade type fuses X D11 uses four 30 ampere fuses 30A For High Level input We recommend you to connect the remote wire as described above The amplifier will produce soft on soft off operation this way You must set the Hi level Low level switch to Low level position in this case In the case that there is no remote voltage available from the car stereo or you want to simplify the installation ...

Страница 6: ...ency from 15 to 50 Hz A typical setting is 25 30 Hz Low Pass Filter The LPF low pass filter allow low frequencies only and blocks higher frequencies A typical setting is 60 80 Hz Choose the setting that sounds best in your car Phase control The phase control can be set continuously from 0 180 degrees This is very useful when you want to adjust the bass sound for best front stage image Start on 0 a...

Страница 7: ...ly Test power wiring 1 Turn on the head unit but do not turn up the volume The amplifier power light should come on If not check the remote and 12 volt wires Also check the ground connection 2 Turn up the head units volume slightly All speakers should operate if not check wiring connections at amplifier and speakers The Subsonic filter at 25 30 Hz and the LPF filter setting at 60 80 Hz Filter sett...

Страница 8: ...ve Bridged mode Master Slave Bridged switch Slave position Bridged switch Master position Connection of DC input to both amplifiers and Remote sub level control to Master amplifier 7 Connecting two X D11 in bridge mode will double the output power Minimum speaker load is then 2 ohms The output power with a 4 ohm load is 1500 Watts and with 2 ohm load 2000 Watts The RCA signal must be connected onl...

Страница 9: ...lt flashlight battery Tap the wire on to the terminal of the battery and observe the movement of the cone The cone should move outwards when the wire touches the battery and inwards when the battery is removed If it is the other way around the speaker has been connected backwards and it must be removed and connected correctly If your system also has a subwoofer connected through a passive 6 or 12 ...

Отзывы: