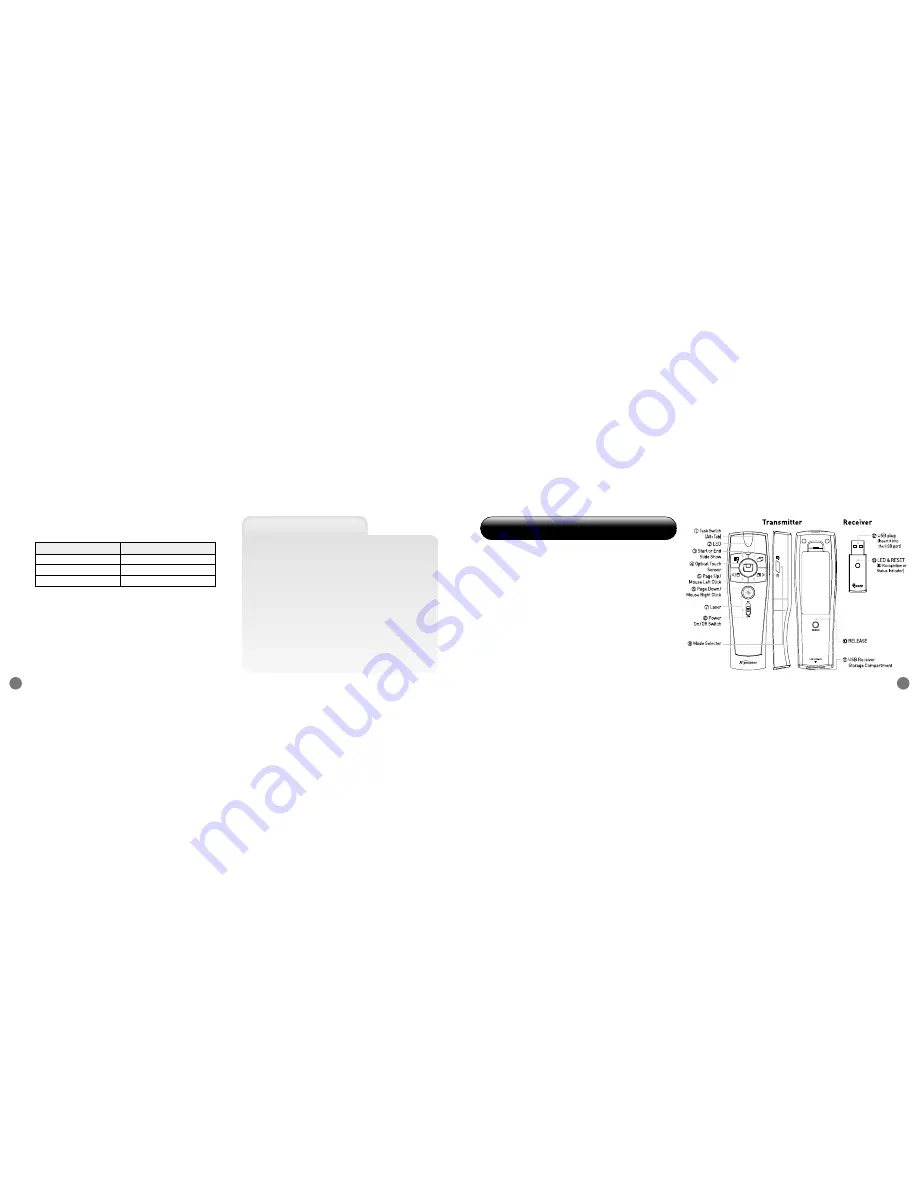
x-pointer XP300 Скачать руководство пользователя страница 5

Layout of the XP300

9

XP300 User Manual

8

1. Press and release “LED & RESET button” on the

Receiver for 1 second. The LED(Green) will start
blinking and blink for 10 seconds.

2. Press together Two buttons (Start or End Slide

Show, Alt+Tab) on the Transmitter and release the
buttons when the LED turns off automatically.

3. If ID paired successfully, the LED on the Receiver

and Transmitter will blink 4 times together.

4. XP300 is ready to use.

- In case of the failure in ID pairing -

Remove and reinsert the USB Receiver. 
Please repeat above installation processes.

ID Pairing between 

Transmitter and Receiver

6. LED Indicator

LED on the transmitter displays the mode status

7. If you see the failure in recognizing the Receiver,

please follow ID Pairing process.

Status

LED

Mouse Mode

Orange color

Presentation Mode

Green color

Laser On

Red color

4. Layout of the XP300

The Transmitter is an all in one controller- A
Remote Controller, Optical Touch Sensor
Mouse, Power On/Off Switch, Mode Selector
and Laser Pointer. The Receiver consists of a
USB plug, LED & RESET buttons.

Содержание XP300

Страница 1: ...XP300 USER MANUAL www choistec com...

Страница 2: ...Package Contents 4 2 Features of the XP300 5 3 Setting up the XP300 6 4 Layout of the XP300 9 5 How to use the XP300 12 6 Cautions 13 7 Certifications 14 8 Support 16 9 Specifications of the XP300 17...

Страница 3: ...XP300 Model with optical touch sensor mouse controls offer greater functionality with finer mouse control and intuitive presentation controls Main functions Page Up Down Start or End Slide Show Switch...

Страница 4: ...ther pouch for protection from the elements scratches dirt and shocks 3 Setting up the XP300 1 Insert 2 x AAA batteries into XP300 Transmitter 2 Insert the Receiver into the USB port of the PC 3 The R...

Страница 5: ...to use In case of the failure in ID pairing Remove and reinsert the USB Receiver Please repeat above installation processes ID Pairing between Transmitter and Receiver 6 LED Indicator LED on the trans...

Страница 6: ...into the USB Port LED RESET ID Recognition or Status indicator No Button Function Task Switch Alt Tab Switching between open windows tasks LED Display the mode status Start or End Slide The Slide Sho...

Страница 7: ...ves the mouse pointer on the screen in the same direction Pushing once performs a left click pushing twice performs a double click Press the Optical Touch Sensor for 1 sec to activate Drag and push ag...

Страница 8: ...e reasonable protection against harmful interference in a residential installation This equipment generates uses and can radiate radio frequency energy and if not installed and used in accordance with...

Страница 9: ...n KOREA If you have problems while using the XP300 or if you have any suggestions don t hesitate to contact us Tel 82 32 246 3409 Fax 82 32 246 3406 Homepage www choistec com E mail inquiry choistec c...

Страница 10: ...User Manual 1 8 2 Receiver Input Power 5V USB Power Operating Temperature 10 50 C RF Power 2mW OS Windows 2000 XP Vista System IBM PC AT Laptop PC Interface USB1 1 2 0 Dimension 47 5 x 16 x 7 5mm Weig...

Страница 11: ......

Отзывы: