background image

Page 32

160337-000 Rev D, 30 September, 2013

Xiotech—Proprietary

ISE User Guide

Management Tools

Logging In

This section describes the steps to log into the Web management tools. The user ID is a

dministrator

 (case 

dependent) and the default password for the first-time login, set by manufacturing, is 

administrator

. The 

password reverts to this default upon a reset to factory settings, during an ISE reformat (see “Reformat an ISE” 
on page 142
).

Web-Mgt

To log into the Web-Mgt (Classic) tool:
1. Obtain the IP address or host name of the MRCs from the site network administrator.

2. To log in to the target ISE, type the IP address or host name of one of the MRCs in the ISE into the

browser’s Address field as shown in the following examples:

http://

<static_ip_address>


or

http://

<dhcp_generated_address>


or

http://

<mrc_host_name>

3. Press 

E

NTER

.

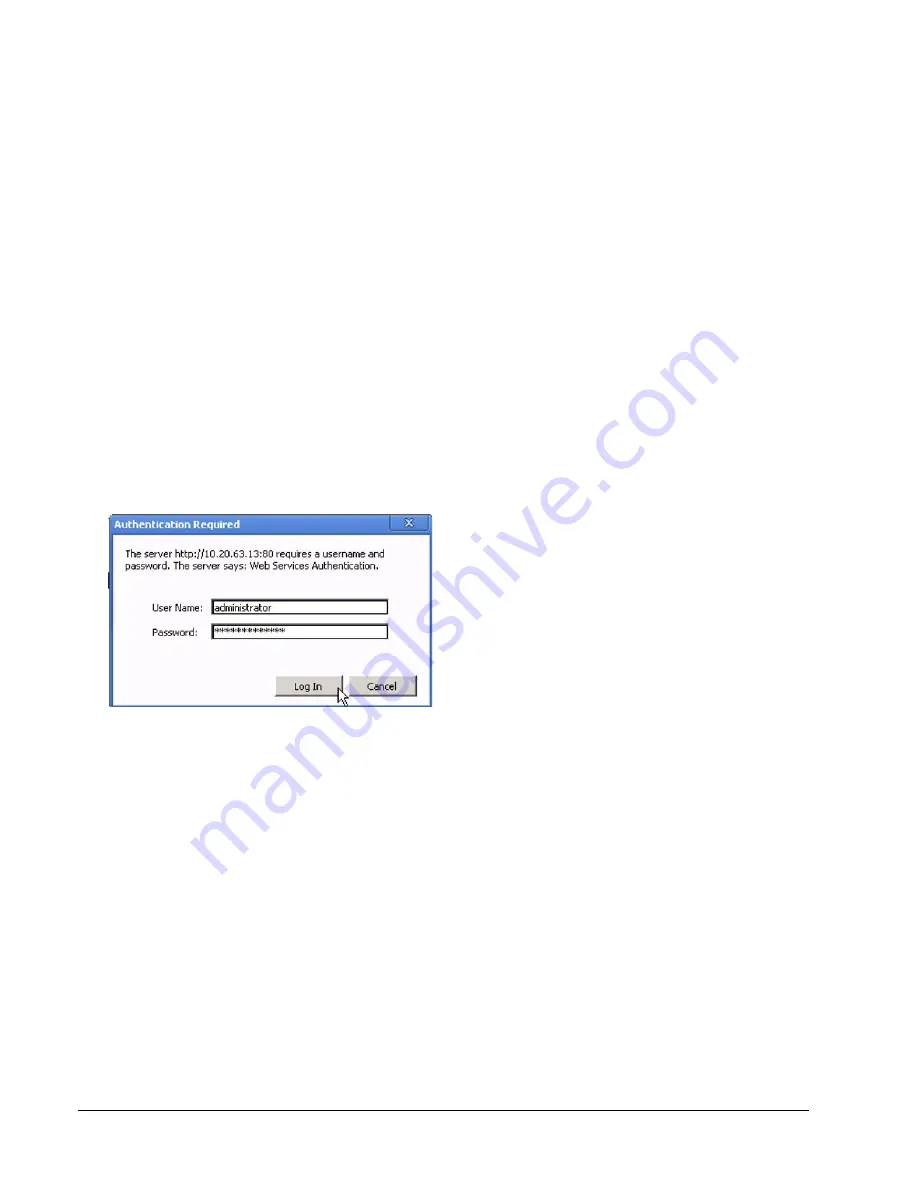
The System Login view appears.

4. Click 

Login

.

The System Authentication dialog appears.

Figure 27. Classic Login Authentication

5. Enter the login credentials as follows:

User name

:


administrator

Password

:


<password>

The default password for the first-time login is 

administrator

.

6. Click 

OK

.

The Web-Mgt is now running and Orchestrator is accessible to manage the site ISE systems.

Orchestrator

To log into the Orchestrator ISE management tool:
1. Enter the name or IP address for an ISE-2 (Model 2400) system

2. On the Orchestrator Login screen (Figure 28 on page 33) enter the User Name as 

administrator

.

3. Enter the Password as 

administrator

Содержание ISE-2 Series

Страница 1: ......

Страница 2: ...ein Use of this manual does not assure legal or regulatory compliance This document is not a warranty of any kind The only warranties given in connection with this product are those contained in Xiote...

Страница 3: ...g 6 Power Supplies 6 Safety and Emissions 6 Rack Loading 8 Environmental Specifications 9 Dimensions 9 Site Requirements 10 Installation 11 Overview 11 Rack ISE Chassis 12 Install Rail Kit 12 Install...

Страница 4: ...Web Based Management 29 Browser Requirements 30 Terminology 30 Logging In 32 Logging Out 33 Switching to Orchestrator 33 Site Index and Help 34 Navigation 34 Reserved Characters 34 Command Line Interf...

Страница 5: ...Subscriptions 73 Send General Update File 74 Orchestrator 74 CLI 74 Send Telemetry Data File 74 Orchestrator 74 CLI 75 Volume and Host Configuration 75 Orchestrator 75 Web Mgt View Volumes 75 Web Mgt...

Страница 6: ...NMP 120 Performance Monitoring 120 Monitoring ISE 121 Event Logs 121 Management Events 121 Downloading Log Files 123 Maintenance 125 Restart 125 Orchestrator 126 Web Mgt 126 Restart CLI 126 Shutdown 1...

Страница 7: ...tor Unit 148 Other Components 149 Appendix A Quick Start 151 Connect 151 First Time Login 151 ISE Firmware Upgrade 152 Initialize 154 Create Hosts 155 Create Storage Volumes 156 Customize and Maintain...

Страница 8: ...Page vi 160337 000 Rev D 30 September 2013 Xiotech Proprietary ISE User Guide Table of Contents...

Страница 9: ...that help with setup and troubleshooting Conventions The following conventions are used in this document Table 1 Document Conventions Related Documents The following documents available for download...

Страница 10: ...Page 2 160337 000 Rev D 30 September 2013 Xiotech Proprietary ISE User Guide Preface ISE Manager User Guide Orchestrator User Guide ISE Analyzer User Guide...

Страница 11: ...commands previously available only to the drive manufacturer A closed loop feedback system between the installation and the manufacturer that collects and analyzes a variety of system operating metric...

Страница 12: ...of six major components as shown in the following figure Figure 1 plus an active bezel Figure 1 ISE Major Components These major components are 1 Two DataPacs containing multiple drives in sealed asse...

Страница 13: ...managed by the MRCs The ISE has two Ethernet management ports one on each MRC and can operate in either Dynamic Host Configuration Protocol DHCP mode or static IP mode DHCP mode is enabled by default...

Страница 14: ...her than direct connections to the branch circuit for example use of power strips Power Supplies All ISE Storage Blade models have redundant power supplies Both AC power cords must be removed before s...

Страница 15: ...30 September 2013 Page 7 Introduction ISE User Guide This Class A digital apparatus complies with Canadian ICES 003 Cet appareil num rique de classe A est conforme la nome NMB 003 du Canada EN 50082...

Страница 16: ...deUser Guide Introduction Figure 2 Declaration of Conformity Rack Loading An ISE Storage Blade can weigh from 100 lbs to 130 lbs care must be taken to mount the ISE Storage Blade on a rack certified t...

Страница 17: ...e Blade are presented in this section Dimensions The ISE Storage Blade dimensions are shown in the figure below Figure 3 Front View with Dimensions without Bezel For reference the ISE with bezel insta...

Страница 18: ...10 35 degrees C Operating humidity 20 80 Non condensing Operating altitude 1 000 6562 10 000 feet 305 3 048 meters Heat dissipation 2 050 btu per hour Loading weight Minimum DataPac varies by model 13...

Страница 19: ...urations The ISE consists of five different Field Replaceable Units FRUs plus a bezel The unit is shipped with the MRC power supply and supercapacitor FRUs pre installed The DataPacs are packaged indi...

Страница 20: ...nd Holed Rack Mounting To install the adjustable rail kit into a round holed rack do the following 1 Remove the rail kit with anchoring screws from its packaging 2 Install both rails as labeled into t...

Страница 21: ...ts packaging Figure 6 on page 12 2 Install both rails as labeled into the server rack by inserting the rail mounting catch pins into the front square holed rack mountings from behind see figure to rig...

Страница 22: ...Front View The ISE is shown from the front with the latches and captive screws pointed out Figure 9 ISE Front View Rear View The ISE is shown from the rear with the latches and captive screws pointed...

Страница 23: ...ated below Figure 11 DataPac Handling Proper and Improper Unpack a DataPac and insert it gently into the front of the chassis with the black latch fully extended and ori ented as shown in Figure 12 be...

Страница 24: ...apacitor into the chassis gently from the front oriented as shown in Figure 12 and with the black latch fully extended When the supercapacitor is firmly in place return the black latch to its closed p...

Страница 25: ...by closing the black latch handle and tightening the two captive screws Figure 10 on page 14 until snug do not overtighten Repeat this step for the other MRC Install Bezel The ISE bezel shown below i...

Страница 26: ...Page 18 160337 000 Rev D 30 September 2013 Xiotech Proprietary ISE User Guide Installation Figure 15 Snap Bezel Into Place Figure 16 Bezel Installed...

Страница 27: ...t interruption in ISE data services FRU Locations The following figure identifies the ISE components FRUs by their location number That is when referring to DataPac one 1 the specified DataPac is loca...

Страница 28: ...d its Fibre Channel ports In this network attached environment the ISE Stor age Blade management interfaces are network accessible through the Ethernet ports In the example below Figure 18 the ISE con...

Страница 29: ...the host HBAs to each MRC Fibre Channel Port The two blue Ethernet cables connect the ISE Ethernet ports to a network switch for management interface access Figure 19 ISE Sample DAS Cabling Connectivi...

Страница 30: ...rvice console port With a service console connected follow the procedure below to establish a service console connection 1 Open a terminal emulation application on the service console 2 Set the termin...

Страница 31: ...ments For a best practices discussion of ISE zoning requirements refer to the Support Matrix at http support X IO com supportmatrix First Time Power On When powering on the ISE for the first time foll...

Страница 32: ...he following message This ISE requires initialization Would you like to initialize it Select y or ESC 2 Press ESC to skip the initialization process initialization will be done later the Skipping init...

Страница 33: ...ation ISE User Guide Determine IP Addresses To determine whether the ISE is using DHCP or a default IP address enter the show network command The network settings are displayed as shown in figure 21 F...

Страница 34: ...ce con nection opened The three management interfaces accessible through the network are X IO Orchestrator storage management and provisioning service X IO Web Management Interface referred to as the...

Страница 35: ...Options There are a number of additional options available for the ISE Some of these see Related Documents on page 1 are ActiveWatch Part of an available X IO Customer Support service ISE Analyzer Ap...

Страница 36: ...Page 28 160337 000 Rev D 30 September 2013 Xiotech Proprietary ISE User Guide Installation...

Страница 37: ...fields except for those characters listed in the table below Table 5 Characters Web Mgt and CLI The Orchestrator accepts special characters in text entry fields except for those characters listed in t...

Страница 38: ...6 0 and later Opera 9 5 and later Safari 3 1 and later JavaScript enabled XML XSL rendering enabled Orchestrator Web Management Interface Browsers Google Chrome and Safari 3 1 and later are recommend...

Страница 39: ...Main area of view containing the view details 4 Drop down menu Drop down menu activated by hovering the pointer over a navigation bar item 5 Current status Dynamic display of the system status Operati...

Страница 40: ...t name of one of the MRCs in the ISE into the browser s Address field as shown in the following examples http static_ip_address or http dhcp_generated_address or http mrc_host_name 3 Press ENTER The S...

Страница 41: ...the upper right corner of the view Figure 25 on page 30 and Figure 26 on page 31 2 To exit from the Web Mgt click the browser close button and the browser window closes Switching to Orchestrator To u...

Страница 42: ...s links to the various views in the Web Mgt interface The Web Mgt and Orchestrator both provide online Help accessible in the upper right corner of the ISE window Navigation After login the At A Glanc...

Страница 43: ...ISE through the remote console 1 To connect to the target ISE use any terminal connection application on the remote console and configure it for SSH service on port 22 2 Type the IP address or the hos...

Страница 44: ...Page 36 160337 000 Rev D 30 September 2013 Xiotech Proprietary ISE User Guide Management Tools...

Страница 45: ...power cords connected to the ISE power supplies Each power supply unit has a power switch as shown in Figure 32 Connect the ISE power cords to appropriate AC receptacles only after first confirming th...

Страница 46: ...tandby States When the ISE is powered on from the power off or standby states it performs a cold boot Boot types are summarized in the following table Table 10 State Power Condition Action Powerup Act...

Страница 47: ...ered off ISE or a WOL signal is sent to an ISE in a standby state the ISE performs a cold boot Boot types are summarized in Table 10 on page 39 Restart An ISE can be restarted while running using Orch...

Страница 48: ...tates differ for a Shutdown see Shutdown on page 39 and a Restart as described in the following table Table 11 Table 11 Restart and Shutdown Power States Action Power State Means of Activation Restart...

Страница 49: ...see Appendix A Quick Start on page 151 Creating the initial configuration is detailed in the following sections of this chapter Initializing the ISE see Initializing ISE on page 41 Setting System Para...

Страница 50: ...t the top of the temperature gauge Refer to the Orchestrator User Guide for complete details Figure 33 Status Summary Orchestrator This view includes most of the information seen on the At A Glance St...

Страница 51: ...n in the upper right hand corner of all views shows Current Status Uninitialized The System is Not Initialized dialog appears over the At A Glance Status Summary view as shown in Figure 34 on page 43...

Страница 52: ...m the following steps 1 On the Initial Spare Configuration page Figure 35 on page 43 click SUBMIT to initialize storage pools and sparing on the DataPacs 2 Click OK to the confirmation message Please...

Страница 53: ...nd Command Line Interface CLI on page 45 describe initializing the ISE using the Web Mgt and CLI respectively For more information on the concept of storage pools see Storage Pools and Volumes on page...

Страница 54: ...torage pools after skipping the initialization prompt use the initialize command with no parameters View the sparing percentage in effect on a system that has already been initialized by using either...

Страница 55: ...trator Web Mgt The system parameters may be changed at any time With the Web Mgt all parameter changes become effective immediately upon clicking SAVE CHANGES see Step 3 below To view or set system pa...

Страница 56: ...hown in Table 13 on page 49 For example to set the System Name enter configure name ise_systemname where ise_systemname is the name to be associated with the ISE Text strings with embedded blanks must...

Страница 57: ...f the name is to contain embedded blanks enclose the character string in quotation marks as shown in the following example configure name ISE System Name Parameters Displayed Through the show ise Comm...

Страница 58: ...show ise command To set the Location from the CLI use the configure location ise_location command see Figure 13 on page 49 If the location is to contain embedded blanks enclose the character string i...

Страница 59: ...rnet ports These addresses are displayed by the Web Mgt and the CLI as the Port 1 and Port 2 addresses and cannot be set when DHCP mode is enabled The ISE enables DHCP Mode by default When DHCP mode i...

Страница 60: ...oth the Web Mgt and the CLI a Date dd mmm yyyy where mmm is the 3 letter representation of a month for example Nov for Novem ber Enter the month in uppercase or lowercase or a combination of both it i...

Страница 61: ...ery option as described in Supercapacitor Detailed on page 115 CLI To enable or disable UPS Mode using the CLI use the configure upsmode Enable Disable command see Command Line Interface CLI on page 4...

Страница 62: ...ptions are configured from the Web Mgt only they cannot be configured from the CLI To subscribe select events from the Available Subscriptions list and then click Add to move them into the Selected Su...

Страница 63: ...file can be viewed or downloaded to be compiled into an SNMP device monitoring tool using the on screen instructions The ISE automatically regenerates the MIB file when changes to any logical object...

Страница 64: ...d by expanding the pool tree element in the navigation pane of many of the Management Information panels Characteristic Description Status Overall state of the storage pool This field usually reports...

Страница 65: ...September 2013 Page 57 Initialize and Configure ISE User Guide Figure 38 Web Mgt ISE 2 Storage Pool Information Figure 39 Web Mgt ISE 7 Series Storage Pool Information From the CLI obtain storage pool...

Страница 66: ...e Storage tab on any Web Mgt panel and the Storage drop down menu appears 2 Select create volume from the menu options to change to the Storage Configuration view as shown below Figure 40 Figure 40 We...

Страница 67: ...me information in the optional Comment field that accepts up to sixty alphanumeric characters including special characters except those listed in Command Line Interface CLI on page 45 8 To clear volum...

Страница 68: ...ted except those listed in Command Line Interface CLI on page 45 Text strings with embedded blanks must be enclosed in quotes as shown in the above example The ISE creates the volume and displays a co...

Страница 69: ...ces ise_name Host View Host then click ADD HOST See the Orchestrator User Guide Web Mgt 1 Select Hosts create host from the navigation bar on the Web Mgt and the Host Configuration screen opens as sho...

Страница 70: ...able Volumes list Volumes can be mapped to hosts during the volume creation process see Mapping Volumes and Hosts on page 64 8 Enter comment text as needed in the optional Comment field The comment ma...

Страница 71: ...c character The comment may be up to sixty alphanumeric characters long Special characters are accepted except those listed in Reserved Characters on page 29 Text strings with embedded blanks must be...

Страница 72: ...st Detailed Information views as described in Volume and Host Configuration on page 75 Mappings are displayed in the Volume Summary view Storage summary and Host Summary view Hosts summary After the i...

Страница 73: ...lays a confirmation similar to that shown in the figure 46 below Figure 46 Volume Host Mapping After the initial volume host mapping scheme has been created it can be modified or deleted at any time u...

Страница 74: ...Page 66 160337 000 Rev D 30 September 2013 Xiotech Proprietary ISE User Guide Initialize and Configure...

Страница 75: ...on page 91 ISE Systems Dashboard ISE Systems Dashboard on page 92 Modify System SNMP Orchestrator To modify the System parameters using Orchestrator follow the procedures detailed in the Orchestrator...

Страница 76: ...e an IP address for a locally installed ISE Analyzer Software Service to which General Update files Telemetry files and alerts can be sent The following destinations can be defined ISE Analyzer Softwa...

Страница 77: ...her HTTPS traffic Notes 1 The interval for Telemetry and General Update subscriptions can be specified but Alert subscriptions can not be specified 2 When creating or changing Telemetry update subscri...

Страница 78: ...paddress 207 250 72 215 type gupdate interval 720 enabled true The range for the interval option is 15 to 1440 minutes For Telemetry it is recommended that the interval be allowed to default to 1440 E...

Страница 79: ...subscriptions using the Orchestrator select All Devices ise_name ActiveWatch Subscriptions See the Orchestrator User Guide Web Mgt From Web Mgt At A Glance Summary Page pull down the System menu and s...

Страница 80: ...NS name 2 Click ALERT to change an Alert subscription 3 Click GENERAL UPDATES to change a General Updates subscription 4 Click TELEMETRY to change a Telemetry subscription 5 When prompted enter the ap...

Страница 81: ...ave changes including un checking any check box if the IP address field is blank Command Line Interface From the CLI enter the following command at the prompt subscribe add ipaddress nnn nnn nnn nnn t...

Страница 82: ...the following command at the CLI prompt gupdate send ipaddress nnn nnn nnn nnn where nnn nnn nnn nnn is the IP address of the local ISE Analyzer Software Service expressed in IPv4 standard format The...

Страница 83: ...10 20 30 40 Note Do not use the telemetry send file unless instructed to by X IO Customer Support Volume and Host Configuration Orchestrator To view ISE volume configuration by pools using the Orchest...

Страница 84: ...n page 77 From this view the following modifications can be made to a volume Change the volume name Change the cache policy View the pool the RAID level the capacity the Global ID and the Local ID of...

Страница 85: ...Guide Changes do not take effect until Save Changes bottom of the view is clicked Figure 51 Detailed Volume Information Orchestrator View Host Configuration To view ISE host configuration using the O...

Страница 86: ...iled Host Information page is shown below in Figure 52 Figure 52 Detailed Host Information Orchestrator Modify Host Configuration To modify the ISE host configuration using the Orchestrator select All...

Страница 87: ...otech Proprietary 160337 000 Rev D 30 September 2013 Page 79 ISE Management ISE User Guide Changes do not take effect until Save Changes bottom of the view is clicked Figure 53 Detailed Host Informati...

Страница 88: ...ow Volume Example Change the volume name cache policy and optional comment through the CLI using the modify command with the options shown in Table 20 below Table 20 Modify Volumes Command Options Com...

Страница 89: ...s to that host must be removed To do so use the unpresent command as described in Modify Volume Host Mappings on page 82 After the host modifications are complete restore or create the requisite mappi...

Страница 90: ...e the Detailed Volume Information page or Detailed Host Information page as described in Volume and Host Configuration on page 75 Delete Volume Host Mapping Orchestrator To delete ISE volume host mapp...

Страница 91: ...ew shown in Figure 56 on page 83 appears see View Modify LUNs on page 85 for more information on LUN mapping Figure 55 Volume Host Mapping Information Delete Figure 56 Host Volume Mapping Information...

Страница 92: ...upon completion Presenting Volume03 to Prod07 OK A subsequent show volume confirms that Volume03 is now mapped to hosts Prod01 and Prod07 Command Options Comment unpresent volume name host name Host o...

Страница 93: ...ging the LUN using the Web Mgt Web Mgt View Modify LUNs and the CLI CLI View Modify LUNs on page 87 Orchestrator View Modify LUNs To view and modify LUNs using the Orchestrator select All Devices ise_...

Страница 94: ...60337 000 Rev D 30 September 2013 Xiotech Proprietary ISE User Guide ISE Management The Volume Summary page shown in Figure 57 below appears Figure 57 Volume Summary Edit Figure 58 Volume Host Mapping...

Страница 95: ...UN2 Figure 59 Host Summary Edit Figure 60 Host Volume Mapping Details 2 Click the drop down in the LUN column of the mapping details page see Figure 58 on page 86 and Figure 60 above for the LUN assig...

Страница 96: ...e process is unaffected by controller failovers and reboots The ISE generates an SNMP trap if enabled for LUN re size processes upon completion and in the event of a failure such as insufficient space...

Страница 97: ...tech Proprietary 160337 000 Rev D 30 September 2013 Page 89 ISE Management ISE User Guide pleted with the Volume Summary page showing the new size in the Size column Figure 61 Volume Summary Page Segm...

Страница 98: ...to resize LUNs using the Command Line Interface 1 At the prompt enter modify volume volume1 expand x where volume1 is the volume to be re sized and x is the new size in GB Alternatively enter modify v...

Страница 99: ...the mapping must be removed before deleting the volume To do so use the unpresent command as described in CLI Modify Volume Host Mapping on page 84 Then delete the volume Deleting Hosts A host that i...

Страница 100: ...erall view of the field of all networked ISE storage that is available from any managed ISE From within the Orchestrator dashboard shown below any of these ISEs can be viewed from the same Orchestrato...

Страница 101: ...nt setup this page acts as a gateway to the four other dashboard pages Figure 66 The four other pages are Status View the status of all ISE systems including individual components selected for managin...

Страница 102: ...See the Orchestrator User Guide Web Mgt The Entry List shows all ISE systems that are being monitored By selecting an ISE from the Entry List and then clicking EDIT an ISE name can be changed By clic...

Страница 103: ...worked ISE field as a single entity Figure 68 This view is dynamically refreshed every two minutes Hovering the pointer over any ISE image in the left navigation pane displays the IP Addresses of the...

Страница 104: ...d ISE field as a single entity Figure 69 This view is dynamically refreshed every two minutes Hovering the pointer over the horizontal bar chart entries initiates an information pop up showing the use...

Страница 105: ...ified for monitoring This performance information is presented in the form of a number of collapsible lists round gauges and horizontal bar charts that provide a glimpse of the current performance met...

Страница 106: ...isting all monitored ISE systems can be collapsed to display the horizontal bar chart in a Network Operations Center mode to show total throughput and bandwidth across all the ISE systems The Individu...

Страница 107: ...erformance dashboard presents performance trends over the last two hours Greater detail is presented in response to hovering the pointer over a particular section The historical data presented on this...

Страница 108: ...Page 100 160337 000 Rev D 30 September 2013 Xiotech Proprietary ISE User Guide ISE Management...

Страница 109: ...Monitoring on page 120 Events Event Logs on page 121 ActiveWatch refer to the ActiveWatch Client Installation and Configuration Guide 160178 000 Front LEDs The LEDs on the ISE front are intended for u...

Страница 110: ...e the blow ups labeled 2 show the LEDs that indicate the state of the supercaps The state of the DataPacs is indicated by the LED pairs labeled number 3 Back LEDs The ISE backside LEDs are intended fo...

Страница 111: ...n on DataPac activity as shown in Table 26 Table 25 MRC supercapacitor Power Supply LEDs Table 26 DataPac LEDs ISE System Monitoring The following section describes monitoring ISE systems from the Web...

Страница 112: ...cation ISE DNS name and IP addresses assigned to the Ethernet ports on the MRCs where address one is that of MRC one and address two is that of MRC two Up Time Time since the last start or re start of...

Страница 113: ...issing from an ISE ten minutes or more after boot up contact X IO Customer Support at 1 800 734 4716 The current status is displayed at the top in the right corner of every Web Mgt page and on the gen...

Страница 114: ...ime Amount of time the system has been running since last powerup Identifier WWID of the ISE Date Current date Time Current system time IP Address 1 and 2 IP addresses assigned to the Ethernet ports o...

Страница 115: ...Component details including their internal environment as detailed in CLI on page 116 powersupply supercap datapac volumes Definitions mappings overall storage capacity and usage and other configurat...

Страница 116: ...ry view see System Status LED States on page 102 Above the temperature gauge the current reading is displayed In the example below the current reading is 30 C Figure 78 Temperature and Event Summary T...

Страница 117: ...vironment summary of all components in the ISE and the overall storage pool status To view detailed information for any component click just to the left of the component Click Refresh or press F5 to u...

Страница 118: ...September 2013 Xiotech Proprietary ISE User Guide Monitoring Port status Ambient temperature gauge The DataPac section of the Environment page includes the following information Figure 79 Status Heal...

Страница 119: ...2 The SuperCap or Battery section of the Environment page includes the following information Figure 80 Status Remaining charge Maximum charge capability The Storage Pool section of the Environment pa...

Страница 120: ...Gb s that both devices support Auto negotiation is enabled by default at the factory To change the FC Speed Setting pull down the menu and click the desired speed Then click SAVE CHANGES in the Global...

Страница 121: ...DataPac next to the icon in the left navigation pane on most pages Figure 82 DataPac Environment Display Explanation Partial Page Click Refresh or press F5 to update the environment page with dynamic...

Страница 122: ...udes information for each unit as described in the following table Table 33 Table 33 Power Supply Environment Display Explanation Field Comment Status Overall state of the power supply normally Operat...

Страница 123: ...he ISE 2 Hyper ISE and ISE 7 Series contains two supercapacitor units see Figure 1 on page 4 to maintain cache memory in the event of a power outage The system maintains and monitors these SuperCaps t...

Страница 124: ...Setup on page 53 as shown in Table 35 Table 35 Temperature Events CLI Warning and critical thresholds are set by the manufacturer and cannot be modified MRC Detailed Enter the show mrc command in the...

Страница 125: ...ype N Port WWN 20000014C3673710 FC speed 4 Gb S Requested Auto oem show datapac DataPac Information DataPac 1 Pool 1 Status Operational None Detailed Status 0x00000000 Position 1 Hardware Ver hwr Redu...

Страница 126: ...ated in total Gigabytes GB Position Physical bay location in the chassis see Figure 101 on page 140 Pool Identifier Values appearing in parenthesis after the DataPac number and are 0 or 1 Temperature...

Страница 127: ...supercap The supercapacitor information fields are described in the following table Table 40 Table 40 Supercapacitor Environment Display Figure 86 Sample Show Battery Display Field Comment Status Over...

Страница 128: ...display on any Web Mgt view The display shows the values for each of the monitored items Click the Refresh button or press F5 to update the performance view and capture any changes to the statistics F...

Страница 129: ...maximum of approximately 2 000 events If the maximum number of events is reached the log drops the oldest events as it adds the new events SNMP trap destinations can be configured through the Web Mgt...

Страница 130: ...authorized service personnel conducting detailed problem investigation if needed See Downloading Log Files on page 123 for more details Clear Event Log To clear the Event Log of all existing events Fr...

Страница 131: ...in the Events Display view This log may be useful during detailed problem investigation by authorized service personnel The Management and Console logs can be viewed and downloaded through the Web Mgt...

Страница 132: ...Page 124 160337 000 Rev D 30 September 2013 Xiotech Proprietary ISE User Guide Monitoring...

Страница 133: ...shing of all data from cache Preparation of internal processes for a graceful shutdown Shutting down of both MRCs Restarting of both MRCs During an ISE shutdown all initialization and all configuratio...

Страница 134: ...t view 2 Click SUBMIT Figure 90 below 3 Click OK in the confirmation dialog that appears this is the only opportunity to cancel the restart opera tion 4 Click OK on the informational Restart will comm...

Страница 135: ...ce on page 51 for more information on the WOL service 2 Power cycling Toggle the power switches on the ISE power supplies off and then on again ensuring that the switches on both supplies are in the O...

Страница 136: ...1 ISE Shutdown CLI To shut the ISE down from the CLI 1 Enter shutdown 2 Enter y or n in response to the confirmation message System shutdown requested Are you sure Under some conditions the system rej...

Страница 137: ...guration settings volume configurations and other system information are preserved through the upgrade process Event notifications are sent during the MRC upgrade process If Event Subscription is on M...

Страница 138: ...the current MRC firmware version Uploading the upgrade file using the Web Mgt is a slow process To shorten the upload time upload the file manually using a suitable service as described in Step 1 Uplo...

Страница 139: ...Browse e Click SUBMIT Figure 93 on page 131 f Click OK on The upload is about to begin pop up Figure 94 MRC Firmware Upload Confirmation The Upload Upgrade Firmware Upload in progress page appears Fi...

Страница 140: ...t File field as shown below sample num bers only Figure 97 Upload Upgrade Firmware Upgrade Ready Step 2 Install Firmware Upgrade During the firmware upgrade process the MRC Status and Detailed Status...

Страница 141: ...re progress view returns showing the animated logo and percentage of upgrade completion When the upgrade completes the moving logo halts and the Upload Upgrade Firmware view returns Figure 92 on page...

Страница 142: ...is process e Enter the following command to specify where in the directory the firmware file is to be deposited cd upgrade controller f Enter the following command to deposit the file put ISE x_y_z_0_...

Страница 143: ...utstanding host commands flush cache and signal the companion MRC to process all host requests to volumes in both DataPacs To preserve access to the resident volumes a multi pathing tool must be runni...

Страница 144: ...d and display an informational message explaining the rejection Click OK on the informational message To override the rejection check the Force Remove box and repeat this procedure from Step 2 The Rem...

Страница 145: ...override the rejection re issue the command with the force option in the command line The console displays the following message MRC n removal in progress type remove status to monitor current status...

Страница 146: ...ding and removing FRUs 3 Click SUBMIT and then click OK on the confirmation dialog box that appears The Add MRC1 or MRC2 view appears with a moving logo to indicate activity The view refreshes itself...

Страница 147: ...d status command shows that the MRC is online The show mrc com mand also displays the status of the MRC Note If the remote console session is connected to the MRC being added the connection may be ter...

Страница 148: ...te Clicking RESET refreshes the view with no component selected 3 Click SAVE CHANGES to cause the LEDs to start flashing 4 To stop the LEDs from flashing clear the component selection and click SAVE C...

Страница 149: ...e 102 ISE Component Identification Front View 1 The numeral 1 points to the number one DataPac and number one supercapacitor 2 The numeral 2 points to the number two DataPac and number two supercapaci...

Страница 150: ...SE from the fabric before beginning an ISE reformat 3 After the ISE is reformatted data on the ISE is no longer accessible Figure 103 Reformat ISE Option Setting Current System Information Parameters...

Страница 151: ...huts down both MRCs Restarts both MRCs User data on the DataPacs is not erased but all metadata that allows mapping to user data is removed resulting in inaccessibility to the data through the ISE All...

Страница 152: ...d CLI To set the user password using the CLI use the configure password new_password command Note When changing the password using the CLI the console displays the password characters as they are ente...

Страница 153: ...Guide 7 Verify that the receiving ISE is in the operational state 8 Change Fibre Channel speed setting on the receiving ISE to that recorded in Step 2 9 Re attach the disconnected receiving ISE Fibre...

Страница 154: ...Page 146 160337 000 Rev D 30 September 2013 Xiotech Proprietary ISE User Guide Maintenance...

Страница 155: ...on Detected SFP Each MRC has four Small Form Factor Pluggable Fibre Channel SFP connectors If any SFP in an MRC fails it can be replaced with a vendor specified replacement SFP using the following pro...

Страница 156: ...the switch is in the OFF position 9 Loosen the two captive screws on the latch handle of the replacement power supply if necessary and open the latch handle 10 Insert the replacement power supply full...

Страница 157: ...atch handle fully to unseat the supercapacitor unit 5 Pull the supercapacitor unit out of the chassis by its latch handle Note An internal green LED remains lit after the supercapacitor unit is pulled...

Страница 158: ...Page 150 160337 000 Rev D 30 September 2013 Xiotech Proprietary ISE User Guide FRU Replacement...

Страница 159: ...e Managed Reliability Controllers MRCs in the ISE from the site network administrator 2 Ensure that power is applied to the ISE by confirming that the green LEDs on the power supplies are illumi nated...

Страница 160: ...he MRC upgrade file zip on X IO s download Web site and download it to a location on the local network 2 Unzip the upgrade file zip 3 Upload the MRC firmware upgrade file controller fw from the unzipp...

Страница 161: ...le name opposite the Current File label 8 Click SUBMIT under the Step 2 to begin the MRC upgrade and click OK on the confirmation message The upgrade begins presenting an Upload Upgrade Firmware progr...

Страница 162: ...itialized Press OK confirmation message Figure 106 1 The System is not initialized Press OK confirmation message requires one of the following actions a Click Cancel to return to Login or close the br...

Страница 163: ...World Wide IDs WWIDs are organized into entities called hosts A host is a collection of one or more HBAs identified by a unique name Hosts may contain HBA ports from different computer systems Hosts p...

Страница 164: ...st mapping scheme by selecting the appropriate hosts from the Available Hosts list and clicking Add to add them to the Selected Hosts list 4 Click SUBMIT The Volume Summary view appears showing the vo...

Страница 165: ...port Matrix at https www X IO com supportmatrix Configured review volume host mapping to verify that the expected volumes are being presented to the host Use utilities and applications provided with t...

Страница 166: ...Page 158 160337 000 Rev D 30 September 2013 Xiotech Proprietary ISE User Guide Appendix B Troubleshooting...

Страница 167: ...reate options Create a host or volume delete options Remove a host or volume modify options Modify a host or volume present options Present a volume to a host unpresent options Unpresent a volume from...

Страница 168: ...Time SBT Solomon Islands Time MSK Moscow Time NZST New Zealand Standard Time AST Arabian Standard Time IDLE International Date Line East IST Iran Standard Time IDLW International Date Line West GST Gu...

Страница 169: ...e through wt comment comment string Modify host This command modifies an existing host WWNs can only be removed if there are no presentations Usage modify host name options options include name new na...

Страница 170: ...e present command presents a host to a list of volumes or a volume to a list of hosts To present a volume to a list of hosts use present volume name host0 host1 To present a host to a list of volumes...

Страница 171: ...splay supercapacitor information hosts Display information about the hosts task Display information about any running tasks datapac Display DataPac information hba Display detected host HBA WWNs netwo...

Страница 172: ...Adds Datapac1 to the system Usage add datapac2 Adds Datapac2 to the system Usage add mrc1 Adds MRC1 to the system Usage add mrc2 Adds MRC2 to the system Remove Removes a Datapac or MRC from the system...

Страница 173: ...zer Subscription Usage subscribe show 10 20 30 40 443 type telemetry enable true interval 1440 Last Sent 14 Sep 2010 09 17 26 Usage subscribe add ipaddress 10 20 30 40 443 type gupdate interval 720 en...

Страница 174: ...Page 166 160337 000 Rev D 30 September 2013 Xiotech Proprietary ISE User Guide Appendix C CLI Commands...

Страница 175: ...ent events 123 management events 121 subscribing to 54 F Fibre Channel connectivity problems 157 Fibre Channel ports displaying 113 116 SFP LEDs 102 speed setting with CLI 49 with Management Interface...

Страница 176: ...operation 143 destinations selecting 54 list of FRU Critical Temperature Threshold 109 116 FRU Temperature Back to Normal 109 116 FRU Warning Temperature Threshold 109 116 PDU support 53 subscribing t...

Страница 177: ...h Proprietary 160337 000 Rev D 30 September 2013 Page 169 Index ISE User Guide creating mapping scheme 64 modifying with Management Interface 76 Volume Summary view 75 W Wake on LAN 127 WOL See Wake o...

Страница 178: ......

Отзывы: