background image

iData 70 operation manual 

- 14 - 

On the Home screen, you can tap and drag the Apps icon from the application tray to Home screen 

for adding the shortcut you want. 


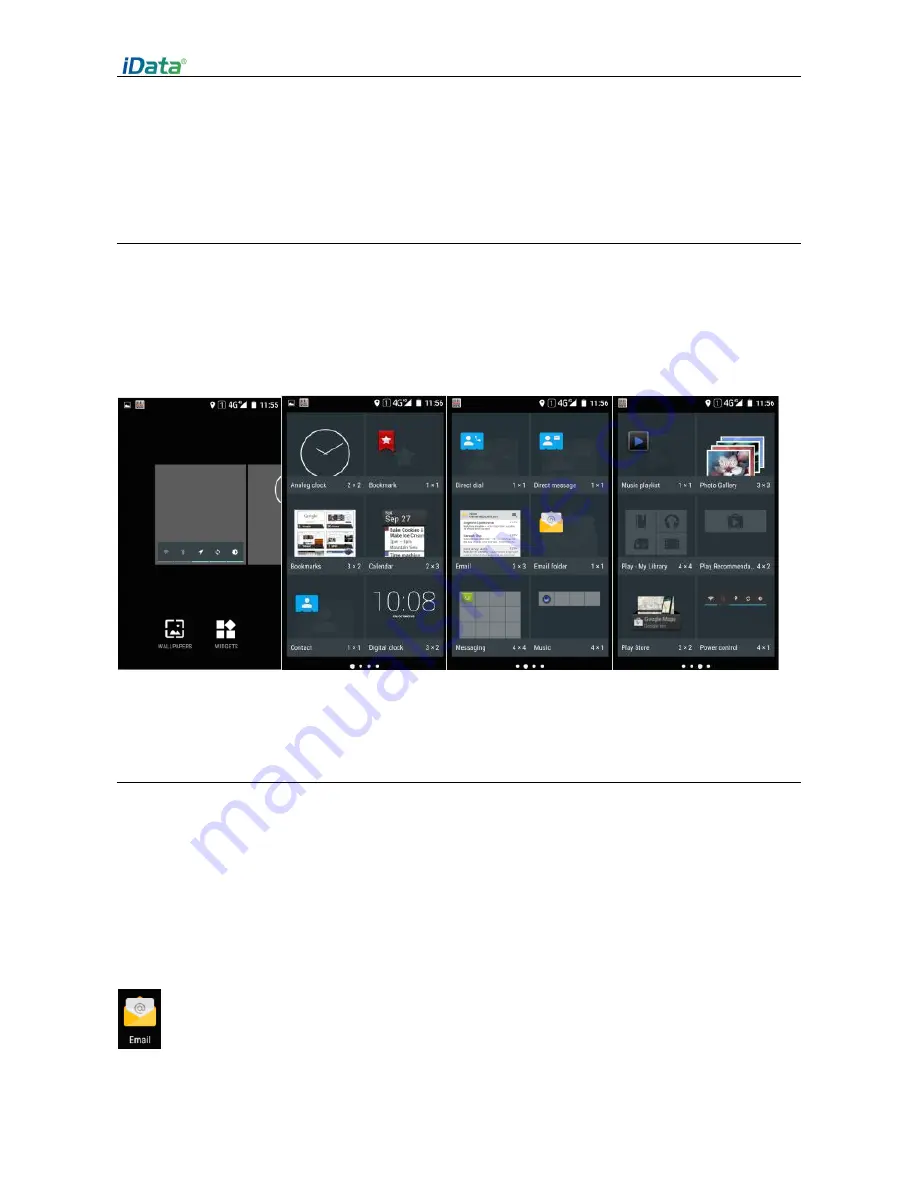
2.6.8 Widgets 

You can add widgets like clock, music player and calendar to Home screen. 

On Home screen, tap application tray icon and slide to Widgets page, tap and drag the tools you 
want to the Home screen. 

Open widgets by tapping the widgets icon. 


3 Email Function 

3.1 Emails 

Email can send/receive mail messages. 
 

 Instruction 

Create a mail account on iData 70, take 163 mail box as example, after log in, click 

settings

 on the 

upper right of the page, access the Accounts option, choose and check all the server and 
receive/send email options, then save, mail account setup completed. 

Find this icon: 

->Emails 

1. Input 

email address

 and 

password

, tap 

Next

, it


starts to connect to email account; 

Содержание iData 70

Страница 1: ...Operation Manual iData 70 ...

Страница 2: ...s and indicators 9 2 6 Basic settings 10 3 Email Function 14 3 1 Emails 14 4 1 Data connection 16 4 2 Wi Fi connection 17 4 3 Bluetooth 18 4 4 GPS 19 4 5 Connect PC with USB 20 4 6 Synchronization 20 5 iData 70 Scanning demo introduction 22 5 1 iScan installation and operation 22 6 Manage iData 70 23 6 1 Install application 23 6 2 Uninstall application 23 6 3 Manage application 24 7 Use precaution...

Страница 3: ...iData 70 operation manual 1 1 Introduction 1 1 iData 70 overview fig 1 1 iData 70 front view fig 1 2 iData 70 back view ...

Страница 4: ...iData 70 operation manual 2 1 2 Insert a TF card Insert a TF card as follows Push the TF card same as the sign direction below into card slot fig 1 3 Insert TF card ...

Страница 5: ...iData 70 operation manual 3 1 3 Insert a SIM card Insert a SIM card as follows Insert SIM card as below direction into card slot fig 1 4 Insert SIM card ...

Страница 6: ...ment and press it downwards 2 Close the battery cover push forward press it downward 3 Push right the battery cover then it s locked Fig 1 5 Installing battery 1 5 Remove battery Remove the battery cover as follows 1 Push the battery lock to the right 2 Pull up the back cover and battery from notching slot of the battery cover ...

Страница 7: ...iData 70 operation manual 5 fig 1 6 Removing battery ...

Страница 8: ... is dying iData 70 automatically shuts down Notes Battery charging time can be more than or less than 3 hours Charging interruption won t cause damage to battery Battery life depends on iData 70 actual usage such as all iData 70 functions operation mode data transmission etc Hints To make sure iData 70 has a longer standby time please do as follows to save battery consumption Charge iData 70 when ...

Страница 9: ...ck and unlock Lock device Short press the power button Device will also lock itself when there s no operations to the device within the auto lock screen time set by system default or customized Unlock device 2 3 Device keys iData 70 has physical keys shown as below 20 keys in total divided into function key digit key symbol key and scan key Among iData 70 physical key board functional keys from le...

Страница 10: ...l usage displayed as below 2 4 Home screen There s 1 Home screen for iData 70 you can switch screen by sliding left or right You can open any Apps by tapping its icon shown on the screen Fn key Deletion key Scanning key Enter Direction key 1Aa key Scanning key ...

Страница 11: ...s and indicators shown on the status bar on the top of the screen displays the device status info and notice tab 2 1 Status icons Icon Instruction Icon Instruction WLAN Signal Bluetooth Airplane mode USB Limited access to internet Miss call USB mapping New message Charging Modulator demodulator log Fully charged Mute Multiple notification icons exceeding display range Desktop application ...

Страница 12: ... shown above might be different to the ones on devices please follow the actual situation 2 6 Basic settings 2 6 1 Date and Time Set the Date and time based on actual need Find this icon Settings Date and Time Set date or set time 2 6 2 Display setting Find this icon Setting Display Brightness Wallpaper Screen latency Fonts ...

Страница 13: ...iData 70 operation manual 11 2 6 3 Sound setting Find this icon Setting Profiles Standard Silence Meeting Outdoors Set regular Sounds Ring by choosing different profiles ...

Страница 14: ...ings Notes This operation will erase below data Accounts System and Apps data and settings Downloaded Apps Below data remains Current system and bundled Apps TF card data like music and pictures 2 6 5 Language and Input settings Find this icon Settings Language and Input Select Language choose any language you want to switch in the list Select Default choose any input method you want in the list ...

Страница 15: ...peration manual 13 2 6 6 Custom settings Find this icon Settings Custom settings User defined setting Turn On Turn Off custom functional keys 2 6 7 Shortcut You can add shortcut on the Home screen for the device ...

Страница 16: ...d drag the tools you want to the Home screen Open widgets by tapping the widgets icon 3 Email Function 3 1 Emails Email can send receive mail messages Instruction Create a mail account on iData 70 take 163 mail box as example after log in click settings on the upper right of the page access the Accounts option choose and check all the server and receive send email options then save mail account se...

Страница 17: ...ynchronize frequency then go to Next 3 Input a name for the account creation tap Next it goes to the mail check and reading page Delete account 1 On the mail page tap Menu then Settings 2 Choose the mail account you want to delete open the settings page ...

Страница 18: ...istake Find this icon Settings More Mobile Network Preferred Network Type Create GPRS data connection then access the Internet Search and register Network manually manual search network network carrier You need to make sure SIM card is inserted into iData 70 before establishing GPRS data connection Usually network setting is already set if it was deleted by mistake you can set the network accordin...

Страница 19: ...ping WLAN OFF ON button to open and search for network If WLAN is already opened click Scan then all in scoped network will be listed out 2 Click the network name you want to connect input the connection password when it pops up the password dialog 3 Click Connect then Wi Fi connection will be completed ...

Страница 20: ...hat without any solid obstruction Find this icon Settings Wi Fi and network Bluetooth 1 Tap the Bluetooth OFF ON button switch on and search other Bluetooth devices 2 From the Bluetooth device list choose the one you want to connect to 3 Input the PIN code in the dialog tap confirm to connect to the device 4 Tap the device icon which is already connected you can see the Forget and File transfer op...

Страница 21: ...as the Bluetooth function enabled and visible During connection must input PIN code this device doesn t support password free connection 4 4 GPS iData 70 is equipped with high performance navigation shipset opening the location information setting it locates rapidly and accurately ...

Страница 22: ...s and choose USB connection mode USB connection mode Directly used for USB storage choose media device MTP Click USB connected option you can open the USB storage 4 6 Synchronization Find this icon Settings Accounts and synchronize 1 Tap Add accounts set new account 2 Choose company or email input mail address and password then click Next wait till connection completed Mail setting please refer to...

Страница 23: ...iData 70 operation manual 21 ...

Страница 24: ...collection Currently iData provides free demo scanning application iScan for iData 70 to get the barcode info Firstly install the iScan on iData 70 installation method referring to 6 1 Installing application iScan icon will appear on the application page after installation tap to open it it is set to use barcode scanning by default tap scan key to do barcode scanning ...

Страница 25: ...mputer operate installing software on computer but in advance you need to install software such as APK installer Pea pod or 91 cellphone assistance which also support batch installation 6 2 Uninstall application Sometimes there could be too many applications installed and some of them are not used which you can uninstall improve speed of device 1 Go to Settings Application choose the application y...

Страница 26: ...ey to open Application management menu entering the application management interface can check the application status which is either from downloads from TF card or in running status You can force to stop uninstall or disable applications listed in the application info interface by tapping it ...

Страница 27: ...rofessional handling will damage the equipment Do not use a pen pencil or other sharp objects to touch the surface of the iData 70 to avoid scratching the screen Do not throw knock or violate the equipment rashly treat the equipment will damage the equipment parts may cause equipment failure Do not use strong chemicals or potent detergent cleaning equipment If the equipment is dirty clean the surf...

Страница 28: ...cloth to wipe the shell including the keys and the keys between the parts Screen The screen can be wiped with an alcohol cloth but be careful not to let the liquid accumulate around the screen Immediately wipe the screen with a soft non woven fabric to prevent streaks on the screen Scanning window Please periodically wipe the scanning window with a mirror paper or other items suitable for cleaning...

Страница 29: ... inactivity iData 70 locks the screen Battery is depleted Change battery iData 70 response slowly iData 70 stores too many files Delete unused memos and records If necessary save these records on the host or use a memory card to increase the storage capacity iData 70 is installed too many applications Delete the user installed application in iData 70 to release memory iData 70 unable to read barco...

Страница 30: ...Bluetooth phone recognizes this iData 70 as a previously paired iData 70 The Bluetooth phone remembers the name and address of the last iData 70 that is paired through the Bluetooth radio Delete the matching device and name from phone manually Bluetooth device can be detected but not connected The device does not support no password connection Set a Bluetooth password Table 7 3 cable failure troub...

Страница 31: ...id 5 1 RAM Optional 8GB ROM 1G RAM Optional 16GB ROM 2G RAM Expansion slot Mini SD 卡 Maximum 32G Screen 4 inch HVGA 800X480 TFT high brightness LED back light Touch screen Industrial capacitive screen Camera Optional Rear 8 million pixel auto focus with LED fill light Window glass for scanning Corning Gorilla Glass Corning Glass Keyboard Front 20 keys side 4 keys Battery 3 8V 5000 mAh lithium poly...

Страница 32: ...des standard battery Communication transmission Wireless wide area network Network frequency 4G TDD LTE B38 B39 B40 B41 FDD LTE B1 B3 3G WCDMA 2100MHZ EVDO 800 MHz TD SCDMA B34 39 2G GSM GPRS 850 900 1800 1900 MHz Wireless wide area network Data service GPRS EDGE HSPA EVDO TDD LTE FDD LTE Wi Fi Wi Fi 802 11a b g n Bluetooth BT 4 0 LE GPS High precision integration GPS A GPS Input output interface ...

Страница 33: ...0 times second Two dimensional regional imager Optical resolution 3 mil Scanning angle Omnidirectional Scanning speed 300 times per second RFID Radio frequency identification Frequency 13 56 MHz Reading distance Within 50 mm Communicatio n protocol ISO14443A B 15693 NFC Optional ...

Страница 34: ...ntent is fully up to date Therefore we reserve the right to make changes at any time without notice Has not received the written permission of Wuxi iData Technology Company Ltd No part of this guide may be copied extracted reproduced modified transmitted translated into any other language in whole or in part for any commercial use in any form or by any means If you have any questions about the equ...

Страница 35: ......

Отзывы: