background image

19

C201/202 REV.02 - 16/12/2016

EN

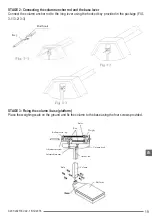
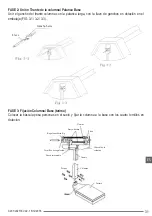
STAGE 2: Connecting the column anchor rod and the base lever

Connect the column anchor rod to the long lever using the hooked key provided in the package (FIG. 

3-1/ 3-2/ 3-3)

STAGE 3: Fixing the column / base (platform)

Place the weighing scale on the ground and fix the column to the base using the four screws provided.

Key

Rod hook

Ruler

Weight

Column head

Anchor rod

Column

Platform

Bolts

Intermediate arm

Adjustment screw

Rod adjuster - kg

Rod

Содержание C201

Страница 1: ...SCULA PESA PERSONAS MECÁNICA ROMANA MOD C201 202 PÈSE PERSONNE MÉCANIQUE AVEC BALANCE ROMAINE MOD C201 202 C201 202 REV 02 16 12 2016 www wunder it MANUALE D USO E MANUTENZIONE INSTRUCTIONS FOR USE AND MAINTENANCE INSTRUCCIONES DE USO Y MANTENIMIENTO INSTRUCTIONS POUR L INSTALLATION ET L UTILISATION IT ...

Страница 2: ...2 C201 202 REV 02 16 12 2016 ...

Страница 3: ...i e istituti di cura con ricovero Le pesapersone C201 e C202 sono prodotti medicali di classe Im con dispositivo di misura e sono tarate in conformità alla classe di precisione III secondo le norme 93 42 e 90 384 CEE Sommario 1 DISPOSIZIONI GENERALI 4 2 SICUREZZA 5 3 DESCRIZIONE E USO PREVISTO 5 4 SPECIFICHE TECNICHE 5 5 INSTALLAZIONE 6 6 ISTRUZIONI PER L USO 8 7 MANUTENZIONE E ASSISTENZA 9 8 CONF...

Страница 4: ...i ad aggiornare questa pubblicazione Il Servizio Assistenza Clienti è a disposizione per ulteriori informazioni sull uso sulla manutenzione e sull assistenza di questo prodotto Convenzioni In questo manuale sono stati adottati i seguenti simboli DISPOSITIVO MEDICO E COMPATIBILITA ELETTROMAGNETICA STRUMENTO DI MISURA CLASSE DI PRECISIONE CERTIFICATO DI GARANZIAASSISTENZA ATTENZIONE POSIZIONATO PRIM...

Страница 5: ...uccessive 3 DESCRIZIONE E USO PREVISTO Tale dispositivo è destinato ad essere utilizzato per pesare le persone in sede di ambulatorio medico a scopo diagnostico generale Ambiente d uso in sede di ospedali e cliniche mediche ambulatori medici Il locale di installazione deve essere dotato di impianto elettrico conforme alle norme in vigore Si raccomanda di utilizzare la bilancia in ambienti non espo...

Страница 6: ...Manuale Istruzioni FASE 1 Montaggio Base Colonna ATTENZIONE Tenere unite la base e la pedana durante la fase di ribaltamento per evitare rischio di fuoriuscita delle boccolette delle leve Appoggiare in orizzontale su un tavolo la colonna della bilancia Fig 3 1 Slegare i cavi che bloccano le leve 2 Estrarre il tirante dell asta con la chiave in dotazione e agganciare la leva lunga della base fino a...

Страница 7: ...onna Leva Base Collegare il gancio del tirante colonna alla leva lunga con la chiave a ganci in dotazione nell imballo FIG 3 1 3 2 3 3 FASE 3 Fissaggio Colonna Base pedana Posizionare la pesapersone a terra e fissare la colonna alla base con le quattro viti in dotazione ...

Страница 8: ...ttura del peso sia sullo zero 3 Salire sulla base pedana della bilancia 4 Spostare il Romano kg per la misura dei kilogrammi e spostare il Romano 100g per la misura dei 100g 5 Quando l asta d equilibrio rimane sospesa e l indice è sul segno rosso il peso è corretto 6 Leggere il peso con i due romani kilogmammi e 100g 7 Scendere lentamente dalla pedana riposizionando i due Romani sullo zero ...

Страница 9: ... accurata pulizia generale La pulizia dello strumento va effettuata con un panno morbido inumidito con acqua o detergente neutro evitando l utilizzo di solventi o sostanze abrasive Durante il trasporto prestare attenzione a non sottoporre lo strumento a urti o eccessive sollecitazioni meccaniche In caso di riparazione o assistenza rivolgersi al proprio rivenditore 8 CONFORMITA STRUMENTO DI PESATUR...

Страница 10: ...accolta L adeguata raccolta differenziata per l avvio dell apparecchio dimesso al riciclaggio al trattamento e allo smaltimento ambientale compatibile contribuisce ad evitare possibile effetti negativi sull ambiente e sulla salute e favorisce il riciclo del materiali di cui e composto il prodotto Per informazioni più dettagliate riguardando i sistemi di raccolta disponibili rivolgersi al servizio ...

Страница 11: ... dello stesso danni causati dall insufficienza o inadeguatezza dell impianto elettrico o alterazioni derivanti da condizioni ambientali climatiche o di altra natura danni dovuti a errata installazione dell apparecchio e riparazioni effettuate da personale non autorizzato Interventi a domicilio per controlli di comodo o presunti difetti Manutenzione ordinaria e ciò che può essere considerato normal...

Страница 12: ...nelle viti posizionate sulla colonna FIG 4 1 Avvitare con la chiave in dotazione le due viti a testa esagonale in modo da fissare lo stati metro alla colonna FIG 4 2 lo statimetro pronto all uso Utilizzo statimetro telescopico meccanico ATTENZIONE Per la misurazione dell altezza il paziente va fatto salire sulla pedana della bilancia MISURE SUPERIORI A 131 CM Alzare la paletta poggia testa ...

Страница 13: ...onarla orizzontalmente Abbassare l asta fino al punto in cui la leva poggia testa tocca la testa del paziente L altezza può essere letta nel punto A MISURE INFERIORI A 131 CM Abbassare la paletta poggia testa e premere il fermo centrale nero ...

Страница 14: ...2 REV 02 16 12 2016 Tenendo premuto il fermo nero abbassare la paletta poggia testa Abbassare l asta fino al punto in cui la paletta poggia testa tocca la testa del paziente L altezza può essere letta nel punto B ...

Страница 15: ... and treatment centres The weighing scales C201 and C202 are class lm medical products with measurement device and are balanced in compliance with precision class III according to standards 93 42 and 90 384 EEC Contents 1 GENERAL SPECIFICATIONS 16 2 SAFETY 17 3 DESCRIPTION AND EXPECTED USAGE 17 4 TECHNICAL SPECIFICATIONS 17 5 INSTALLATION 18 6 USAGE INSTRUCTIONS 20 7 MAINTENANCE AND SUPPORT 21 8 C...

Страница 16: ...d to update the documentation The Customer Service is available for any further information on product usage maintenance and assistance Symbols The following symbols have been used in the manual MEDICAL DEVICE AND ELECTROMAGNETIC COMPATIBILITY MEASUREMENT DEVICE PRECISION CLASS WARRANTY CERTIFICATE CAUTION PLACED BEFORE THE PROCEDURES ARE OVER NON COMPLIANCE CAN CAUSE DAMAGES TO THE PRODUCT WARNIN...

Страница 17: ...checks 3 DESCRIPTION AND EXPECTED USAGE The tool has been designed to weigh people in a clinic for general diagnostic purposes Usage environment hospitals and medical clinics The installation room must be equipped with an electric system in compliance with the legislation in force Always use the weighing device in a place which is not exposed to magnetic interferences People authorised to use the ...

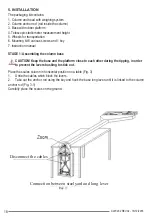
Страница 18: ...on manual STAGE 1 Assembling the column base CAUTION Keep the base and the platform close to each other during the tipping in order to prevent the levers bushing to stick out Place the scales column in horizontal position on a table Fig 3 1 Untie the cables which block the levers 2 Take out the anchor rod using the key and hook the base long lever until it is linked to the column anchor rod Fig 3 ...

Страница 19: ...g lever using the hooked key provided in the package FIG 3 1 3 2 3 3 STAGE 3 Fixing the column base platform Place the weighing scale on the ground and fix the column to the base using the four screws provided Key Rod hook Ruler Weight Column head Anchor rod Column Platform Bolts Intermediate arm Adjustment screw Rod adjuster kg Rod ...

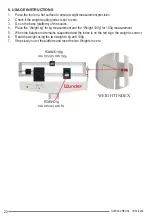
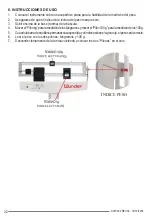
Страница 20: ...3 Go on the base platform of the scales 4 Place the Weight kg for kg measurement and the Weight 100g for 100g measurement 5 When the balance rod remains suspended and the index is on the red sign the weight is correct 6 Read the weight using the two weights kg and 100g 7 Step slowly out of the platform and reset the two Weights to zero READING INDEX READING INDEX WEIGHT INDEX ...

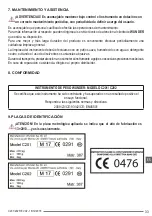
Страница 21: ...ool should be cleaned using a soft cloth dampened with water or neutral cleanser Avoid the usage of solvents or abrasive products During transportation ensure the tool is not subject to impacts or high mechanical stresses For repairs and support contact your reseller 8 COMPLIANCE WUNDER WEIGHING MACHINE MODEL C201 C202 We certify that the tool has been checked and has passed the functional trial I...

Страница 22: ...sal helps reducing negative effects on environment and health and promotes the recycling of the materials of which the product is made For further details on the available collection methods contact the local waste dismissal service or the store where the product has been bought As a consumer the user is obliged by law to returned used or dead batteries You can deliver your batteries to the public...

Страница 23: ...nd tampering damages due to inability to use the tool or improper use damages due to inadequacy of the electric system or modifications due to environmental weather or other conditions damages due to wrong installation and repairs carried out by non authorised personnel interventions on site for regular checks or supposed defects ordinary maintenance and all what can be considered as a normal wear...

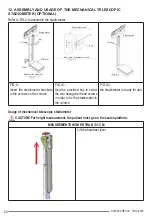
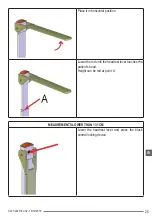
Страница 24: ...ided key to screw the two hexagonal head screws in order to fix the stadiometer to the column FIG 4 2 the stadiometer is ready for use Usage of mechanical telescopic stadiometer CAUTION For height measurement the patient must go on the scales platform Stadiometer Key Platform Stadiometer assembly Base Column Stadiometer rod Key Rear hole of stadiometer rod Stadiometer Column MEAUREMENTS HIGHER THA...

Страница 25: ...6 EN Place it in horizontal position Lower the rod until the headrest lever touches the patient s head Height can be red at point A MEAUREMENTS LOWER THAN 131 CM Lower the headrest lever and press the black central locking device ...

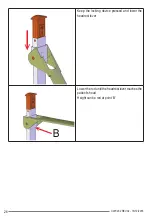
Страница 26: ...26 C201 202 REV 02 16 12 2016 Keep the locking device pressed and lower the headrest lever Lower the rod until the headrest lever touches the patient s head Height can be red at point B ...

Страница 27: ...médicos y sanatorios con hospitalización Las básculas pesa personas C201 y C202 son productos médicos de clase Im con dispositivo de medición y han sido calibradas de conformidad con la clase de precisión III según las normas 93 42 y 90 384 CEE Ìndice 1 DISPOSICIONES GENERALES 28 2 SEGURIDAD 29 3 DESCRIPCIÓN Y USO PREVISTO 29 4 CARACTERÍSTICAS TÉCNICAS 29 5 INSTALACIÓN 30 6 INSTRUCCIONES DE USO 32...

Страница 28: ...in comprometerse a actualizar esta publicación El Servicio deAtención al Cliente está a disposición para más información sobre el uso el mantenimiento y la asistencia de este producto Convenciones En este manual se han adoptado los siguientes símbolos DISPOSITIVO MÉDICO Y COMPATIBILIDAD ELECTROMAGNÉTICA INSTRUMENTO DE MEDICIÓN CLASE DE PRECISIÓN CERTIFICADO DE GARANTÍAASISTENCIA ATENCIÓN COLOCADO ...

Страница 29: ... DESCRIPCIÓN Y USO PREVISTO Dicho dispositivo está destinado a ser usado para pesar personas en ambulatorios médicos con el fin de obtener un diagnóstico general Ambiente de uso en hospitales y clínicas médicas ambulatorios médicos El local donde se coloque deberá estar dotado de instalación eléctrica conforme a las normas actualmente en vigor Es aconsejable utilizar la báscula en ambientes no exp...

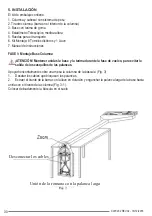
Страница 30: ...es FASE 1 Montaje Base Columna ATENCIÓN Mantener unidas la base y la tarima durante la fase de vuelco para evitar la salida de los casquillos de las palancas Apoyar horizontalmente sobre una mesa la columna de la báscula Fig 3 1 Desatar los cables que bloquean las palancas 2 Extraer el tirante de la barra con la llave en dotación y enganchar la palanca larga de la base hasta unirla con el tirante ...

Страница 31: ...ganchos en dotación en el embalaje FIG 3 1 3 2 3 3 FASE 3 Fijación Columna Base tarima Colocar la báscula pesa personas en el suelo y fijar la columna a la base con los cuatro tornillos en dotación Llave Gancho barra Nonius Pilón Cabezal de la columna Tirante Columna Tarima Pernos Brazo intermedio Tornillos de regulación Regulador barra Kg Barra barrita ...

Страница 32: ...ro 3 Subir encima de la base tarima de la báscula 4 Moverel Pilónkg paralamedicióndeloskilogramosymoverel Pilón100g paralamedicióndelos100g 5 Cuandolabarradeequilibriopermanezcasuspendidayelíndiceestéenelsignorojo elpesoserácorrecto 6 Leer el peso con los dos pilones kilogramos y 100 g 7 Descender lentamente de la tarima volviendo a colocar los dos Pilones en el cero ÍNDICE LECTURA ÍNDICE LECTURA ...

Страница 33: ... cuidadosa limpieza general La limpieza del instrumento deberá efectuarse con un paño suave humedecido con agua o detergente neutro evitando el uso de disolventes o sustancias abrasivas Duranteeltransporte prestaratenciónanosometerelinstrumentoagolpesoexcesivaspresionesmecánicas En caso de reparación o asistencia dirigirse al proprio distribuidor 8 CONFORMIDAD INSTRUMENTO DE PESO WUNDER MODELO C20...

Страница 34: ...ecuada recogida selectiva para el sometimiento del aparato fuera de servicio al reciclaje tratamiento y eliminación medioambiental compatible contribuye a evitar posibles efectos negativos para el medio ambiente y la salud de las personas y favorece el reciclaje del material del que está compuesto el producto Para información más detallada concerniente a los sistemas de recogida disponibles pueden...

Страница 35: ...o daños causados por la insuficiencia o inadecuación de la instalación eléctrica o alteraciones derivadas de condiciones medioambientales climáticas o de otro tipo dañosdebidosaunainstalaciónerróneadelaparatoyareparacionesefectuadasporpersonalnoautorizado actuaciones a domicilio para controles no debidos o presuntos defectos mantenimiento ordinario y lo que puede considerarse el deterioro normal p...

Страница 36: ...s dos tornillos de cabeza hexagonal para fijar el estadímetro a la columna FIG 4 2 El estadímetro está listo para usar Utilización del estadímetro telescópico mecánico ATENCIÓN Para la medición de la altura deberá pedirse al paciente que se suba en la tarima de la báscula Estadímetro Llave Tarima Montaje estadímetro Base Columna Barra del estadímetro Llave Foro posterior de la barra del estadímetr...

Страница 37: ...arla horizontalmente Bajar la barra hasta el punto en el que la palanca apoyacabezas toque la cabeza del paciente La altura puede leerse en el punto A MEDIDAS INFERIORES A 131 CM Bajar la paleta apoyacabezas y apretar el tope central negro ...

Страница 38: ...2 REV 02 16 12 2016 Manteniendo apretado el tope negro bajar la paleta apoyacabezas Bajar la barra hasta el punto en el que la paleta apoyacabezas toque la cabeza del paciente La altura puede leerse en el punto B ...

Страница 39: ...ements médicaux avec hospitalisation Les pèse personnes C201 et C202 sont des produits médicaux de classe lm avec dispositif de mesure et ils sont calibrés conformément à la classe de précision III suivant les normes 93 42 et 90 384 CEE Sommaire 1 DISPOSITIONS GÉNÉRALES 40 2 SÉCURITÉ 41 3 DESCRIPTION ET USAGE PRÉVU 41 4 SPÉCIFICATIONS TECHNIQUES 41 5 INSTALLATION 42 6 MODE D EMPLOI 44 7 ENTRETIEN ...

Страница 40: ...blication à jour Le Service Assistance Clients est à disposition pour des informations supplémentaires sur l utilisation l entretien et l assistance de ce produit Conventions Les symboles suivants ont été adoptés dans ce manuel DISPOSITIF MÉDICAL ET COMPATIBILITÉ ÉLECTROMAGNÉTIQUE INSTRUMENTS DE MESURE CLASSE DE PRÉCISION CERTIFICAT DE GARANTIE ASSISTANCE ATTENTION POSITIONNÉ AVANT DE DÉTERMINER D...

Страница 41: ...s qui s ensuivent 3 DESCRIPTION ET USAGE PRÉVU Ce dispositif est destiné à être utilisé pour peser les personnes pendant une consultation médicale en vue d un diagnostic général Milieu d emploi en milieux hospitaliers et cliniques médicales établissements médicaux La pièce d installation doit être dotée de circuit électrique conforme aux normes en vigueur On conseille d utiliser la balance dans de...

Страница 42: ... 1 Montage Base Colonne ATTENTION Tenir la base et le marchepied unis durant la phase de basculement pour éviter le risque de sortie des douilles des leviers Poser la colonne de la balance Fig 3 à l horizontal sur une table 1 Détacher les câbles qui bloquent les leviers 2 Extraire le tirant de la tige avec la clé fournie et accrocher le levier le long de la base jusqu à la brancher avec le tirant ...

Страница 43: ...vec la clé à crochets fournie dans l emballage FIG 3 1 3 2 3 3 PHASE 3 Fixation Colonne Base marchepied Positionner le pèse personne au sol et fixer la colonne à la base avec les quatre vis fournies Clé Crochet tige Vernier Contre poids Tête colonne Tirant Colonne Marchepied Boulons Bras intermédiaire Vis de réglage Régulateur tige kg Tige ...

Страница 44: ...rchepied de la balance 4 Déplacer le contre poids kg pour la mesure des kilogrammes et le contre poids 100 g pour la mesure des 100 g 5 Quand la tige d équilibre reste suspendue et que l indice est sur le signe rouge le poids est correct 6 Lire le poids avec les deux contre poids kilogramme et 100 g 7 Descendre lentement du marchepied en repositionnant les deux contre poids sur le zéro INDICE LECT...

Страница 45: ...toyage général soigné Le nettoyage de l instrument doit être effectué avec un chiffon humide humidifié avec de l eau ou un détergent neutre en évitant l utilisation de solvants ou substances abrasives Durant le transport faire attention à ne pas soumettre l instrument à des chocs ou sollicitations mécaniques excessives En cas de réparation ou assistance s adresser à son revendeur 8 CONFORMITÉ INST...

Страница 46: ...nementale compatible contribue à éviter de possibles effets négatifs sur l environnement et sur la santé et cela favorise le recyclage des matériaux dont la machine se compose Pour des informations plus détaillées concernant les systèmes de tri disponibles s adresser au service local d élimination déchets ou au magasin où le produit a été acheté En qualité de consommateur vous êtes obligé par la l...

Страница 47: ...nsuffisance ou inadéquation du circuit électrique ou altérations découlant de conditions environnementales climatiques ou d autre nature dommages dus à l installation erronée de l appareil et réparations effectuées par un personnel non autorisé Interventions à domicile pour contrôles de défauts présumés Entretien ordinaire et ce qui peut être considéré détérioration normale pour usage Le service d...

Страница 48: ...e Tige du stadiomètre Clé Trou arrière de la tige du stadiomètre Stadiomètre Colonne FIG 4 Introduire les étriers du stadiomètre dans les vis qui se trouvent sur la colonne FIG 4 1 Visser avec la clé fournie les deux vis à tête hexagonale de façon à fixer le stadiomètre sur la colonne FIG 4 2 Le stadiomètre est prêt à l emploi Utilisation stadiomètre télescopique mécanique ATTENTION Pour la mesure...

Страница 49: ...tionner horizontalement Baisser la tige jusqu au point où le levier repose tête touche la tête du patient La hauteur peut être lue dans le point A TAILLES INFÉRIEURES À 131 CM Baisser la palette repose tête et presser le blocage central noir ...

Страница 50: ...1 202 REV 02 16 12 2016 En gardant le blocage pressé baisser la palette repose tête Baisser la tige jusqu au point où la palette repose tête touche la tête du patient La hauteur peut être lue dans le point B ...

Страница 51: ...51 C201 202 REV 02 16 12 2016 FR ...

Страница 52: ...Wunder Sa Bi S r l Via Vecchia per Monza 20 20056 Trezzo sull Adda MI Tel 39 02 90964566 mail wunder wunder it ...

Отзывы: