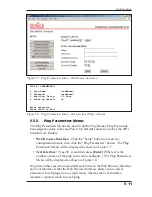
WTI IPS-1600 Скачать руководство пользователя страница 15

3-5

Quick Start

c) 

Switch Outlet On:

  From the Web Browser Interface, select the 

button in the "On" column for Plug 1, and then click "Apply."  From 

the Text Interface, type 

/ON 1

 and press 

[Enter]

.  The status 

indicator for Plug 1 should then go back On, indicating that the 

command has been successfully completed.

3. 

Log Out:

  When you have finished communicating with the unit, it is 

important to always log off by issuing the appropriate IPS command, 

rather than simply closing your Telnet or communications program.  

When you log off using the proper IPS command, this ensures that the 

unit has completely exited from command mode, and is not waiting for 

the inactivity timeout to elapse before allowing additional connections.
a) 

Web Browser Interface:

  Click on the "Log Out" button.

b) 

Text Interface:

  Type 

/X

 and press 

[Enter]

.

This completes the introductory overview of the IPS Internet Power Switch.  

Please proceed to Section 4 and Section 5 for complete installation and 

configuration procedures.

Содержание IPS-1600

Страница 1: ...WTI Part No 13506 Rev B IPS 800 1600 Series InternetPowerSwitches Models IPS 800 IPS 800 CE IPS 1600 IPS 1600 CE Firmware Version 1 41 and Higher User s Guide Model IPS 1600 Model IPS 800...

Страница 2: ......

Страница 3: ...protection and supply wiring GROUNDING Reliable earthing of this equipment must be maintained Particular attention should be given to supply connections when connecting to power strips rather than di...

Страница 4: ...ith Part 15 of the FCC rules Operation of this device is subject to the following conditions 1 This device may not cause harmful interference and 2 this device must accept any interference that may ca...

Страница 5: ...us 5 6 5 3 2 The Serial Parameters Menu 5 9 5 3 3 Plug Parameters Menus 5 11 5 3 3 1 Plug Passwords and Co Location Features 5 12 5 3 3 2 The Boot Sequence Delay Period 5 13 5 3 4 Network Parameters M...

Страница 6: ...al Parameters Menu Text Interface 5 7 5 5 Serial Parameters Menu Web Browser Interface 5 9 5 6 Serial Parameters Menu Text Interface 5 9 5 7 Plug Parameters Menu Web Browser Interface 5 11 5 8 Plug Pa...

Страница 7: ...f operational passwords the System Administrator Level which allows access to all con guration and switching functions and the User Level which only allows access to assigned plugs and cannot be used...

Страница 8: ...xteen switched 100 to 120 VAC power outlets The IPS 800 CE includes eight switched 208 to 240 VAC power outlets The IPS 1600 CE includes sixteen switched 208 to 240 VAC power outlets All other feature...

Страница 9: ...r which supply power to the Circuit A outlets Also includes cable keeper not shown Model RPS 820 208 240 VAC Power Inlet 10 Amp Circuit Breaker Model RPS 830 100 120 VAC Power Inlet 15 Amp Circuit Bre...

Страница 10: ...in Power switch in the On position and release the Default Button All menu de ned parameters will be reset to default values Manual Plug Toggle Press the Default Button and hold it down for three seco...

Страница 11: ...The IPS 800 and IPS 1600 should be connected to a 100 to 115 VAC power supply and the IPS 800 CE and IPS 1600 CE should be connected to a 208 to 240 VAC power supply CAUTION Prior to connecting power...

Страница 12: ...t when the IPS is shipped from the factory RS232 Port Parameters are set as follows 9600 bps 8 Data Bits One Stop Bit No Parity Although the IPS allows these parameters to be easily rede ned for the p...

Страница 13: ...lay Default 1 unde ned unde ned ON 0 5 Secs ON 2 unde ned unde ned ON 0 5 Secs ON 3 unde ned unde ned ON 0 5 Secs ON 4 unde ned unde ned ON 0 5 Secs ON 5 unde ned unde ned ON 0 5 Secs ON 6 unde ned un...

Страница 14: ...Via Modem Use your communications program to dial the number for the phone line which is connected to your external modem Note that in order to communicate with the unit via modem you must rst access...

Страница 15: ...log off by issuing the appropriate IPS command rather than simply closing your Telnet or communications program When you log off using the proper IPS command this ensures that the unit has completely...

Страница 16: ...3 6 IPS 800 IPS 1600 Series User s Guide...

Страница 17: ...vent the power supply cables from being accidentally disconnected from the unit IPS 1600 and IPS 1600 CE Sixteen plug units include pre installed cable keepers When attaching the power supply cables t...

Страница 18: ...de is set to Console as described in Section 5 3 1 4 3 2 Connecting an External Modem When connecting directly to an external modem use a standard AT to Modem cable Make certain that the modem is init...

Страница 19: ...is entered the System Mode will be active If a Plug Password is entered the User Mode will be active The System Password is de ned via the General Parameters menu Section 5 3 1 and the Plug Passwords...

Страница 20: ...vailable via network modem or local PC The sections that follow describe the procedure for accessing the Web Browser Interface or the Text Interface Note Con guration functions are only available when...

Страница 21: ...etwork The IPS must be connected to your TCP IP Network and your PC must include a communications program such as Hyperterminal Access Via Modem An external modem must be connected to the IPS RS232 CO...

Страница 22: ...he unit will display the Password Prompt Key in either the System Password or Plug Password and press Enter If the System Password has not been de ned the prompt will not be displayed when the unit is...

Страница 23: ...selected parameters will not be activated until you click the Apply button Click Switch Panel to return to the main status screen Text Interface Refer to the Help Screen H then enter the appropriate c...

Страница 24: ...to de ne the following parameters System Password The IPS will display a password prompt when you attempt to access command mode When the System Password is entered at log on the System Mode will be...

Страница 25: ...haracters asterisks or quotation marks Site ID De nes a brief text message which can describe the location of the IPS unit Up to 32 characters Default unde ned Notes The Site ID Message cannot begin w...

Страница 26: ...tering a password If security is a concern and the Automated Mode is required it is recommended to use the IP Security feature Section 5 3 4 1 to restrict access Manual Switch Button Enables and con g...

Страница 27: ...cess the Setup Menus and then click the Serial Parameters button The Serial Parameters Menu will be displayed as shown in Figure 5 5 Text Interface Type C and press Enter The Serial Parameters Menu wi...

Страница 28: ...serial COM RS232 Port for use with either a local PC or an external modem Note that when the Port Mode is set to Modem the modem initialization string will be sent every 15 minutes Default Console Mo...

Страница 29: ...re n is the number or name of the plug you wish to con gure The Plug Parameters Menu will be displayed as shown in Figure 5 8 Note that in this case the major difference between the Web Browser Interf...

Страница 30: ...the Default command D is invoked or after power to the unit has been interrupted and then restored After the default command is invoked or power is restored the IPS will automatically switch each plu...

Страница 31: ...user is only allowed access to plugs one through four and that the Boot Sequence Delays for each plug have been set as follows Plug 1 1 Second Plug 2 2 Seconds Plug 3 5 Seconds Plug 4 1 Minute If the...

Страница 32: ...enu Web Browser Interface NETWORK PARAMETERS 1 IP Address 192 168 168 168 2 Subnet Mask 255 255 255 0 3 Gateway Address unde ned 4 Send MSS 536 5 IP Security MAC Address 00 09 9b 00 a0 32 Enter Select...

Страница 33: ...e con guration of your individual network Contact your network administrator for appropriate settings The Network Parameters Menus allow the following parameters to be de ned Except where noted all pa...

Страница 34: ...g with the selected permit deny action for each mask a Each Security Mask prompt de nes a speci c IP address or range of addresses Each Mask Action prompt de nes the permit deny action for the corresp...

Страница 35: ...only by addresses that begin with 192 deny access to 192 1 1 5 Security Mask 1 255 255 255 255 Mask 1 Action Deny Security Mask 2 192 255 255 255 Mask 2 Action Permit Security Mask 3 192 1 1 5 Mask 3...

Страница 36: ...isplayed as shown in Figure 5 13 The Telnet Parameters Menus allow the following parameters to be de ned Please note that all parameters listed here are available via both the Web Browser Interface an...

Страница 37: ...then click the Web Server Parameters button The Web Server Parameters Menu will be displayed as shown in Figure 5 14 Text Interface Type W and press Enter The Web Server Parameters Menu will be displa...

Страница 38: ...de ned con guration As described in Section 7 this provides quick recovery in the event that the unit is accidentally reset to default parameters and also allows you to copy parameters to other IPS un...

Страница 39: ...ce the rst screen that is displayed is the Plug Status Screen or Switch Panel The Plug Status Screen Figure 6 1 lists the current On Off status of the IPS s Switched Outlets and provides a series of r...

Страница 40: ...lick the Boot button in the All Plugs row and then Click Apply 6 Set Plugs to Power Up Defaults To set plugs to their user de ned Power Up Default On Off status click the Default button in the All Cir...

Страница 41: ...rrent status of the IPS s Switched AC Outlets and displays the rmware version and currently de ned Site I D Message Normally the Plug Status Screen will also be redisplayed each time a command is succ...

Страница 42: ...r commands are successfully completed When switching and reboot operations are initiated Boot Sequence Delay times will be applied as described in Section 5 3 3 2 Internet Power Switch v1 41h Site ID...

Страница 43: ...d plug Note that the BOOT command can also be entered as BO For example BOOT 1 or BO ATMSWTCH 4 Set Plugs to Power Up Defaults Type D and press Enter Plugs will be set to their default On Off status w...

Страница 44: ...e number for the plugs that mark the beginning and end of the series separated by a colon For example to switch plugs 1 through 3 On enter the following ON 1 3 Enter 4 All Plugs To apply a command to...

Страница 45: ...e is enabled all IPS password security functions are disabled and users are able to access System Level command functions including the con guration menus and control plugs without entering a password...

Страница 46: ...ng invalid formats or arguments All other status display and con guration commands will still function as normal 6 5 Manual Operation In addition to the command driven functions available via the Web...

Страница 47: ...etc which allows downloading of ASCII les Note Although this function is only available via the Text Interface parameters that are de ned via the Web Browser Interface will also be sent to the ASCII...

Страница 48: ...on gure your communications program to upload an ASCII text le 4 Upload the le with the saved parameters If necessary key in the le name and directory path 5 When the upload is complete make certain t...

Страница 49: ...ore beginning this upgrade procedure 1 Obtain the update le Firmware modi cations can either be mailed to the customer on a CDR or downloaded from WTI Place the upgrade CDR in your disk drive or copy...

Страница 50: ...omplete Upload If the upload is interrupted times out or if the update le becomes corrupted during transfer the IPS will display a screen which asks for con rmation before proceeding To proceed type 1...

Страница 51: ...Apx 1 A Interface Description A 1 Serial COM RS232 Port Interface Figure A 1 COM Port Interface...

Страница 52: ...z Connectors Two 2 IEC 320 C14 Inlets Line Cords Supplied AC Outputs Connectors IEC 320 C13 Outlets IPS 800 CE has Eight Outlets IPS 1600 CE has 16 Outlets Load 10 Amps per Circuit providing a Total o...

Страница 53: ...odel of the unit its serial number and a description of its symptoms If the unit should need to be returned for factory repair it must be accompanied by a Return Authorization number from Customer Ser...

Страница 54: ...rademarks of their respective companies Information and descriptions contained herein are the property of Western Telematic Inc Such information and descriptions may not be copied disseminated or dist...

Страница 55: ...ompt 5 8 Console Port 2 2 4 2 Apx 1 Baud Rate 5 10 Data Bits 5 10 Parity 5 10 Stop Bits 5 10 Contact Information Apx 3 Customer Service Apx 3 D Data Bits 5 10 Default Button 2 2 5 8 Default Command 6...

Страница 56: ...2 RS232 Port 2 2 4 2 Apx 1 S Saving Parameters 5 20 7 1 Sectors 8 1 Security 5 16 Security Level 5 1 Send MSS 5 15 Serial Parameters 5 9 to 5 10 Serial Port Apx 1 Baud Rate 5 10 Data Bits 5 10 Parity...

Страница 57: ...Notes 1 Notes...

Страница 58: ...Notes 2 IPS 800 IPS 1600 Series User s Guide Notes...

Страница 59: ......

Страница 60: ...5 Sterling Irvine California 92618 949 586 9950 Toll Free 1 800 854 7226 Fax 949 583 9514 http www wti com...

Отзывы: