Warner Shelter Systems Limited
PAGE 5
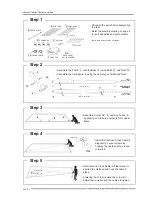
* Corners are numbered for ease of explanation only.
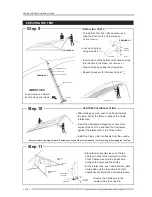
• Place the Tent Top beside the middle part of one
frame section and unfold fabric along one end.
• Roll out the Tent Top.
* Ensure that centre socket would pull out towards
the centre, otherwise rotate entire Tent Top
bundle 180°.
• Pull centre socket, unfolding towards the centre.
• Attach webbing 1 & 2 to corresponding corners
as shown in
STEP 8A
on
PAGE 7
• Pull upper layer towards the 3rd corner. Use
toggle rope and avoid stepping on Tent Top.
• Repeat to 4th corner.
• Attach webbings 3 & 4 to corresponding corners.
SEE STEP 8B
on
PAGE 7
.
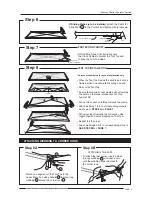
Step 8
Step 6
•
If Sliding Walls are to be installed
, attach the Cable for
Slide Wall 20 to the Corners and tighten with turnbuckle.
Step 7
TENT TOP INSTALLATION
Step 8A
• Attach one segment of the Tent Top to the
upper frame by pulling handle B to place loop
webbing A around the corner loop C .
C
B
A
• To attach the last corner, insert a stake
through webbing A and push down
until the webbing slips underneath
the corner loop.
ATTACHING THE LAST
Step 8B
Turnbuckle
Cable: Slide Wall
ATTACHING WEBBING TO CORNER HOOK
Cross
Cable
1
1
2
2
Centre Socket
1
2
3
4
1
2
4
3
1
2
..\graphicshome\Marquee\Manuals\MQ1020\MQ1020 Manual 2007.FH11
• Unfold Drop Sheet (not included) over
the Cross Cables to protect the Tent Top and
to keep the Tent Top clean.
Drop Sheet
(NOT INCLUDED)
PROTECTING CANOPY


