background image

6

auto return 
    Home

speed-select 
button

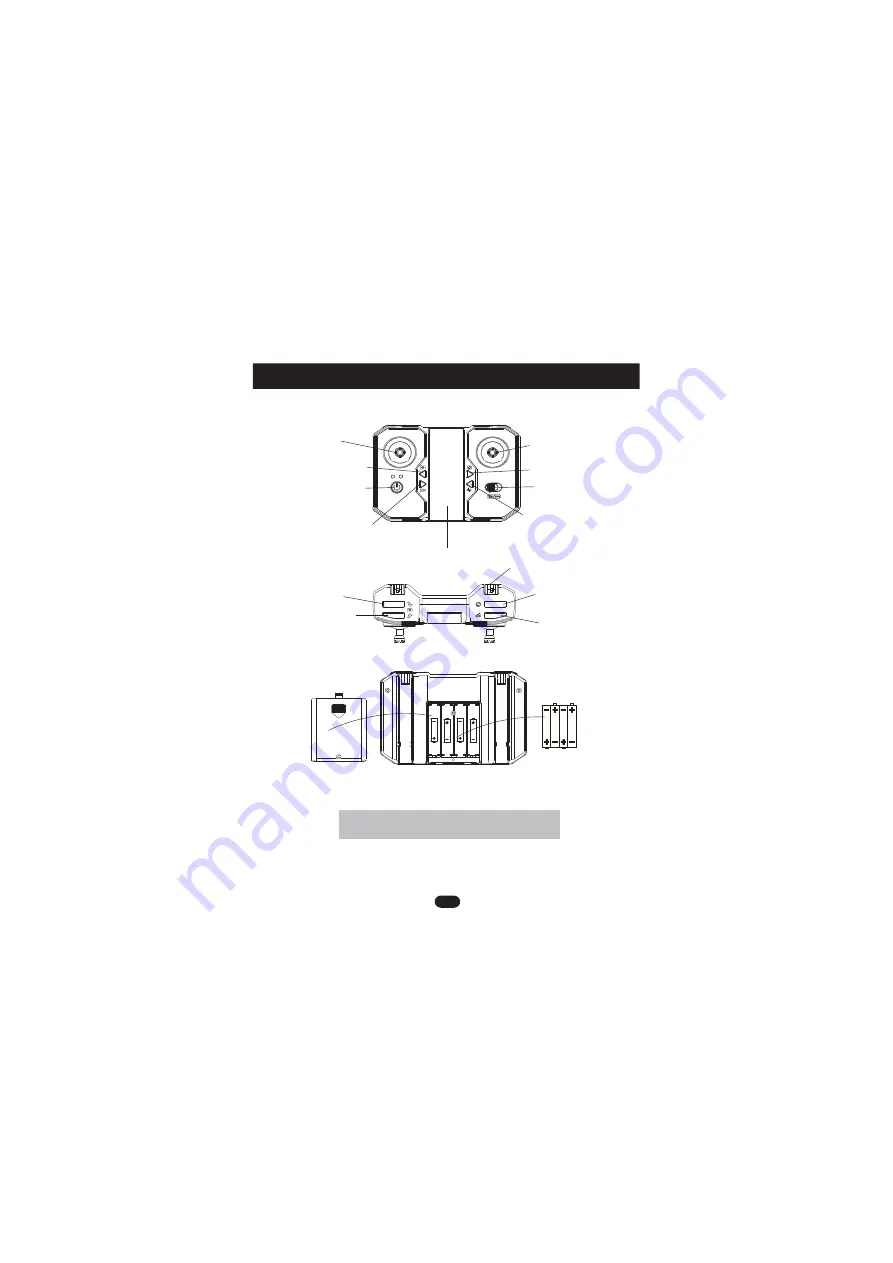
Controller functions

camera up

camera down

antenna

calibration/
emergency Stop

right stick

one key start/stop

normal/GPS mode

throttle 
left stick

power switch

picture/LED

video/
headless mode

 phone holder

1.Unscrew the battery cover,and insert 4xAAA batteries(not included),
   make sure to insert them following the correct polarity as shown.
2.Replace the battery cover.

Always use alkaline batteries
Never mix old and new batteries

.

.

4xAAA batteries
  (not included)

Содержание LARK V3 EC20

Страница 1: ...EC20 WWW WOWITOYS COM RZLWHF w INSTRUCTIONS FOR USE ...

Страница 2: ...ety Guidelines 1 2 3 4 14 17 7 6 11 Contents Use of Battery 4 Packing list Drone Blades Details Controller Functions Download the APP Preparation for Flight Flying the Drone Features APP 8 23 24 Specification Trouble Shooting ...

Страница 3: ...hat are proper and in accordance with local regulations terms and all applicable policies and guidelines 2 When using this product please be sure to strictly abide by the specification requirements and safety guidelines stated in this document Any personal injury property damage legal disputes and all other adverse events caused by the violation of the safety instructions or due to any other facto...

Страница 4: ...have enough power 3 Please be sure that all the propellers are undamaged and are installed in the right direction 4 Please do a thorough check of the product before each use Check for firmness of the parts any signs of cracks and wear of the propeller battery power and effectiveness of the product until the issue has been dealt with 1 Make sure the surrounding area is free of people pets or other ...

Страница 5: ...attery is in use or being charged remove it from the device or charger immediately and discontinue use of it 8 Do not connect the battery directly to wall outlets or car cigarette lighter sockets 7 It is recommended to only use the USB charging cable that comes with the drone to charge the battery 6 If the device is not going to be used for an extended period of time remove batteries to prevent po...

Страница 6: ...tention to the letter A or B printed underneath each blade Drone s details Blade A Clockwise Blade A Clockwise Blade B Counter Clockwise HEAD Camera Blade B Counter Clockwise Packing list USB charger x 1 Controller x 1 Drone x 1 Battery x 1 Blade x 4 Screwdriver x 1 User Manual x 1 ...

Страница 7: ...WARNING Computer USB Port Battery USB Adapter 5V 0 5 2 0A 1 Remove the battery from the drone insert the charging wire into the battery charging slot 2 Connect the USB charger square socket to a computer the USB indicator will glow red 3 The red light will go out when the battery is fully charged insert the battery into drone ...

Страница 8: ...p normal GPS mode throttle left stick power switch picture LED video headless mode phone holder 1 Unscrew the battery cover and insert 4xAAA batteries not included make sure to insert them following the correct polarity as shown 2 Replace the battery cover Always use alkaline batteries Never mix old and new batteries 4xAAA batteries not included ...

Страница 9: ...n a horizontal surface and turn on the remote control power switch At this time the remote control power indicator flashes red Turn on the drone the remote control will beep twice to indicate that it is ready to pair at this time the front green lights and rear red lights flash 2 Slowly push the left lever of the remote control up to the top and then down to the bottom At this time the remote cont...

Страница 10: ... turn into a steady light which means that the drone has received the pairing instruction and completed the self check The pairing is successful 3 Download the APP 1 Turn on the drone 2 Enter the Settings menu of your mobile device 3 Activate WIFI connection search for the drone s wifi network and connect to it 4 Click on the ICON to open the interface of the APP the video image from the drone s c...

Страница 11: ... of the drone will flash quickly and the rear red light will be steady on indicating that the compass calibration is started Please be noted that long pressing this button for 3 seconds will activate emergency stop function 2 Pick up the drone and keep it horizontal then rotate the drone clockwise at a constant speed approximately 3 5 rotations wait until the front green light is on the rear red l...

Страница 12: ...atellites Switch the remote control to GPS mode at this time GPS signal light on the remote control flashes red The front green light of the drone flashes to indicate that the drone is searching for GPS satellite signals When the drone is flying in outdoor GPS mode it must have enough GPS signal before it can take off The normal outdoor search time for satellites without interference is about 3 5 ...

Страница 13: ...nd the drone will automatically take off at an altitude of about 1 2 meter 2 Manual take off pull the left and right levers at the same time as shown in the figure and then push the left throttle lever upwards to take off Taking off method 2 Take off method 1 Take off method 2 Flying the Drone GPS mode GPS signal ...

Страница 14: ...will land on its own Landing method 2 Pull the left throttle lever of the remote control to the bottom and the drone will land by itself Landing method 1 Landing Method 2 6 Drone Operations 1 Ascend descend turn left turn right Use the left lever to control the altitude rotation during flight ...

Страница 15: ...ntal surface to pair the remote control to the drone 2 Select normal mode on remote control as shown in the figure 3 The drone is ready to take off and can be operated by the remote control DO NOT switch between normal mode GPS mode during flight Such operation will lead to flight anomalies of the drone failure of GPS positioning deviation of reverse flight and other serious faults normal mode ...

Страница 16: ...card slot 2 To record a video 4 5 Long press the camera button to turn on off the LED light To activate headless mode long press the video button the drone will fly in the desired selected direction regardless of the direction the drone is facing Long press the video button again to exit the headless mode 3 Geomagnetic Calibration Emergency Stop Please refer to the description of this function on ...

Страница 17: ...the GPS mode 8 Speed select button Two speeds for the drone fast and slow When the drone is flying in the GPS mode press the return button for 2 to 3 seconds the drone will return to the position where GPS mode started 9 Auto return home 7 Camera down 6 Camera up Long press the one key start stop button hear a short beep the drone will take off slowly and hover at an altitude of about 1 2 meters 4...

Страница 18: ...keoff place 1 Long press the auto return home button for 2 3 seconds the drone will fly back to the takeoff place automatically 2 Directly switch off the power of the remote control the drone will return to the takeoff place Remark When the drone is out of the range of the remote control the drone will fly back to the takeoff place automatically Auto return home ...

Страница 19: ... 5 Controller signal 6 Drone Power 7 Show Hide set up menu 8 Hide 9 3D view 10 Reverse lens 11 V Sign 12 Waypoint flight 13 Follow me 14 Surround flight 15 Add music 16 One key start 17 One key stop 18 Automatic return 19 Photo Video 20 Shutter 21 Replay 22 Map 23 Distance 24 Filter 25 Zoom ...

Страница 20: ... a speed of 3 meters per second Follow me Mode Surround Mode Tap the icon to activate follow me flight mode Normal flight altitude is above 5 meters GPS signal is more than or equal to 8 satellites the drone will follow the mobile phone to move position Waypoint Flight Mode Tap the icon to activate the waypoint flight mode Set multiple location points on the map and the drone will fly in the order...

Страница 21: ...e takeoff point The drone can fly for about 5 minutes under low power 2 When the drone does not have enough battery power to fly the remote control will alarm rapidly all the time At the same time the drone will automatically return 3 Return upon out of Control If the drone and the remote control lose connection the drone will automatically enter the return home mode The drone will automatically r...

Страница 22: ...de if the drone signal encounters interference user moves the remote control position etc the drone will automatically turn back when the signal is bad andwill not turn back automatically until the drone signal is good 1 Please search for GPS signals in an open area do not block the GPS receiving antenna 2 Before flying flip the remote control antenna out to enhance the signal Antenna Wifi antena ...

Страница 23: ...or two seconds wait until the indicator of the remote control turns into red and flash slowly then pull this lever to the bottom and stay for two seconds When the indicator of the remote control turns into green indicating that the switch is successful Right hand mode to Left hand mode Long press the No 2 button at the same time turn on the power switch of remote control then let go the remote con...

Страница 24: ...hotos and videos which will be stored in the SD card without connecting to the WIFI Note SD cards and card readers are not included in this product How to replace the blades Use a screwdriver to remove the screws on the drone blades align the hollow shaft replacing with new corresponding blades and then use the screwdriver to tighten the screws Note The blades are divided into A B styles Please ch...

Страница 25: ... of signal Image transmission range Video resolution Full charge time 100 150 minutes Li po 7 4V 1300mAh Camera resolution 1920X1080 1920x1080 25fps Compatible memory card type Micro SD card minimum 4GB maximum 128GB Mirco SD card with transmission speed of class10 and above 249g 1000m 1000m Working environment temperature 0 to 40 C Remote control Working frequency Maximum effective distance of si...

Страница 26: ...place with new hollow shaft Always fly sideways and out of balance 1 The blades are deformed 2 There is a motor damaged 3 The drone is not leveled during pairing 1 Replace with new blades 2 Replace with new motor 3 Put the drone on a level surface and re pair GPS return is not accurate 1 The compass is not calibrated 2 Satellites searched are less than 14 1 Recalibrate the compass 2 Wait until the...

Страница 27: ...use harmful interference to radio communications However there is no guarantee that interference will not occur in a particular installation If this equipment does cause harmful interference to radio or television reception which can be determined by turning the equipment off and on the user is encouraged to try to correct the interference by one or more of the following measures Reorient or reloc...

Отзывы: