background image

3

EN

PRODUCT SAFETY 

GENERAL & ADDITIONAL SAFETY INSTRUCTION

WARNING: Read all safety warnings and all instructions.

 Failure to follow the 

warnings and instructions may result in electric shock, fire and/or serious injury.

Carefully read the instructions for the safe operation of the machine.

Save all warnings and instructions for future reference.

-This appliance is not intended for use by persons (including children) with reduced physical, 

sensory or mental capabilities, or lack of experience and knowledge, unless they have been given 

supervision or instruction concerning use of the appliance by a person responsible for their safety.

-Children should be supervised to ensure that they do not play with the appliance.

-This appliance contains batteries that are only replaceable by skilled persons.

WARNING:

 For the purposes of recharging the battery, only use the detachable supply unit 

provided with this appliance.

WARNING: 

To reduce the risk of injury to persons and damage to the machine, do not remove 

battery pack before switching off the machine.

IMPORTANT

READ CAREFULLY BEFORE USE

KEEP FOR FUTURE REFERENCE

Safe operation practices

Training

a)  Read the instructions carefully. Make sure you understand the instructions and be familiar with 

the controls and the proper use of the appliance.

b)  Never allow people unfamiliar with these instructions or children to use the appliance. Local 

regulations can restrict the age of the operator.

c)  The operator or user is responsible for accidents or hazards occurring to other people or their 

property.

Preparation

a)  Ensure the correct installation of boundary wire as instructed.

b)  Periodically inspect the area where the appliance is to be used and remove all stones, sticks, 

wires, bones, and other foreign objects.

c)  Periodically visually inspect to see that the blades, blade bolts and cutter assembly are not worn 

or damaged. Replace worn or damaged blades and bolts in sets to preserve balance.

d)  On multi-spindle appliances, take care as rotating one blade can cause other blades to rotate.

e)  WARNING! The lawnmower shall not be operated without the guard in place.

Operation

1. General

a)  Never operate the appliance with defective guards, or without safety devices, for example 

deflectors, in place.

b)  Do not put hands or feet near or under rotating parts. Keep clear of the discharge opening at all 

times.

c)  Never pick up or carry an appliance while the motor is running.

d)  Operate the disabling device from the appliance.

-    Before clearing a blockage;

-    Before checking, cleaning or working on the appliance.

e)  It is not permitted to modify the original design of robotic lawnmower. All modifications are made 

at your own risk. 

f)   Start robotic lawnmower according to the instructions. When the power key is switched on, 

make sure you keep your hands and feet away from the rotating blades. Never put your hands 

Содержание WR149E

Страница 1: ...Owner s manual...

Страница 2: ......

Страница 3: ...iar with these instructions or children to use the appliance Local regulations can restrict the age of the operator c The operator or user is responsible for accidents or hazards occurring to other pe...

Страница 4: ...ildren or people in the vicinity Maintenance and storage WARNING When the mower is turned upside down the power key must always be switched off The power key should be switched off during all work on...

Страница 5: ...ogether may cause burns or a fire c Do not expose battery pack to heat or fire Avoid storage in direct sunlight d Do not subject battery pack to mechanical shock e In the event of battery leaking do n...

Страница 6: ...l then be recycled or dismantled in order to reduce the impact on the environment Battery packs can be hazardous for the environment and for human health since they contain hazardous substances Do not...

Страница 7: ...before checking cleaning or working on Landroid 5 It is not permitted to modify the original design of Landroid All modifications are made at your own risk 6 Start Landroid according to the instructio...

Страница 8: ...ck clean and dry 8 The battery pack gives its best performance when it is operated at temperature around 20 C 9 When disposing of battery packs keep battery packs of different electrochemical systems...

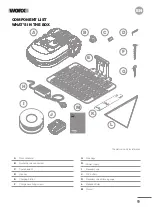
Страница 9: ...c m 1 0 2 i n c h 4 c m A B C D E F G H I J K L M Worx Landroid Boundary wire connectors Spare blade kit Hex key Charging Station Charge base fixing screws Wire pegs Power supply Boundary wire 20V ba...

Страница 10: ...Limits slot Voice Control High Pitched Alarm Slot USB port Cutting height adjustment Microphone LCD Display Interface ACS slot GETTING TO KNOW LANDROID The picture is only for reference Accessories av...

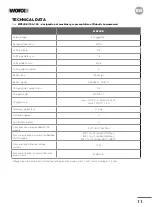
Страница 11: ...model WA3750 1 Charger rating Input 100 240 V 50 60 Hz 38 W Output 20V 1 5 A Machinery weight kg 11 2kg Protection degree III App Wifi Bluetooth Y Frequency band of embedded WLAN module 2 412GHz 2 484...

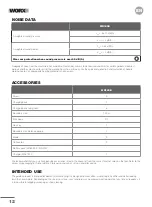
Страница 12: ...arging base 1 Charging base fixing nails 8 Boundary wire 150 m Wire pegs 210 Hex key 1 Boundary wire distance gauge 1 Blade 9 Connector 2 Battery pack WA3553 3 WA3014 1 Charger WA3750 1 1 We recommend...

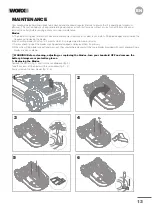
Страница 13: ...cy of replacing the blades B Each cutting blade will last up to 2 months when it is programmed to mow every day C Always check to see if the blades are chipped or damaged and replace them if necessary...

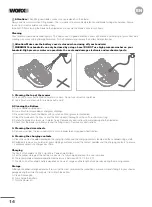
Страница 14: ...gloves for protection D Clean the blade disc the chassis and the front wheel s thoroughly with a soft brush or moist rag E Rotate the blade disc to ensure it rotates freely Remove any obstructions to...

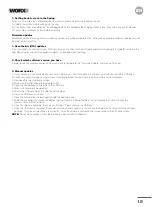
Страница 15: ...ual updates A If your Landroid is not connected to your Wi Fi network you can still update it to the latest software version with a USB drive B Check your account page via www account worxlandroid com...

Страница 16: ...ging in a powered off state ERROR MESSAGES Sometimes things can go wrong Fortunately Landroid is smart enough to tell you if it is enountering an issue so you can fix it If in doubt please visit our w...

Страница 17: ...on Mower lifted Press START to reset Landroid is lifted up Also if the lift sensor has been activated several times in a short period this will cause a Lifted error Turn power off Take Landroid to an...

Страница 18: ...r lawn is divided in two separated areas connected by a corridor less than 3 ft wide one of which is not provided with the charging station when Landroid runs out of charge take it manually to the cha...

Страница 19: ...ower does not charge There is no power Check the power cord is connected properly to the charger and the charger is connected to a suitable power supply Make sure both the charging contacts on the mow...

Страница 20: ...connection Check the LED light on the charging station Check the connection between the contact paddles located on the charging station and the charging contacts on the mower Landroid stops in the wo...

Страница 21: ......

Страница 22: ......

Страница 23: ......

Страница 24: ......

Отзывы: