background image

18

Cordless Lawn Mower 

EN

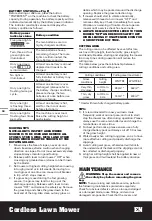
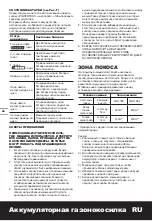
BATTERY STATUS (See Fig. F)

Before starting or after use, press the button 

“POWERTEST” on the machine to check the battery 

capacity. During operation, the battery capacity will be 

indicated automatically by the battery power indicator. 

The indicator constantly senses and displays the 

battery condition as follows:

Battery power 

indicator status

Battery condition

Five green lights 

(

) are 

illuminated.

The two batteries are in a 

highly charged condition.

Two, three or four 
green lights are 
illuminated.

The two batteries have a 
remaining charge. The more 
lights are illuminated, the 
more battery capacity.

Only one green 
light (

is illuminated.

At least one battery is almost 
depleted and needs to be 
charged.

No light is 

illuminated.

At least one battery is not 

fully installed or battery may 

be defective.

Only one light is 

flashing twice per 

cycle.

At least one battery is over 

discharged (please refer to 

the battery charge condition), 

please recharge the two 

batteries at once before use 

again or storage.

Only one light 

is flashing three 

times per cycle.

At least one battery is hot, 

wait for them cool down 

before start again.

Only one light is 

flashing four times 

per cycle.

The machine is over load. 

Raise the cutting height or 

push slowly.

MOWING TIPS

NOTE: ALWAYS INSPECT AREA WHERE 

MOWER IS TO BE USED AND REMOVE ALL 

STONES, STICKS, WIRE, METAL AND OTHER 

DEBRIS WHICH MIGHT BE THROWN BY THE 

ROTATING BLADE.

1.  Mow across the face of slopes, never up-and-

down. Exercise extreme caution when changing 

direction on slopes. Do not mow excessively steep 

slopes. Always maintain good footing.

2.  Release switch lever to turn mower “OFF” when 

crossing any graveled area (stones can be thrown 

by the blade).

3.  Set mower at highest cutting height when mowing 

in rough ground or in tall weeds. Removing too 

much grass at one time can cause circuit breaker 

to trip, which stops mower. 

4.  If a grass bag is used during the fast growing 

season, the grass may tend to clog up at the 

discharge opening. Release switch lever to turn 

mower “OFF” and remove the safety key. Remove 

the grass bag and shake the grass down to the 

back end of the bag. Also clean out any grass or 

debris which may be packed around the discharge 

opening. Replace the grass collection bag.

5.  If mower should start to vibrate abnormally, 

release switch lever to turn mower “OFF” and 

remove safety key. Check immediately for cause. 

Vibration is a warning of trouble. Do not operate 

mower until a service check has been made. 

6.  ALWAYS RELEASE SWITCH LEVER TO TURN 

MOWER “OFF” AND REMOVE SAFETY KEY 

WHEN LEAVING IT UNATTENDED EVEN FOR 

A SHORT PERIOD OF TIME.

CUTTING AREA

The cutting area can be affected by several factors, 

such as cutting height, lawn humidity, grass length 

and density. Besides, starting and stopping the mower 

too many times during operation will reduce the 

cutting area.

The table below gives the relationship between 

cutting conditions and cutting area.

Cutting conditions

Cutting area (maximum)

Grass 

conditions

Cutting 

height

WG779E

WG779E.1

Very thin, 

dry grass

cut 7cm to 

5cm

280m

2

 *

460m

2

 *

Thin, dry 

grass

cut 7cm to 

3cm

140m

2

 *

230m

2

 *

* Used with two fully charged battery packs.

TIPS:

1)  It is recommended to mow your lawn more 

frequently, walk at normal pace, and not to start/

stop the mower too often during operation. Please 

always use the same two batteries and charge the 

two batteries at same time.

2)  For best performance, please ensure use a fully 

charged battery pack and always cut off 1/3 or less 

of the grass height.

3)  Walk slowly when cutting long grass, so as to have 

more effective cutting and properly discharge the 

clippings.

4)  Avoid cutting wet grass, otherwise it will stick to 

the underside of the deck and the clippings cannot 

be collected or discharged properly.

5)  A higher cutting height shall be applied to new or 

thick grass and it will extend the battery duration.

MAINTENANCE

WARNING: Stop the mower and remove 

the safety key before removing the grass 

bag.

NOTE: 

To ensure long and reliable service, perform 

the following maintenance procedures regularly. 

Check for obvious defects such as a loose, dislodged 

or a damaged blade, loose fittings, and worn or 

damaged components. Check that the covers and 

Содержание WG779E

Страница 1: ...WG779E WG779E 1 WG779E 9 P09 P22 P36 P48 P61 Cordless Lawn Mower Juhtmeta Muruniiduk Z les P v js Bez Str vas Pievada Belaid Vejapjov EN RU ET LV LT...

Страница 2: ...Original instructions EN RU Algup rane kasutusjuhend ET Instrukcijas ori in lvalod LV Originali instrukcija LT...

Страница 3: ...2 3 4 5 16 15 14 11 10 9 7 8 13 12 6 1...

Страница 4: ...1 2 A5 B1 A1 A2 A4 A3...

Страница 5: ...1 3 1 2 2 100 0 C2 B2 B3 C1 B4 D1...

Страница 6: ...17 For WG779E 1 For WG779E 1 2 G1 G2 D2 D3 E F...

Страница 7: ...1 70mm 2 60mm 3 50mm 4 40mm 5 30mm 6 20mm ECO TURBO 1 1 2 2 3 4 5 6 a b 1 2 0 100 J1 J2 I2 I1 H K2 K...

Страница 8: ...N 1 N 2 N 3 19 18 M 1 M 2 M 3 1 2 K2 N L O1 O2 L M K2 L2 L L1...

Страница 9: ...pliance The appliance is only to be used with the power supply unit provided with the appliance IMPORTANT READ CAREFULLY BEFORE USE KEEP FOR FUTURE REFERENCE Safe operation practices Training a Read t...

Страница 10: ...ces other than grass and when transporting the lawnmower to and from the area to be mowed j never operate the lawnmower with defective guards or without safety devices for example deflectors and or gr...

Страница 11: ...apment of the fingers between moving blades and fixed parts of the lawnmower e Always allow the lawwnmower to cool down before storing f When servicing the blades be aware that even though the power s...

Страница 12: ...when it is operated at normal room temperature 20 C 5 C m When disposing of battery packs keep battery packs of different electrochemical systems separate from each other n Recharge only with the char...

Страница 13: ...rn exhausted batteries to your local collection or recycling point Wear protective gloves Remove battery from the socket before carrying out any adjustment servicing or maintenance Blade continues to...

Страница 14: ...ER 8 INTELLICUT DIAL 9 CUTTING HEIGHT ADJUSTMENT KNOB 10 CARRY HANDLE 11 HANDLE KNOB LOWER 12 SAFETY FLAP 13 GRASS COLLECTION BAG 14 BAG HANDLE 15 GRASS BAG INDICATOR 16 HANDLE KNOB UPPER 17 BATTERY P...

Страница 15: ...2 5Ah WA3572 4 0Ah WA3553 Battery type Lithium Ion Charger model WA3869 WA3883 Charger rating Input AC 100 240V 50 60Hz Output 20V 2 0A Input 100 240V 50 60Hz Output 1 20V 2 0A Output 2 20V 2 0A Char...

Страница 16: ...e an estimation of exposure level in the actual conditions of use should also take account of all parts of the operating cycle such as the times when the tool is switched off and when it is running id...

Страница 17: ...power indicator on the machine See details in BATTERY STATUS part IMPORTANT When only one light is illuminated at least one battery is depleted and needs to be charged even though the mower may still...

Страница 18: ...Release switch lever to turn mower OFF and remove the safety key Remove the grass bag and shake the grass down to the back end of the bag Also clean out any grass or debris which may be packed around...

Страница 19: ...for blade balancing 7 Replace blade on mower and tighten securely Refer to instructions below BLADE BALANCING See Fig N Check balance of blade by placing center hole in blade N 1 over a nail or screwd...

Страница 20: ...o reduce deck drag on grass Check each wheel for free rotation 5 Mower is abnormally noisy and vibrates A Release Switch Lever to turn mower off Remove safety key Turn mower on side and check blade to...

Страница 21: ...y assessment procedure as per Annex VI Measured Sound Power Level 87 76dB A Declared Guaranteed Sound Power Level 90dB A The notified body involved Name Intertek Testing Certification Ltd notified bod...

Страница 22: ...22 RU c d a...

Страница 23: ...23 RU b c d b c e f g h i j k l m...

Страница 24: ...24 RU n o p q a b c d e f a b...

Страница 25: ...25 RU c d e f g h i j k...

Страница 26: ...26 RU 20 C 5 C m n WORX o p q r s t u v...

Страница 27: ...27 RU...

Страница 28: ...28 RU 1 2 3 4 5 6 7 8 INTELLICUT 9 10 11 12 13 14 15 16 17 E 18 O1 19 O1...

Страница 29: ...E 1 WG779E 9 40V Max 2x20V Max 3300 3500 min 34cm 20 70mm 6 160mm 180mm 30L 2 5Ah WA3572 4 0Ah WA3553 WA3869 WA3883 100 240V 50 60Hz 20V 2 0A 100 240V 50 60Hz 1 20V 2 0A 2 20V 2 0A 2 5 2 12 8kg 13 4kg...

Страница 30: ...30 RU ah 3 246 2 K 1 5 WG779E WG779E 1 WG779E 9 1 1 1 2 2 2 WA3572 2 WA3553 2 WA3869 1 WA3883 1...

Страница 31: ...31 RU A1 A2 A3 A4 A5 B1 B2 B3 B4 C1 C2 D1 D1 D2 D3 2 E F G1 G2 H Intellicut 20 TURBO TURBO I1 I2 a b J1 J2 K L1 L2...

Страница 32: ...32 RU F POWERTEST Five green lights 2 3 4 1 1 2 3 4 5 6 WG779E WG779E 1 7cm 5cm 280m2 460m2 7cm 3cm 140m2 230m2 1 2 1 3 3 4 5...

Страница 33: ...33 RU 1 2 3 1 2 1 2 3 1 2 4 5 3 6 7 N N 1 N 2 N 3 O1 O2 50 19 18 19 18 L1 L2 L1 L2...

Страница 34: ...34 RU 1 A B C 2 A B C D 3 A B C 4 A 5 A B 180 6 A B 7 A 8 A C D 9 1 3 B 10 A 11 A 42 C...

Страница 35: ...88 EC VI 87 76 A 90 A Intertek Testing Certification Ltd 0359 Davy Avenue Knowlhill Milton Keynes MK5 8NL EN 60335 1 EN 60335 2 77 EN 62233 EN ISO 3744 EN 55014 1 EN 55014 2 Marcel Filz Positec Germa...

Страница 36: ...d kaasasoleva vooluallikaga OLULINE INFO LUGEGE ENNE KASUTAMIST HOOLIKALT HOIDKE EDASPIDISEKS ALLES T OHUTUSE TAGAMINE KASUTAMISEKS VALMISTUMINE a Lugege juhist hoolikalt Tutvuge seadme juhtimise ja i...

Страница 37: ...muude pindade kui muru liikuda ja seadme transportimisel niitmispiirkonda ja tagasi j rge kunagi t tage masinaga millel on katkised kaitsed v i katted v i paigaldamata turvaseadmeteta nagu n iteks def...

Страница 38: ...lvaruosi ja tarvikuid d Muruniidukit reguleerides tuleb olla ettevaatlik et s rmed ei j ks liikuvate terade ja niiduki fikseeritud osade vahele e Laske muruniidukil enne hoiulepanekut alati maha jahtu...

Страница 39: ...ja akupaketti mitu korda laadida ja t hjendada et saavutada selle maksimaalne t v ime l Akupaketil on suurim v imsus kui seda kasutatakse toatemperatuuril 20 C 5 C m Akupaketi utiliseerimisel hoidke e...

Страница 40: ...eale mootori v lja l litamist Enne hooldust eemaldage blokeerimisseadis Kaitske vihma ja vee eest rge p letage rge visake akusid ra viige t hjad akud kohalikku kogumis v i mbert tlemiskohta Kasutage k...

Страница 41: ...I 2 L LITIKANG 3 KAABLIKLAMBER 4 LEMINE K EPIDE 5 ALUMINE K EPIDE 6 AKUPINGE INDIKAATOR 7 AKUPAKI KATE 8 INTELLICUT VALIK 9 L IKEK RGUSE REGULAATORNUPP 10 KANDMISK EPIDE 11 ALUMINE K EPIDEMENUPP 12 OH...

Страница 42: ...mahutavus 2 5Ah WA3572 4 0Ah WA3553 Aku t p Liitium Ioon Laadija mudel WA3869 WA3883 Laadija n itajad Sisend 100 240V 50 60Hz V ljund 20V 2 0A Sisend 100 240V 50 60Hz V ljund 1 20V 2 0A V ljund 2 20V...

Страница 43: ...rraldatud HOIATUS Kui hinnatakse vibratsiooniga kokkupuutumise taset tegelikes kasutustingimustes tuleb arvestada ka kasutusts kli k iki osi n iteks aega kui seade on v lja l litatud ja kui see on k i...

Страница 44: ...le on v hemalt ks akudest halvasti paigaldatud v i vigane Kontrollige et akud on korralikult paigaldatud VT F K ivitamine Seiskamine VT G1 G2 L ikek rguse reguleerimine HOIATUS Seisake masin vabastage...

Страница 45: ...etingimuste ja niitmisala suuruse suhet L iketingimused L ikeala suurus maksimaalne Rohu omadused L ikek rgus WG779E WG779E 1 V ga peen kuiv rohi L ikamine 7 cm kuni 5 cm 280m2 460m2 huke kuiv rohi L...

Страница 46: ...utusv ti Puhastage masina v lispinnad p hjalikult pehme harja ja riidega rge kasutage vett lahusteid ega poleerimisvahendeid Eemaldage kogu muru ja j gid eriti hutusavadest Keerake masin k lili ja puh...

Страница 47: ...ikek rgust Kontrollige et k ik rattad saavab vabalt p relda 5 Niiduk on ebanormaalselt m rarikas ja vibreerib A Niiduki v ljal litamiseks vabastage l litikang Eemaldage ohutusv ti keerake seade k lil...

Страница 48: ...elektroier ci Ier ce ir j izmanto tikai ar baro anas bloku kas pieg d ts kop ar ier ci SVAR GI R P GI IZLASIET PIRMS LIETO ANAS SAGLAB JIET TURPM KAI LIETO ANAI DRO AS EKSPLUAT CIJAS METODES APM C BA...

Страница 49: ...m m uz kur m nav z les k ar transport jot ier ci uz un no p au anas vietas j Nekad nedarbiniet ier ci ar boj t m aizsargier c m vai vairogiem vai bez dro bas ier c m piem ram deflektoriem un vai z les...

Страница 50: ...n l s rezerves da as un piederumus d Z les p v ja regul anas laik esiet uzman gs lai nov rstu pirkstu iespr anu starp kust b eso iem asme iem un nekust gaj m mauri a p v ja da m e Pirms novieto anas g...

Страница 51: ...ukciju un lietojiet pareizu uzl des proced ru j Neatst jiet akumulatoru uzl d joties kad to nelietojat k P c ilg kas uzglab anas var b t nepiecie ams uzl d t un izl d t akumulatoru vair kas reizes lai...

Страница 52: ...p c motora izsl g anas Pirms apkopes no emiet blo anas ier ci Nepak aujiet lietum vai denim Nesadedziniet Izlietotus akumulatorus nededziniet Nododiet izlietotos akumulatorus viet j sav k anas viet va...

Страница 53: ...4 AUG J ROKTURIS 5 APAK JAIS ROKTURIS 6 AKUMULATORA ENER IJAS INDIKATORS 7 AKUMULATORA V CI 8 INTELLICUT ZVANI 9 P AU ANAS AUGSTUMA REGUL ANAS SVIRA 10 N S JIET ROKTURI 11 ROKTURA POGA APAK J 12 DRO B...

Страница 54: ...0Ah WA3553 Akumulatora tips Litija jonu L d t ja modelis WA3869 WA3883 L d t ja v rt jums Ievade 100 240V 50 60Hz Izeja 20V 2 0A Ievade 100 240V 50 60Hz Izeja 1 20V 2 0A Izeja 2 20V 2 0A Uzl des laiks...

Страница 55: ...to ana noz m ar to ka pak au anas l menis re lajos lieto anas apst k os j izv rt vis ier ces darbin anas cikla laik piem ram laik kad ier ce ir izsl gta un laik kad t str d tuk gait un neveic uzdevumu...

Страница 56: ...umulatora l me a indikators uz ma nas S k ku inform ciju skatiet sada BATERIJAS STATUSS SVAR GS Ja izgaismojas tikai viena gaisma vismaz viena no baterij m ir izl d jusies un ir j uzl d pat tad ja p v...

Страница 57: ...strauji augo aj sezon tiek izmantoti z laugu maisi i z les dr kst aizsprostoties kanaliz cij Atlaidiet sl dzi sviru lai iesl gtu p v js OFF un iz emiet dro bas atsl gu No emiet salmu maisu un sakratie...

Страница 58: ...et asme u bilances nor d jumus 7 Nomainiet asmeni uz p v ja un dro i pievelciet L dzu skatiet t l k sniegtos nor d jumus ASMENI BALANC ANA Skat t N Asmens balanss tiek p rbaud ts novietojot vid jo cau...

Страница 59: ...ieliniet grie anas augstumu lai samazin tu kl ja pretest bu uz z li P rbaudiet vai katrs ritenis var br vi griezties 5 P v js ir neparasti trok ains un vibr A Atlaidiet sl dzi lai aizv rtu p v ju No e...

Страница 60: ...elikumam VI Izm r tais ska as stiprums 87 76 dB A Deklar tais garant tais ska as stiprums 90 dB A Iesaist t organiz cija kam sniegts pazi ojums Nosaukums Intertek Testing Certification Ltd pilnvarot i...

Страница 61: ...ti naudojamas tik su tuo maitinimo bloku kuris yra pateiktas su prietaisu SVAR GI R P GI IZLASIET PIRMS LIETO ANAS SAGLAB JIET TURPM KAI LIETO ANAI I SAUGOKITE ATEI IAI SAUGAUS DARBO PATIRTIS MOKYMAS...

Страница 62: ...audokite prietaiso jei jo apsaugai ar skydai pa eisti arba n ra apsaugini priemoni pvz kreiptuvo ir arba ol s gaudykl s k Motor junkite laikydamiesi nurodym o p das laikykite atokiai nuo peilio l jung...

Страница 63: ...l ji visi kai atv s f Prie prad dami peili technin s prie i ros darbus nepamir kite kad nors maitinimo altinis yra i jungtas peiliai vis tiek gali suktis AKUMULIATORI NAUDOJIMO SAUGOS TAISYKL S a Near...

Страница 64: ...oriaus j gali tekti kelis kartus krauti ir v l i krauti kad akumuliatoriaus veikt maksimalia galia l Akumuliatorius veikia geriausiai kai jis naudojamas esant prastai kambario temperat rai 20 C 5 C m...

Страница 65: ...ros darbus i imkite i jungimo tais Ma in saugokite nuo lietaus ir vandens Nedeginkite Nei meskite maitinimo element I sekusius maitinimo elementus gr inkite vietin surinkimo ar perdirbimo punkt M v ki...

Страница 66: ...RANKENA 5 APATIN RANKENA 6 AKUMULIATORIAUS INDIKATORIUS 7 AKUMULIATORIAUS PAKAVIMAS 8 INTELLICUT SKAL 9 PJOVIMO AUK IO REGULIAVIMO RANKEN L 10 NE IMO RANKENA 11 APATIN RANKEN L 12 APSAUGIN SKLEND 13 O...

Страница 67: ...572 4 0Ah WA3553 Akumuliatoriaus tipas Li io joninis krovos taiso modelis WA3869 WA3883 krovos taiso na umas vestis 100 240V 50 60Hz I vestis 20V 2 0A vestis 100 240V 50 60Hz I vestis 1 20V 2 0A I ves...

Страница 68: ...iomis s lygomis reikia taip pat atsi velgti visas darbo ciklo dalis kaip antai laikotarpius kai rankis i jungiamas ir kai jis veikia tu i ja eiga o ne atliekant darb Tai gali enkliai suma inti skleidi...

Страница 69: ...toriaus galios indikatorius renginyje r duomenis AKUMULIATORIAUS B KL skyriuje SVARBU Kai si iebia viena viesel bent vienas akumuliatorius yra i eikvotas ir j reikia krauti net jei ir oliapjov vis dar...

Страница 70: ...no metu naudojamas ol s krep ys ol gali u kim ti i metimo ang Atleiskite jungiklio svirt nor dami i jungti oliapjov ir i imkite saugos rakt Nuimkite ol s krep ir i purtykite ol per mai o gal Taip pat...

Страница 71: ...a men pjovimo briaunas su smulkia dilde M 3 arba gal stuvu 6 Patikrinkite a men balans r a men balansavimo instrukcijas 7 Pakeiskite a menis ant pjovimo renginio ir tvirtai priver kite r toliau pateik...

Страница 72: ...aisvai sukasi 5 oliapjov yra ne prastai triuk minga ir vibruoja A Atleiskite jungiklio svirt kad i jungtum te oliapjov I imkite saugos rakt Pasukite oliapjov on ir patikrinkite a menis kad sitikintum...

Страница 73: ...ra pagal VI pried I matuotas garso galios lygis 87 76 dB A Skelbiamas garantuojamas garso galios lygis 90 dB A Dalyvaujanti notifikuotoji staiga Pavadinima Intertek Testing Certification Ltd paskelbto...

Страница 74: ......

Страница 75: ......

Страница 76: ...Copyright 2019 Positec All Rights Reserved AR01421200 www worx com...

Отзывы: