background image

2 in 1 Cordless Lawn Mower  EN

16

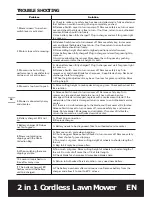
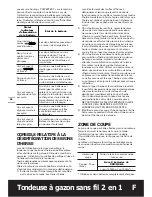
No light is 
illuminated.

At least one battery is not fully 
installed or battery may be 
defective.

Only one light is 
flashing twice per 
cycle.

At least one battery is over 
discharged (please refer to 
the battery charge condition), 
please recharge the two bat-
teries at once before use again 
or storage.

Only one light 
is flashing three 
times per cycle.

At least one battery is hot, 
wait for them cool down 
before start again.

Only one light is 
flashing four times 
per cycle.

The machine is over load. 
Raise the cutting height or 
push slowly.

MULCHING MOWING TIPS

When using the mulching plug, your new mower 
is designed to cut the grass clippings into small 
pieces and distribute them back into the lawn, using 
mulching fins located inside the mower deck.
Under normal conditions, the mulched grass will 
biodegrade quickly to provide nutrients to the lawn. 
Please review the following recommendations for 
optimum mulching performance, 
1)  Avoid mowing when the grass is wet from rain or 

dew. Wet grass may form clumps which interfere 
with the mulching action and reduce runtime. The 
best time to mow grass is in the late afternoon 
when the grass is dry and the newly cut area will 
not be exposed to direct sunlight.

2)  For best mulching performance, set the cutting 

height to remove about one third of the grass 
blade length. If the lawn is overgrown, it may be 
necessary to increase the cut height to reduce the 
pushing effort and prevent overloading the motor. 
For extremely heavy mulching, it is advisable 
to first cut at a high cut height setting, and then 
re-cut to the final cut height. Otherwise, make 
narrower cuts and mow slowly.

3)  For best performance, keep the mower housing 

free of built-up grass. From time to time turn 
off mower and wait for the blade to come to a 
complete stop. Then unplug the Safety Key and 
turn mower on its side. Using an object such as 
a stick, wipe out any accumulation of grass in the 
blade area. Be careful of the sharp edges of the 
blade. Clean often in wet, new grass, and always 
after every use.

4)  Certain types of grass or grass conditions may 

require that an area be mulched a second time 
to fully disperse the grass throughout the lawn. 
If cutting a second time, it is advisable to cut 
perpendicular (across) the first cut pattern. DO 
NOT CHANGE CUT PATTERN IN ANY WAY THAT 

WOULD CAUSE MOWING DOWN A HILL.

5)  Change your cutting pattern from week to week. 

This will help prevent matting and graining of the 
lawn.

CUTTING AREA

The cutting area can be affected by many factors 
including: cutting height, operation practices (ex: 
starting/stopping), lawn moisture levels, grass length 
and thickness.
The below table provides the potential cutting area 
based on the specific cutting condition.

Cutting Height

Recommend lot size 

(maximum)

Cutting off .75” 
(2cm)

With 2*20V/4.0Ah batteries

Up to 5500 sq.ft. (500m

2

) *

* Used with two fully charged battery packs.

TIPS:

1)  Mowing the lawn frequently and reducing the 

amount of starting/stopping procedures will help 
conserve battery runtime. It is recommended 
to always use the same two batteries during 
operation with fully charged levels.

2)  For the best cutting performance, it is 

recommended to only mow up to 1/3 or less 
of the current grass height at a time. Mow at 
a slower pace when cutting long/thick grass 
to allow the mower to properly discharge the 
clippings.

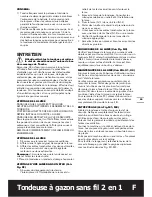
MAINTENANCE


WARNING: Stop the mower and remove 
the safety key before removing the 

grass bag.
NOTE: 

To ensure long and reliable service, perform 

the following maintenance procedures regularly. 
Check for obvious defects such as a loose, dislodged 
or a damaged blade, loose fittings, and worn or 
damaged components. Check that the covers and 
guards are all undamaged and are correctly attached 
to mower. Carry out any necessary maintenance or 
repairs before operating mower. If the mower should 
happen to fail despite regular maintenance, please 
call our customer helpline for advice.

BLADE SHARPENING

KEEP BLADE SHARP FOR BEST MOWER 
PERFORMANCE.
WEAR PROPER EYE PROTECTION WHILE 
REMOVING, SHARPENING, AND INSTALLING 
BLADE. ENSURE THAT SAFETY KEY IS REMOVED.
Sharpening the blade twice during a mowing season 

Содержание WG744

Страница 1: ...EN F ES 2 in 1 Cordless Lawn Mower Tondeuse gazon sans l 2 en 1 Cortac sped sin cables 2 en 1 P02 P19 P31 WG744 WG744 9...

Страница 2: ...better and safer at the rate for which it was designed 8 Don t overreach Keep proper footing and balance at all times 9 Stay alert Watch what you are doing Use common sense Do not operate lawn mower...

Страница 3: ...the appliance before making any adjustments changing accessories or storing appliance Such preventive safety measures reduce the risk of starting the appliance accidentally 18 Under abusive condition...

Страница 4: ...equently and replace with manufacturer s recommended parts when necessary 8 Mower blades are sharp Wrap the blade or wear gloves and use extra caution when servicing them 9 Maintain or replace safety...

Страница 5: ...lade rotates downward remove some metal from the heavy or lower end until the blade is balanced It is balanced when neither end drops SAVE THESE INSTRUCTIONS SYMBOLS KEEP HANDSAND FEET AW AY GARDER MA...

Страница 6: ...2 in 1 Cordless Lawn Mower EN 6 16 1 2 3 6 4 5 10 11 14 12 15 13 9 7 8...

Страница 7: ...GHT ADJUSTMENT KNOB 8 CARRY HANDLE 9 INTELLICUT DIAL 10 BATTERY INDICATOR LIGHT 11 BATTERY PACK COVER 12 SAFETY FLAP 13 BAG HANDLE 14 CABLE CLIP 15 GRASS BAG INDICATOR 16 MULCHING INSERT 17 BATTERY PA...

Страница 8: ...20V 2 0A Charging time approx Battery pack 4 0 Ah 1pc 4 0 Ah 2pcs 2hrs 2hrs Machine Weight 38 1lbs 37 3lbs Voltage measured without workload Initial battery voltage reaches maximum of 20 volts Nomina...

Страница 9: ...2 in 1 Cordless Lawn Mower EN 9 1 1 2 A1 A2 B1 A4 A3 A5...

Страница 10: ...2 in 1 Cordless Lawn Mower EN 10 1 2 C2 B2 B3 C1 B4 C3 1 2 3 1 1 2...

Страница 11: ...2 in 1 Cordless Lawn Mower EN 11 F D2 E 17 100 0 D1 G1 G2 1 2...

Страница 12: ...2 in 1 Cordless Lawn Mower EN 12 1 2 J2 ECO ECO TURBO ECO TURBO TURBO H1 H2 J1 I 5 6 4 3 2 1 1 1 1 5 30mm 2 1 3 5 40mm 3 2 50mm 4 2 2 5 60mm 5 2 4 5 70mm 6 3 1 5 80mm a b K 0 100 1 2...

Страница 13: ...2 in 1 Cordless Lawn Mower EN 13 N1 1 N1 2 N1 3 N2 1 N2 2 N2 3 19 18 M2 N2 O1 N1 L M1...

Страница 14: ...2 in 1 Cordless Lawn Mower EN 14 O2...

Страница 15: ...is discharged condition may reduce the life and performance of your battery When no light is illuminated at least one battery is not fully installed or battery may be defective please double check the...

Страница 16: ...edges of the blade Clean often in wet new grass and always after every use 4 Certain types of grass or grass conditions may require that an area be mulched a second time to fully disperse the grass t...

Страница 17: ...lance of blade by placing center hole in blade N2 1 over a nail or screwdriver shank N2 2 clamped horizontally in a vise N2 3 If either end of the blade rotates downward le that end Blade is properly...

Страница 18: ...ight to reduce deck drag on grass Check each wheel for free rotation 5 Mower is abnormally noisy and vibrates A Release Switch Lever to turn mower off Remove safety key Turn mower on side and check bl...

Страница 19: ...z vous convenablement Ne portez pas des v tements lousses ou des bijoux Ils peuvent se prendre dans des pi ces en mouvement L utilisation de gants de caoutchouc et chaussures paisses est recommand e l...

Страница 20: ...utilisez pas la batterie ou l appareil s il est visiblement endommag 7 Avertissement Ne modi ez pas et n essayez pas de r parer l appareil ou la batterie vous m me 8 La batterie doit tre recycl e 9 L...

Страница 21: ...vant de d marrer le moteur 16 Si la machine se met vibrer de mani re anormale arr tez le moteur et v ri ez imm diatement la cause Les vibrations indiquent g n ralement un probl me 17 Portez toujours u...

Страница 22: ...e vous traversez une all e un chemin ou une route pleine de gravier c Apr s avoir heurt un objet arr tez le moteur d branchez la prise lectrique inspectez soigneusement la tondeuse et assurez vous qu...

Страница 23: ...ale avant d effectuer n importe quel travail de r glage de r paration ou d entretetien La lame continue de tourner une fois la machine arr t e Attendez que toutes les pi ces de la tondeuse se soient a...

Страница 24: ...24 Tondeuse gazon sans fil 2 en 1 F 16 1 2 3 6 4 5 10 11 14 12 15 13 9 7 8...

Страница 25: ...PORT 9 COMMUTATEUR INTELLICUT 10 VOYANT DE LA BATTERIE 11 COUVERCLE DU BOITIER DE BATTERIE 12 BAVETTE DE S CURIT 13 POIGN E DE SAC 14 SERRE C BLES 15 T MOIN DE REMPLISSAGE DU BAC DE RAMASSAGE DE L HER...

Страница 26: ...0A Sortie 2 20V 2 0A Temps de recharge environ Bloc pile 4 0Ah 1 pi ce 4 0Ah 2 pi ces 2 heures 2 heures Poids de la machine 17 3kg 38 1 lb 16 9kg 37 3 lb Tension mesur e hors fonctionnement La tensio...

Страница 27: ...ible d nominateur commun Voir Fig E FONCTIONNEMENT Indicateur d nergie de la batterie sur la machine Voir les d tails dans la partie TAT DE LA BATTERIE IMPORTANT Lorsqu un seul voyant est allum au moi...

Страница 28: ...ionnement Le meilleur moment pour tondre l herbe consiste en la n de l apr s midi alors que l herbe est s che et que la pelouse fra chement tondue n est pas expos e aux rayons directs du soleil 2 A n...

Страница 29: ...en mode de stockage horizontal AFF TAGE D UNE LAME DANS UN TAU Voir Fig N1 1 S assurer du d gagement du levier de l interrupteur de l immobilit de la lame et du retrait de la cl de s curit avant d enl...

Страница 30: ...frottement du chassis sur l herbe V ri er que chaque roue tourne librement 5 La tondeuse produit des sons anormaux et vibre A Relacher l anse pour teindre la tondeuse Retirer la cl de s ret Placer la...

Страница 31: ...toras Use siempre una m scara para la cara o contra el polvo si la operaci n produce polvo 6 Use el Artefacto Adecuado No use ning n artefacto para un trabajo para el cual no ha sido dise ado 7 No Fue...

Страница 32: ...erencia futura 14 No use cargadores que no sean los espec camente suministrados para uso con el equipo Las celdas y bater as secundarias se deben cargar antes del uso Siempre use el cargador correcto...

Страница 33: ...remo cuidado cuando cambie la direcci n sobre las pendientes 2 Observe si existen ori cios surcos baches rocas u otros objetos escondidos El terreno desparejo puede causar un resbal n y ca da El pasto...

Страница 34: ...ente la vibraci n es un s ntoma de problemas e Detenga el motor cada vez que deje la herramienta sin supervisi n y antes de efectuar una reparaci n o inspecci n f Apague el motor y espere a que la hoj...

Страница 35: ...izar cualquier ajuste servicio o mantenimiento Las cuchillas continuar n girando despu s de que la m quina se apague Espere hasta que todos los componentes de la m quina se hayan detenido completament...

Страница 36: ...Cortac sped sin cables 2 en 1 ES 36 16 1 2 3 6 4 5 10 11 14 12 15 13 9 7 8...

Страница 37: ...E 9 INTERRUPTOR INTELLICUT 10 LUZ DE INDICADOR DE BATER A 11 CUBIERTA DE ALOJAMIENTO DE BATER A 12 TAPA DE SEGURIDAD 13 MANIJA DE BOLSA 14 GANCHOS PARA EL CABLE 15 INDICADOR DE LLENADO DE LA BOLSA DE...

Страница 38: ...V 2 0A Salida 2 20V 2 0A Tiempo de carga aprox Bater as 4 0 Ah 1 pieza 4 0 Ah 2 piezas 2 horas 2 horas Peso de la m quina 38 1 lbs 17 3kg 37 3 lbs 16 9kg Voltaje medido sin carga de trabajo El voltaje...

Страница 39: ...nar en el denominador com n m s bajo Vea la Fig E OPERACI N Indicador de energ a de la bater a en la m quina Consulte los detalles en la parte ESTADO DE BATER A IMPORTANTE Cuando s lo se enciende una...

Страница 40: ...cubierta de la cortac sped 1 Evite podar el c sped cuando est mojado debido a la lluvia o al roc o El pasto h medo tiende a formar grupos que inter eren con la acci n de desbroce y reducen el tiempo d...

Страница 41: ...vertical PARA AFILAR LA CUCHILLA EN UNA PRENSA Vea la Fig N1 1 Aseg rese de haber liberado la palanca del interruptor de que la cuchilla se haya detenido y de quitar la llave de seguridad 2 Saque la c...

Страница 42: ...conducto de descarga C Es posible que el ajuste de altura de las ruedas se haya jado demasiado bajo para el estado del c sped Eleve la altura de corte 4 Cuesta mucho empujar la podadora A Eleve la alt...

Страница 43: ...do despu s de muchos usos A Return to Authorized Service location may need new battery 11 El LED del cargador de bater a parpadea en rojo y no se puede cargar la bater a A The battery overheats after...

Страница 44: ...Copyright 2018 Positec All Rights Reserved Copyright 2018 Positec Tous droits r serv s Derechos reservados 2018 Positec Todos los derechos reservados AR01338900 www worx com...

Отзывы: