background image

14

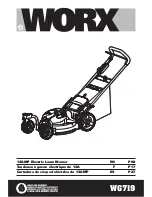
13AMP Electric Lawn Mower               EN

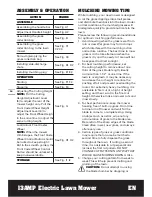
ASSEMBLY & OPERATION

ACTION 

FIGURE

ASSEMBLE

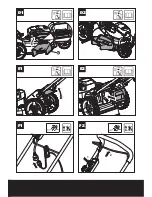
Assembling the handle bar

See Fig. A1

Adjustment Handle’s height

See Fig. A2

Assembling the grass 
collection bag

See Fig. B

Assembling the grass 
collection bag to the lawn 
mower

See Fig. C1 
C2 C3

Removing/emptying the 
grass collection bag

See Fig. C4

Installing side-discharge 
chute

See Fig. D1 D2

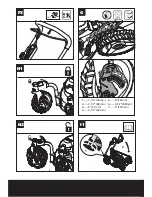
Installing mulching plug

See Fig. E1 E2

OPERATION

Starting 

See Fig. F1 F2

Stopping 

See Fig. F3

Adjusting The Cutting Height

NOTE:

 Pull the Cutting 

Height Adjustment Lever 
(8) to adjust the rear of the 
mower height only. Pull the 
Front Caster Wheel Height 
Adjustment Lever (6) to 
adjust the Front Wheel Height 
in the same time to adjust the 
same cutting height.

See Fig. G

Lock/Unlock Front Caster 
Wheel

NOTE: 

When the mower 

climb slopes, the Front Caster 
Wheel Control Button should 
be locked to keep straight.
But in the smooth garden, the 
Front Caster Wheel Control 
Button should be unlocked to 
keep maneuverability.

See Fig. H1 H2

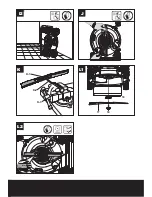
STORAGE

See Fig. I1 I2

MULCHING MOWING TIPS

While mulching, your new mower is designed 
to cut the grass clippings into small pieces 
and distribute them back into the lawn. Under 
normal conditions, the mulched grasses will 
biodegrade quickly to provide nutrients to the 
lawn.
Please review the following recommendations 
for optimum mulching performance.
1.  Avoid mowing when the grass is wet from 

rain or dew. Wet grass may form clumps 
which interfere with the mulching action 
and reduce runtime.  The best time to mow 
grass is in the late afternoon when the 
grass is dry and the newly cut area will not 
be exposed to direct sunlight.

2.  For best mulching performance, set 

the cutting height to remove about one 
third of the grass blade length, ideally 
no more than 1-1/2” at one time. If the 
lawn is overgrown, it may be necessary 
to increase the cut height to reduce the 
pushing effort and prevent overloading the 
motor. For extremely heavy mulching, it is 
advisable to first cut at a high cut height 
setting, and then re-cut to the final cut 
height. Otherwise, make narrower cuts and 
mow slowly. 

3.  For best performance, keep the mower 

housing free of built-up grass. From time 
to time turn off mower and wait for the 
blade to come to a complete stop. Using 
an object such as a stick, wipe out any 
accumulation of grass in the blade area. 
Be careful of the sharp edges of the blade. 
Clean often in wet, new grass, and always 
after every use.

4.  Certain types of grass or grass conditions 

may require that an area be mulched a 
second time to fully disperse the grass 
throughout the lawn.  If cutting a second 
time, it is advisable to cut perpendicular 
(across) the first cut pattern. DO NOT 
CHANGE CUT PATTERN IN ANY WAY THAT 
WOULD CAUSE MOWING DOWN A HILL.

5.  Change your cutting pattern from week to 

week. This will help prevent matting and 
graining of the lawn.

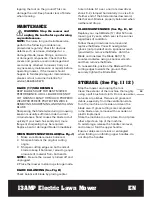
CAUTION:

 Do not attempt to unclog 

the blade chamber by dropping or 

Содержание WG719

Страница 1: ...13AMP Electric Lawn Mower EN Tondeuse gazon lectrique de 13A F Cortadora de c sped el ctrica de 13AMP ES P08 P17 P27 WG719...

Страница 2: ......

Страница 3: ...2 3 8 9 10 11 12 1 5 4 7 6 13 14 15 2 1 A1 A2 C1 B...

Страница 4: ...1 15 2 C2 C1 C3 D2 D1 B C4...

Страница 5: ...2 1 14 D2 D1 E1 E2 1 2 F3 F1 G F2...

Страница 6: ...1 2 3 4 5 6 7 1 2 3 4 5 6 7 1 1 1 4 30mm 2 1 1 2 38mm 3 2 51mm 4 2 1 2 64mm 5 3 76mm 6 3 1 2 89mm 7 4 100mm 2 1 1 F3 H1 G H2 I1 I2 J...

Страница 7: ...K 1 K 2 K 3 18 17 16 GRASS SIDE 1 I2 J K L2 L1...

Страница 8: ...TION BAG 12 HANDLE BAR 13 SIDE DISCHARGE COVER 14 SIDE DISCHARGE CHUTE 15 MULCHING PLUG 16 BLADE BOLT See Fig L1 17 BLADE See Fig L1 18 SPACER See Fig L1 Not all the accessories illustrated or describ...

Страница 9: ...fire electric shock and personal injury including the following WARNING Risk of injury could occur if the lawn mower is operated without the catcher assembly attached WARNING The use of any other acc...

Страница 10: ...better and safer at the rate for which it was designed 12 Don t overreach Keep proper footing and balance at all times 13 Stay alert Watch what you are doing Use common sense Do not operate lawn mowe...

Страница 11: ...tective devices in place and working 10 Never leave a running machine unattended 11 Stop the motor and wait until the blade comes to a complete stop before cleaning the machine removing grass catcher...

Страница 12: ...nd service instruction manual carefully Be thoroughly familiar with the controls and the proper use of the equipment b Never allow children to operate a power mower c Keep the area of operation clear...

Страница 13: ...ade causes vibration that could damage the motor drive unit or cause personal injury e Sharpen a dull blade equally at each end to maintain the balance f Clear the blade thoroughly and check its balan...

Страница 14: ...id mowing when the grass is wet from rain or dew Wet grass may form clumps which interfere with the mulching action and reduce runtime The best time to mow grass is in the late afternoon when the gras...

Страница 15: ...unts of material from both ends NOTE 1 Be sure the mower is turned off and unplugged 2 Place the mower in stand up storage mode BLADE BALANCING See Fig K Check balance of blade by placing center hole...

Страница 16: ...cutting height 4 Mower is too hard to push A Raise cutting height to reduce deck drag on grass Check each wheel for free rotation 5 Mower is abnormally noisy and vibrates A Release operating bail to...

Страница 17: ...DON 13 COUVERCLE D VACUATION LAT RALE 14 CHUTE D VACUATION LAT RALE 15 DISPOSITIF DE PAILLAGE 16 BOULON DE LA LAME Voir L1 17 LAME Voir L1 18 ENTRETOISE Voir L1 Les accessoires illustr s ou d crits ne...

Страница 18: ...INSTRUCTIONS AVERTISSEMENT Lors de l utilisation d appareils lectriques de jardinage des pr cautions de base doivent tre observ es afin de r duire les risques de feu choc lectrique et blessure grave...

Страница 19: ...e la longueur de la rallonge et de l amp rage indiqu e sur la plaque signal tique Dans le doute utilisez la prochaine grosseur plus lev e Plus le num ro de grosseur de fil est petit plus grosse est la...

Страница 20: ...RTANT PRATIQUES DE S CURIT POUR LES TONDEUSES AUTO TRACT ES I FONCTIONNEMENT G N RAL 1 Lisez comprenez et suivez toutes les instructions concernant la machine et contenues dans le s manuel s avant de...

Страница 21: ...les 3 Ne tondez pas de l herbe humide ou dans des pentes excessivement raides De mauvaises chaussures peuvent entra ner un accident par glissade et par chute 4 Ne tondez pas proximit de foss s de rigo...

Страница 22: ...s de ou sous les pi ces rotatives de l appareil Ne restez jamais proximit de la zone d vacuation b Arr tez la les lame s lorsque vous traversez une all e un chemin ou une route pleine de gravier c Apr...

Страница 23: ...bas meulez un peu de m tal du c t qui penche vers le bas jusqu ce que la lame soit bien quilibr e La lame est quilibr e lorsqu aucune extr mit ne s abaisse SAUVEGARDEZ CES INSTRUCTIONS SYMBOLES KEEP...

Страница 24: ...relire les recommandations suivantes afin d optimiser le rendement du mode de d chiquetage 1 viter de tondre l herbe lorsqu elle est mouill e par la pluie ou la ros e Les brins d herbe mouill s forme...

Страница 25: ...nt puisque le sable mousse la lame REMPLACER IMM DIATEMENT UNE LAME PLI E OU ENDOMMAG E AFF TAGE DE LA LAME Voir J 1 S assurer que la lame est toujours quilibr e 2 Aff ter dans l angle original de cou...

Страница 26: ...ou du chassis B Le r glage de la hauteur des roues pourrait tre trop bas pour l tat de la pelouse Augment er la hauteur de coupe 4 Il est trop difficile de pousser la tondeuse A Augmenter la hauteur d...

Страница 27: ...13 CUBIERTA DE DESCARGA LATERAL 14 ESCOTILLA DE DESCARGA LATERAL 15 TAP N DE TRITURACI N 16 PERNO DE ASPA Vea La Fig L1 17 ASPA Vea La Fig L1 18 ESPACIADOR Vea La Fig L1 No todos los accesorios ilust...

Страница 28: ...manipular LEA Y COMPRENDA TODAS LAS INSTRUCCIONES ADVERTENCIA Cuando se emplean herramientas el ctricas para jardiner a siempre deben seguirse ciertas pautas b sicas de seguridad a fin de reducir el...

Страница 29: ...s ganchos para los enchufes que se describen en este manual 10 No Abuse del Cable Nunca transporte un artefacto por el cable o jale del mismo para desenchufarlo Mantenga el cable alejado del calor ace...

Страница 30: ...el movimiento de la m quina hacia atr s 8 Nunca apunte el material descargado hacia alguna persona Evite descargar el material contra una pared u obstrucci n El material puede rebotar hacia el operado...

Страница 31: ...ltima vez 1 Mantenga a los ni os alejados del rea de corte de pasto y bajo el cuidado alerta de un adulto responsable que no sea el operador 2 Est alerta y apague la cortadora de pasto si un ni o ingr...

Страница 32: ...tuar una reparaci n o inspecci n f Apague el motor y espere a que la hoja se detenga por completo antes de extraer el receptor de c sped o antes de quitar la obstrucci n del tubo de descarga g Corte e...

Страница 33: ...rtadora de pasto Mantenga alejados a los ni os Alerta de seguridad Resbal n en pendiente Lea el manual Doble aislamiento Las cuchillas continuar n girando despu s de que la m quina se apague Espere ha...

Страница 34: ...rle nutrientes a su c sped Para obtener el mejor funcionamiento revise las siguientes recomendaciones para desbrozar 1 Evite podar el c sped cuando est mojado debido a la lluvia o al roc o El pasto h...

Страница 35: ...ojos siempre que quite afile o instale la cuchilla En la mayor a de las zonas la cuchilla debe afilarse dos veces durante la temporada de podado En zonas con suelos arenosos se puede requerir afilado...

Страница 36: ...e de las ranuras de ventilaci n Ponga la m quina de costado y limpie el rea de la hoja Si hay cortes de pasto compactados en la zona de la hoja qu telos con un trozo de madera o pl stico Guarde la m q...

Страница 37: ...asiado bajo para el estado del c sped Eleve la altura de corte 4 Cuesta mucho empujar la podadora A Eleve la altura de corte para reducir el rozamiento de la plataforma contra el c sped Verifique que...

Страница 38: ......

Страница 39: ......

Страница 40: ...Copyright 2014 Positec All Rights Reserved 2CLM15BPK11000A0 www worx com...

Отзывы: