13A Electric Pressure Washer
EN
10
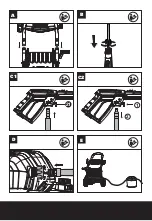
Attach the garden hose
Connect one end of the home
garden hose (not supplied) to
the adapter and another end
to waterspout.
See Fig. D
OPERATION
Extension cord
It is not recommended
to use the extension
cord.
If necessary, ensure
the plug and extension cord
connection is on an elevated
surface that does not contact
the water area.
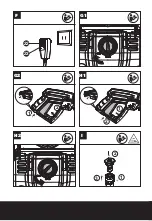
See Fig. E
GFCI plug test
Press “test”, the light will be
out.
Press “reset”, the power
regains and the light will
illuminate.
Note: To keep good
operation of GFCI, please
implement it once a
month.
See Fig.F
START/STOP
Turn on the water supply tap.
Connect the washer to the
power supply and turn the
switch to “ON/I ”position.
Then press trigger
Note: Before pressing
trigger, make sure Lock-
off switch is in “unlock”
position.
WARNING: Do not
start the machine
without connecting
and turning on the water
supply because it may
cause damage to high
pressure seals and reduce
the service life of pump.
See Fig. G1,G2
Release the trigger and turn
the switch to “OFF/II”position.
Turn Off the water supply tap
Note: When not in use,
make sure Lock-off switch
is in “lock” position.
See Fig.H1,H2
Select the right nozzles
Choose a suitable nozzle
pattern according to your
work.
Nozzle 0
0
(red) and Nozzle 15
0
(yellow) are applicable for
cleaning stubborn stain on
concrete.
Nozzle 25
0
(green) is applicable
for cleaning on concrete,
bricks and masonry.
Nozzle 40
0
(white) is applicable
for cleaning on wooden and
other soft objects .
The soap nozzle is applicable
for soaping while other
nozzles cannot be used to
do it.
Turbo nozzle is applicable for
cleaning on concrete, bricks
and masonry.
WARNING: Do not
change the nozzle
pattern when the
tool is powered on.
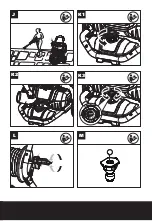
See Fig.I
Cleaning
Begin with the nozzle 1-2ft
away from the surface
and approach with caution
until it reaches the desired
position for overly close
spray may do harm to
surface.
WARNING: Do not
connect the machine
to water supplies
that are dirty, rusty,
muddy, or corrosive.
(Including window
cleaning liquids, plant
foods, or fertilizers etc.)
See Fig.J
Add and use detergent
Unscrew the Soap tank cap
and add appropriate detergent
.Then screw the Soap tank
Knob.
Install the soap nozzle .
Turn soap adjusting knob left
and right to decrease and
increase the dosage.
Note: If necessary, use
a funnel (not supplied)
to prevent accidental
overflows of detergent
outside of the tank.
See Fig.K1,K2,K3
Use the Hose Reel
To unwind the hose ,turn Hose
Reel Handle clockwise.
To wind the hose, turn
Hose Reel Handle counter
clockwise.
Note: pull the Hose Reel
Handle out and uncoil hose
from the hose reel before
use.
See Fig.L
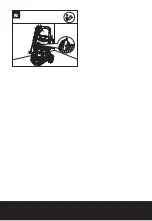
Содержание WG604
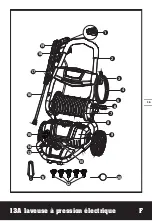
Страница 4: ...4 13A Electric Pressure Washer EN 11 12 9 8 7 6 5 4 3 2 10 1 19 18 17 16 15 14 13 20 ...
Страница 5: ...2 1 21 C1 B A D D C2 E ...
Страница 6: ...2 1 2 1 1 2 3 22 23 G2 G1 F D H2 H1 I ...
Страница 7: ...K2 K1 J D L K3 M ...
Страница 8: ...N ...
Страница 15: ...15 13A laveuse à pression électrique F 11 12 9 8 7 6 5 4 3 2 10 1 19 18 17 16 15 14 13 20 ...
Страница 22: ...22 Lavadora a presión eléctrica de 13A ES 11 12 9 8 7 6 5 4 3 2 10 1 19 18 17 16 15 14 13 20 ...
Страница 27: ......


