Worx WA0860 Скачать руководство пользователя страница 8

EN

8

7.

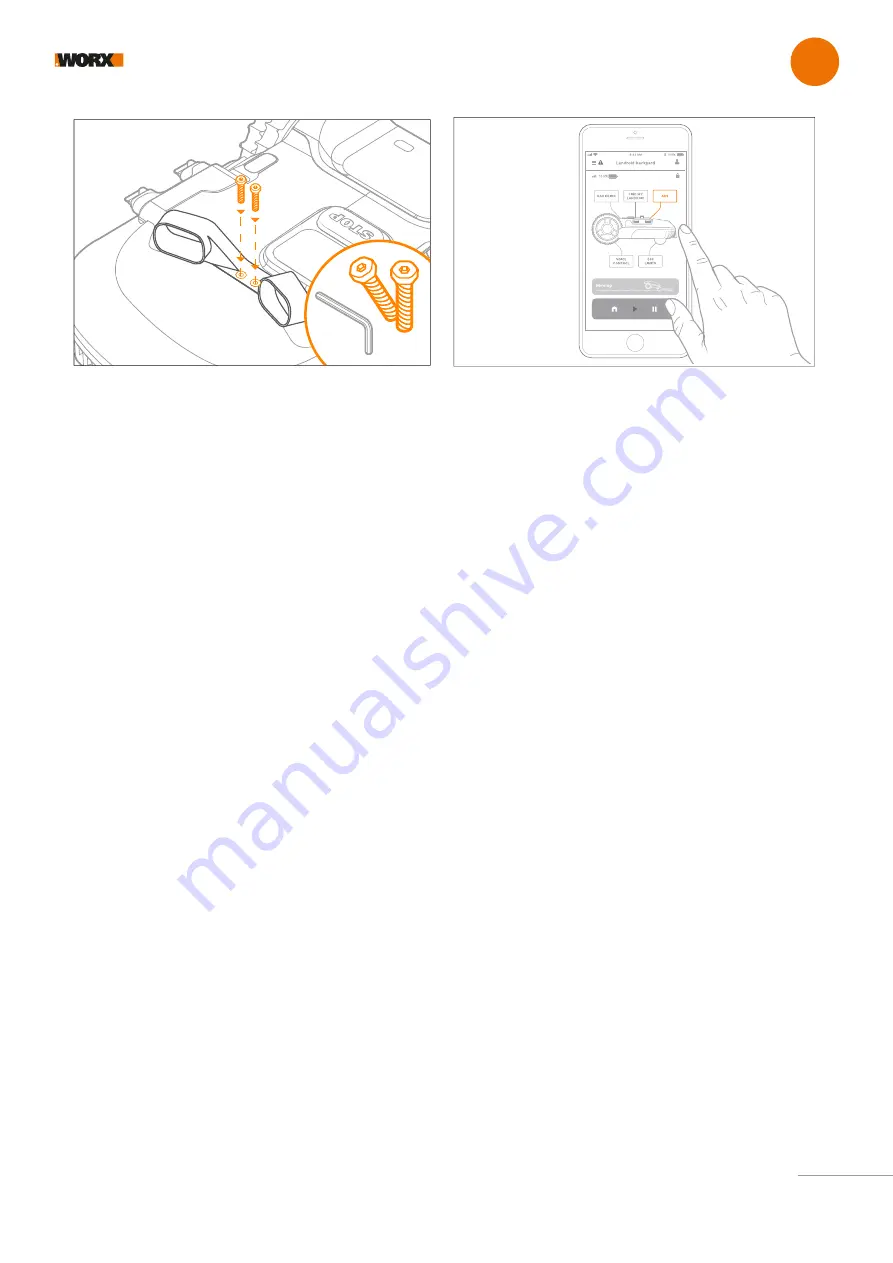
 Secure ACS with the provided screws

7

www.worx.com/landroid/support

VIDEO

Getting started

8.

 The ACS icon is now active. Touch it to see the status and to 

activate/disactivate the option. If the Status shows “error” contact 

our support team at https://support.worx-europe.com

8

Содержание WA0860

Страница 1: ...Owner s manual WR153E WR155E Original instruction ACS get started 1x 2x In the box From your toolbox WA0860 ...

Страница 2: ...Safety first Important safety instructions Get familiar with What s in the box How it works Getting started Installation Quick reference Trouble shooting Technical data Declaration of Conformity p 03 p 04 p 05 p 06 p 07 p 21 p 21 p 22 TABLE OF CONTENTS ...

Страница 3: ...Welcome EN 3 Thank you for purchasing a Worx ACS Support www worx europe com support Landroid Owner s Site https account worxlandroid com login We re here to help ...

Страница 4: ... serious injury Carefully read the instructions for the safe operation of the machine Save all warnings and instructions for future reference Symbols Warning Read the operator s manual Waste electrical products should not be disposed of with household waste Please recycle where facilities exist Check with your Local Authorities or retailer for recycling advice ...

Страница 5: ...Get familiar with EN WHAT S IN THE BOX 5 ACS module 1 allen key 2 screws A B C 1x 2x A B C ...

Страница 6: ...ndroid starts ACS is deactivated for few seconds Landroid is running back to the charging base on the boundary wire Landroid is on its way to a mowing zone Landroid meets the boundary wire and bounces back ACS is deactivated for 2 8 seconds it rains as large drops might be recognized as obstacles there s heavy dew in the morning the robot is raised the sensors are dirty please remember to clean th...

Страница 7: ... Landroid models Before proceeding with the installation please make sure your Landroid s firmware is updated to the last version For more information on firmware upgrade please refer to the Maintenance section of the Landroid o pedia https support worx europe com 1 Turn off Landroid 2 Use a screwdriver to remove the cover 3 Remove Landroid connector s inner protection 4 Plug ACS connectors into L...

Страница 8: ...rews 7 www worx com landroid support VIDEO Getting started 8 The ACS icon is now active Touch it to see the status and to activate disactivate the option If the Status shows error contact our support team at https support worx europe com 8 ...

Страница 9: ...river wear gloves to avoid injury 2 Turn Landroid upside down 9 6 5 5 Gently push in order to open the housing on the other side of Landroid 6 Close the flap OK START SET 1 Landroid M 500 WR141E 4 Open the small flap as shown in the picturet Getting started 2 3 4 ...

Страница 10: ...es back in 8 7 8 Turn Landroid back to its position 9 10 9 Remove the cover slot 10 Remove Landroid connector s inner protection 11 12 11 Plug ACS connectors into Landroid s connectors 12 Insert ACS into the slot Getting started ...

Страница 11: ...the provided screws 11 Getting started 13 14 The ACS icon is now active Touch it to see the status and to activate disactivate the option If the Status shows error contact our support team at https support worx europe com 14 ...

Страница 12: ...ly push in order to open the housing on the other side of Landroid 6 Close the flap START OK A B C D Power OFF Goodbye 1 2 Landroid M 700 WR142E Landroid M 1000 WR143E 2 Turn Landroid upside down 3 Remove Landroid blades using a screwdriver wear gloves to avoid injury Getting started 2 3 ...

Страница 13: ... blades back in 8 Turn Landroid back to its position 9 10 9 Remove the slot cover 10 Remove Landroid connector s inner protection 11 12 11 Plug ACS connectors into Landroid s connectors 12 Insert ACS into the slot Getting started ...

Страница 14: ...ndroid screen please double check that ACS sensors are clean if not proceed to clean them with a soft cloth If the issue persists please go to https account worxlandroid com access your profile and open a ticket using the form 14 Getting started 16 The ACS icon is now active Touch it to see the status and to activate disactivate the option If the Status shows error contact our support team at http...

Страница 15: ...Turn off Landroid 3 4 4 Open the small flap as shown in the picturet 6 5 5 Gently push in order to open the housing on the other side of Landroid 6 Close the flap 2 Turn Landroid upside down 2 3 Remove Landroid blades using a screwdriver wear gloves to avoid injury ...

Страница 16: ...k in 8 7 EN 8 Turn Landroid back to its position 9 10 9 Remove the slot cover 10 Remove Landroid connector s inner protection 11 12 11 Plug ACS connectors into Landroid s connectors 12 Insert ACS into the slot 16 Getting started ...

Страница 17: ...11 07 Work done today Charging 50 00 00 13 14 Getting started 17 14 The ACS icon is now active Touch it to see the status and to activate disactivate the option If the Status shows error contact our support team at https support worx europe com 14 ...

Страница 18: ...in the picturet 6 5 5 Gently push in order to open the housing on the other side of Landroid 6 Close the flap 18 START OK A B C D Power OFF Goodbye 1 2 Landroid L1500 WR153E Landroid L 2000 WR155E Getting started 2 3 Remove Landroid blades using a screwdriver wear gloves to avoid injury ...

Страница 19: ...k in 8 7 EN 8 Turn Landroid back to its position 9 10 9 Remove the slot cover 10 Remove Landroid connector s inner protection 11 12 11 Plug ACS connectors into Landroid s connectors 12 Insert ACS into the slot 19 Getting started ...

Страница 20: ...droid screen please double check that ACS sensors are clean if not proceed to clean them with a soft cloth If the issue persists please go to https account worxlan droid com access your profile and open a ticket using the form 20 Getting started 16 The ACS icon is now active Touch it to see the status and to activate disactivate the option If the Status shows error contact our support team at http...

Страница 21: ...lay settings On 7 segments display it is not possible to act on ACS settings directly then please use the App The ACS is turned off when Landroid returns to the charging base along the boundary wire If Landroid hits an obstacle or intercepts the perimeter wire the ACS will be disabled for 2 8 seconds The ACS module automatically turns off in case of rain because heavy rain is recognized as obstacl...

Страница 22: ...iption ACS module Type WA0860 Function Obstacle avoidance Complies with the following Directives 2014 30 EU 2011 65 EU EU 2015 863 Standards conform to EN 55011 EN 55014 2 2020 03 27 Allen Ding Deputy Chief Engineer Testing Certification Positec Technology China Co Ltd 18 Dongwang Road Suzhou Industrial Park Jiangsu 215123 P R China 22 ...

Отзывы: