background image

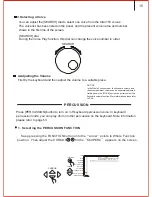
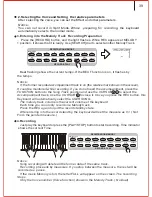
2.Selecting  the STYLE Function
    

Press the [FUNCTION] button till the

arrow

points  to the STYLE position.

*. 

Keep pressing the [STYLE] button to quickly select the ACCOMP VOL parameter in 

the whole  function.
[Refer to P 47]

3.Selecting a STYLE

*

. Use the [SEARCH] dial to select one of 100 style of  this instrument. More information 

please refer to P. 54.

   In the front panel there are 32 commonly-used accompaniment  styles.

 The current style and number show  in the screen.
*. While [A/B]up- light on, the voice  you select is the down side, while the down-light 
 the up side style.

4.Setting  the TEMPO
     

Every Style type has its own Tempo. It displays on the right side of the TEMPO 

mark. While the Accompaniment is started, this Tempo will not be changed even if  you
 select any other Style at the same time.
     To select the Tempo of 40-240/tempi by the TEMPO          buttons. Every press to 
increase one tempi. Keep pressing to quicken the procedure. Press the TEMP           at
the same time to return to the original tempo.


You may also select the Tempo parameter by the CURSOR  buttons. Use the  CURSOR

              buttons  or the NUMBER buttons to change the parameter. Press the CURSOR
   buttons  at the same time to return to the original tempo. You can select this while  during  or
 before the performance.

MEMORY

MULTIFUNCTION

DUAL VOICE

SPLIT MODE

HARMONY/ECHO

WHOLE FUNCTION

NUMBER EFFECT

S. NUMBER

VOICE

STYLE

FUNCTION

TEMPO

SEARCH

TEMPO

CURSOR

29

Содержание W8807A

Страница 1: ...ypes of commonly used styles for rapid choice With 9 groups of percussion instrument and a special effec voice group including a group of Chinese traditional percussion instrument Song Recording funct...

Страница 2: ...g the Harmony Echo Number Effect the Reverb Style Setting the Reverb Return Level Setting the Chorus Return Level Keyboard CONTENT Setting the Tempo P 29 Start the Accompaniment P 30 Accompaniment Tra...

Страница 3: ...le with a line through it means that the indicated action must not be performed Indications within or nearby this symbol are specifically prohibited The example at left indicates that disassembly is p...

Страница 4: ...the instrument Never attempt of take apart or modify the instrument its accessories or separately sold options Doing so may cause fire electrical shock or malfunction Consult your dealer concerning al...

Страница 5: ...into contact with battery fluid Take care to observe the followings Install batteries so their polarity matches that indicated on the instrument For safety and to prevent possible leakage of battery...

Страница 6: ...t allow the liquid inside the LCD to come into contact with your skin which can cause inflammation and reddening Should the LCD liquid get into your mouth immediately wash out your mouth with water an...

Страница 7: ...4 REVERB button P 23 SYNCSTART STOP P 30 CHORUS button P 25 STYLE button P 29 INTRO button P 30 PERCUSSION button P 15 MAINA B P 31 A B Switch button P 30 3DEFFECTbutton P 26 ENDINGbutton P 32 TOUCHbu...

Страница 8: ...PANEL REAR PANEL 1 9 21 22 FOOT SWITCH FOOT SWITCH BACK BOARD BACK BOARD 1 Headphone Auxiliary Output P 9 AC Adapter Socket P 9 Rear Panel P 9 MIDI IN P 9 35 MIDI OUT P 9 35 Footswitch P 9 Sustain Ped...

Страница 9: ...ont panel with 4 black screws at each side 3 Place the body onto the plank and fix it with 4 zinc gilded screws at each side as shows in the illustration 4 Connect the cable of foot switch with the pl...

Страница 10: ...put output Put a standard earphone to connect the keyboard s PHONE plug While connection is made you may only hear the sound inside the earphone and practice the music without disturbing the others Th...

Страница 11: ...SONGS POWER Press the DEMO button this instrument will play the music automatically The name of the first song will appeared on the screen This instrument comes with 6 songs in memory while they will...

Страница 12: ...ton to stop the playback then press VOICE button to remove the function back to normal performance 4 To Select other demos During the demo playback you can adjust the SEARCH dial to select other demo...

Страница 13: ...t Track Parameters and Icons There are altogether 7 accompaniment tracks such as Rhythm Bass Chord 1 2 Pad and Phrase 1 2 Each track has its own switch voice number and volume parameter When one track...

Страница 14: ...the exactchord you veplayed 13 MINUS ONE REVERB CHORUS TOUCH DUAL SUSTAIN KEY PERCUSSION Minus One It appears when this function is selected Reverb It appears when Reverb Function is turned on Chorus...

Страница 15: ...CE A B button is on it indicates the voice you can select is among the down row voices otherwise it is from te up row voices Selecting and Playing a Voice S T S T PLAYING THE PIANO 1 REGIST FREEZE TEM...

Страница 16: ...ent volume can be separately adjusted Holding down the VOICE button can quickly select the keyboard volume function More information please refer to P 46 PERCUSSION Keep pressing the FUNCTION button u...

Страница 17: ...de the voice of the left hand selects by the split mode The following describes the details Press the MODE button till the arrow marks to the Keyboard Split Thus you enter into the SPLIT MODE Right Ha...

Страница 18: ...6 Split point could be any key from 0 127 if use for MIDI original point set as 59 B2 CURSOR or Function Explanation 1 Selecting the SPLIT MODE Press the FUNCTION button till the arrow marks to the SP...

Страница 19: ...n when the power switch turns on Press the TOUCH button to quickly select the parameter of the touch sensitivity More information please refer to P 48 SUSTAIN HARMONY DUAL TOUCH DUALVOICE This functio...

Страница 20: ...1 2 Octave The original setting by the Function team Function Explanation D Revlv1 D Cholv1 D Pan Setting the second voice of the dual output Rev level From 0 none to 127 Max Effect Settingthesecond v...

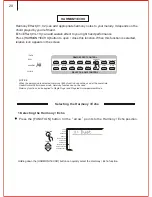
Страница 21: ...ce mode Harmony function can not be used Harmony function can be applied to Single Finger and Fingered Accompaniment Mode 1 Selecting the Harmony Echo Press the FUNCTION button till the arrow points t...

Страница 22: ...diminish the sound of the melody TYPE EXPLANATION 01 Duet Double voice Harmony 2nd voice lower than the melody 02 Octave Add a bass octave to the melody 03 Tremolo 1 4 Produce the tremolo 1 4 04 Tremo...

Страница 23: ...which makes the number flash NOTICE Press the CURSOR buttons at the same time can remove the transpose parameter to 0 The new parameter of the transpose will act on the following tone 2 To set the par...

Страница 24: ...TS CHORD BEAT RHYTHM BASS ON OFF VOICE VOL CHORD PAD PHRASE ACCOMP MELODY MELODY 1 1 1 1 2 MINUS ONE REVERB CHORUS KEY PERCUSSION SUSTAIN HARMONY DUAL TOUCH MEMORY MULTIFUNCTION DUAL VOICE SPLIT MODE...

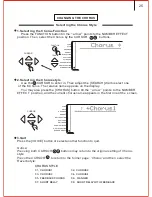
Страница 25: ...Reverb Effect 1 Selecting the Reverb Return Level Press the FUNCTION button till the arrow points to the NUMBER EFFECT position Then select the RevRtnlv by the CURSOR buttons Notice This setting infl...

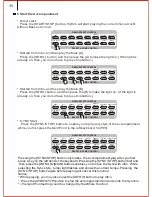
Страница 26: ...rst line of the screen Selecting the Chorus Style 3 Quit Press the VOICE button or select another function to quit Notice Pressing both CURSOR buttons may return to the original setting of Chorus styl...

Страница 27: ...Use the SEARCH dial to adjust 00 127 3 Quit Press the VOICE button or select another function to quit Notice This setting influences all voices Each reverb send Level of the voice including Split Dua...

Страница 28: ...chords with one or two fingers USING AUTO ACCOMPANIMENT Example Chord Types Major Minor Seventh Major chord Press the root note of the chord Minor chord Press the root note together with the nearest b...

Страница 29: ...VENTH AUGMENTED SEVENTH AUGMENTED SUSPEND FOURTH ONE PLUS TWO PLUS FIVE M M6 M7 M7 11 Madd9 M9 69 aug m m6 m7 m7b5 madd9 m9 m11 mM9 dim dim7 7 7sus4 79 7 11 713 7bg 7b13 7 9 M7aug 7aug sus4 1 2 5 1 3...

Страница 30: ...has its own Tempo It displays on the right side of the TEMPO mark While the Accompaniment is started this Tempo will not be changed even if you select any other Style at the same time To select the Te...

Страница 31: ...after you first press a key on the left hand of the keyboard Pressing the SYNC STOP button first and then press the INTRO MAIN buttons enables you to have the Sync with intro While selecting the Sync...

Страница 32: ...reen 7 To select Main A or B While playing you can freely choose Main A or B After you press A or B this keyboard will automatically add in a kind of fill in altogether 2 kinds in order to make the ch...

Страница 33: ...left part of the keyboard it will continue playing proper bass chord that suitable for your performance Press START STOP button to stop accompaniment Or press ENDING button to stop it after the ending...

Страница 34: ...THM Provide the Percussion or Drum voice BASS Provide different Bass voices according to the style such as ELECTRIC BASS ACOUSTIC BASS CHORD 1 2 Provide the Rhythm Strings accompaniment like the voice...

Страница 35: ...lickers Then use cursor buttons or number buttons to select the voice number The accompaniment uses different voice from what printed on the panel RHYTHM track can only use voices from 1 to 8 and othe...

Страница 36: ...by the SEARCH dial The relative name appears in the screen The lowest C1keyboard number is 36 centre C C3 is 60 and highest C6 is 96 Split point number could be any of 0 127 though it has overpassed t...

Страница 37: ...everb RevRtnLv Volume of the keyboard Percussion team Chorus Chorus ChoRtnLv Octave 3D Effect on off Tempo Transpose Rev Level Chorus Level Accompany vol data open close Vol Ttone Mode Normal Duel Fin...

Страница 38: ...ccompaniment This will not disturb your performance while using different memory settings Press the FREEZE button to open close the function When this function is on the word FREEZE appears in the scr...

Страница 39: ...g with this instrument The song includes the accompaniment and the melody you played The song track includes an accompaniment track and two melody tracks Song 5 is a user song to record your performan...

Страница 40: ...Once you press the REC button this Keyboard will automatically select the USER SONG The melody track volume is the current volume of the keyboard Each time you could only record one Melody track Pres...

Страница 41: ...gle Finger or Fingered mode and any style to suit the song 40 Section change INTRO FILL IN ENDING Style number Chord change current value Melody track on off Voice Volume change Rev Accompaniment volu...

Страница 42: ...measure 4 Recording At this moment it records the left part of the keyboard you play If you record both the Accompaniment and the melody playing at the right part of the keyboard will start recording...

Страница 43: ...close this track When closed the track mark disappears When the playback is on the voice volume can be rewritten 4 Rewriting the Voice Volume While playing you could rewrite the setting of the voice...

Страница 44: ...position Then use the CURSOR button to select MinusMod parameter Use the SEARCH dial to appoint the channel PRACTICE FUNCTION Mode Part Turned Off Left hand MinusMod Right hand MinusMod Both hand Min...

Страница 45: ...REPEAT button at the beginning of your desired part A shows in the screen and press it again at its end B shows in the screen Then it can repeatedly play the part you desired until you press the REPEA...

Страница 46: ...left MinusChL P B Range PBRange Metronome Metronom Tuning Tuning Remote channel RemoteCh Keyboard output KybdOut Keyboard Percussive KBDPERC 3D Effect 3DEffect 45 Reverb Level Chorus Level Pan 00 127...

Страница 47: ...need and then use SEARCH dial to set the parameter COMMON FUNCTIONS 46 8 OCTAVE To change the Octave pitch of the voice in the right part of the keyboard 1 is to fall by an Octave and 2 by Octaves and...

Страница 48: ...olding Tempo and NUMBER button to input minus number Press both CURSOR bottons to return to the original setting VOICE SET This function automatically sets the parameters which have great influence on...

Страница 49: ...sage you can close the Minus during you practice Notice Passage 1 16 is available Press both CURSOR buttons to return to the original number setting 01 for right hand 02 for left hand 48 METRONOME You...

Страница 50: ...ine whether the data output from the MIDI OUT MIDI FUNCTION MIDI is an international standard It connects musical instruments that have this function in order to control and transmit data to each othe...

Страница 51: ...7 TIMPANI RNSEMBLE 49 48 STRINGS ENSEMBLE1 1 50 49 STRINGS ENSEMBLE12 2 51 50 SYNTH STRINGS1 1 52 51 SYNTH STRINGS2 2 53 52 CHOIR AAHS 54 53 VOICE OOHS 55 54 SYNTH VOICE 56 55 ORCHESTRA HIT BRASS 57 5...

Страница 52: ...BELL 114 113 AGOGO 115 114 STEEL DRUMS 116 115 WOOOBLOCK 117 116 TAIKO DRUM 118 117 MELODIC TOM 119 118 SYNTH DRUM 120 119 REVERSE CYMBAL SOUND EFFECT 121 120 FRET NOSE 122 121 BREATH NOISE 123 122 SE...

Страница 53: ...1 43 DIXIE 2 2 44 JAZZBALLAD 1 1 45 JAZZBALLAD 2 2 46 JAZZWALTZ 47 CHARLSTON 48 RAGTIME COUNTRY No Name 49 COUNTRY 1 1 50 COUNTRY 2 2 51 COUNTRYDANCE 52 COUNTRYROCK 53 COUNTRYWALTZ CARIBBEAN 54 REGGA...

Страница 54: ...T 5 HQ ELEC SET 39 D 2 42 F 2 44 G 2 46 A 2 49 C 3 51 D 3 54 F 3 Closed Hi Hat EXC1 56 G 3 58 A 3 61 C 4 63 D 4 66 F 4 89 F6 Low Wood Block 90 F 6 Mute Cuica EXC4 91 G6 Open Cuica EXC4 92 G 6 Mute Tri...

Страница 55: ...54 DRUM SET TABLE MIDI CHANNEL 10...

Страница 56: ...ower supply cable Owners manual Warranty card Keyboard 88 key keyboard with standard touch response Voice 348 PCM voices Max polyphony note 64 notes Keyboard percussion 1 9 groups Sound effect 1 group...

Страница 57: ...W8807A OWNER S MANUAL...

Отзывы: