background image

6

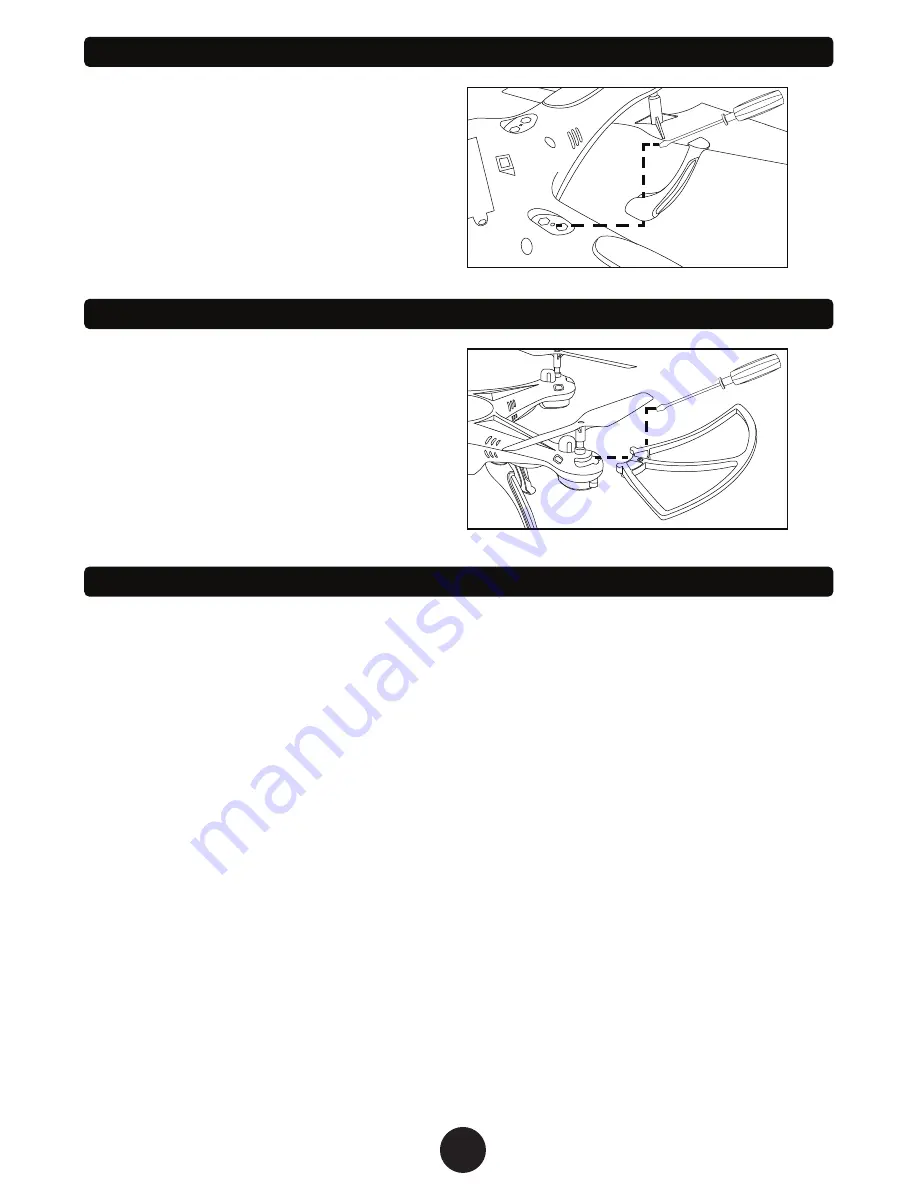
INSTALLING THE LANDING SKIDS

INSTALLING THE ROTOR GUARDS

NOTE: The landing skids are all identical and can be 

installed in any of the landing skid slots on the drone.

Turn off the drone and turn over to install the landing 

skids.
Line up the landing skid with the three slots on any of 

the drones landing skid slots and push into place.
Secure each landing skid with a single screw using the 

supplied screwdriver.

NOTE: The rotor guards are all identical and can be 

installed on any rotor arm of the drone.

Make sure the drone is turned off and ready the four 

rotor guards and screws.
Line up the rotor guard with one of the rotor arms on 

the drone, make sure the pegs on the guard fit into the 

three slots on the end of each arm. 
Secure each rotor guard with a single screw in the 

center slot of the drones rotor arm.

PREFLIGHT PREP / SYNCING THE DRONE TO THE REMOTE

1. Make sure the battery pack is connected, in the battery compartment and the battery cover is 

closed securely.

2. Press the power button in on the top of the drone and place the drone on a flat surface with no 

obstructions in its flight path. The drone’s LED lights will begin to flash.

3. Turn on the Remote Control pressing the button at the center of the remote. The remotes power 

indicator will start flashing.

4. Push the left joystick on the remote all the way down, then all the way up, then all the way back 

down again. The remote will beep twice and the LED lights on the drone and the power indicator 

light on the remote will stop flashing. This means the drone is paired. (If this does not occur, turn off 

the remote and drone and try again.

5. Once paired, the drone is ready to fly. All you need to do is gently push up on the transmitters 

throttle stick and the rotors will start to spin. Continue slowly pressing up the on throttle stick to take 

off. It is STRONGLY recommended that you use the drone outdoors during initial flights.

Содержание Pogue Drone

Страница 1: ...I N S T R U C T I O N M A N U A L ITEM NO 33777...

Страница 2: ...TALLING THE DRONE BATTERY CHARGING THE DRONE BATTERY INSTALLING THE ROTOR GUARDS INSTALLING THE LANDING SKIDS FLYING THE DRONE FLYING THE DRONE SPECIAL FUNCTIONS ADJUSTING THE TRIM POST FLIGHT REPLACI...

Страница 3: ...flying area is 25ft x 25ft x 15ft 2 Be sure that the transmitter and drone batteries are fully charged 3 Be sure that the throttle is at its lowest position to avoid premature flight 4 Always turn on...

Страница 4: ...Speed Modes Left Right Turning Trim Ascend Descend Left Right Turning Forward Backward Left Right Sideways Flight Forward Backward Trim Left Right Sideways Trim 4 Landing Skids Landing Skids LED Light...

Страница 5: ...ed Promptly change and replace old or defective batteries Battery Type Battery Specification Usage Duration Charge Time BATTERY PACK SPECIFICATIONS LiPo Battery 3 7V 380mAh Flight Duration 6 8 minutes...

Страница 6: ...TO THE REMOTE 1 Make sure the battery pack is connected in the battery compartment and the battery cover is closed securely 2 Press the power button in on the top of the drone and place the drone on...

Страница 7: ...the drone for the first time please read the instructions carefully and make sure you fully understand how to control your drone Left Spin Right Spin Left Spin Right Spin Move Right Move Left Move Rig...

Страница 8: ...ill always default to low speed when you first turn it on Press the SPEED CONTROL button once and you will hear 2 beeps meaning it is now on medium speed Press the SPEED CONTROL button again and you w...

Страница 9: ...ps Turn Left Trim Drone is moving forward Drone is turning to the left Push the RIGHT TRIM button until the drone stops turning Turn Right Trim FRONT BACK Push the FORWARD TRIM button until the drone...

Страница 10: ...rrect location FRONT BACK A B B A Use the included screwdriver to unscrew and remove the screw on the rotor Remove the damaged rotor by lifting upward Be sure not to misplace the screw Place the corre...

Страница 11: ...drone on a flat surface before taking off Transmitter batteries are installed incorrectly Transmitter and or drone is not powered ON Turn both transmitter and drone ON Transmitter batteries are draine...

Страница 12: ...www worldtechtoys com Email customerserv worldtechtoys com Phone 877 498 8697 Monday Friday 8 00AM 5 00PM Pacific Time WWW WORLDTECHTOYS COM MADE IN CHINA SPECIFICATIONS COLORS AND CONTENT MAY VARY FR...

Отзывы: