Assembly Steps
CAUTION:
To Prevent risk of fire, do not use the light bulb with wattage greater than 60W or
13W CFL. Use Type A bulb with E26 base for this product.
(Note:Bulb Not included)
Professional help is recommended if you are not sure about product assembly.
CARE AND MAINTENANCE:
Do not polish or clean fixture with harsh cleaners as it may damage the finish.
Do not place fixture outside, for indoor use only.
Not for commercial use, for residential use only.
Clean Dust and spills using a non-colored, lint free soft cloth.
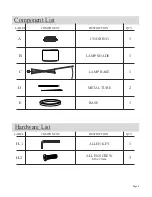
UNO Ring (A)
Lamp
Shade (B)
Lamp Base (C)
Metal Tube (D)
Metal Tube (D)
Base (E)
Allen Screw (H-2)
Allen Key (H-1)
Page-3
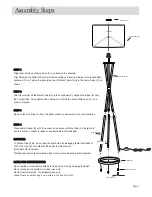
STEP-1
Align stem sections of Lamp base (C) as shown in the drawing.
First Screwed the Metal Tube (D) which has wiring until secured. Adjust cord length after
tightened.
Then, tighten the remaining two (2) Metal Tubes (D) into the Lamp Base (C) as
shown
STEP-2
After Securely fixed the Metal Tubes (D) into Lamp base(C), aligned the Base (E)
onto
the 3 metal tube. Then tighte
n
Allen Screw
s
(H-2) with the help of Allen key (H-1)
as
show in diagram.
STEP-3
Remove the Uno Ring (A) from the light socket by unscrewing it counter clockwise.
STEP-4
Place
Lamp
Shade (B) onto the socket, and secure with Uno Ring (A). Install bulb
into the socket. Product is ready to use.
(Note:Bulb Not included)


