background image

24v Lithium-ion Cordless Drill with Hammer Action 

AFTER SALES SUPPORT

e-mail: [email protected]

1800 909 909

MODEL: №. 51887  •  06/2016  •  51887

(toll free)

24

AFTER SALES SUPPORT

(toll free)

e-mail: [email protected]

1800 909 909

24v Lithium-ion Cordless Drill with Hammer Action 

MODEL: №. 51887  •  06/2016  •  51887

Trouble Shooting

FAQ/Troubleshooting

Do I need to charge the battery before use?

Yes, New battery packs are shipped in a low charge condition and must be fully charged 

before use. It takes approximately 1 hour to fully charge your new battery. Charging of 

batteries should not be undertaken casually. Through the charging cycle the condition of 

the battery pack should be monitored and the charge cycle turned off at completion or at 

the end of the recommended time.

How do I obtain the best life for the battery?

-  Never allow the drill to come to a complete stand still before recharging. The battery 

should be placed on charge whenever the battery is noticeably running down or the drill 

no longer performs a task it previously performed.

-  Avoid allowing lose items like screws or nails etc. to be stored with battery packs as these 

or similar items can short battery packs and cause a fire or explosion.

-  Always unplug the plug pack charger when not in use and store in a dry secure place.
-  Avoid charging or storing your battery in temperatures below 0ºC and above 40ºC.

How do I use the 2 gears on the drill?

To select the LOW gear (low speed, high torque setting), push the gear selector backward, 

towards the back of the drill/driver. The word LO will be displayed. 
To select the HIGH gear (high speed, low torque setting), push the gear selector forward, 

towards the chuck. The word HI will be displayed. 

How do I adjust the torque?

To adjust the torque setting you rotate the torque collar. The higher the number, the higher 

the torque setting collar.
Controlling the torque allows for better control when using the drill/driver on specific add 

screwing tasks and prevents over-fastening and over-tightening.
For drill/driving, always use the drill/driver position by aligning the drill/driver symbol with 

the triangular indicator on the front face of the drill/driver near the torque collar.
For setting the torque position, select a low setting on the torque collar and align the 

selected symbol with the triangular indicator on the top of the drill/driver.

How do I select hammer function?

Rotate the torque collar until the Hammer symbol aligns with the triangular indicator.

What is the function of the Forward / Reverse switch?

This switch will allow you to change the direction of the motor while the trigger switch is 

not depressed.
Drill/driving uses the forward mode. The reverse mode is intended for the removal of 

screws and assisting to remove jammed drill/driver bits.

What do I do if I have an issue with my drill?

If you have any issues with your drill/driver, please contact our Customer Service line on 

1800 909 909.

Содержание Titanium+ 51887

Страница 1: ...Manual Product Info www powertoolsupport com Read all safety warnings and all instructions thoroughly before operating this product IM ed5 06 2016 51887 24V LITHIUM ION CORDLESS DRILL WITH HAMMER ACT...

Страница 2: ...website or contact details for example Advantage You are not required to manually enter a website address or contact details How it works To scan the QR code all you need is a smartphone with QR codes...

Страница 3: ...ad 16 Temperature cut out 17 Low voltage cut out 17 Forward reverse switch 18 Adjustable torque 18 Using the Hammer function 18 Inserting and removing bits 19 Drill driving 19 Drill driving plastics a...

Страница 4: ...ion of the Cordless Hammer Drill including details of starting and stopping and correct use of the Cordless Hammer Drill on pages 16 to 20 as well as the maintenance instructions on pages 21 Intended...

Страница 5: ...cause hearing loss Double insulated for additional protection Regulatory Compliance Mark Appliance complies with requirements of electrical approval EMC in Australia Read the instruction manual Waste...

Страница 6: ...do not play with the device 1 Work area safety a Keep work area clean and well lit Cluttered and dark areas invite accidents b Do not operate power tools in explosive atmospheres such as in the presen...

Страница 7: ...t in serious personal injury b Use personal protective equipment Always wear eye protection Protective equipment such as dust masks nonskid safety shoes a hard hat or hearing protection used for appro...

Страница 8: ...ories or storing power tools Such preventive safety measures reduce the risk of starting the power tool accidentally d Store idle power tools out of the reach of children and do not allow persons unfa...

Страница 9: ...in a hazardous situation General safety warnings 7 5 Battery tool use and care a Recharge only with the charger specified by the manufacturer A charger that is suitable for one type of battery pack m...

Страница 10: ...contact with this In the event of accidental contact rinse with water If liquid should get into the eyes get medical assistance Battery fluid may result in skin irritations and burns h Do not open th...

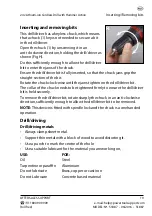
Страница 11: ...ies Dull or damaged bits have a greater tendency to bind in the workpiece i When removing the bit from the tool avoid contact with skin and use proper protective gloves when grasping the bit or access...

Страница 12: ...battery pack if the ambient temperature is less than 4 C or greater than 40 C h Do not short circuit the battery pack A short circuit gives rise to a heavy current causing overheating and the possibi...

Страница 13: ...AFTER SALES SUPPORT toll free e mail help powertoolsupport com 1800 909 909 24v Lithium ion Cordless Drill with Hammer Action MODEL 51887 06 2016 51887 13 11...

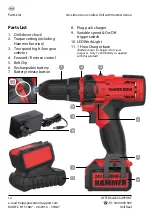
Страница 14: ...ue setting including Hammer function 3 Two speed high low gear selector 4 Forward Reverse control 5 Belt Clip 6 Rechargeable battery 7 Battery release button 8 Plug pack charger 9 Variable speed On Of...

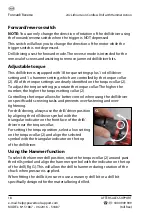
Страница 15: ...this manual NOTE When the battery of the drill driver is at the lower end of the charge the drill driver is more susceptible to the overload condition Running the drill driver at close to maximum loa...

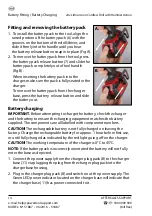
Страница 16: ...tery charging IMPORTANT Before attempting to charge the battery check the charger and the battery to ensure the charging equipment matches the battery supplied The components are all labelled with com...

Страница 17: ...eady for use after approximately 1 hour The Green light will remain on until the charger plug pack is turned off or disconnected 2 Speed gearbox The 2 Speed Gearbox allows you to select a gear with th...

Страница 18: ...fully depress the trigger once the task has started CAUTION Extended use of the variable speed under load will overload and then permanently damage the speed control Drill driver Overload This drill d...

Страница 19: ...the battery pack has cooled down it can again be used to operate the drill driver as long as the load or the conditions causing the original excessive temperature has been corrected Low voltage cut o...

Страница 20: ...ng you rotate the torque collar The higher the number the higher the torque setting collar 2 Controlling the torque allows for better control when using the drill driver on specific add screwing tasks...

Страница 21: ...t Rotate the chuck clock wise until the jaws tighten on the drill driver bit The collar of the chuck needs to be tightened firmly to ensure the drill driver bit is held securely To remove the drill dr...

Страница 22: ...iver is about to break through the item being drill drivered LED work light When the unit is switched on the LED work light 10 also comes on to ensure better vision and to make working in dark areas m...

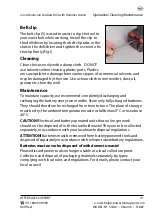
Страница 23: ...mpletely discharging and recharging the battery every two months Store only fully charged batteries They should therefore be recharged from time to time The place of storage must be dry the ambient te...

Страница 24: ...ke special care to heed the Cautions and Warnings Your Workzone Titanium 24V Lithium Ion Cordless Drill has many features that will make your job faster and easier Safety performance and dependability...

Страница 25: ...cal service station for reclamation Do not throw it in the trash or pour it into the earth What your 3 year warranty means Great care has gone into the manufacture of this product and it should theref...

Страница 26: ...low speed high torque setting push the gear selector backward towards the back of the drill driver The word LO will be displayed To select the HIGH gear high speed low torque setting push the gear se...

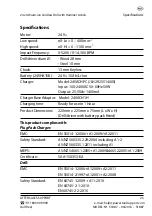
Страница 27: ...551400S Input 100 240VAC 50 60Hz 50W Output 25 5Vdc 1400mA Charger Base Adaptor Model 24VACH1H Charging time Ready for use in 1 Hour Product Dimensions 220mm x 225mm x 75mm L x W x H Drill driver with...

Страница 28: ...roducts are developed to our stringent quality speci cations If you are not entirely satis ed with this product please return it to your nearest ALDI store within 60 days from the date of purchase for...

Отзывы: