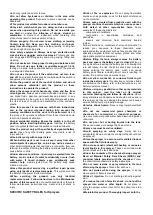
the instructions in your battery operators manual.
Liquids to be sprayed must be as thin as water. Thicker
liquids will not spray properly.
Do not overfill the tank.
NOTE:
A removable strainer prevents debris that can clog or
damage the pump from entering the tank. It may be removed
when using a funnel or for cleaning. Always reinsert strainer
before reinstalling cap.
1.
Remove the battery pack (if necessory)
2.
Unscrew the cap and remove it from the tank.(
(see fig.5))
3.
Fill the tank with the desired amount of water (up to 12 liters).
4. Measure the recommended amount of liquid.
5. Carefully pour the liquid into the tank.
6. Rinse the measuring container with clean water.
7. Screw the cap back onto the sprayer, making sure it is
tightened securely.
8. Reinstall the battery pack.
Spray solutions may be premixed and poured into the sprayer,
using a funnel if needed.
NOTE:
If using a measuring container or if using a funnel to fill the
tank, be sure to thoroughly clean and rinse these items after use.
If premixing the spray solution, rinse the container used for
mixing.
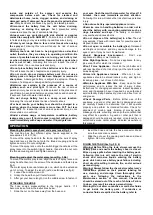
MOUNTING THE BATTERY PACK (See fig. 7 &8)
CAUTION:
Before mounting the battery pack, make sure the tank
is clean and dry especially on the battery cover and battery
cartridge. If needed, wipe off any dirt or spilled water.
1. Presse the clip on the battery cartridge cover and pull
outside. Show as fig 7.
2. Insert the battery pack into the battery cartridge, show as
fig.8. After head a click sound, it means the battery pack
already secured.
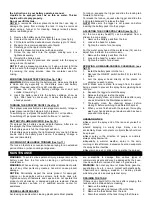
TURNING THE SPRAYER ON/OFF (See fig. 9)
The sprayer was constructed as two stage main switch, I stage is
lower pressure and the II stage is high pressure.
To switching on, just press the switch button on I or II position.
To switching off, just press the switch button on
“o” position.
BATTERY VOLUME INDICATOR (See fig. 10)
Thr sprayer has a battery volume indicator feature. After turn on
the sprayer, the three indicator light will on.
If the battery pack is full, the three light will all on
If the battery pack is empty, the light remains only one ligh. Please
double check the battery pack volume. If necessary, change a
new one immediately.
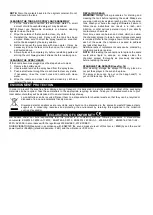
LOCKING-ON THE HANDLE TRIGGER (See fig. 11)
The lock-on feature is convenient when spraying for an extended
period of time or when covering a large area.
To lock-on, squeeze the trigger and slide the locking tab
forward to hook it up.
To release the lock-on, squeeze the trigger and slide the
locking tab backward to release the hook.
NOTE:
Make sure the trigger is not locked on before
inserting the battery pack into the sprayer.
ADJUSTING THE CONE SPRAY HEAD (see fig. 12)
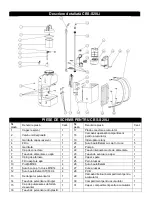
For the cone spray head(17) can be adjusted from a
stream to a cone spray.
1. Remove the battery pack from the tool.
2. Loosen the head for a tream.
3. Tighten the nozzle for a fan spray
For the metal spray head of the metal lance (14) can be
adjust from a stream to a water column.
1. Remove the battery pack from the tool.
2. Loosen the head for a water column.
3. Tighten the nozzle for a stream.
SPRAYING HOME-AND-GARDEN CHEMICALS (see
fig 13)
1. Install the battery pack into the tool.
2. Depress the ON/OFF switch button(10) to start the
motor.
3. Aim the sprayer head directly at the plants or
objects you wish to spray.
NOTE: Make sure to stand far enough from the object
being sprayed to prevent the spray from splashing back
onto you.
4. Squeeze the trigger to start the spray.
5. Release the trigger to stop the spray.
6. Always empty, clean, and drain the tank after every
use as directed in the Maintenance section.
7. Thoroughly clean the chemical sprayer before
storing or before switching to a different chemical.
8. When you are finished with the sprayer, thoroughly
wash your hands and any area where skin has been
exposed to the spray.
OPERATING TIPS
●
Never point the spray end of the lance at yourself or
others.
●
Avoid spraying on windy days. Spray can be
accidentally blown onto plants or objects that should not
be sprayed.
●
Never spray in the direction of people or animals;
always spray downwind.
●
Especially in warmer weather, spray in the early
morning or late afternoon. Excessive heat can evaporate
the spray before it settles.
●
Never smoke, eat, or drink while operating the sprayer.
MAINTENANCE
WARNING:
To avoid serious personal injury, always remove the
battery pack from the tool when cleaning or performing any
maintenance.
WARNING:
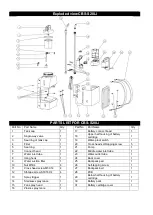
When servicing, use only identical replacement parts.
Use of any other parts may create a hazard or cause product
damage.
NOTICE:
Periodically inspect the entire product for damaged,
missing, or loose parts such as screws, nuts, bolts, caps, etc.
Tighten securely all fasteners and caps and do not operate this
product until all missing or damaged parts are replaced. Please
contact customer service or a qualified service center for
assistance.
GENERAL MAINTENANCE
Avoid using solvents when cleaning plastic parts. Most plastics
are susceptible to damage from various types of
commercial solvents and may be damaged by their use.
Use clean cloths to remove dirt, dust, oil, grease, etc.
WARNING:
Do not at any time let brake fluids, gasoline,
penetrating oils, etc., come in contact with plastic parts.
Chemicals can damage, weaken, or destroy plastic
which may result in serious personal injury.
DRAINING THE TANK
If there is any liquid left in the tank after spraying, the
tank should be drained before cleaning.
1. Remove the battery pack.
2. Unscrew the cap and remove it from the tank.
3. Remove the the strainer from the tank.
4. Drain the contents of the tank through the fill area.

