background image

Installation


Greenstar 8000 Life – 6720883865 (2019/02)

30

Carry handles

For transportation of the appliance always use the carry handles [1] and 
[2] (with the control unit in the closed position).

Fig. 38   Transport, lifting and handling

Preparing the appliance installation

NOTICE: 

Incorrect mounting can cause material damage.

If the appliance is mounted incorrectly, it may fall off the wall.

▶ Only install the appliance on a rigid, solid wall. This wall must be able 

to carry the weight of the appliance and must at least be as large as 
the bearing surface of the appliance.

▶ Only use screws and wall plugs that are suitable for the wall type and 

weight of the appliance.

▶ Remove the packaging, observing all notices in the packaging.
▶ Make sure that the gas type specified on the data plate is the same as 

the gas type supplied.

▶ Make sure that the installation location is in the country of destination 

specified on the data plate. 

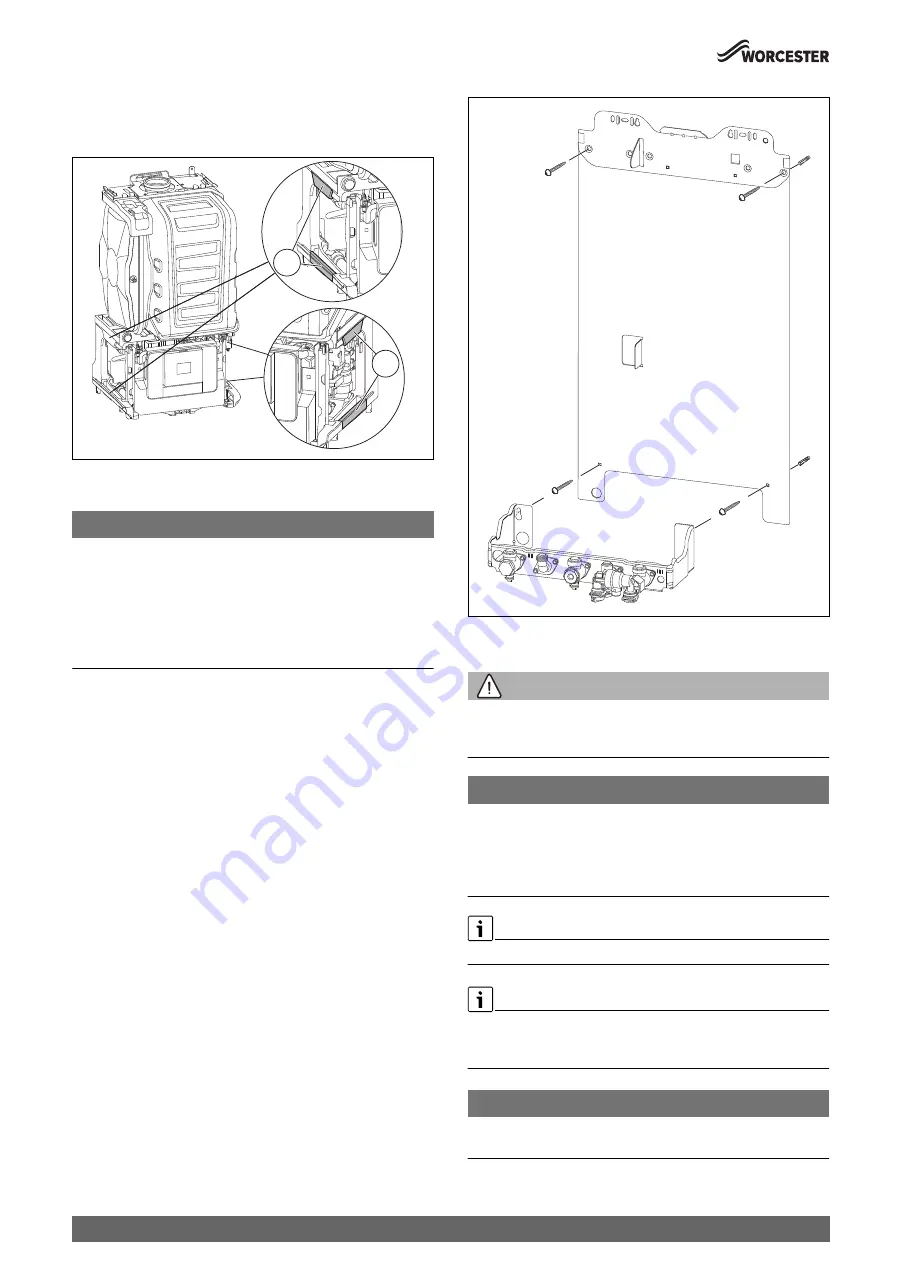
▶ Fasten the wall mounting plate to the wall using 4 screws and wall 

plugs.

▶ Attach the pre-plumbing manifold to the lower screws and tighten.

Fig. 39   Fitting the wall mounting plate and pre-plumbing manifold

5.2

Appliance connections

WARNING: 

Appliance gas connection

Ensure the mains gas supply is isolated before starting any work 
and follow all relevant safety precautions.

NOTICE: 

Appliance hydraulic connections

▶ Ensure all water pipe work, to be connected, is isolated/drained and 

observe all relevant safety precautions.

▶ Be aware of plastic components when using a naked flame on pipe 

work.

Surplus water may be present inside the appliance due to factory testing.

External condensate pipe work or internal pipe runs in unheated areas 
such as lofts, basements and garages exposed to prolonged cold 
temperatures should be protected 

 chapter  4.5.

NOTICE: 

Commissioning without water damages the appliance!

▶ Operate this appliance only when filled with water

0010023273-001

2

1

0010023431-001

Содержание Greenstar 8000 Life GR8300iW 30 C

Страница 1: ...6720883865 2019 02 UK IE Installation and Maintenance Instructions Gas fired condensing combi boiler Greenstar 8000 Life GR8300iW 30 C GR8300iW 35 C GR8300iW 40 C GR8300iW 45 C GR8300iW 50 C ...

Страница 2: ...r installation 33 5 5 Electrical connection 34 5 5 1 Installer connections 34 5 5 2 Cable preparations 36 5 5 3 External controls domestic installations 36 6 Commissioning 36 6 1 Pre Commissioning checks 36 6 2 Water treatment 37 6 2 1 Filling the appliance and adding Inhibitor 37 6 2 2 Adjusting the operating pressure of the heating system 38 6 3 Starting the appliance 38 6 3 1 Control panel over...

Страница 3: ...the gas valve 59 9 6 Checking the strainer in the cold water pipe and the flow turbine 60 9 7 Checking replacing the motor of the 3 way valve 60 9 8 Replacing the 3 way valve 61 9 9 Replacing the plate heat exchanger 61 9 10 Following inspection maintenance 61 10 Fault finding and diagnosis 61 10 1 Operating and fault displays 61 10 1 1 General information 61 10 1 2 Fault code table 62 10 1 3 Faul...

Страница 4: ... which are suitable for use with the appliance It is the responsibility of the designer installer of the flue to ensure this flue gas system operates correctly and in a safe manner H If you smell gas A gas leak could potentially cause an explosion If you smell gas observe the following rules Prevent flames or sparks Do not smoke use a lighter or strike matches Do not operate any electrical switche...

Страница 5: ...Benchmark Code of Practice which is available from the Heating and Hot water Industry Council who manage and promote the scheme Visit centralheating co uk for more information H Health and safety The appliance contains no asbestos and no substances have been used in the construction process that contravene the COSHH Regulations Control of Substances Hazardous to Health Regulations 1988 H Combustio...

Страница 6: ...ctice for domestic and hot water supply BS6891 Installation of low pressure gas pipe work up to 28mm R1 BS5546 Installation of gas hot water supplies for domestic purposes EN12828 Central heating for domestic premises BS5440 1 Flues and ventilation for gas appliances of rated heating not exceeding 70kW net Flues BS5440 2 Flues and ventilation for gas appliances of rated heating not exceeding 70kW ...

Страница 7: ...tput in kW C Combi appliance NG Gas type Natural Gas LPG Gas type Liquid Petroleum Gas 3 6 Product identification Data plate The data plate includes the product performance information approval data and serial number The data plate location can be found in the product overview Additional type plate The product name and the most important product data are shown on the additional data plate The addi...

Страница 8: ...tre from appliance left side 220 D Flue centre from rear of appliance 87 Function From left case edge Diameter of pipe 1 Condensate Outlet 58mm 22mm Rubber push fit connection 2 CH Flow 90mm 22mm Compression fitting 3 DHW Outlet 155mm 15mm Compression fitting 4 Gas Inlet 220mm 22mm Compression fitting 5 DCW Inlet 285mm 15mm Compression fitting 6 CH Return 350mm 22mm Compression fitting 7 PRV Disch...

Страница 9: ...1 Plate heat exchanger 2 KEY accessory housing slot wireless Gateway 3 Condensate trap 4 Data plate 1 5 Hot water temperature sensor 6 Pressure sensor 7 Pressure gauge 8 Venturi sealed 9 Schrader Valve 10 Fan 11 Expansion vessel 12 Heating flow 0010023231 001 15 2 14 12 11 9 10 8 1 25 24 5 13 6 17 18 19 20 21 22 23 27 28 30 4 31 29 7 32 16 3 26 ...

Страница 10: ...pable of sustaining a pressure of 3 bar Radiator valves should conform to BS 2767 10 All other valves should conform to BS 1010 It is best practice to fit Thermostatic Radiator Valves TRV s to all radiators except the area where the room thermostat is sited which must be fitted with lockshield valves that are left open If the circulating pump speed is fixed and system circulation can be significan...

Страница 11: ...e central heating circuit example 1 Appliance Sealed primary system 2 x central heating zones Requirement for new builds if the floor area of a property is over 150m2 Fig 7 Separated heating zones 1 Appliance 2 Zone valves 4 1 4 System fill Filling primary sealed systems NOTICE Filling the primary sealed system The system must not be filled with salt based softened water Ensure the primary water f...

Страница 12: ...knownlength theeffectivelengthwillbeincreasedby0 5mforeach 90 elbowandteefittedandby0 3mforeach90 bend Thismethod is only a estimate for more complex design please refer to BS6891 2015 and training given in ACS Liquid Petroleum Gas LPG Discharge rates for copper tube with 2 5mbar differential pressure between the ends for LPG Table 6 Liquid Petroleum Gas LPG Liquid Petroleum Gas LPG When using thi...

Страница 13: ...heating system pipe work can be damaged by frost if installed in an internal unheated area such as a loft basement or garage The appliance internal frost protection only monitors the system water temperature within the appliance to provide protection for the appliance Installafrostthermostatandpipethermostatconnectedinseries to protect the system pipe work We recommend that the frost thermostat is...

Страница 14: ...roup approved Condensfit II flue systems only no other manufacturer s flue have been tested or approved for use with Worcester Bosch Group appliances CAUTION Concealed flue systems Where a flue system is going to be concealed provision must be made for service and inspection Voids containing concealed flues must have at least one inspection hatch no less than 300mm square Fluejointswithinthevoidmu...

Страница 15: ...ncluded in length calculation 60 100 180 570mm 80 125 405 600mm Extended telescopic horizontal flue assembly B Flue length L adaptor bend included in length calculation 60 100 570 790mm 80 125 N A Horizontal fixed length flue assembly Fig 14 Horizontal flue option Flue length L adaptor bend included in length calculation 60 100 330 1 050mm 80 125 N A Extended horizontal flue Fig 15 Horizontal flue...

Страница 16: ...lue lengths High level horizontal flue with additional 90 elbow Fig 19 Horizontal flue option Flue length L initial bend included in length calculation Maximum flue length as stated in Horizontal maximum flue lengths minus the 90 bend equivalent straight flue length as stated in Table 11 Effective length of bends High level horizontal flue with additional 90 elbows Fig 20 Horizontal flue option Fl...

Страница 17: ... with a 60mm plume management system as stated previously Horizontal plume management runs The initial horizontal run from the terminal elbow must have a minimum10 fallback stoptabsintheelbowpreventlessthan10 to the appliance for proper disposal of condensate Any further horizontal runs after an elbow can be 3 WARNING Minimum plume management length The minimum distance of 500mm must be maintained...

Страница 18: ...ast 1500mm from the opening or vent whensitedbelowthewindowor600mmwhensitedtoeitherside or above 7 400mm measured diagonally from a pitched roof or 500mm in regions with heavy snow fall 300mm measured vertically from the air intake to the closest intersection with the roof 8 1 200mm separation measured between a vertical flue and a horizontal flue terminal Not required if the horizontal flue is 1 ...

Страница 19: ...terminal in relation to surfaces or boundary lines 6 The terminal must be at least 1500mm from the opening or vent whensitedbelowthewindowor600mmwhensitedtoeitherside or above 7 600mm diagonally to an opening door air vent or opening window 8 1 200mm separation measured between a vertical flue and a horizontal flue terminal Not required if the horizontal flue is 1 200mm above 9 Forthepurposeofdete...

Страница 20: ...maflueterminaltoafannedairinlettobedetermined by the ventilation equipment manufacturer A flue terminal guard shall be fitted whenever a terminal or air inlet is fitted less than 2 000mm above ground above a balcony or above a flat roof to which people have access 4 4 5 Plume re direct and plume management terminal positions Maximum and minimum plume management lengths A minimum distance of 500mm ...

Страница 21: ... within the footprint of the carport If the exhaust terminal is extended at least 300mm beyond the footprint of the carport then the distance from the terminal to an opening within the carport can be reduced to 600mm The exhaust terminal can also be routed though the roof of the carport providing 25mm clearance is provided around the flue pipetoanyflammablematerialandthatitextendsatleast300mm abov...

Страница 22: ...uns For additional information refer to External Connections section 4 5 3 Internal connections Soil stack connection Figure 29 In order to minimise risk of freezing during prolonged cold spells the following methods of installing condensate drainage pipe should be adopted Wherever possible the condensate drainage pipe should be routed and terminatedsothatthecondensatedrainsawayfromtheapplianceund...

Страница 23: ...he pipe diameter should be increased to a minimum diameter of 32mm before it passes through the wall to the exterior The pipe should be insulated using suitable waterproof and weather resistant insulation Theexternalpipeshouldtaketheshortestandleastexposedrouteto the discharge point and should fall as steeply as possible away from the appliance with no horizontal runs in which condensate might sta...

Страница 24: ...an increased risk of freezing causing the condensate pipe to become blocked with ice and the boiler to shut down Although it is possible to increase the size of the soak away and the area with limestone chippings in clay soil areas if the clay content is high and preventseffectivedispersalofthecondensatethenasoakawaymaynot be a suitable means of condensate disposal and an alternative method should...

Страница 25: ...face the external wall as shown to help prevent freezing In all normal circumstances a PRV discharge pipe installation as described above is suffice to meet all but the most exceptional circumstances Where the PRV discharge pipe could be susceptible to damage vandalism freezing etc that could cause either a blockage or restriction in the ability to discharge safely then a tundish should be conside...

Страница 26: ...fitted to the return to reduce the risk of contaminants entering the appliance Follow the guidance of BS7593 Inhibitor Add a suitable inhibitor or combined inhibitor anti freeze if the system is exposed to freezing conditions to the heating system in accordance with the DWTA code of practice and manufacturer s guidelines ProductsapprovedtotheBuildCertstandardaredeemedascompatible with the componen...

Страница 27: ...elivery are undamaged Remove the appliance from its packaging check the contents against the scope of delivery Once the appliance is unpacked the installation can commence Important handling instructions Itisadvisedthattwopeopleareusedtocarrythecartonfromthevan to the point of delivery Oncethecartonhasbeendelivered theoutercartonisremovedfirst Careshouldbetakenwhenreleasingthestraps Ifasharpimplem...

Страница 28: ...ld share the lifting of the appliance up to the loft hatch tilt and slid on its back into the loft space Ensurethattheroofspacehaspermanentfixedlighting apermanent fixed retractable ladder and a fixed floor area from the hatch to the appliance installation point This will allow access for installation normal use and servicing Before installing the appliance ensure that the system has been cleaned ...

Страница 29: ...howstherelativepositionsofthe flue and the top and bottom fixings of the wall mounting frame Fix the wall mounting template 3 to the wall in the desired position Drill the holes 4 through the template for the primary fixing points as indicated on the template Additional fixing points for the appliance will be indicated on the wall mounting template Flue outlet position The appliance wall mounting ...

Страница 30: ...cationisinthecountryofdestination specified on the data plate Fasten the wall mounting plate to the wall using 4 screws and wall plugs Attach the pre plumbing manifold to the lower screws and tighten Fig 39 Fitting the wall mounting plate and pre plumbing manifold 5 2 Appliance connections WARNING Appliance gas connection Ensure the mains gas supply is isolated before starting any work and follow ...

Страница 31: ...n 22mm Before hanging the appliance onto the wall mounting frame ensure that the pressure relief Drain Pipe is connected securely Apply a smear of silicone lubricant to the seal to ease connection later Fig 42 Connect PRV discharge pipe Fitting the condensate pipework Secure the pipe to the wall at the last joint Ensure the pipe protrudes through the pre plumbing manifold by 25mm If exiting throug...

Страница 32: ...ed the lifting operation is carried out by 2 people observing all precautions for safe lifting of heavy objects Do not lift by the top case panel There are two handling holes incorporated into the inner casing left and right in the lower section of the appliance Fig 38 Fig 45 Hanging the boiler 5 Makeconnectionsbetweentheboilerandthepre plumbingmanifold and the pre plumbing manifold and the system...

Страница 33: ...ponents are pushed fully home and secured Thefluerisesfromtheapplianceatanangleof3 or52mmpermetre length Support the flue at each flue extension joint and at each change of direction use suitable brackets and fittings Flue bracket silver 100mm part number 7 738 112 876 Support Bracket Kit silver 7 738 112 876 Flue bracket 100mm part number 7 716 191 177 Flue brackets 100mm x 6 part number 7 716 19...

Страница 34: ... are connected to the appliance that require 230 Volts must be connected to the same supply as the appliance Type A RCDs must be employed where additional protection is required External fuse 3A Amps When stripping the wires ensure copper strands do not fall into the control box NOTICE Risk of damage from hot appliance components Hot appliance components can damage electrical cables Ensure all ele...

Страница 35: ... pre heat time control External frost thermostat FS output frost thermostat supply FR input frost thermostat return Without function 0010019570 001 5 7 Ø Ø 8 9 Ø 10 12 13 14 Ø 0010023703 001 PE PC0 N L PW2 N L FS FR LR LR PW1 N L N IN 230V OUT 230V L L N TW1 1 2 T1 1 2 T0 1 2 LF0 1 2 I3 1 2 I1 1 2 BUS 1 2 TW1 1 2 T1 1 2 T0 1 2 LF0 1 2 I3 1 2 I1 1 2 BUS 1 2 PE PC0 N L PW2 N L FS FR LR LR PW1 N L N ...

Страница 36: ...ted External frost thermostat connections 4 The Live supply is terminal FS The Switch Live is terminal FR Fig 57 External controls connections example 1 230V mains supply to the appliance 2 230V supply from the appliance to the external controls 3 CH DHW Switch Live Demand from the external controls 4 External frost protection Live supply and Switch Live Demand 6 Commissioning 6 1 Pre Commissionin...

Страница 37: ...lling the appliance and adding Inhibitor Before pressurising the system Additional expansion vessel fitted to the system The appliance integral expansion vessel is pre charged to 1 0bar equal toastaticheadof10 0m 32 8ft ASchradertypevalveisfittedtothe expansion vessel to allow for pressure adjustment if required If an extra expansion vessel is fitted to the central heating system ensure that it is...

Страница 38: ...ng mode on set the maximum flow temperature 6 3 2 Turn on the appliance Set the language the first time the appliance is turned on To scroll through the languages press the or the key To select the desired language press the OK key When the symbol appears alternately with the flow temperature the siphon filling program is active The condensate siphon in the appliance is filled Chapter 6 3 3 6 3 3 ...

Страница 39: ...ss the d key Adjustment with casing removed in chimney sweep mode 1 Setthechimneysweepmodeandstartuptheapplianceatmaximum rated output 2 Setthechimneysweepmodeandsettheapplianceatminimumrated output 6 5 Combustion casing removal Remove the combustion cover Fig 61 Removing the combustion cover 6 6 Checking gas inlet pressure 6 6 1 Checking the gas supply pressure Switch off the appliance and close ...

Страница 40: ...r equal to Greater than 6 7 Checking the gas rate Thegasrateshouldbemeasuredatthegasmeteraftertheappliance hasbeenoperatingforaminimumof10minutesatmaximumoutput Refer to Technical data section of this manual for the appliance gas rates and CO CO2 ratios Where a gas meter is not available e g L P G the CO CO2 must be checked Gas rate must be checked with the appliance in service maximum output test...

Страница 41: ...y in the Commissioning section Visually check the integrity of the whole flue system and confirm that all the components are correctly assembled fixed and supported The flue gas analyser must be the correct type as specified in BS 7967 Before use the analyser must have been calibrated as specifiedbythemanufacturer Theinstallermustbecompetentinthe use of the analyser Check and zero the analyser in ...

Страница 42: ...ting must be carried out by a competent qualified person Testing must not be attempted unless the person carrying out the combustion check is equipped with a calibrated Flue Gas Analyser conforming to BS 7967 and is competent in its use Flue gas analysis Ensure that the gas inlet pressure has been checked and is satisfactory Refit the test point plugs after the test has been completed The flue gas...

Страница 43: ...outside temperatures will affect the output of the appliance especially the DHW Ensure that all documentation is left with the appliance or homeowner Appliance documentation Controls documentation Any other equipment documentation that is connected to the appliance or system Appliance not in use If the appliance is not going to be used immediately and may be exposed to freezing conditions advise t...

Страница 44: ...ction L 1 Unit More information 1 A1 Current status Status code 1 A2 Current fault Fault code table 28 1 A3 Maximum heating output The maximum thermal output can be reduced via the service function 3 b1 1 A5 Actual temperature C Flow temperature at the flow temperature sensor 1 A6 Set flow temperature C Setting value of the flow temperature demanded by the heating controller 1 A7 Temperature at hy...

Страница 45: ...deviation 3 b2 Standby time 3 5 60 minutes The time interval determines the minimum dela between starting and restarting the boiler If an outside temperature controlled heating controller is connected this setting is optimised by the heating controller 3 b3 Temperature interval for switching off the burner and switching it on again 15 6 2 K C Difference between current flow temperature and set flo...

Страница 46: ...pump characteristic map 0 3 d6 Pump overrun 1 2 60 minutes 24 hours Run on time of the heating pump pump run on time begins at the end of the heat requirement Service function L 3 Settings adjustment range Remark restriction Service function L 4 Settings adjustment range Remark restriction 4 A1 Ventilation function 0 1 Auto 2 Permanent The ventilation function can be activated after maintenance Du...

Страница 47: ...on OFF ON This service function is only available if service function 4 b1 is activated Appliancefrostprotectionswitchestheburnerand heat pump on if the outside temperature falls below 5 C This prevents the heating appliance freezing 4 b6 Frost temperature limit 0 5 10 C Temperaturevalueforthesystemfrostprotection This service function is only available if service function 4 b1 was activated If th...

Страница 48: ...nce message NO YES Service function L 4 Settings adjustment range Remark restriction Service function L 5 Settings adjustment range Remark restriction 5 A1 Maximum flow temperature 30 88 C Limits the adjustment range for the flow temperature 5 A2 Maximum DHW temperature 35 60 C Limits the adjustment range for the hot water temperature 5 A3 Minimum boiler output heating and DHW 10 50 Minimum heat o...

Страница 49: ... requirements Check that the safety and regulation appliances 3 bar pressure release valve air bleed etc are operating properly Check all joints and connections in the system and remake any that show signs of leakage Refill and re pressurise if applicable as described in the commissioning section When it is frequently necessary to add water to maintain pressure in theinstallation eventhoughnoleaks...

Страница 50: ...theclipon top of the boiler and remove outer case Fig 71 Removing outer case 8 5 Fan pressure test NOTICE Fan pressure test Theappliancemustberunningatmaximumoutputinchimneysweep mode for the fan pressure test chapter 6 4 Fig 72 Fan pressure test point This test is to determine if the heat exchanger requires cleaning or additional actions Fan pressure test reading The pressure reading will be in n...

Страница 51: ... the readings conform to those given in the following tables In addition to CO and CO CO2 ratio checks also check the maximum and minimum CO2 percentage reading Table 26 CO2 and O2 contents If the CO2 is out of tolerance then please check The gas inlet pressure The gas rate The fan test pressure Theflueandairintake plusanypossibleblockagesinthecondensate disposal The condition of burner For leaks ...

Страница 52: ... part number 7 719 001 996 8 9 1 Checking the burner Remove the combustion cover chapter 6 5 Remove the burner cover Fig 74 Removing the burner cover Remove the burner and clean its components Fig 75 Burner Reinstall the burner in reverse order including a new gasket TheGR8300iW45and50applianceshaveadifferentgasketwithcodet pin Install the burner and the burner cover Check the gas air ratio 8 9 2 ...

Страница 53: ...o gain access to the heat exchanger for cleaning Remove the combustion casing Lower the control panel into the service position Disconnect electrical wires to the fan ignition transformer spark electrodes flue overheat thermostat main heat exchanger temperature sensor and flow pipe temperature sensor Flueway Fan assembly Ignition transformer Spark electrode assembly Burner housing burner and gaske...

Страница 54: ...op to bottom Fig 82 Cleaning brush Use the handle of the brush to remove debris from the condensate tray It is possible to rinse any remaining debris from the heat exchanger either through the access point or alternatively through the top of the heat exchanger when the burner is removed Pour water into the heat exchanger to rinse the debris through to the suitable container below the outlet to the...

Страница 55: ...lace electrodes if required Install electrode set with new gaskets Fig 86 Installing electrode set Check integrity of seal of electrode set Using a mirror to check for misting Fig 87 Checking for leaks with an inspection mirror Observe for misting 8 9 6 Cleaning the siphon Cleaning the condensate trap WARNING Danger to life due to poisoning If the condensate trap is not filled poisonous flue gas c...

Страница 56: ...uired order When the gasket is correctly inserted the pin is visible in the recess and is flush with the top edge of the gasket Fig 90 Pressing on the gasket Check the condensate hose and clean if required Fill the condensate trap with approx 250 ml water Replace the condensate trap An audible click will indicate locking Ensure condensate trap is secured correctly Fig 91 8 10 Setting the air gas r...

Страница 57: ...rity Seal 2 Adjustable venturi Switch on the appliance Remove the plug from the flue gas test point Push the flue gas probe centrally into the flue way Seal the test point Fig 94 Flue gas test point To ensure heat transfer open the radiator valves and zone valves Setthechimneysweepmodeandstartuptheapplianceatmaximum rated output Measure the CO2 content Check the CO2 content at maximum rated output...

Страница 58: ... component where a gasket or seal has been disturbed or replaced check for gas tightness using a gas sniffer leak detection fluid On re assembly check all affected seals for cracks hardness and deterioration If damaged or in any doubt the seal must be replaced Also after re assembly carry out the following checks Fan pressure Flue gas analysis Only use Worcester Bosch Group original spare parts wi...

Страница 59: ... the spring forward 1 Remove the pressure sensor 2 9 4 Pressure relief valve removal Open the cover Fig 50 Remove the condensate trap Fig 88 Pull the spring up 1 Press the PRV Pipe down lightly 2 Remove the Pressure relief valve 3 9 5 Replacing the gas valve Close the gas isolator 1 Unscrew the bayonet connection 2 Unscrew the union nut 3 Remove the gas pipe Fig 97 Removing the gas pipe 1 Unplug t...

Страница 60: ...for contamination Fig 100 Removing the strainer from the cold water pipe 1 Pull out the flow turbine Fig 101 Removing the flow turbine at the cold water pipe Select the service menu 1 b2 current turbine flow rate Blow in the flow direction of the turbine If nothing appears on the display replace the turbine 9 7 Checking replacing the motor of the 3 way valve Check the motor in the service menu 6t ...

Страница 61: ...pliance Ensure that the appliance settings and functionality is correct Ensure the CH DHW programmer timer is functioning Ensure the room thermostat is functioning Ensure the cylinder thermostat if fitted is functioning Ensure the cold water mains is turned on Ensure the primary system has adequate pressure system content for the system type Ensure there is gas to the appliance Are other gas appli...

Страница 62: ...ct code plug is installed 2 Exchange or reconnect code plug 815 W Low loss header temp sensor faulty 1 Check the sensor port 2 Check the differential sensor for incorrect installation position or breakage 1010 O NoBUScommunication CableforEMS Bus is not correct connect or damaged 1 Connect the cable for the EMS Bus correct or replace the damaged cable 2 Exchange fuse 1017 W Water pressure too low ...

Страница 63: ...o small or the size of the ventilation opening is too small 14 Clean the heating block on the flue gas side 15 Replace the control unit burner control unit 2946 V Incorrect code plug detected Replace the code plug 2948 B No flame signal with low output The burner starts automatically after cleaning 1 If the fault occurs repeatedly check the settings of the CO2 values 2950 B Noflamesignalfollowings...

Страница 64: ...p up water until the preset pressure is reached 3 Replace the cable to the pressure sensor 4 Replace the pressure sensor Fault code Fault category Fault text on the display description Remedy Appliance faults Remedy Combustion noises too loud rumbling noises Check the gas type Check the gas supply pressure Check the flue system clean or repair if required Check the gas air ratio Check the air gas ...

Страница 65: ...ximum rated heat input net QnW kW 30 2 30 2 34 4 34 4 Maximum rated heat output PnW kW 30 2 30 2 34 4 34 4 Maximum mains inlet pressure standing pressure PMW bar 10 10 10 10 Minimum mains inlet pressure working for max flow bar 2 3 2 3 3 2 3 2 Minimum mains inlet pressure working for operation bar 0 2 0 2 0 2 0 2 Minimum required flow to activate DHW demand l min 1 9 1 9 1 9 1 9 DHW temperature ra...

Страница 66: ... min kW 5 5 5 5 5 5 5 5 Minimum rated heat output 80 60 C Pmin kW 5 0 5 0 5 0 5 0 Maximum flow temperature C 70 70 70 70 Maximum flow temperature possible C 82 82 82 82 Maximum permissible operating pressure PMS bar 2 5 2 5 2 5 2 5 Available pump head at 20 C system temperature rise m 2 0 2 0 2 0 2 0 Domestic Hot Water DHW Minimum heat input kW 5 1 5 1 6 3 6 3 Maximum rated heat input net QnW kW 4...

Страница 67: ...W 50 Unit Natural gas Propane1 Gas flow maximum rate 10 minutes from lighting Natural Gas2 m3 h 5 1 Propane Gas LPG kg h 3 8 Central Heating CH Maximum rated heat input net Qmax kW 34 4 34 4 Maximum rated heat output 40 30 C kW 36 0 36 0 Maximum rated heat output 50 30 C Pcond max kW 35 7 35 7 Maximum rated heat output 80 60 C Pmax kW 33 8 33 8 Minimum rated heat input net Qmin kW 5 1 5 1 Minimum ...

Страница 68: ... charge pressure bar 1 0 1 0 Appliance protection rating4 IP X4D X4D Permissible ambient temperature short time long time C 0 50 40 0 50 40 Nominal capacity of the appliance l 5 9 5 9 Total packaged weight kg 57 57 Total appliance weight excluding packaging kg 49 49 Lift weight without front and side panels kg 43 43 1 Propane butane mixture for fixed containers with capacity up to 15 000 l 2 The G...

Страница 69: ...gas 20017 GR8300iW 35 C Natural gas 20018 GR8300iW 40 C Natural gas 20019 GR8300iW 45 C Natural gas 20020 GR8300iW 50 C Natural gas 20021 Temperature C 10 Resistance 300 600 900 1200 1800 1500 0 5 6 7 4 3 2 1 0 0010012467 001 H m V l h A 4 3 1 2 B 5 6 8 G20 20 mbar Gross calorific value HS 0 C kWh m3 11 2 Net calorific value Hi 15 C kWh m3 9 5 Performance kW Load kW Display Gas volume l min at TV ...

Страница 70: ...20 5 60 36 21 0 21 6 63 38 22 0 22 6 66 40 23 0 23 6 69 41 24 0 24 6 72 43 25 0 25 6 74 45 26 0 26 6 77 47 27 0 27 6 80 49 28 0 28 7 83 50 29 0 29 7 86 52 30 0 30 7 89 54 31 0 31 7 92 56 32 0 32 7 95 57 33 0 33 7 98 59 33 7 34 4 100 60 G20 20 mbar Gross calorific value HS 0 C kWh m3 11 2 Net calorific value Hi 15 C kWh m3 9 5 Performance kW Load kW Display Gas volume l min at TV TR 80 60 C ...

Страница 71: ...heating block 6 Flame sensing electrode 7 Ignition electrode 8 Heating block temperature limiter 9 Ignition transformer 10 Flow Turbine 11 Fan 12 Control cable of the heating pump 13 Heating pump 230 V 14 Connecting lead for KEY slot 2 4 5 7 13 9 12 10 18 1 3 0010023241 001 6 11 L N L 230V OUT 230V IN PE FR FS LR LR L N PW1 PW2 PC0 BUS I3 LF0 T1 TW1 T0 I1 1 2 1 2 N N L N L 1 2 1 2 1 2 1 2 1 2 4 6 ...

Страница 72: ...s Logs Greenstar 8000 Life 6720883865 2019 02 72 15 Display 16 Code plug 17 Terminal strip for external accessories terminal assignment Tab 5 5 1 page 34 18 3 way valve 19 Connecting lead 20 Earth PE 21 Earth bar 22 Not used ...

Страница 73: ...rimary water system filter been installed Yes No The condensate drain has been installed in accordance with the manufacturer s instructions and or BS5546 BS6798 Yes CENTRAL HEATING MODE measure and record Gas rate m3 hr OR ft3 hr Burner operating pressure if applicable mbar OR Gas inlet pressure mbar Central heating temperatures Flow temperature C Return temperature C COMBINATION BOILERS ONLY Is t...

Страница 74: ... Yes Yes Yes No Yes Yes Yes Yes Yes Year 3 ________________________ ___________________ Yes Yes Yes Yes Yes Yes Yes Yes Yes No Yes Yes Yes Yes Yes Year 4 ________________________ ___________________ Yes Yes Yes Yes Yes Yes Yes Yes Yes No Yes Yes Yes Yes Yes Year 5 ________________________ ___________________ Yes Yes Yes Yes Yes Yes Yes Yes Yes No Yes Yes Yes Yes Yes Year 6 ________________________...

Страница 75: ...gnature SERVICE 05 Date SERVICE 06 Date Engineer name Engineer name Company name Company name Telephone No Telephone No Gas safe register No Gas safe register No Record At max rate CO ppm AND CO2 Record At max rate CO ppm AND CO2 Atmin rate Wherepossible CO ppm AND CO2 Atmin rate Wherepossible CO ppm AND CO2 Comments Comments Signature Signature SERVICE 07 Date SERVICE 08 Date Engineer name Engine...

Страница 76: ... Kingdom Tel 0330 123 9559 worcester bosch co uk TECHNICAL SUPPORT 0330 123 3366 RENEWABLE SUPPORT 0330 123 9229 CONTROLS AND CONNECTIVITY TEAM 0330 123 3641 APPOINTMENTS 0330 123 9339 SPARES 0330 123 9779 LITERATURE 0330 123 9119 TRAINING 0330 123 0166 SALES 0330 123 9669 ...

Отзывы: