background image

Page 13

Due to continuous product research and development,

the information contained herein is subject to change without notice.

www.stoddart.com.au

www.stoddart.co.nz

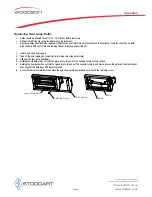
Replacing Heat Lamp Bulbs

Operation

•  Bulbs should be allowed to cool for 10 - 15 minutes before removing
•  All heat lamp fi tting are spring loaded for easy replacement
•  Heat lamp bulbs should only be replaced with gloves or a soft cloth� No skin should touch the new bulb� If skin touches the new bulb, 

wipe the bulb with a soft cloth and rubbing alcohol to remove all possible oils

1�  Isolate from the power supply 
2�  Take off the end capping by removing the retaining screw (do not discard)
3�  Slide out the four lamp shield bars
4�  Holding the old bulb with a soft cloth or glove, press into one of the sockets, rotate out and remove
5�  Holding the new bulb with a soft cloth or glove, press into one of the sockets, rotate in and slowly release the bulb into the other socket, 

ensuring that the bulb does NOT become broken

6�  Re-install the lamp shield bars then place the end capping into position and secure with the retaining screw

Retaining Screw

End Capping

Bulb

Socket

Lamp Shield Bars

Содержание W.HFC Series

Страница 1: ...the use care and maintenance of your quality Woodson product Models W HFS W HFC W HFSQ Hot Food Displays SPECIFICATION INSTALLATION AND OPERATION MANUAL READ ALL INSTRUCTIONS BEFORE USE Revision Date...

Страница 2: ...Page Intentionally Left Blank Page 1 Due to continuous product research and development the information contained herein is subject to change without notice www stoddart com au www stoddart co nz...

Страница 3: ...ection 6 Information Plumbing Connections 6 Information Specification Technical Specifications 7 W HFSxx Specification W HFSQxx W HFCxx Operation Initial Start up Operation 9 Initial Start up Operatio...

Страница 4: ...product according to these instructions your Woodson product should give you many years of reliable service Stoddart is a wholly Australian owned company which manufactures and distributes Woodson com...

Страница 5: ...or near this unit Keep fingers out of pinch point areas Unit is not waterproof DO NOT use jet sprays hoses or pour water over on the exterior of the unit Only use this unit with voltage specified on...

Страница 6: ...lated and provides access for future maintenance Place the unit on a level stable work surface capable of supporting its weight Do not position the unit in wet areas near heat and or steam sources nea...

Страница 7: ...ed where relevant unless the procedures specify otherwise FAILURE TO DO SO MAY RESULT IN ELECTRIC SHOCK WARNING WARNING This unit must be installed in accordance with AS NZS 60335 1 Notes If the suppl...

Страница 8: ...0mm 600mm 600mm Power 1 5kW 2 4kW 3 0kW 3 3kW 3 6kW AMPS 10A plug lead fitted 10A plug lead fitted 15A plug lead fitted 15A plug lead fitted 15A plug lead fitted Specifications Model W HFSQ22 W HFSQ23...

Страница 9: ...ange without notice www stoddart com au www stoddart co nz Specification W HFSQxx W HFCxx 2 module 705mm 3 module 1030mm 4 module 1355mm 5 module 1680mm 6 module 2005mm 723 32 260 78 600 480 211 7 0 3...

Страница 10: ...areas demineralised water should be used in all cases 2 Water should be filled to a level approximately 10mm above the element and then turn the Thermostat to high for approximately 10 15 minutes and...

Страница 11: ...d on the temperature gauge is the water air temperature NOT the food temperature It is important to regularly monitor the food temperature in the Bain Marie Food Temperature All storage of food should...

Страница 12: ...contains citric oxalic nitric phosphoric acid Do NOT use cleaning agents with chlorides or other harsh chemicals as this can cause corrosion After treatment wash with warm not hot soapy water and dry...

Страница 13: ...d 4 Using a clean sanitised cloth thoroughly wipe the stainless steel and metal parts dry Do NOT let water pool on the unit Check crevices and folds Note In some areas particularly seaside environment...

Страница 14: ...bulb with a soft cloth and rubbing alcohol to remove all possible oils 1 Isolate from the power supply 2 Take off the end capping by removing the retaining screw do not discard 3 Slide out the four la...

Страница 15: ...he well O Close the water valve Wait 30 minutes Temperature gauge broken T Replace temperature gauge Thermostat or Temperature probe broken T Replace thermostat Mineral deposits on element T Filter wa...

Страница 16: ...Zealand Business Number 6837694 New Zealand Sales Tel 0800 79 1954 Email sales stoddart co nz Service Spare Parts Tel 0800 935 714 Email service stoddart co nz Email spares stoddart co nz www stoddar...

Отзывы: