background image

Dealer Service 

35

MAN1168 (5/27/2016)

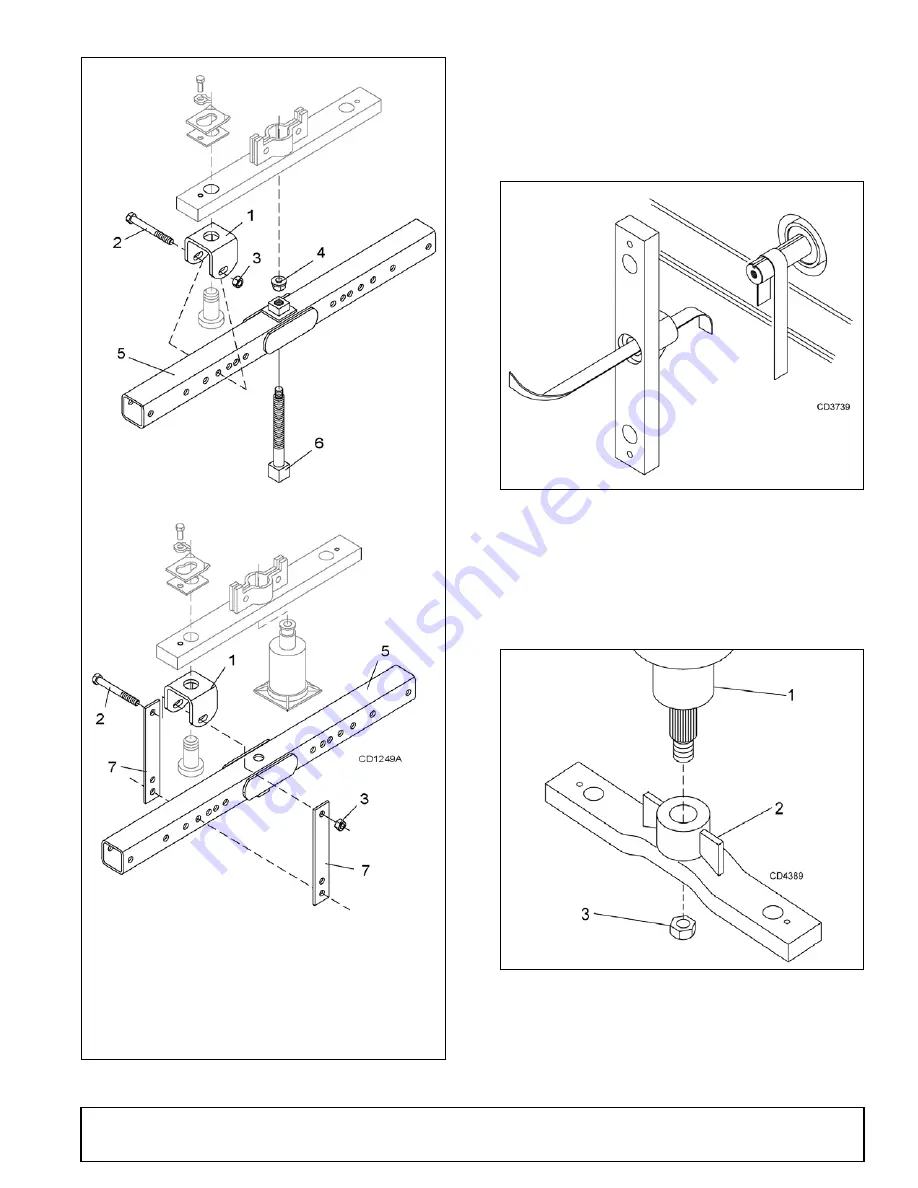
 Figure 18

. Crossbar Removal

Crossbar Installation

1.

Using emery cloth (220 or finer), remove surface
rust, and foreign material from hub, splined
gearbox vertical shaft, and crossbar. See Figure
19.

 Figure 19

. Typical Crossbar and Gearbox Shaft

2.

Install crossbar (2) on splined shaft. See Figure 20

.

Install nut (3). Torque nut to 450 lbs-ft. Install cotter
pin.

 Figure 20

. Crossbar Installation

1. Clevis

2. 5/8 NC x 4 Cap screw

3. 5/8 NC Hex nut

4. Pad assembly

5. Tube assembly

6. Screw assembly

Содержание DS10.50

Страница 1: ...OPERATOR S MANUAL ROTARY CUTTER MAN1168 Rev 7 12 2016 DS8 50 DS8 50Q DS10 50 DS10 50Q DSO8 50 DSO8 50Q DSO10 50 DSO10 50Q...

Страница 2: ...at www WoodsEquipment com or in the United States and Canada call 1 800 319 6637 The equipment you have purchased has been carefully engineered and manufactured to provide dependable and satisfactory...

Страница 3: ...ORDER FORM 5 SAFETY RULES 7 10 SAFETY DECALS 11 13 OPERATION 14 OWNER SERVICE 21 TROUBLESHOOTING 27 DEALER SERVICE 29 ASSEMBLY INSTRUCTIONS 38 DEALER CHECK LIST 46 INDEX TO PARTS LISTS 47 BOLT TORQUE...

Страница 4: ...manual references are made to right and left direction These are determined by standing behind the equipment facing the direction of forward travel Blade rotation is clockwise right and counter clock...

Страница 5: ...with AEM Association of Equipment Manufacturers reinforces the proper procedures to follow while operating your mowing equipment The video does not replace the information contained in the Operator s...

Страница 6: ...ipment Manufacturers A large variety of training materials ideal for groups are available for a nominal charge from AEM Following is a partial list Training Package for Rotary Mowers Cutters English C...

Страница 7: ...r allowing anyone to approach the equipment Make sure all hydraulic hoses fittings and valves are in good condition and not leaking before starting power unit or using equipment Check and route hoses...

Страница 8: ...ping the blade enclosure in every mowing condition It is possible for objects to ricochet and escape traveling as much as 300 feet 92 m Do not allow bystanders in the area when oper ating attaching re...

Страница 9: ...ngerous Always wear relatively tight and belted clothing to avoid getting caught in moving parts Wear sturdy rough soled work shoes and protective equipment for eyes hair hands hearing and head and re...

Страница 10: ...instructions for storage ON MOUNTED AND SEMI MOUNTED CUTTERS Disconnect cutter driveshaft and secure up off ground Raise cutter with 3 point hitch Place blocks under cutter side skids Lower cutter ont...

Страница 11: ...hrough very small scratches or under edges of decals causing them to peel or come off Replacement safety decals can be ordered free from your Woods dealer To locate your nearest dealer check the Deale...

Страница 12: ...PN 18866 540 RPM OR 9b PN 15922 1000 RPM 10 PN 1004114 11 PN 57123 RED REAR REFLECTOR 9 12 PN 1002940 AMBER FRONT REFLECTOR 9 SAFETY INSTRUCTIONAL DECALS ATTENTION BECOME ALERT YOUR SAFETY IS INVOLVE...

Страница 13: ...Y INSTRUCTIONAL DECALS ATTENTION BECOME ALERT YOUR SAFETY IS INVOLVED Replace Immediately If Damaged 14 PN 19924 15 PN 1004991 17 PN 33347 18a PN 57840 540 RPM OR 18b PN 57841 1000 RPM 13 PN 15502 16...

Страница 14: ...g operation Always wear relatively tight and belted clothing to avoid getting caught in moving parts Wear sturdy rough soled work shoes and protective equipment for eyes hair hands hearing and head an...

Страница 15: ...o check for potential excessive turn angle 1 Disconnect driveline from tractor start engine and turn as far right or left as possible 2 Shut engine off set parking brake remove key and try to connect...

Страница 16: ...arbox input shaft will increase Follow steps as you would for the 3 point hitch to insure proper engagement Raise and lower cutter and measure the maximum and minimum distance between the tractor PTO...

Страница 17: ...set the cutting height accordingly Pull Type Units To adjust cutter for normal mowing select a cutting height example 4 inches Blades are approximately 1 3 4 above bottom of cutter Dimension A plus 1...

Страница 18: ...us injury or death Only use a tractor with a Roll Over Protective Structure ROPS and seat belt Securely fasten seat belt before starting tractor The cutter is operated with tractor controls Engage the...

Страница 19: ...um transport speed for towed and semi mounted machines is 20 mph 32 km h Regardless of the maximum speed capability of the towing tractor do not exceed the implement s max imum transport speed Doing s...

Страница 20: ...lower equipment to make sure air is purged from hydraulic cylinders and hoses ___ Check that all hardware is properly installed and secured ___ Check to ensure blades are sharp in good condi tion and...

Страница 21: ...it Just placing jackstands underneath will not ensure your safety The working surface must be level and solid to support the weight on the jackstands Make sure jackstands are stable both top and botto...

Страница 22: ...ENCY 1 Driveline U Joint 10 hrs 2 Telescoping Shaft 10 hrs 3 CV Body Assembly 10 hrs 10 pumps minimum 4 Driveline Shield 10 hrs 5 Carrier Bearing 40 hrs 6 Side Drive Yoke 40 hrs 7 Gearbox Check Oil Le...

Страница 23: ...rrect 3 Align crossbar 8 with blade access hole in cutter frame Apply a liberal coating of Never Seez or equivalent to blade pin and crossbar hole Make sure blade offset is away from cutter Push blade...

Страница 24: ...e flange yoke 1 clutch hub 3 drive plate 5 and thrust plate faces 6 6 Reassemble clutch 7 Compress each of the six compression springs 8 by tightening the six cap screws 7 and lock nuts 10 The compres...

Страница 25: ...spect chain shielding each day of operation and replace any broken or missing chains as required Figure 14 Flexible Couplers FLEXIBLE COUPLER RUBBER DISK REPLACEMENT The flexible coupler side drive is...

Страница 26: ...After Each Use Remove large debris such as clumps of dirt grass crop residue etc from machine Inspect machine and replace worn or damaged parts Replace any safety decals that are missing or not readab...

Страница 27: ...r cutting height Note Set height so blades do not frequently hit ground Excessive lush and tall vegetation Recut at 90 to first pass Excessive side skid wear Running with skids continuously on ground...

Страница 28: ...28 Troubleshooting MAN1168 5 27 2016 NOTES...

Страница 29: ...immediately Bearing failure is indicated by excessive noise and side to side or end play in gear shafts Seal Replacement Recommended sealant for gearbox repair is Permatex Aviation 3D Form A Gasket or...

Страница 30: ...2 8 Remove input bearing 7 by using a punch and hammer from outside of housing 9 Support housing in vise in a horizontal position 10 The castle nut 15 cotter pin 25 and hub are already removed with t...

Страница 31: ...the backlash 16 Press in input oil seal 19 using tube of correct diameter Be careful not to damage seal lip 17 Press oil cap 20 on to cover the rear of housing using a tube of the correct diameter 18...

Страница 32: ...oil seals 15 to be replaced from both sides of output shaft 14 5 Remove snap rings 16 and shims 17 from both sides of output shaft 14 6 Support gearbox in a handpress and push on left side of output s...

Страница 33: ...ngs 11 into input housing 12 using a round tube of the same diameter and a handpress 12 Assembly bearing 13 shim 17 gear 8 shim 7 and castle nut 6 to input shaft 1 13 Align groove in castle nut 6 and...

Страница 34: ...use either the puller screw Item 6 Figure 18 or a small hydraulic jack to remove the crossbar 2 Remove blades as shown in Figure 17 Figure 17 Blade Removal 3 Remove cotter pin 34 and castle nut 33 fro...

Страница 35: ...ial from hub splined gearbox vertical shaft and crossbar See Figure 19 Figure 19 Typical Crossbar and Gearbox Shaft 2 Install crossbar 2 on splined shaft See Figure 20 Install nut 3 Torque nut to 450...

Страница 36: ...front of the cutter 3 Measure from the front of the cutter to the blade pin on left crossbar 4 Hold crossbars in position while connecting the side drivelines Figure 21 Crossbar Timing Bottom View UNI...

Страница 37: ...nsert journal cross into bearing cup with grease fitting away from shaft Be careful not to disturb needle bearings Insert another bearing cup directly across from first cup and press in as far as poss...

Страница 38: ...Install the flat side of the nut toward the rim for laminated severe duty Ag and airplane tires Torque to 75 lbs ft NOTE Install the chamfered side of the nut toward the inside for steel rims for pneu...

Страница 39: ...r vent plug 16 Hydraulic adapter fitting 17 Male quick coupler 18 5 8 NC x 5 1 2 HHCS GR5 19 5 8 NC hex lock nut 20 1 2 NC x 3 HHCS GR5 21 1 2 NC x 5 1 4 HHCS GR5 22 1 2 NC Flanged lock nut 23 3 8 Fla...

Страница 40: ...ace both break links 2 together and position between front holes of lift arms secure with cap screw 19 spacer sleeve 6 and flanged lock nut 20 NOTE Break links must rest on top of rear spacer sleeve 6...

Страница 41: ...1 4 7 Sleeve 5 8 x 1 x 13 16 8 Top link pin 9 Lower hitch pin 10 Driveline 11 Tailwheel assembly 12 Hydraulic adapter fitting 13 Hydraulic restricter fitting 14 Male quick coupler 15 Hydraulic hose 1...

Страница 42: ...lag pins 4 washers 27 and cap screws 28 5 Attach hydraulic cylinder 7 to left hitch arm 2 and lug on left side of cutter using pins 21 and cotter pins 24 6 Install reducer busing 17 and restricter swi...

Страница 43: ...1 56 x 2 19 x 4 00 12 Klik pin 13 Hydraulic hose 154 14 Hydraulic hose 156 15 Hydraulic cylinder vent plug 16 Hydraulic adapter fitting 17 Hydraulic reducer fitting 18 Hydraulic restricter elbow fitti...

Страница 44: ...here thrown objects could injure people or dam age property If this machine is not equipped with full chain or rubber shielding operation must be stopped when anyone comes within 300 feet 92 m This sh...

Страница 45: ...elding to the front of the frame using cap screws 6 and lock nuts 8 2 Attach rear chain shielding to the rear of the frame using carriage bolts 7 and lock nuts 8 Figure 32 Optional Chain Shielding Ins...

Страница 46: ...ILITY ___ Show customer how to make adjustments Describe the options available for this cutter and explain their purpose ___ Explain importance of lubrication to customer and point out lubrication poi...

Страница 47: ...540 RPM FRONT CV DRIVE ASSEMBLY 56 1000 RPM FRONT CV DRIVE ASSEMBLY 57 DS8 50 REAR FIXED LENGTH DRIVE 58 DS10 50 REAR FIXED LENGTH DRIVE 59 DS8 50 SLIP CLUTCH DRIVE ASSEMBLY 60 DS10 50 DSO8 50 DSO10...

Страница 48: ...48 Parts MAN1168 5 27 2016 MAIN FRAME ASSEMBLY...

Страница 49: ...42960 1 Right flex coupler DSO8 50 or 19 1040673 1 Right flex coupler DS10 50 or 19 1042962 1 Right flex coupler DSO10 50 20 1040672 1 Left flex coupler DS8 50 or 20 1042961 1 Left flex coupler DSO8 5...

Страница 50: ...ng jack 14 1038123 1 Hose 154 x 1 4 NPT x 9 16 JICF 90 15 11975 1 1 2 NPT Vent plug 16 54315 1 1 2 NPTM x 9 16 JICM Adapter 17 66511 1 1 2 NPT Male coupler 18 990 5 8 NC x 5 1 2 HHCS GR5 REF PART QTY...

Страница 51: ...page 60 10 57419 1 540 RPM Drive DS10 50 See page 61 10 57290 1 1000 RPM Drive DS10 50Q See page 61 11 1 Tailwheel assembly See page 64 12 54315 2 1 2 NPTM x 9 16 JICM Adapter 13 1038891 2 1 4 NPTF x...

Страница 52: ...2 19 x 4 00 12 27542 2 7 16 x 11 32 Klik pin 13 1038123 1 Hose 154 x 1 4 NPT x 9 16 JICF 90 14 8669 2 Hose 156 x 1 4 NPTM x 1 4 NPTM 15 11975 1 1 2 NPT Vent plug 16 54315 1 1 2 NPTM x 9 16 JICM Adapt...

Страница 53: ...plug 3 8 4 NSS 1 Gearbox housing 5 1 Cotter pin B 4 x 60 6 57329 1 Castle nut M40 x 1 5 7 1002492 1 Spacer 8 57446 1 Gear 22T M8 540 rpm 8 57447 1 Gear 16T M8 1000 rpm 10 8 M10 x 25 Hex head cap screw...

Страница 54: ...ng cup cone 7 39411 2 Bearing cup cone 8 57338 1 Protective seal 9 1 Cotter pin B 4 x 50 10 57320 2 Snap ring 85 UNI7437 11 57321 1 Snap ring 50 UNI7435 12 57471 1 Shim 45 3 x 2 5 57471 Kit 13 57471 2...

Страница 55: ...Right B 1042962 1 Complete flex coupler drive DSO10 50 Right C 1042961 1 Complete flex coupler drive DSO8 50 DSO10 50 Left 1 1008147 1 2 1 2 Yoke 1 3 4 20 spline 2 NSS 1 1 Single yoke tube assembly 3...

Страница 56: ...y with fitting 5 1033114 1 Yoke shaft CV splined 30 4 6 1009065 2 Drive shield bearing kit 7 18864 1 Danger decal rotating driveline N S 8 1019641 1 Outer shield CV 9 1021315 1 Inner shield CV 10 3334...

Страница 57: ...1 U Joint cross bearing kit 55E 13 1007869 1 Yoke 55R x 1 50 x SP 1 5 23 14 765 1 1 2 NC Lock nut 15 3699 1 1 2 NC x 2 Hex head cap screw GR5 N S Not Shown REF PART QTY DESCRIPTION A 1021101 1 1000 RP...

Страница 58: ...0767 1 Support bearing 6 18864 1 Decal Danger rotating driveline 7 33347 1 Decal Danger guard missing 8 40778 1 Screw 9 1041694 1 Shield asy complete 10 1041695 1 Flange yoke 11 57432 4 Friction disc...

Страница 59: ...ting driveline 13 33347 1 Danger decal Shield missing 14 40778 1 Screw 15 1024776 1 Shield 16 57441 1 Flange yoke 17 57432 4 Friction disc 18 57442 1 Hub 1 3 4 20 I C SN 19 57443 1 Drive plate 20 5725...

Страница 60: ...S5 8 1041678 1 Friction clutch 1 3 4 20 spline 9 40766 2 Bearing ring SC25 10 18864 1 Decal Danger rotating driveline 11 33347 1 Decal Danger guard missing 12 40778 2 Screw 13 1041679 1 Support bearin...

Страница 61: ...anger Rotating driveline 15 33347 1 Decal Danger guard missing 16 40778 2 Screw 17 40767 1 Support bearing 18 40779 1 Grease fitting REF PART QTY DESCRIPTION 20 40758 1 Slide lock collar repair kit 1...

Страница 62: ...1 x 9 16 Sleeve HT 4 28873 2 3 4 x 1 1 2 x 1 4 Washer 5 13759 3 4 NC x 2 1 4 HHCS GR5 6 6100 1 2 NC x 1 1 4 HHCS GR5 7 302207 3 4 NC Flanged lock nut 8 11900 1 2 NC Flanged lock nut REF PART QTY DESC...

Страница 63: ...5 bolt or 16 1017040 1 6 00 x 9 Solid tire rim hardware 5 bolt or 16 1039976 1 25 x 8 14 Severe duty ag tire rim hardware 5 bolt or REF PART QTY DESCRIPTION 16 1039976F 1 25 x 8 14 Severe duty ag tire...

Страница 64: ...9 1386 1 1 NC Hex jam nut 10 34279 1 1 NC Hex lock nut 11 1042245 1 Caster arm Includes items 23 24 12 2370 2 Washer 1 62 x 3 x 18 13 12889 1 O Ring 3 32 x 1 9 16 OD 14 12881 1 Cap washer 15 4674 1 3...

Страница 65: ...in 9 1043015 1 Caster arm Includes items 21 22 10 2370 2 Washer 1 62 x 3 x 18 11 12889 1 O Ring 3 32 x 1 9 16 OD 12 12881 1 Cap washer 13 4674 1 3 8 x 2 Spirol pin 14 990 5 8 NC x 5 1 2 HHCS GR5 15 19...

Страница 66: ...14478 3 8 NC x 4 HHCS GR5 5 6697 3 8 NC x 1 Carriage bolt GR5 6 14350 3 8 NC Flange lock nut HHCS Hex Head Cap Screw Standard Hardware Obtain Locally REF PART QTY DESCRIPTION 1 1042264 2 Front rubber...

Страница 67: ...NC x 4 HHCS GR5 7 6697 3 8 NC x 1 Carriage bolt GR5 8 14350 3 8 NC Flange lock nut A R As Required HHCS Hex Head Cap Screw Standard Hardware Obtain Locally REF PART QTY DESCRIPTION 1 1043022 2 Front c...

Страница 68: ...gment 4 1 1 Segment 5 1 3 4 Segment REF PART QTY DESCRIPTION A 8811 1 Crossbar puller complete 1 19914 2 Crossbar puller clevis 2 3097 4 5 8 NC x 4 1 2 HHCS GR5 3 230 4 5 8 NC Hex nut 4 24879 1 Crossb...

Страница 69: ...1 2 467 634 722 979 1020 1383 Diameter Thread Pitch Millimeters Wrench Size Coarse Thread Fine Thread Diameter Thread Pitch Millimeters Marking on Head Marking on Head Metric 8 8 Metric 10 9 Metric 8...

Страница 70: ...HHCS Hex Head Cap Screw HT Heat Treated JIC Joint Industry Council 37 Degree Flare LH Left Hand LT Left m Meter mm Millimeter M Male MPa Mega Pascal N Newton NC National Coarse NF National Fine NPSM...

Страница 71: ...Category 2 3 Quick Hitches 16 Category 2 Standard Hitch 15 Category 3 Standard Hitch 16 Tractor Adjustments 15 Pull Type 14 Hydraulic Connection 15 Interference Check 15 Turning Limits for CV Driveli...

Страница 72: ...tion under this Warranty is limited to at WOODS option the repair or replacement free of charge of the product if WOODS in its sole discretion deems it to be defective or in noncompliance with this Wa...

Страница 73: ...nce with this Warranty The product must be returned to WOODS with proof of purchase within thirty 30 days after such defect or noncompliance is discovered or should have been discovered routed through...

Страница 74: ...ames or service marks not owned by Woods Equipment Company that appear in this manual are the property of their respec tive companies or mark holders Specifications subject to change without notice WO...

Отзывы: