Wood master CleanFire 300 Скачать руководство пользователя страница 10

6

CLEANFIRE OUTDOOR FURNACE • OWNER'S MANUAL

118

5800033

198

224

296

5000015

418

388

6593

1330

118

5926

1" Central

PEX

956

534

556

*Parts and accessories sold separately.

 Pump size may vary. For illustration purposes only.

NOTE

Grounding Rod Kit (p/n 6593) must 

be installed with every furnace.

SUPPLY

RETURN

Qty    p/n       Description

2 5800033 0015e3 Pump 

4

118

Close Nipple, 3/4" 

2

224

Isolation Flange Kits, 3/4" 

2

198

Ball Valve, 3/4" 

2

296

Swing Check Valve, 3/4" 

2

536

Nipple, 3/4" x 7"

4

388

Hex Bushing, 1-1/4" x 3/4" 

4

5926

Crimp Ring, 1" 

Stainless Steel Clamp

2 - Pump Parts List*

2

556

Power Supply Cord, 32"

4

1330

MPT to PEX, 3/4" x 1" 

1

11157

Nipple, 1-1/4" x 3" 

2 5000015 Nipple, 1-1/4" x 2-1/2" 

2 5000016 90° Elbow, 1-1/4" FPT 

1

6593

Grounding Rod Kit 

1

409

Close Nipple, 1-1/4"

2

418

Tee, 1-1/4"

*Parts and accessories sold separately.

 Pump size may vary.

 For illustration purposes only.

NOTE

Grounding Rod Kit (p/n 6593) must 

be installed with every furnace.

5800033

198

118

388

536

296

556

6593

1330

5926

1" Central

PEX

SUPPLY

224

Qty    p/n       Description

1 5800033 0015e3 Pump 

2

118

Close Nipple, 3/4" 

1

536

Brass Nipple, 3/4"  x 7"

1

198

Ball Valve, 3/4" 

1

224

Isolation Flange Kit, 3/4"

1

296

Swing Check Valve, 3/4" 

2

388

Hex Bushing, 1-1/4" x 3/4" 

2

5926

Crimp Ring, 1" 

Stainless Steel Clamp

1 - Pump Parts List*

1

556

Power Supply Cord, 32"

2

1330

MPT to PEX, 3/4" x 1" 

1

6593

Grounding Rod Kit 

RETURN

*Pump Extension Kit (p/n 2500164) required.

CleanFire 300/500 Models – 2-Pump Configuration*

CleanFire 300/500 Models – 1-Pump Configuration

Содержание CleanFire 300

Страница 1: ... liquids in the vicinity of this or any other appliance WHAT TO DO IF YOU SMELL GAS Do not try to light any appliance Do not touch any electrical switch Immediately call your gas supplier Follow the supplier s instructions If you cannot reach your gas supplier call the fire department Installation and service must be performed by a qualified installer service agency or the gas supplier OUTDOOR WOO...

Страница 2: ...ut Capacity 150 000 Btu hr Range 0 to 148 625 Btu hr Water Capacity 150 gal Weight 1 460 lbs Performance is a product of the combustion rate combustion efficiency and heat exchange efficiency with a single fuel load without refueling Results vary based on wood species wood quality wood quantity and moisture content Efficiencies are determined under the same test conditions using higher heating val...

Страница 3: ...o Submit Water Sample 13 System Maintenance 14 Water Test Kits and Test Results 14 Post Heating Season Maintenance 15 Flushing The System 15 Wood Selection and Preparation 17 Operating Instructions 18 Firestar Combustion Controller 18 How the Cleanfire Works 18 Cold Start Firing 20 Adding Heat Load 22 Ash Removal Frequency 22 Adding Wood 22 Maintenance Schedule 27 Control Locations 28 Routine Main...

Страница 4: ...ate excessive smoke which is wasted fuel Split Stack Cover and Store Video http www youtube com watch v yo1 Zrh11s EPA offers four simple steps to properly dry firewood before using in a wood burning stove or fireplace Wet wood can create excessive smoke which is wasted fuel Burning dry seasoned firewood with a moisture content of 20 or less can save money and help reduce harmful air pollution Res...

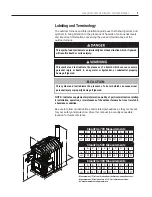
Страница 5: ...mage if ignored NOTE Indicates supplementary information worthy of particular attention relating to installation operation or maintenance of the outdoor furnace but is not related to a hazardous condition Be sure to follow all instructions and related precautions as they are meant for your safety and protection Store this manual in a readily accessible location for future reference Measurement G i...

Страница 6: ... Be sure the outdoor furnace is filled with water before firing Never fire the outdoor furnace when the water level is more than 1 2 5 cm below the FULL mark on the sight gauge MolyArmor 350 must be added before the initial fill see Water Quality and Maintenance Disconnect the electrical power to the outdoor furnace before replacing an electrical component Do not attempt service inside the electri...

Страница 7: ...micals or fluids to start the fire Use kindling or gas fired wood ignition option to start an initial fire NOTE The sight gauge valve should always be closed except when checking water level Water will automatically drain from the sight gauge tube when the valve is closed Remember that this type of valve requires only 1 4 turn to open or close This heater is designed to burn natural wood only DO N...

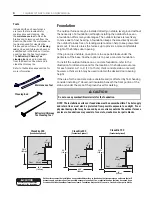
Страница 8: ...r more information Foundation The outdoor furnace may be installed directly on stable level ground without the necessity of a foundation although installing the outdoor furnace on a foundation offers many advantages The outdoor furnace is less likely to move due to frost heaving A foundation keeps the area directly around the outdoor furnace free of standing water and can help to keep unwanted pes...

Страница 9: ... 3 4 2 198 Ball Valve 3 4 2 296 Swing Check Valve 3 4 2 274 90 Street Elbow 3 4 4 5926 Crimp Ring 1 Stainless Steel Clamp 3 Pump Parts List 3 556 Power Supply Cord 32 1 582 6 Outlet Converter 4 1330 MPT to PEX 3 4 x 1 1 5000015 Nipple 1 1 4 x 2 1 2 3 536 Nipple 3 4 x 7 1 6593 Grounding Rod Kit 2 409 Close Nipple 1 1 4 1 411 90 Street Elbow 1 1 4 2 5643 Brass Clamp 1 1 4 1 410 Ball Valve 1 1 4 1 22...

Страница 10: ... 2 5000015 Nipple 1 1 4 x 2 1 2 2 5000016 90 Elbow 1 1 4 FPT 1 6593 Grounding Rod Kit 1 409 Close Nipple 1 1 4 2 418 Tee 1 1 4 Parts and accessories sold separately Pump size may vary For illustration purposes only NOTE Grounding Rod Kit p n 6593 must be installed with every furnace 5800033 198 118 388 536 296 556 6593 1330 5926 1 Central PEX SUPPLY 224 Qty p n Description 1 5800033 0015e3 Pump 2 ...

Страница 11: ...lamp Tighten all hardware securely NOTE A hole for the ground terminal has been pre punched in the outdoor furnace base near the pumps Furnace Installation Connecting to Your Existing System A common installation is to connect the outdoor furnace to an existing water heater and then to an existing forced air system A water to air heat exchanger is mounted in the plenum or duct work of the existing...

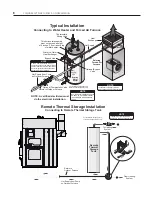
Страница 12: ... F 85 C minimum NOTE Installer must comply with all applicable codes and regulations NOTE Any electrical installation should be done by a qualified installer in accordance with applicable codes NOTE A certified electrician must do the electrical installation Typical Installation Connecting to Water Heater and Forced Air Furnace Hot Supply from Pump on Outdoor Furnace Return to Outdoor Furnace Opti...

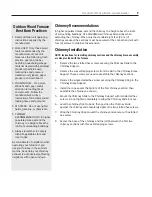
Страница 13: ...ition the Chimney Slide against the chimney and completely tighten the two slotted hex screws 7 Wrap the Chimney Strap around the chimney and secure with a slotted hex screw 8 Secure the base of the chimney and the joint between the first two chimney sections with three self tapping screws Outdoor Wood Furnace Best Burn Practices 1 Read and follow all operating instructions supplied by the manufac...

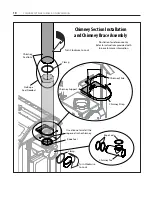
Страница 14: ...ion and Chimney Brace Assembly Turn Clockwise to Lock Clamp Clamp No Rope Seal Needed Rope Seal Use silicone to install the rope seal in the chimney Illustration for reference only Refer to instructions provided with furnace for more information Chimney Slide Chimney Support Chimney Strap Rope Seal Chimney Tee ...

Страница 15: ...n three or more sections are used When adding sections of chimney make sure that there is nothing within the fall zone of the chimney that could be damaged If something is located within the fall zone and cannot be removed guy wires or braces may need to be installed to prevent a falling chimney from causing damage NOTE If more than three 4 foot 1 2 m sections of chimney are used a support e g a p...

Страница 16: ...smosis or deionized water to prevent bacterial growth and minimize minerals in the system Bacterial growth is likely to occur with low antifreeze concentrations and can cause corrosion in the furnace water jacket and or clogging of heat exchangers To confirm the antifreeze solution is adequate and to kill bacteria immediately heat the system up to 185 F allow the pumps to circulate for at least 24...

Страница 17: ...at your water sample information is accurate and that you submit your samples on a timely basis as required by the warranty for your stainless steel outdoor furnace Failure to do so will result in a one year warranty Water Sample Kit Your owner s packet contains a Water Sample Kit for submitting an initial water test Additional Water Samples Kits are available from your WoodMaster dealer When to S...

Страница 18: ...cy Test kits should be stored in a dry area at room temperature to obtain maximum accuracy over a longer period of time Biological contamination can occur if the furnace is not heated up to 185 F immediately after filling it with inhibitor and water as directed NOTE ANY time water is added to the system it is extremely important to bring the water temperature up to operating temperature 185 F as s...

Страница 19: ... chimney to keep rain from entering the outdoor furnace Clean and oil the chimney flue to the firebox Flushing the System If the system water is brown or orange it is an indication that the corrosion inhibitor level has not been maintained correctly and corrosion is present in the water jacket Sludge Conditioner p n 166 or 1660 can be used by circulating the recommended amount through the furnace ...

Страница 20: ...ely after filling the system can allow bacteria present in the water to multiply which may increase the potential for corrosion in the system 6 Insulate the area using a mat of fiberglass insulation 7 Install the inspection panel and secure with self tapping screws Draining Treated System Water MolyArmor 350 is composed of common materials Molybdenum compounds characterized as nontoxic in US Publi...

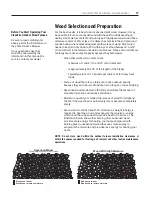
Страница 21: ... the amount of creosote formation and reduces emissions Maintain a quantity of smaller drier pieces of wood for relighting the fire if the wood load is burned very low or becomes completely empty Green wood contains about 50 moisture by weight Energy is required to heat the wood and evaporate the moisture energy which could have been used to provide heat for the home The illustration below shows t...

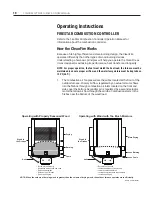
Страница 22: ...box located at the front of the outdoor furnace Primary air flow regulated by an actuator motor flows into the firebox through combustion air inlets located on the front and sides near the bottom Secondary air is regulated by a second actuator motor that allow air flow through the air tube Combustion starts in the firebox near the bottom of the wood load Operating with Properly Seasoned Wood Ash C...

Страница 23: ...mely high temperatures aid in complete combustion The chimney creates a draft negative pressure which helps to draw exhaust gases from the furnace 3 Heat is transferred to the water from the hot gases as they move through the firebox the Reaction Chamber and the heat exchanger F lo w Secondary Air Fusion Combustor 5 12 7 cm Max Coals Ash Ash Reaction Chamber Primary Combustion Air Inlets CORRECT P...

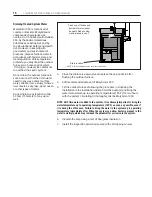
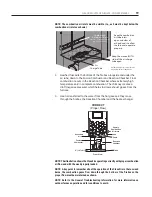
Страница 24: ... expand when heated 1 Disconnect the heat load draw by turning off the pump s 2 Turn the controller on by pressing the Power button 3 CleanFire 700 500 only Lift and push the bypass door handle toward the back of the outdoor furnace to open the bypass door then unlatch and open the firebox door NOTE The alarm is a reminder that the bypass door is open During a cold start it will continue to sound ...

Страница 25: ...t on the front of the outdoor furnace will result and it could cause a dangerous build up of gas in the firebox Cold Start Initial Fire Up Kindling Approximately 15 38 cm Paper 2019 Central Boiler 6 Allow the wood load to burn until the kindling turns to coals leave the bypass door open then add enough kindling again to fill the firebox about 1 4 full On top of the kindling add 8 10 inches 20 25 c...

Страница 26: ...t off allowing the furnace to cycle to the idle mode again NOTE The outdoor furnace will not operate satisfactorily if the heat load is higher than the output capacity of the outdoor furnace 3 At this point there should be glowing coals established in the bottom of the firebox The firebox can be filled with dry seasoned split wood Ash Removal Frequency During the first week of operation check the ...

Страница 27: ...bed to deepen and become compacted This can result in poor heat output and combustion because of restricted airflow Compacted ash will not fall into the Reaction Chamber it will need to be removed with a shovel 4 Some ash in the bottom of the firebox but not alongside the charge tube is necessary for the proper operation of the outdoor furnace Ash acts as an insulator keeping the glowing coals in ...

Страница 28: ...primary elbow The operating procedures will maintain good air flow and very efficient combustion DAILY Run the cleaning rod through the ash and coal bed and along both sides of the air tube as shown on previous page to keep ash loose Use care near the refractory This will allow excess ash to flow down into the Reaction Chamber If the coal bed remaining wood is more than 4 inches deep it may be nec...

Страница 29: ...annel as needed It is best not to allow the Reaction Chamber to fill to a depth over 1 2 full Inspect and clean the chimney tee as needed to prevent restriction Clean and inspect the spark arrestor if one is being used as needed Review the operation and maintenance and refueling tips videos available on the Online Support Center NOTE If the furnace has been operated without adequate airflow and ef...

Страница 30: ...irebox door Do not use the firebox door to ram wood into the outdoor furnace Do not operate the outdoor furnace with the firebox door open Combustion in the firebox cannot be controlled if the firebox door is left open or unlatched If the firebox door is left open an uncontrolled burn will result To return to a controlled burn close and latch the firebox door 11 CleanFire 700 500 only Wait for 15 ...

Страница 31: ...al for your application can be determined D When new after three months then every six months thereafter F Frequency will vary depending on heat load requirements type of wood used and the moisture content of the wood E Refer to Testing Treated Water in the Outdoor Furnace Installation and Initial Water Treatment Guide A C A C C C D Inspect and clean the combustion fan and inlet screen 10 Oil the ...

Страница 32: ...ntive maintenance schedule are intended to serve as a guideline Actual intervals between inspections and maintenance may vary depending on a number of factors including your heat load requirements type of wood used and outdoor temperatures NOTE Proper maintenance of the firebox Reaction Chamber Fusion Combustor heat exchanger chimney transition box and chimney tee are essential for the outdoor fur...

Страница 33: ... the risk of a chimney fire The chimney and chimney connector must be clean and in good condition MAINTENANCE SECTIONS Refer to the Preventive Maintenance Schedule for the recommended intervals with which to perform these maintenance items Section 1 Water Level Open the sight gauge valve The sight gauge tube will fill to indicate the level of water in the outdoor furnace Be sure to close the sight...

Страница 34: ...the cover to prevent air from leaking out Leaking air caused by an improperly fitting cover can cause corrosion Chimney Inspection Cover Band Clamp 2019 Central Boiler Section 6 Heat Exchangers NOTE Inspect the heat exchangers weekly and clean as needed until the interval for your application can be determined Frequency will vary depending on a number of factors including heat load requirements ty...

Страница 35: ...off to the side when opening it CAUTION Open the heat exchanger door slowly and stand off to the side when opening it Inspect door seal Inspect door insulation 5 Inspect the door insulation and door seal Repair replace any defective seal or insulation 6 Inspect the door frame edge for any buildup of creosote or ash Use the maintenance tool to clean the door edges CAUTION Always wear the appropriat...

Страница 36: ...en down to the bottom between each folder of the exchanger NOTE If there is creosote buildup in the heat exchanger it is caused by operating the furnace incorrectly It is important to follow the recommended operation and maintenance procedures see Operating Instructions Angle the cleaning rod up to clean from the top of the exchangers and then down to the bottom in between each fold 9 Using the ma...

Страница 37: ...e maintenance tool to pull the ash to the front of the furnace Take care when pulling ash from each side of the Combustor not to move the refractory sections 4 Use a small shovel to remove all of the ash and deposits from the Reaction Chamber Take care not to damage the temperature sensor You can also clean ash from the back of the furnace by opening the heat exchanger door Fusion Combustor Cleani...

Страница 38: ... and to the seams 2 If signs of corrosion are present contact your dealer Refer to the section Corrosion is Present in the Troubleshooting section 3 A thin tar like creosote layer may form on the firebox walls and migrate toward the bottom of the firebox where it could collect into a thicker layer Normally this layer will burn up as it collects on the bottom If it migrates to the bottom of the fir...

Страница 39: ...ir tube holes and buildup that may collect around the combustion air tubes themselves The side combustion air tubes can be removed if necessary To remove lift the end of the tube closest to the back of the firebox up off of the retaining pin then in and toward the back of the firebox Install by reversing this procedure NOTE If there is a large amount of buildup on the exterior of the combustion ai...

Страница 40: ...lowing procedure 4 If the decal on the fan housing indicates to oil the bearings remove the bolts securing the combustion fan and remove the combustion fan Hold the fan so the oil locations are upright then apply 10 drops of SAE 20 non detergent oil e g 3 IN ONE Oil in each location as shown Install the combustion fan and secure with bolts NOTE Hold fan so the oil locations are upright to ensure t...

Страница 41: ...ed 2 Inspect each refractory module for damage Small cracks and chips in the refractory are normal If large pieces of the refractory modules are missing contact your WoodMaster dealer 3 Install the air tube making sure the alignment pin is seated in the alignment hole in the refractory modules Section 12 Primary Air Elbow 1 Disconnect the electrical power to the outdoor furnace at the main power s...

Страница 42: ...blockage or obstructions in the air tube a screwdriver and a shop vac may be useful 7 Install the primary air elbow over the air tube then tighten the hose clamp 8 Connect the actuator motor wiring harness 9 Close and secure the airbox door Install the outer airbox cover and secure with screws Do not connect power or operate the outdoor furnace with the outer airbox cover removed The outer airbox ...

Страница 43: ...ing CAUTION Always wear the appropriate personal protective gear e g protective gloves clothes dust mask etc when cleaning ash from the firebox and the Reaction Chamber etc CAUTION Clear the entire area surrounding the outdoor furnace of any combustible materials before performing these cleaning procedures Be careful not to spill any coals or ash Place coals and ash in a metal container with a tig...

Страница 44: ...Door Frame 1 3 2 4 7 Combustion Air Inlets 5 6 7 2 Firebox For illustration purposes Your furnace may have different configuration Door Frame Open the firebox door then scrape the face and surface area of the door frame to remove any deposits Firebox See Maintenance Section 8 Firebox ChimneyTee See Maintenance Section 3 Chimney Tee Heat Exchangers See Maintenance Section 6 Heat Exchangers Reaction...

Страница 45: ...JUSTMENT If the firebox door seal has been replaced and it is not sealing properly the firebox door may need to be adjusted to close more tightly When adjusting the firebox door make sure it is not adjusted too tightly as damage to the firebox door frame or door seal may result 1 To tighten the hinges loosen the inner adjustment nut and turn the outer nut in slightly then tighten the inner adjustm...

Страница 46: ...e groove pressing it firmly into the bead of silicone sealant Make sure the seal is not stretched as it is pressed into the corners Force the seal out to fill in the corners as shown 2015 Central Boiler 5 Scrape the face and surface area of the door frame to remove any deposits 6 Close the firebox door Make sure that pressure is felt as the latch is closed to ensure the seal is tight with the door...

Страница 47: ...l rope and clean any remaining silicone adhesive from the groove Any residue left in the groove will interfere with the new seal 5 Apply a liberal amount of silicone sealant into the entire Reaction Chamber door seal groove 6 Starting at the center of the hinge side of the Reaction Chamber door insert the new door seal rope into the groove pressing it firmly into the bead of silicone sealant Make ...

Страница 48: ...raper remove the heat exchanger door seal rope and clean any remaining silicone adhesive from the groove Any residue left in the groove will interfere with the new seal 5 Apply a liberal amount of silicone sealant into the entire heat exchanger door seal groove 6 Starting at the center of the hinge side of the heat exchanger door insert the new door seal rope into the groove pressing it firmly int...

Страница 49: ...airbox access cover then open the airbox door 3 Disconnect the actuator motor harness and disconnect the fan harness 4 To test for a faulty component connect one component at a time e g start with one of the actuator motors then connect power to the outdoor furnace If the circuit breaker trips the component is likely faulty If not disconnect power to the outdoor furnace and repeat the procedure un...

Страница 50: ...al 2 Remove the airbox access cover then open the airbox door Using a scraper or similar tool scrape off the existing seal from the airbox 3 Clean off any remaining adhesive residue with alcohol or a suitable solvent 4 Measure and cut replacement seal Seal 5 Remove the adhesive backing from the replacement seal and carefully apply the seal to the airbox as shown making sure there are no gaps 6 Clo...

Страница 51: ...ing it toward the back of the outdoor furnace 2 Remove the rope gasket then remove the existing refractory modules 3 Ensure the area where the new refractory modules will be installed is clean and free of all debris Install the new refractory modules then install a new rope gasket on top of the refractory modules 4 Install the new air tube by placing it in the opening at the front of the outdoor f...

Страница 52: ...emove the pump access cover 3 Disconnect the thermocouple connector then remove the mastic tape from the thermocouple 4 Remove the thermocouple 5 Install the new thermocouple until the stop collar contacts the thermocouple tube Mastic Tape NOTE Pump and components removed for clarity 6 Secure the thermocouple with the mastic tape then connect the thermocouple connector 7 Install the pump access co...

Страница 53: ...move all wood coals and ash from the firebox and allow the firebox to cool thoroughly before replacing the heat exchanger door insulation 3 Remove the heat exchanger access cover from the back of the furnace 4 Carefully undo both latches on the heat exchanger door then slowly open the door making sure to stand clear of the opening CAUTION Open the heat exchanger door slowly and stand off to the si...

Страница 54: ...ger door NOTE The first few times the heat exchanger door is opened and closed after installing new insulation it could seem more difficult to secure the latches This is normal and once the insulation settles securing the latches will be easier 16 Install the heat exchanger access cover HEAT EXCHANGER ACCESS COVER INSULATION NOTE Be sure to check the temperature range for the spray adhesive It may...

Страница 55: ...ox and allow the firebox to cool thoroughly before working inside the firebox Combustion AirTube 1 Lift the end of the tube closest to the back of the firebox up off of the retaining pin then in and toward the back of the firebox Install by reversing this procedure NOTE If there is a large amount of buildup on the exterior of the combustion air tube it may be necessary to first remove the buildup ...

Страница 56: ...y ash or deposits from behind the air channel in the wall of the firebox Remove acorn nuts to remove front air channel For illustration purposes Your furnace may have different configuration 2 Install the new air channel Apply a high temperature anti seize compound to the stud threads then secure with the acorn nuts and tighten securely ...

Страница 57: ...Chamber full of ash The Reaction Chamber is where final combustion occurs It is important that the Reaction Chamber remain unobstructed to allow final combustion to occur It is not designed to be an ash collection area although over time ash will gradually accumulate in the Reaction Chamber If ash builds up in the Reaction Chamber to a level that obstructs flow the performance of the outdoor furna...

Страница 58: ...sed by operating the furnace incorrectly It is important to follow the recommended operation and maintenance procedures see Adding Wood section Is there creosote and or ash inside the airbox Creosote ash or even coals in the airbox is an indication that the outdoor furnace has not been maintained and or operated properly Especially important to the operation and efficiency of the outdoor furnace i...

Страница 59: ...ter If the display on the controller indicates Low Water the system senses a low water condition Check the water level at the sight gauge and if necessary add water according to the Water Quality and Maintenance section If adding water does not correct the problem contact your WoodMaster dealer NOTE If water needs to be added it is very important to identify the cause of water loss and correct imm...

Страница 60: ...y cleaned to ensure nothing obstructsexhaustflowthroughthesystem Firethefurnaceandallowittoreachnormaloperating temperature before performing the test Drill a hole in the chimney inspection cover then with the outdoor furnace and chimney at normal operating temperature use a manometer to check draft If flue draft is less than 0 05 in WC 12 45 Pa add more chimney sections After the test fill the ho...

Страница 61: ...ting If not disconnect power to the pump Close valves at the pump Disassemble the pump and try to turn the pump shaft If the shaft is stuck replace the pump cartridge Replace only the cartridge whenever possible If necessary replace the pump Follow instructions supplied with the pump 5 Air in system Check for air in the water lines or heat exchangers If you hear a gurgling sound in a heat exchange...

Страница 62: ...iant in floor heat Bringing a cold concrete slab up to temperature the first time will take a considerable amount of time and wood once warm wood consumption will be reduced if the concrete slab and building are insulated properly 14 Heat load too large Re evaluate the system and match heat load to the outdoor furnace D SMOKE COMING FROM BETWEEN FIREBOX DOOR AND FRONT OF THE DOOR FRAME 1 Door seal...

Страница 63: ...is not circulating Check to make sure the pump is operating and water is circulating continuously through the supply and return lines to keep water temperature uniform in the outdoor furnace 4 Circulation valve s closed Be sure the proper valves in the system are open to allow circulation 5 Pulse set to run too long and or too often in a low heat draw situation Increase the time between idle pulse...

Страница 64: ...l etc will require high wood consumption 2 Excessive heat loss See items 6 10 of Building is Losing Temperature 3 Supply and return line heat loss If not using ThermoPEX supply and return lines buried in a wet low lying area may cause a large heat loss that will greatly increase wood consumption 4 High heat demand Concrete slabs with radiant heat that are poorly insulated or are exposed to water o...

Страница 65: ...t your chimney meets the recommendations in this owner s manual and by loading the firebox to match your heat load Once the water content of the wood has evaporated the emissions become very transparent 1 Too much ash in firebox Refer to Routine Maintenance for ash removal I CORROSION IS PRESENT CALL DEALER NOTE To reduce condensation in the firebox it is not recommended to set the temperature bel...

Страница 66: ...ez PAS de déchets d essence l huile de vidange ni d autres liquides ou matériaux inflammables NE faites PAS fonctionner la chaudière avec la porte de chargement du combustible ou celle d enlèvement des cendres ouverte NE stockez PAS de carburant ou autres matériaux combustibles à l intérieur du périmètre de sécurité indiqué Inspectez et nettoyez périodiquement les carneaux et la cheminée Pour des ...

Страница 67: ...LOR SIZE 4 11 9 10 18GA Secondary Air Actuator DESTINATION 1 2 3 5 6 7 8 12 GRN WHT 18GA 18GA BLK WHT 18GA 18GA 16GA 16GA 18GA 18GA 18GA 16GA 16GA GRN YEL GRN WHT BLK RED VIO Secondary Air Actuator Secondary Air Actuator Secondary Air Actuator Primary Air Actuator Primary Air Actuator Primary Air Actuator Primary Air Actuator RED WHT BLU WHT BLK BLU 120 VAC Combustion Fan Earth Ground 120 VAC Neut...

Страница 68: ...SAMPLE INFORMATION CLEANFIRE MODELS FROM WOODMASTER INC ATTN WATER QUALITY DEPARTMENT 20502 160th Street Greenbush MN 56726 NOTE It is your responsibility as owner to ensure that your water sample information is accurate and that you submit your samples on a timely basis as required by the warranty for your stainless steel outdoor furnace Failure to do so will result in a one year warranty WATER S...

Страница 69: ...65 CLEANFIRE OUTDOOR FURNACE OWNER S MANUAL NOTES ...

Страница 70: ...66 CLEANFIRE OUTDOOR FURNACE OWNER S MANUAL NOTES ...

Страница 71: ...67 CLEANFIRE OUTDOOR FURNACE OWNER S MANUAL NOTES ...

Страница 72: ...ls combustion air tubes turbulators chimney sections and chimney tee This limited warranty covers the part only service calls mileage and labor to diagnose the problem and install a new part are not covered EXCLUSIONS AND LIMITATIONS This Limited Warranty applies only to WoodMaster CleanFire Titanium Series outdoor furnaces This limited warranty covers only those defects or corrosion failures that...

Отзывы: