background image

20

WARNING: 

Never use strong cleaning agents such as acetone or benzene!

These substances can damage the surface and the anti-reflex coating!

Cleaning

Cabinet

:

Clean the cabinet by gently wiping it with a soft, lint free cloth. 

Lenses:

Clean the lenses by gently wiping with a soft, lint free cloth (do not use a paper tissue!). Clean by 

breathing on the lens to create moisture then wipe with a lint free cloth (If need be, use a special 
optical cleaner only!).

MAINTENANCE

The firmware (software) of your Visualizer (including the o

) can easily be upgraded to the 

latest version. The firmware update can be done via USB, Ethernet (LAN) or USB stick.
Firmware update files can be downloaded free of charge at 

www.wolfvision.com

Updates via USB or Ethernet/LAN can be made with the vSolution Link Software by WolfVision.
Updates via USB stick need the firmware file to be placed in the folder root:\WOLFVISION\
(default folder can be changed in the on-screen menu  Advanced Settings / USB Settings).
Alternatively, the firmware update can be started in the on-screen menu (Advanced Settings / Device Info), 
provided the Visualizer is connected to the Internet and a nameserver IP address is assigned (Advanced 
Settings / Ethernet Settings). By selecting the line ”Check For FW Update”, the Visualizer checks the 
WolfVision server for newer firmware files. Follow the on-screen instructions to start the update process.

n-screen HELP


(Support)

.

Firmware Upgrades

If you want to work with more than one Visualizer in the same room, the units should be set to different 
infrared codes, in order to control them all individually.
The IR code of the Visualizer has to match the code of the remote control.

To change the IR code, enter the 

"Advanced Settings / Miscellaneous Settings" and 

set  the  "IR  Code"  to A,  B,  C  or  D  (code A  is  default).  To  change  the  IR code  on  the  remote  control, 
simultaneously  press 

PRESET  1, 


PRESET  2

and

  ZOOM  TELE


ress 

PRESET 1, PRESET 2 

and

 ZOOM WIDE


on-screen menu, go to 


(#26)


(#33)

.


Each  time  this  key 

combination is used, the code switches from A to B, C, D ... A ...in the given order. 
For resetting the remote control to code A, simultaneously p

.

The LED shows the selected code (it flashes one time for code A, two times for code B, three times for code 
C and four times for code D).

Different IR Codes

Please note that an infrared remote control can only be used up to a certain distance from the unit. Objects 
situated  between  the  Visualizer  and  the  infrared  remote  control,  and  weak  batteries,  interfere  with 
reception.

Infrared Remote Control

CAUTION

Risk of explosion if batteries are replaced by an incorrect type.
Dispose of used batteries according to the instructions. Recycle the batteries.

ATTENTION

Il y a danger d‘explosion s‘il y a remplacement incorrect de la batterie. Remplacer uniquement avec une 
batterie du même type ou d‘un type équilanent recommandé par le constructeur.
Mettre au rebut les batteries usagées conformément aux instructions du fabricant. Recycler les batteries.

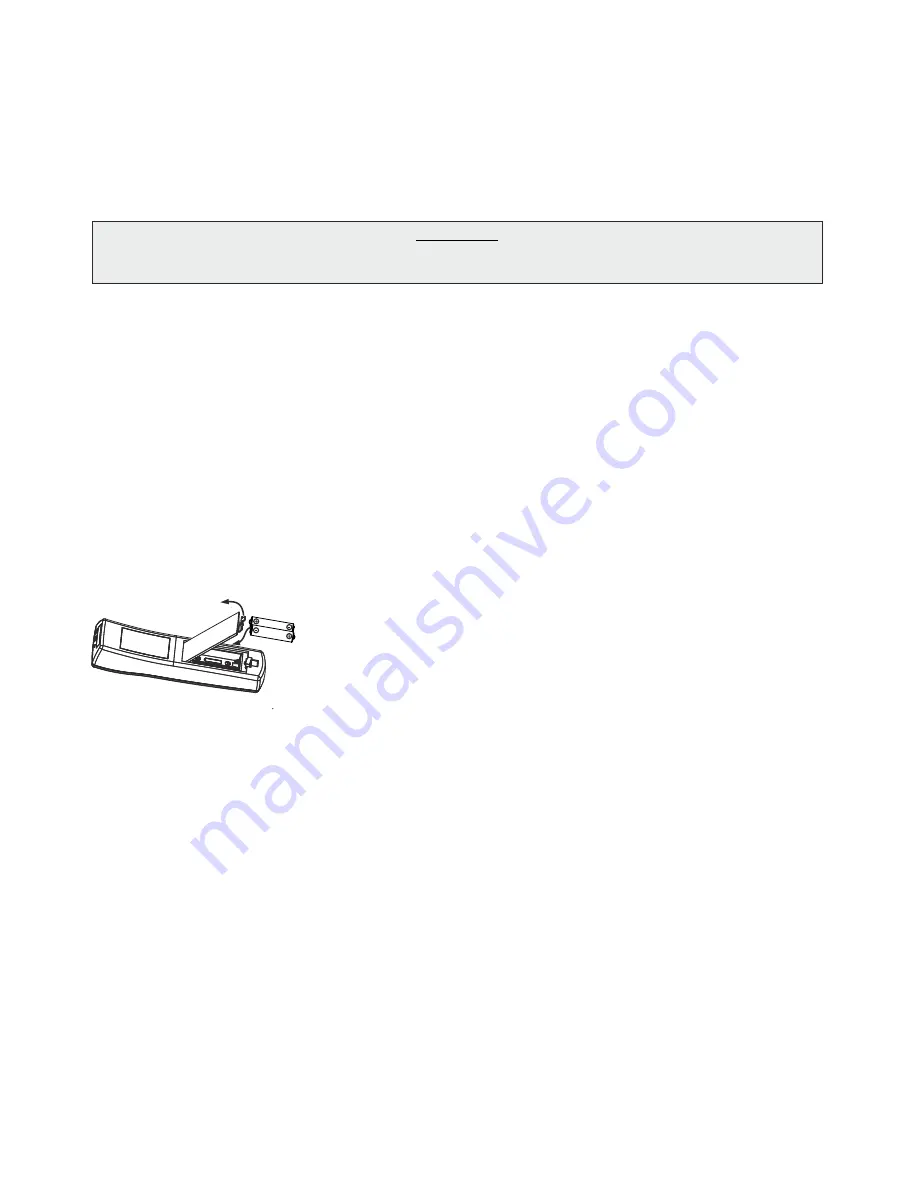
If the Visualizer can only be controlled from a close distance, you may 
need to change the batteries.
If the Visualizer cannot be controlled at all with the infrared remote control, 
you may need to check the code or to change the batteries.
Open the cover on the back of the remote control and replace both 1.5V 
AAA (Code LR03) batteries with new ones of the same type.

Check the polarity of the batteries!

Содержание vz-8plus 4

Страница 1: ...Check out our internet homepage for additional information www wolfvision com support BEDIENUNGSANLEITUNG BEDIENUNGSANLEITUNG INSTRUCTIONS INSTRUCTIONS VZ 8plus4 VZ 8plus4 ENGLISH DEUTSCH R ...

Страница 2: ...talling the Visualizer in environments where there is radiation This could cause monitor image distortion or damage the image sensor of the camera Do not pull the plug from the power socket with wet hands If the Visualizer is not used for a long time disconnect it from mains The external power supply has to be approved by CSA or UL in accordance to CSA 22 2 60950 or UL1950 The outputs have to be L...

Страница 3: ... Directive electrical equipment Inspections tests and evaluation are according to UL60950 CSA22 22 60950 Inspections tests and evaluation are according to the CB Scheme Inspections tests and evaluation are according to the PCT Scheme Marks on the unit Approval Worldwide Patents Copyright Information Copyright by WolfVision All rights reserved WolfVision Wofu Vision and are registered trademarks of...

Страница 4: ...ote control see pages 4 5 and 20 5 POWER key 4 LIGHT key and Light indication LED see page 6 and Power indication LED see page 6 6 Preview monitor see page 8 7 Connectors on the back of the unit as shown on next page 8 Close up lens for camera see page 8 9 IR receiver camera head 10 Light source 11 Zoom wheel see page 6 12 Camera keys see page 6 13 Pull pad to lift the arm up down see page 7 3 4 ...

Страница 5: ...ee page 19 15 HDMI OUTput see page 15 16 RGB OUTput 15pin see pages 15 17 HDMI INput see page 16 18 19 USB port to Host to computer see page 17 20 Power connection 12V DC 21 LAN port see pages 17 and 18 for external HDMI signals USB port to Client to peripheral devices for external storage units see pages 11 and 17 10 100 BASE T TX with PoE functionality ...

Страница 6: ...picture see page 9 31 LASER POINTER indication LED Indicates active Laser LED 32 LASER POINTER key Important Do not stare directly into the laser beam This is hazardous for your eyes 33 ZOOM keys To zoom in TELE and to zoom out WIDE 34 USB key For displaying pictures of the USB memory see page 11 35 EXT key Shows the signal of the external input use the VZ key to display the live image again see p...

Страница 7: ... more than 2 seconds For recalling the preset press the PRESETkey quickly see page 9 When on screen menu is activated it works as select key see page 14 43 FREEZE key menu select key left Freezes the current image The FREEZE light indicates if the FREEZE mode is activated see page 9 When on screen menu is activated it works as select key see page 14 see page 9 see page 14 see page 9 see page 14 Ke...

Страница 8: ... are middle zoom size approx image width of 14 cm autofocus on auto iris on As soon as the Power Indication LED stays green illuminated you can start working with the Visualizer The behavior of the unit once the power has been supplied or after the POWER key has been pressed can be changed in the unit s on screen menu see page 14 Setting Up the Visualizer 1 Connect the power pack to the POWER 20 A...

Страница 9: ...e camera arm of the Visualizer together with the light source can be turned vertically down Image Flip By turning the camera head to record in front of the Visualizer the image will be automatically turned 180 degrees image flip This feature is very useful for recording the face of the presenter or objects hanging on the wall behind the unit 8 Close up adaptor lens For shooting an object outside o...

Страница 10: ...ch as LIGHT NEGATIVE NEGATIVE BLUE BLACK WHITE FREEZE etc to a PRESET key in the on screen menu of the Visualizer see page 14 When picking up documents in portrait and lanscape orientation assign the function ASPECT RATIO to a PRESET key This will toggle the aspect ratio of the camera between 4 3 and 16 9 mode p an press any one of the s or more will Hint Preset Function Optical Zoom Digital Zoom ...

Страница 11: ...still appear to be wrong the white balance can be adjusted manually one push Hints to perform a One Push white balance Top light Zoom in on a white object e g a sheet of paper until there is only white on the screen and press the for 2 seconds Lightbox with transparencies optional Turn off the light of the Visualizer and switch on the optional lightbox Remove everything from the light box zoom to ...

Страница 12: ...s move the picture bar with the NAVIGATION keys 4 6 24 and confirm it with the ENTER key 39 Use the NAVIGTIONS keys 4 6 to show the previous nextpicture Use the ENTERkey to returnto the splitview Use your computer for organization of the USB storage device like creating or deleting folders moving picturesfrom one folderto another deletingpicturesor formattingof the USB storagedevice Pleasenote for...

Страница 13: ...seamless transition fade over dissolve effect when switching between the Visualizer image the image from the external input the internal image memory of the Visualizer and images on an USB stick This feature makes switching from one media to the other appear very smooth and professional The behavior of the Visualizer can be changed in the on screen menu see page 14 The Picture in Picture Mode offe...

Страница 14: ... 255 255 255 with all other addresses the stream can be received at one destination only 224 x x x and 239 x x x are reserved port mode resolution frame rate and format of the stream up to RTPH264 With mode setting AUTO the Visualizer streams on demand only The vSolution Link Software by WolfVision and most internet browsers can start the stream automatically In case your browser or third party ap...

Страница 15: ...t the color reproduction of the camera e g White Balance settings Color Mode and Positive Negative Hint If the picture on your screen appears to be too light or too dark or the color saturation is not correct the Color Mode can be changed For better readability of handwritten texts the image can be changed to BLUE To change the Detail Settings sharpness and to change the Output Resolution manually...

Страница 16: ...put of the Visualizer to a higher standard than the native resolution of your displayunit Follow the instructionsin the user manual of the connectedunits Please note when the aspect ratio does not match the native resolution of the Visualizer or display device black bars on top bottomor left rightcan be shown Some display devices offer the possibilityto zoom in the image to minimizethe black bars ...

Страница 17: ...l resolutions and refresh rates in this range Preferred 1080p 1920x1080 60Hz Depending on input resolution black bars are possible Following data are provided Plug Play Monitor VESADDC Monitor name WolfVision Video Input Definition digital signal Vertical range limits 50Hz 60Hz Horizontal range limits 20kHz 75kHz Maximum pixel clock 170MHz Gamma 2 2 Preferred resolution 1080p 1920x1080 60Hz he Vis...

Страница 18: ...e software vSolution Link to control the Visualizer and to use it as a scanner for 3 dimensional objects Images in JPG TIF or BMP format can be taken in a fraction of a second Additionally video files can be stored and the Visualizer can be administrated Please download the latest version of vSolution Link from www wolfvision com Support Stored pictures are including EXIF data available with forma...

Страница 19: ...est Security The and the to control the Visualizer through an external device such as a room control system that is used to integrateconferencerooms LAN port 21 USB device port 19 can be used The completecontrol protocolcan be found on our internetwebsite under www wolfvision com Support Room Management Systems Power over Ethernet plus PoE The LAN port of the Visualizer includes Power over Etherne...

Страница 20: ...be fixed onto a table with the supplied table lock bolt in order to minimize the risk of theft Please note that the usable depth of thread is 8mm do not screw in more than this Supplied accessories Screw DIN 912 M6x35 Zn 101689 Screw DIN 912 M6x50 Zn 101690 Washer DIN 125A6 4 12x1 6 101691 Washer DIN 7349 6 4 17x3 101692 4 Assembly instructions VZ 8 107799 washer 6 4 12x1 6 Dimensions Technical Sp...

Страница 21: ...individually The IR code of the Visualizer has to match the code of the remote control To change the IR code enter the Advanced Settings Miscellaneous Settings and set the IR Code to A B C or D code A is default To change the IR code on the remote control simultaneously press PRESET 1 PRESET 2 and ZOOM TELE ress PRESET 1 PRESET 2 and ZOOM WIDE on screen menu go to 26 33 Each time this key combinat...

Страница 22: ...tage input Power consumption Power source Operating Temperature Relative Humidity Warranty Made in 1 CMOS 1 3 Progressive Scan Camera 60 frames 1920 x 1080 2 073 600 2 073 600 124 416 000 very good colors 1080p HD 1920x1080 UXGA SXGA SXGA SXGA XGA SVGA 4 3 and 5 4 1080p HD 720p HD WXGA WUXGA 16 9 and 16 10 980 lines automatic and manual automatic and manual yes continuously working high speed yes ...

Страница 23: ... defined settings can be stored on USB stick Live to freeze comparison Picture in Picture LCD live preview monitor 60 frames per second in all resolutions H 264 video streaming via LAN BYOD vSolution Connect support WLAN support vPacks Feature Packs of VZ 8 product line The WolfVision Feature Packs are offering the possibility of adding functions onto existing units Ask your WolfVision dealer for ...

Страница 24: ...the desiredMEMORY key 38 pressedfor 2 seconds Recallingimages Pressthe desiredMEMORY key 38 quickly Activatingthe on screenmenu Press the MENU key 22 to activate the on screen menu Use the Number keys 24 to navigate and Number5 key 39 to select For the help function pressthe HELPkey 23 Resettingsingleitemsof the on screenmenu Select the desired item in the on screen menu and keep theNumber 7 key 2...

Страница 25: ...abel und den Netzstecker niemals mit feuchten Händen berühren Wird das Gerät längere Zeit nicht benutzt so ziehen Sie bitte den Netzstecker Das verwendete Netzteil benötigt eine europäische Zertifizierung nach EN 60950 oder von CSA UL nach UL60950 oder Ul1950 Das Netzteil muss LPS Limited Power Source mit begrenzter Leistung einhalten DEUTSCH Angeführte Vorsichtsmaßnahmen unbedingt beachten Elektr...

Страница 26: ...ions tests and evaluation are according to the CB Scheme Inspections tests and evaluation are according to the PCT Scheme Aufkleber am Gerät Weltweite Patente Copyright Information Tested to complywith FCC standards for home or office use Prüfungen Copyright WolfVision Alle Rechte vorbehalten WolfVision Wofu Vision und sind registrierte Warenzeichen der WolfVision Holding AG Austria Dieses Dokumen...

Страница 27: ... LED siehe Seite 6 5 POWER Taste und Betriebszustandsanzeige LED siehe Seite 6 6 Vorschau Monitor siehe Seite 8 7 Anschlüsse auf der Geräterückseite siehe nächste Seite 8 Nahlinse für die Kamera siehe Seite 8 9 IR Empfänger Kamerakopf 10 Lichtquelle 11 Zoom Rad siehe Seite 6 12 Kamera Tasten siehe Seite 6 13 Ziehvorrichtung für den Arm siehe Seite 7 19 7 1 4 VZ 8light Visualizer 7 6 13 10 11 5 2 8...

Страница 28: ...lock siehe Seite 19 15 HDMI OUT Ausgang siehe Seite 15 16 RGB 15 17 HDMI IN 16 18 Anschluss für Massenspeichergeräte siehe Seit 19 USB Anschluss zum Computer siehe Seite 17 20 DC Eingang 12V 21 Ausgang 15 Pin siehe Seite Eingang für HDMI Signale siehe Seite USB Client en 11 und 17 Host LAN 10 100 BASE T TX Anschluss mit PoE Funktionalität siehe Seiten 17 und 18 ...

Страница 29: ...e 9 31 LASER POINTER LED Leuchtet sobald der Laserpointer aktiv ist 32 LASER POINTER Taste Wichtig Nicht direkt in den Laserstrahl blicken Dies kann IhreAugen schädigen 33 ZOOM Tasten Durch Drücken der ZOOM Tasten zoomt die Kamera in Richtung Tele beziehungsweise Weitwinkel Position 34 USB Taste Zur Darstellung der Bilder vom USB Stick siehe Seite 11 35 EXT Taste Zur Darstellung des externen Signa...

Страница 30: ... zeigt ob der AF eingeschaltet ist siehe Seite 9 Bei aktiviertem On Screen Menü arbeitet dieAF Taste als HELP Taste Durch Drücken für 2 Sekunden wird die ausgewählte Einstellung zurückgesetzt siehe Seite 14 XTERN Taste MENU Taste Zum Umschalten zwischen Visualizer Bild und externem Eingang siehe Seite 16 Die EXTERN LED zeigt ob der Externe Modus eingeschaltet ist Durch Drücken der EXTERN Taste für...

Страница 31: ... Beim Einschalten des Visualizers werden automatisch folgende Einstellungen hergestellt mittlere Zoom Position Bildbreite ca 14cm Autofokus an Autoiris an Sobald die POWER LED durchgehend grün leuchtet ist der Visualizer betriebsbereit Das Verhalten des Gerätes beim Einschalten oder nach dem Drücken der POWER Taste kann im On Screen Menü geändert werden siehe Seite 14 Aufstellen des Visualizers 1 ...

Страница 32: ...werden Bilddrehung Image Flip Sobald die Kamera des Visualizers gedreht wird um vor dem Gerät aufzunehmen wird das Bild automatisch um 180 gedreht Image Flip damit es nicht auf dem Kopf steht Dieses Feature ist sehr nützlich wenn z B das Gesicht des Vortragenden oder Objekte an der Wand aufgenommen werden sollen 8 Nahlinse Um Objekte außerhalb der Arbeitsfläche aufzunehmen muss die Nahlinse 8 hoch...

Страница 33: ...n SEITEN VERHÄLTNIS zugewiesen werden Dadurch wechselt der Kameraaufnahmemodi zwischen 4 3 und 16 9 Um eine Preset Einstellung zu programmieren stellen Sie zuerst alle gewünschten Einstellungen ein und drücken dann eine der Preset Tasten für mehr als 2 Sekunden Am Bildschirm erscheint eine Meldung sobald die Einstellungen übernommen wurden Tipp Preset Funktion Zoom Optisch Digital WolfVision Visua...

Страница 34: ...nueller One Push Weißabgleich durchführt werden Tipps beimAusführen eines One Push Weißabgleiches Oberlicht Zoomen Sie auf einen weißen Gegenstand z B weißes Blatt Papier bis das gesamte Bild weiß ist und drücken dann die für 2 Sekunden Lichtbox optional mit Overheadfolien Schalten Sie das Visualizer Licht mit der aus und die optionale Lichtbox ein Entfernen Sie alles von der Arbeitsfläche und zoo...

Страница 35: ...t vorhanden Durch Drücken der SNAPSHOT Taste 36 wird das aktuell angezeigte Bild im nächsten freien Bildspeicherplatz abgelegt Sobald alle 9 Speicherplätze belegt sind werden die ältesten Bilder überschrieben Ringspeicher Externes USB Speichermedium angeschlossen Durch Drücken der SNAPSHOT Taste 36 wird das aktuell gezeigte Bild auf dem externen USB Speichermedium abgespeichert und eine Meldung er...

Страница 36: ...ieser ermöglicht Überblendungseffekte wenn zwischen dem Bild des Visualizers dem Bild des externen Einganges den Bildern im internen Speicher des Visualizers und Bildern auf einem USB Stick umgeschaltet wird Durch dieses Feature wirkt das Umschalten zwischen den einzelnen Medien fließend und professionell Das Verhalten kann im On Screen Menü geändert werden siehe Seite 14 Der Bild in Bild Modus Pi...

Страница 37: ...u verwendenden Port Modus Auflösung Frame Rate und Format des Streams bis zu RTPH264 Mit der Mode Einstellung AUTO sendet der Visualizer den Stream nur auf Anfrage OnDemand Die vSolution Link Software by WolfVision und die meisten Internetbrowser starten den Stream automatisch Sollte der verwendete Browser oder eine sonstige Fremd Applikation Media Player den Stream nicht starten können stellen Si...

Страница 38: ...de Bildhelligkeitund Gegenlichtkompensation Ändert Einstellungen mit Auswirkung auf die Farbwiedergabe der Kamera wie z B Weißabgleich Farbwiedergabemodiund Positiv Negativ Tipp Falls Ihnen das Bild auf Ihrem Bildschirm zu hell oder zu dunkel erscheint beziehungsweise die Farbsättigungnichtstimmt kann der Farbmodusgeändertwerden Für bessereLesbarkeitvon handgeschriebenenTextenkann der BLAU Modusve...

Страница 39: ...r tatsächlichen nativen Auflösung des Visualizers oder Wiedergabegerätes entsprechen so werden schwarze Balken oben unten beziehungsweise links rechts dargestellt Manche Wiedergabegeräte bieten die Möglichkeit das Bild zu vergrößern um die schwarzen Balken zu minimieren Beachten Sie hierzu die Hinweise in der Bedienungsanleitung des angeschlossenen Gerätes 5 4 Ab Werk ist die Auto Resolution Funkt...

Страница 40: ...ntalfrequenz Limit 20kHz 75kHz Maximaler Pixel Clock 170MHz Gamma 2 2 BevorzugteAuflösung 1080p 1920x1080 60Hz HDMI Verschlüsselung HDCP Die Verschlüsselung HDCP High bandwidth Digital Content Protection wird nicht unterstützt Verschlüs selte Signale am HDMI IN werden vom Visualizer als schwarzes Bild ausgegeben Die proprietäre HDCP Verschlüsselungsmethode wird unter anderem für Hi Definition Holl...

Страница 41: ...oaden Sie die aktuellste Version des Video CaptureTreibers von www wolfvision com vSolution Link by WolfVision Mit der Software vSolution Link kann der Visualizer gesteuert und als Scanner für 3 dimensionale Objekte verwendet werden Bilder im JPG TIFF oder BMP Format können in Bruchteilen einer Sekunde aufgenommen werden Zudem können Videos aufgezeichnet und der Visualizer administriert werden Bit...

Страница 42: ...d fürAdminund Gast Sicherheit Der LAN Anschluss 21 und USB Anschluss 19 kann zur Steuerung des Visualizers über externe Systeme wie Raumsteuerungssystemevon Konferenzräumen benutztwerden Das kompletteProtokollfindenSie auf der WolfVisionHomepageunter www wolfvision com Support Raumsteuerungssysteme Power over Ethernet plus PoE Der LAN Anschluss 21 des Visualizers verfügt über Power over Ethernet P...

Страница 43: ...der mitgelieferten Tisch Fixiereinheit an einem Tisch festgeschraubt werden um das Risiko eines Diebstahls zu minimieren Bitte beachten Sie dass die nutzbare Gewindetiefe 8mm beträgt Schraube nicht weiter eindrehen Mitgeliefertes Zubehör Schraube DIN 912 M6x35 Zn 101689 Schraube DIN 912 M6x50 Zn 101690 Scheibe DIN 125A6 4 12x1 6 101691 Scheibe DIN 7349 6 4 17x3 101692 4 Montageanleitung VZ 8 10779...

Страница 44: ...nterschiedliche IR Codes gestellt werden um die Geräte einzeln ansteuern zu können Der IR Code des Gerätes muss mit dem der Fernbedienung übereinstimmen Ändern Sie im On Screen Menü unter Erweiterte Einstellungen Diverse Einstellungen den gewünschten Code Code A ist Standard Auf der Fernbedienung selbst ändern Sie den Code durch gleichzeitiges Drücken beider PRESET 1 PRESET 2 nd der ZOOM TELE Tast...

Страница 45: ...uftfeuchtigkeit Garantie Hergestellt in Eingebauter Liv e vSolution Link s Benutzereinstellungen auf USB Stick Bildmischer mit Überblendung A HDM RG US E LAN LAN streaming modes multicast and unicast 1 CMOS 1 3 Progressive Scan Kamera 60 Bilder Verhältnis 16 9 Verhältnis 16 9 Verhältnis 16 9 sehr gute Farben automatisch und manuell automatisch und manuell ja ständig arbeitend sehr hohe Geschwindig...

Страница 46: ... individueller Einstellungen auf USB Stick Livebild Standbild Vergleich Bild im Bild LCD Vorschaumonitor 60 Bilder pro Sekunde fps in allen Formaten H 264 Video Streaming über LAN BYOD vSolution Connect Unterstützung WLAN Unterstützung vPacks Feature Packs der VZ 8 Produktlinie Die WolfVision Feature Packs bieten die Möglichkeit zusätzliche Funktionen bei den Geräten zu aktivieren Fragen Sie Ihren...

Страница 47: ...Taste 38 für 2 Sekunden Aufrufenvon Bildern DrückenSie die gewünschteMEMORY Taste 38 kurz Aktivierendes On ScreenMenüs Drücken Sie die MENU Taste 22 um das On Screen Menü zu aktivieren Benutzen Sie die Nummern Tasten 24 zum Navigieren und die Nummer 5 39 zum Auswählen Für die Hilfefunktion drücken Sie die HILFETaste 23 Zurücksetzender aktuellgewähltenZeileim On ScreenMenü WählenSie im Menü die gew...

Страница 48: ...yo Tel 81 0 3 6233 9465 Fax 81 0 3 6233 9466 E mail wolfvision japan wolfvision com Canada WolfVision Canada Inc Ottawa Tel 1 613 741 9898 Toll free 877 513 2002 Fax 1 613 741 3747 E Mail wolfvision canada wolfvision com United Kingdom WolfVision UK Ltd Maidenhead Tel 44 1628 509067 Fax 44 1628 509100 E Mail wolfvision uk wolfvision com Toll free Tel 1 650 648 0002 Toll free 800 356 WOLF Germany J...

Отзывы: