background image


9


Screen Stitching


This option connects the selected screens into a video wall configuration.


Cancel Stitching


Return the Video Wall configuration to normal outputs.


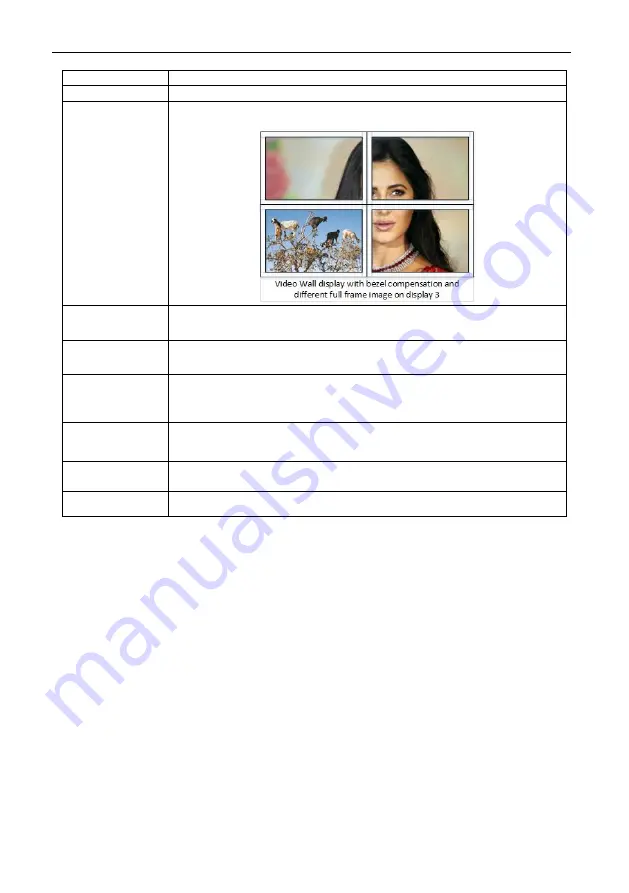
Screen x – Cancel 
Stitching


Removes the single screen x from the video wall to allow the displaying another 
full frame image within the video wall configuration, as shown in this example:


Input Select


Use  the  sub-menu  to  select  the  input  to  display  on  the  video  wall  or  the 
secondary input image shown in the above example.


Output Select


This option is only available for any screen that is not assigned to a video wall 
mode.


Output Type


This option is only available for any screen that is not assigned to a video wall 
mode. It allows setting of the selected screen output mode as described in the 

Error! Reference source not found.

 section on page 14.


Output Format


This option is only available for any screen that is not assigned to a video wall 
mode. It allows setting of the output resolution for the selected screen output.


Mirror


Two sub options : OFF ( default ), ON ( H+V Mirror)


When select 

ON

, you can make 180

º

 rotation with the selected screen


Test Pattern


When enable Test Pattern, the output will display Color Bar pattern


Bezel Setting


The Bezel Setting section allows the entry of values to compensate for the display bezel thickness. 
These values may be entered either as pixels (Type A) or as milli metre (Type B).


Type A Bezel Settings


The image size will be adjusted to allow for the number of pixels entered in each of the  entry 
boxes. Click the 

Set

 button view the effect of the new values.


Type B Bezel Settings


The image size will be adjusted to allow for the Inner and Outer display dimensions as entered 
in each of the entry boxes. Click the 

Set

 button view the effect of the new values.


Bezel Compensation


The  following  images  demonstrate  the  effect  of  not  having  bezel  compensation  and  what  a 
correctly configured bezel compensation setting should produce:


WolfPack

 4K 60 2x4 Video Wall Processor

Содержание HDTVHDPMXB24VM

Страница 1: ...nly use accessories specified by the manufacture Unplug this device during Lightning Storms Product specifications may be subject to technical upgrades without further notice WolfPack 4K 60 2x4 Video Wall Processor Model No HDTVHDPMXB24VM WolfPack 4K 60 2x4 Video Wall Processor ...

Страница 2: ...L 4 Video Wall Context Menu 8 Bezel Setting 9 Bezel Compensation 9 Layout Save Load 10 6 SPECIFICATIONS 10 General 10 Video and Audio 10 Power Supply 10 Environmental and Physical 10 Package Contents 11 7 SAFETY INSTRUCTIONS 11 WolfPack 4K 60 2x4 Video Wall Processor 4 USING THE HDTVHDPMXB24VM ...

Страница 3: ...on up to 3840x2160 60Hz video output for video wall RS232 control Support CEC control with displayer by PC Tool or commands 3 Connectors and Controls Front Name Description PWR LED Lit when the unit is powered HD A LED Lit when HDMI A input is connected HD B LED Lit when HDMI B input is connected LP A LED Lit when Loop out A is connected LP B LED Lit when Loop out B connected HD 1 4 LED Lit when t...

Страница 4: ...t for video wall desired output video wall display devices to HD 1 HD4 HDMI output connector With PC Tool or RS232 commands to control the unit for different wall display 5 PC tool Switch tab on the PC tool 1 PC tool connection with UART or Network 2 Select input source for each scaling output port 3 All Set function select HD A or B to all the scaling output 4 Select input source for B MAIN outpu...

Страница 5: ...rt as Manual EDID User can select predefined EDID and write to HDMI A and B input ports Predefined EDID option like below 4K60 2 0CH 1920x1200 2 0CH 4K60 5 1CH 1680x1050 2 0CH 4K30 2 0CH 1600x1200 2 0CH 4K30 5 1CH 1440x900 2 0CH 1080P 2 0CH 1400x1050 2 0CH 1080P 5 1CH 1360x768 2 0CH 720P 2 0CH 1280x1024 2 0CH 1024x768 2 0CH Manual WolfPack 4K 60 2x4 Video Wall Processor ...

Страница 6: ...60p 50Hz 10 1366x768 60Hz 3 3840x2160p 30Hz 11 1360x768 60Hz 4 3840x2160p 25Hz 12 1280x1024 60Hz 5 1920x1200 60Hz 13 1280x768 60Hz 6 1920x1080p 60Hz 14 1280x720p 60Hz 7 1920x1080p 50Hz 15 1280x720p 50Hz 8 1600x1200 60Hz 16 1024x768 60Hz Please note 3840x2160 25 30Hz can only be used for standalone display not for video wall PQ tab on the PC tool Suggest always use the default setting 50 50 50 50 C...

Страница 7: ...cted screens will be shown as bright blue 3 Use the right mouse button to open a menu 4 Select Screen Stitching from the menu to program the video wall mode The selected screens will now be shown as bright green 5 To change the displayed image either use the methods detailed in the section Error Reference source not found starting on page 10 or right click to open the pop up menu and select the de...

Страница 8: ...8 Video Wall Context Menu Right clicking on any of the screen icons will display the following context menu WolfPack 4K 60 2x4 Video Wall Processor ...

Страница 9: ...t assigned to a video wall mode It allows setting of the output resolution for the selected screen output Mirror Two sub options OFF default ON H V Mirror When select ON you can make 180º rotation with the selected screen Test Pattern When enable Test Pattern the output will display Color Bar pattern Bezel Setting The Bezel Setting section allows the entry of values to compensate for the display b...

Страница 10: ...00 baud rate 8 data bits 1 stop bit no parity Video and Audio Input Video Formats Supported 4096x2160p 24 25 30 50 60Hz 3840x2160p 24 25 30 50 60Hz 1080p 24 25 30 50 60Hz 1080i 50 60Hz 1920x1200 60Hz 1680x1050 60Hz 1600x1200 60Hz 1440x900 60Hz 1400x1050 60Hz 1366x768 60Hz 1360x768 60Hz 1280x1024 60Hz 1280x960 60Hz 1280x800 60Hz 1024x768 60Hz 1280x720p50 60Hz Audio Format 2 0 channel 5 1 channel LP...

Страница 11: ...tructions 1 Do not operate either of this product outside the specified temperature and humidity range given in the above specifications 2 Ensure there is adequate ventilation to allow this product to operate efficiently 3 Repair of the equipment should only be carried out by qualified professionals as these products contain sensitive devices that may be damaged by any mistreatment 4 Only use this...

Отзывы: