WobbleWorks 3 Doodler Create+ Скачать руководство пользователя страница 6

9

10

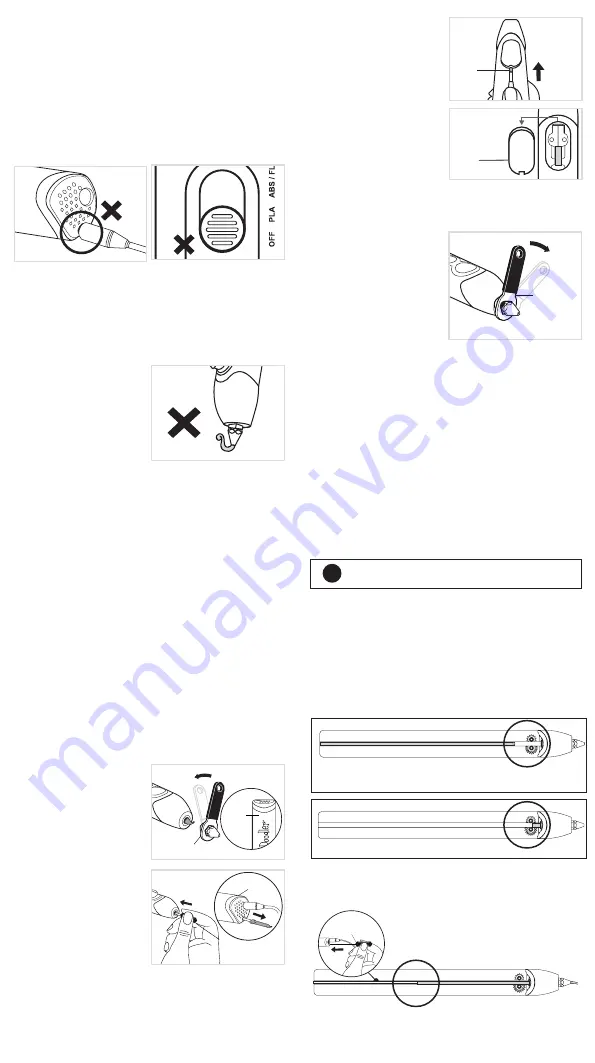
1. My Pen won’t turn on! 
    (Light doesn’t turn on)

Let’s double check the following:

A. 

Is the 

Power Adapter

 plugged into a working power outlet?

B. 

Is the end of the 

Power 

Adapter

 connected to the 

correct part of the 

Pen

?

If you have a spare power adapter around the house please 

use it to test your 

3Doodler

. This will help determine if 

the problem is with your 

3Doodler

 or with the 

Power 

Adapter

 provided in the box.

NOTE:

C. 

Make sure the 

Control 

Switch

 on your 

3Doodler 

 is not set to 

OFF

.

3. My Plastic is not extruding from
    my 3Doodler .

3A. Plastic not engaging properly with the Drive Gear:

Gently push until you feel the strand pulled through the

 Drive 

Gear

 on its own. 

If the above does not work, reverse the 

Plastic 

fully from the 

Pen

(See Section 2, Step 6) Snip ends, then reinsert and try again.

If 

Plastic 

is too short to be removed from the 

Pen

, move to 3B.

3B. Plastic is too short to be removed from the Pen:

Try unscrewing the 

Nozzle 

and 

using the 

Unblocking Tool

.

While 

Pen

 is hot (

BLUE 

or 

GREEN


Light

 on), use 

Mini 

Spanner

 to unscrew and 

remove 

Nozzle 

anti-clockwise. 

While using the 

Reverse

 feature 

of the 3Doodler , insert 

Unblocking Tool

 through open 

front end of 

Pen 

and gently 

push any excess 

Plastic

 out 

through the back of the 

Pen

.

Mini 

Spanner

BLUE


or 

GREEN


Light

3C. Plastic may be wrapped 
around the Drive Gear. 

Remove 

Maintenance Cover


using 

Mini Screwdriver


provided in the box. 

Use the 

Mini Screwdriver 

or 

Unblocking Tool

 to lift 

and release 

Plastic

 from the 

Drive Gear

 and out of the 

Pen


through the open area beneath 
the 

Maintenance Cover

 or 

from the 

Plastic Loading Port

.

Mini 

Screwdriver

2. My Plastic is extruding but it 

    won’t stick to the paper, or is 

    curling up around the Nozzle.

Stop extruding and start 
again using the following 
instructions:

When the 

Plastic 

resumes 

extruding, push the 

Nozzle 

firmly down into the paper, 

allowing 

Plastic 

to stick to the 

surface. 

Drag the 

Plastic 

along the 

paper or surface in a continuous 
unbroken line as if you were 
writing with a pencil. 

Keep your movement slow and 
steady. The 

Plastic 

should hold 

to the paper and not curl up 
around the 

Nozzle

.

Maintenance 

Cover

Blue

 or 

Green 

Light

Unblocking 
Tool

Nozzle

 may loosen with 

continued usage (or in transit). 
While 

Pen

 is hot (

BLUE

 or 

GREEN


Light

 on), gently turn 

Nozzle 

clockwise to tighten 

it using the 

Mini Spanner


provided. Stop tightening once 

you first feel resistance so as 

to avoid over-tightening the 

Nozzle

 and breaking it.

A. 

Click either the 

FAST

 or 

SLOW

 button once.

B.

 If Step A does not solve this problem, please unplug your 

3Doodler


and then plug it in and try again. 

5. My Plastic won’t stop extruding.

4. My Plastic is leaking from
    around the Nozzle. 

While the 

Pen 

is on and hot (

BLUE

 or 

GREEN


Light

), 

double click


either the 

FAST 

or

 SLOW

 button. 

Light 

will start flashing to signal 

the

 Plastic

 is reversing. Once the 

Plastic

 stops reversing, it is safe 

to remove it from the

 Pen 

by gently pulling on the back of the 

strand.

If 

Plastic

 is too short to reverse, see Section 3, Step 3B.

6. How do I reverse my 
    unused Plastic?

Snip the ends of your 

Plastic 

now for easier loading 

and Doodling later.

It is possible that the 

Plastic

 is either too short to reverse all the 

way out of your 

3Doodler

, or that the 

Plastic

 has moved 

past the 

Pen’s


Drive Gear

 system.

You will be able to check for these issues by looking through the 

Maintenance Cover

7. I have reversed my Plastic but
    cannot get it out.

For both of these issues, you can try the following options:

 Insert a new strand of 

Plastic

 or 

Unblocking Tool

 to push the 

remaining 

Plastic

 through while 

Pen

 is 

ON

 and extruding.

Plastic 

reversed, but too short to take out and no longer in 

contact with the 

Drive Gear

.

TIP

Mini 

Spanner

Plastic 

is beyond 

Drive Gear. 

Or

 While using the 

Reverse

 feature of the 3Doodler , remove 

Nozzle

 and use 

Unblocking Tool 

to push 

Plastic

 out the back of 

the 

Pen

. (See Section 3, Step 3B).

Unblocking Tool

Содержание 3 Doodler Create+

Страница 1: ...et compr hensibles que possible No tires estas instrucciones Nos hemos esforzado para que sean lo m s tiles y amenas posible Bitte werfen Sie diese Anleitung nicht weg Wir haben uns wirklich sehr ang...

Страница 2: ...to you and will void your warranty Injuries to the user may include but are not limited to harm sustained from inhaling substances that are not suitable for heating or burns from flammable materials...

Страница 3: ...ding from the Nozzle Extruded Plastic will harden after a few seconds Press the FAST button once to stop extruding x1 1 x1 3 4 3 2 2 5 x1 Step 3 Doodle your name Use box below to create your first Doo...

Страница 4: ...ling on the back of the strand With Pen set to ABS FLX wait for BLUE Light to come on Double click either Speed Button Light will start flashing to signal Plastic reversing x2 Flashing BLUE 5 3 inches...

Страница 5: ...use After 5 minutes of inactivity the 3Doodler Create s heating system will automatically power down You will need to press one of the Speed Buttons OR toggle the Control Switch OFF and then ON again...

Страница 6: ...the paper allowing Plastic to stick to the surface Drag the Plastic along the paper or surface in a continuous unbroken line as if you were writing with a pencil Keep your movement slow and steady The...

Страница 7: ...ired operation Warning Changes or modifications to this unit not expressly approved by the party responsible for compliance could void the user s authority to operate the equipment NOTE This equipment...

Страница 8: ...est pas utilis ou avant de le ranger Laisser la buse refroidir totalement avant de la ranger L outil de nettoyage peut devenir tr s chaud NE PAS toucher la partie m tallique de l outil apr s l avoir...

Страница 9: ...d extrusion LEV E ou BASSE Port de contr le Roue d entrainement Entraine le Plastique dans le Stylo Buse Embout chaud d o le Plastique est extrud pour mod liser Contr le de vitesse RAPIDE Contr le de...

Страница 10: ...r comment dessiner verticalement Extruder du Filament sur une feuille de papier jusuq a obtenir un tas de la taille d une coccinelle S assurer qu il soit fix sur la feuille de papier Appuyer sur le bo...

Страница 11: ...souples Info Filament flexible Apr s avoir retir le filament du 3Doodler Create couper et retirer toute partie fondue l extr mite de votre filament avant de le r utiliser dans le 3Doodler Create Ceci...

Страница 12: ...S assurer que l interrupteur de votre 3Doodler Create est sur la postion OFF 3 Mon filament ne s extrude pas de mon 3Doodler Create 3A Le filament n est pas engag proprement dans le m canisme Pousser...

Страница 13: ...ne fonctionne toujours pas merci de nous contacter help the3Doodler com et nous nous vous aiderons 8 Mon stylo ne chauffe pas la LED reste rouge SECTION 4 ASTUCES ET BONNES PRATIQUES Pour une utilisa...

Страница 14: ...etirer toute partie fondue l extr mit de votre filament avant de le r utiliser dans le 3Doodler Create Ceci permet de reduire les blocages et les bouchons Lumi re BLEUE ou VERTE Lumi re BLEUE x2 Lumi...

Страница 15: ...se podr an producir son da os provocados por la inhalaci n de sustancias no aptas para calentarse o quemaduras provocadas por los materiales usados en el 3Doodler Create SOLO PARA ADULTOS MANTENER FU...

Страница 16: ...l Pl stico se empezar a extrudir por la boquilla El pl stico extrudido se endurecer en pocos segundos Pulsa el bot n R PIDO una vez para detener la extrusi n x1 segunos 1 3 5 2 x1 Paso 3 Dibuja tu nom...

Страница 17: ...UL Con el boli en posici n ABS FLX espera a que se encienda la luz AZUL Pulsa dos veces cualquiera de los dos botones de velocidad La luz empezar a parpadear para indicar que el pl stico est retrocedi...

Страница 18: ...5 minutos de inactividad el sistema de calentamiento del 3Doodler Create se apagar autom ticamente Tendr s que pulsar uno de los botones de velocidad O poner el bot n de control en OFF apagado y otra...

Страница 19: ...amienta de desbloqueo 3C El pl stico puede haberse enredado en el engranaje impulsor Retira la Cubierta desmontable con el Mini destornillador incluido en la caja Utiliza el Mini destornillador para l...

Страница 20: ...a funci n inversa de la retira la boquilla y utiliza la herramienta de desbloqueo para empujar el pl stico y sacarlo por la parte trasera del boli Ver Secci n 3 paso 3B DEJA descansar a tu 3Doodler Cr...

Страница 21: ...fasst werden sollte Ziehen Sie den Stecker und stellen Sie den Schalter auf OFF wenn Sie den Stift nicht benutzen oder wieder verstauen wollen Lassen Sie die D se komplett abk hlen bevor Sie den Stift...

Страница 22: ...onstemperatur zu w hlen Bedienungsfeld Antriebsrad Dr ckt den Kunststoff durch den Stift D se Hei es Ende an welchem der Kunststoff zum Doodeln extrudiert wird Geschwindigkeitsknopf FAST SCHNELL Gesch...

Страница 23: ...chnitt beginnen in welchem wir Ihnen beibringen werden wie man vertikal in der Luft doodlet Extrudieren Sie Kunststoff auf ein Blatt Papier bis Sie einen Tropfen haben der etwa so gro wie ein Marienk...

Страница 24: ...Create entfernt haben schneiden und entfernen Sie teilweise geschmolzenes Material vom Ende des Stiftes ab bevor Sie es erneut in Ihren 3Doodler Create geben Dies wird Blockaden und Verstopfungen ver...

Страница 25: ...icht aus dem 3Doodler Create extrudiert werden 3A Der Kunststoff wird nicht richtig vom Antriebsrad gefasst Schieben Sie den Kunststoffstrang vorsichtig und bis Sie merken dass er eigenst ndig vom Ant...

Страница 26: ...st zu kurz um ihn herauszunehmen und ber hrt nicht mehr das Antriebsrad Mini Schrauben schl ssel Schneiden Sie nun die Enden des Kunststoffstiftes ab um ihren 3Doodler Create einfacher damit laden zu...

Страница 27: ...entfernen Sie ihn richtig MACHEN SIE EINE PAUSE BLAUES oder GR NES Licht BLAUES Licht x2 Blinkendes BLAU 1 3 2 SPEZIFIKATION DES NETZADAPTERS Eingang 100 240 V AC 0 5 A MAX 50 60 Hz Ausgang 5V DC 1 2A...

Страница 28: ...abile usato nella 3Doodler Create PU ESSERE UTILIZZATA SOLO DA PERSONE ADULTE TENERE FUORI DALLA PORTATA DEI BAMBINI AV V E R T E N Z E SEZIONE 2 GUIDA INTRODUTTIVA ALLA 3DOODLER CREATE Come funziona...

Страница 29: ...to Il Filamento estruso si indurir dopo pochi secondi Una volta terminata l estrusione premere il pulsante FAST x1 Passo 3 Scrivere il proprio nome con la 3Doodler Create Scrivere il nome nel riquadro...

Страница 30: ...e aspettare l accensione della luce BLU Premere due qualsiasi Pulsante della Velocit La luce comincer a lampeggiare per segnalare il recupero del Filamento x2 Lampeggiatore BLU 13 46 cm I Filamenti d...

Страница 31: ...po 5 minuti di inattivit il sistema di riscaldamento della 3Doodler Create si spegne automaticamente Per continuare a usarla necessario premere uno dei Pulsanti della Velocit OPPURE spegnerla e riacce...

Страница 32: ...e riprendere l estrusione seguendo queste indicazioni Quando il Filamento ricomincia a fuoriuscire premere saldamente l Estrusore sulla carta per permettere al Filamento di aderire alla superficie Tra...

Страница 33: ...essibile Estremi non spuntati VS Estremi spuntati Non tirare il Filamento dalla parte posteriore della 3Doodler Create in casi diversi da quelli specificati LASCIARE riposare la 3Doodler Create dopo 2...

Страница 34: ...ler com warranty Per i Termini e le Condizioni e altre notifiche consultare la pagina web the3Doodler com terms and conditions Accedere al Vano di Manutenzione usando il Mini Cacciavite in dotazione U...

Страница 35: ...ere schade door het inhaleren van schadelijke stoffen door verkeerd gebruik van materialen die niet geschikt zijn voor opwarming of brandwonden door ontvlambare producten gebruikt in de 3Doodler Creat...

Страница 36: ...Geextrudeerde plastic zal binnen enkele seconden uitharden Duw eenmaal op de FAST knop om te stoppen met extruderen x1 1 3 2 5 x1 Stap 3 Doodle uw naam Gebruik de opening hieronder om uw eerste Doodl...

Страница 37: ...LED Met de temperatuurknop op ABS FLX wacht tot de Blauwe LED oplicht Klik tweemaal op een van de twee snelheidsknoppen De LED zal beginnen flikkeren om aan te geven dat de Plastic eruit komt x2 Blin...

Страница 38: ...uik Schakel tijdens dit half uur uw 3Doodler Create uit Na 5 minuten inactiviteit zal de 3Doodler Create zelf het hittesysteem uitschakelen Om het terug in te schakelen klik je op een van de snelheids...

Страница 39: ...cties wanneer het Plastic begint te extruderen duw de nozzle zacht maar stevig tegen het papier waardoor de plastic de kans krijgt zich vast te hechten aan het oppervlak Sleep de pen en het plastic ov...

Страница 40: ...verwijderen NEEM EEN PAUZE Nadat je de Plastic staafjes uit de 3Doodler Create hebt verwijdert knip en verwijder de deels gesmolten stukken aan het eind van het staafje af zeker als u de staafjes nad...

Страница 41: ...SECTION 5 STENCILS SECTION 5 POCHOIRS SECCI N 5 PLANTILLAS ABSCHNITT 5 SCHABLONEN SEZIONE 5 MODELLI DEEL 5 SJABLONEN Eiffel Tower Tour Eiffel Torre Eiffel Eiffelturm Torre Eiffel De Eiffeltoren x4 x4...

Страница 42: ...81 82 Glasses Lunettes Gafas Brille Occhiali Brillen x1 x1 1 2 6 6 6 6 7 7 7 7 3 3 3 3 2 2 2 2 1 4 4 4 5 5 5 5 4 1 1 1...

Страница 43: ...produit est prot g par la propri t intellectuelle de WobbleWorks S il vous pla t voir la liste des brevets de Wobbleworks Este producto est protegido por propiedad intelectual y pertenece a WoobleWor...

Отзывы: