


PBC100
User Guide
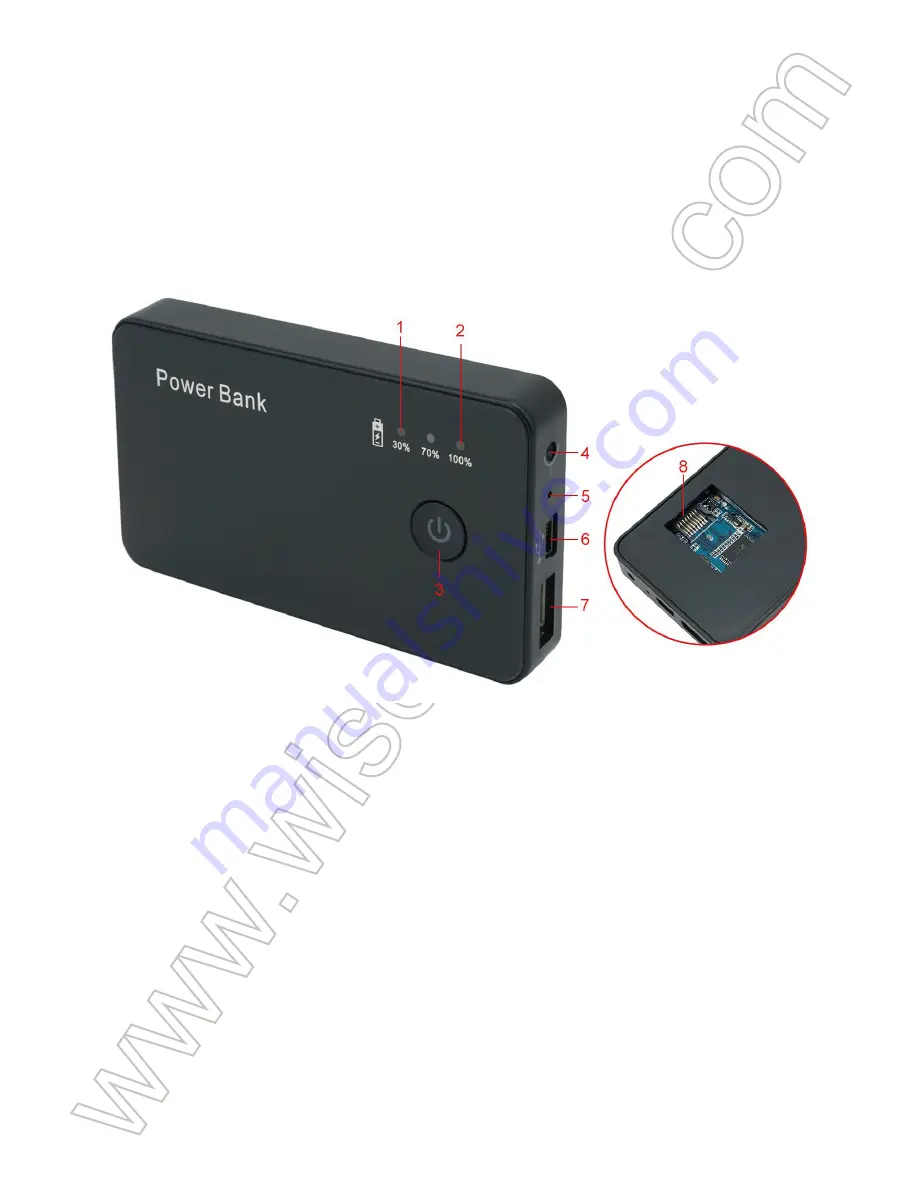
I. Product Overview
1. Red Indicator Light
2. Blue Indicator Light
3. Power/Video Recording/Motion Detection Recording Button
4. Camera Lens
5. Reset Button
6. DC5V 1A Power Input
7. DC5V 1A Power Output
8. Micro SD Card Slot
II. What’s in the Box
-1× Power Bank Camera
-1× USB Cable
- 2 × Back Covers
-1 × 8GB Micro SD Card (fitted into the Micro SD card slot already)
III. Operation
>> Please make sure your camera is fully charged before using.
>> Please make sure the Micro SD card has been formatted already and is securely fitted
into the camera’s SD card slot, or it will not work. We recommend you use a SDHC Class
10 Micro SD card.
[Note]:
If no Micro SD card is fitted into the camera or it cannot be read, the red indicator light
will be illuminated for 3 minutes, then both red and blue indicator lights will flash twice and turn
off. The camera will shut down automatically.
3.1. POWER ON/OFF
3.1.1. Power on the camera by pressing the Power Button for 2 seconds. The red
indicator light will come on and stay illuminated, indicating the camera has entered into
standby mode automatically.
3.1.2. Power off the camera by pressing the Power Button for 4seconds. Both red and
blue indicator lights will flash twice and then turn off.
[Note]:
The camera will shut down automatically if it is in standby mode without any operation
more than 3 minutes.
3.2. VIDEO RECORDING
3.2.1. Power on the camera by pressing the Power Button for 2 seconds. The red
indicator light will come on and stay illuminated, indicating the camera has entered into
standby mode automatically.
3.2.2. Press the Video Recording Button once to start videorecording. The red indicator
light will flash twice and then turn off.
3.2.3. Press the Video Recording Button once again to stopvideorecording. The red
indicator lightwill come on and stay illuminated, indicating the camera is back to standby
mode.
[Note]:
1). A video clip will be generated and saved every 10 minutes automatically.
2). The camera can record video for 8 hours continuously on a full charge.
3). Video Resolution: 1280×720P Video Format: AVI
4). The camera will shut down automatically and save all video files if it is in low battery. Both red
and blue indicator lights will flash twice and turn off.
3.3. MOTION DETECTION RECORDING
3.3.1. Power on the camera by pressing the Power Button for 2 seconds. The red indicator
light will come on and stay illuminated, indicating the camera has entered into standby mode
automatically.
3.3.2. Press the Motion Detection Recording Button for 2 seconds to make the camera enter
into motion detection recording mode. The blue indicator light will flash twice and then turn off.
The camera will capture a 10 minutes’ video automatically when a movement is detected.
3.3.3. Press the Motion Detection Recording Button once to exit motion detection
recording mode. The red indicator light will come on and stay illuminated, indicating the
camera is back to standby mode.
IV. Video/Image File Uploads
4.1. Power off the camera, remove the Micro SD card and insert it into a card reader.
4.2. Insert the card reader into a proper PC computer USB port.
4.3. The Micro SD card will be recognized as a removable disk drive.
4.4. All the files can be accessed in the drive.
V. Setting Time/Date Stamp
5.1. Power off the camera, remove the Micro SD card and insert it into a card reader.
5.2. Insert the card reader into a proper PC computer USB port.
5.3. Removable disk drive folder appears.
5.4. Click on the drive in the root directoryand inside the root directory, create a file named
“time.txt”.
5.5. Write the current date and time in the “time.txt” file with the correct format:
YYYY.MM.DD HH:MM:SS (For example: 2016.04.12 14:24:32). If you don’t need the time
and date stamp on the video footage, you can add an "N" in the “time.txt” file. (For
example: 2016.04.12 14:24:32 N). Save this file.
5.6. Restart the camera and the system will upgrade the program automatically.
VI. Charging
6.1. Power off the camera and connect it to an outlet AC power supply using the USB
cable and your DC 5V 1A phone charger.
6.2. The red indicator light will stay illuminatedwhile the blue one will keep flashing during
the charging process.
6.3. It will take 12 hours to obtain a full charge.
6.4. When the camera is fully charged, both red and blue indicator lights will stay
illuminated.
VII. Resetting
If for any reason, the camera stops responding or isn’t working properly, a quick reset will
restore it back to normal operation.
Operation:
When the camera is powered on, use a pin to press the Reset Button once
and the camera will shut down automatically. Then you can restart the camera to the
factory default settings.
Содержание PBC100
Страница 21: ...PBC100 I 1 2 3 4 5 6 DC5V 1A 7 DC5V 1A 8 SD II 1 1 USB...
Страница 24: ...6 3 12 6 4 VII 1...


