background image

English _

21


!

INST

ALLA

TION & CONNECTION

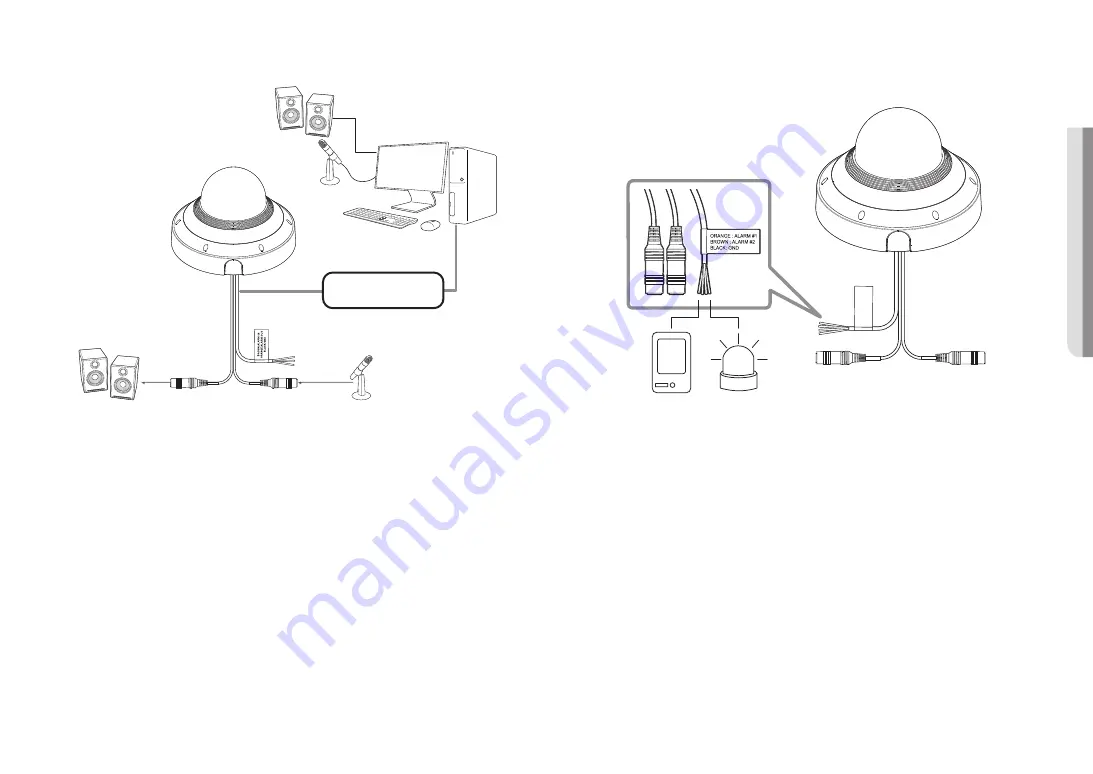
Connecting to Audio Input/Output

Network

PC

Microphone

Speaker

Microphone

Speaker

1. 

Connect the AUDIO IN port of the camera with the microphone or LINE OUT port of the amplifier that the 
microphone is connected to.

2. 

Connect the AUDIO OUT port of the camera with the speaker or LINE IN port of the amplifier that the 
speaker is connected to.

3. 

Check the specifications for audio input.


~

Audio Codec


- Audio In : G.711 PCM (Bit Rate: 64kbps / Sampling Frequency: 8kHz), G.726 ADPCM (Bit Rate: 

16Kbps, 24Kbps, 32Kbps, 40Kbps / Sampling Frequency: 8kHz), AAC (Bit Rate: 48Kbps / Sampling 
Frequency: 16kHz)


~

Full duplex Audio


~

Audio in

 : Selectable (microphone/Line-in), Supported voltage: 2.5VDC (4mA), Input impedance: 2K Ohm


~

Audio out

 : Line-out (3.5mm mono jack), Maximum output: 1Vms, Line out impedance : 600Ω

Connecting to the I/O port box

Connect the Alarm I/O cable to the corresponding port of the port box.

Sensor

Alarm 

(Warning lamp) 


~

ALARM #1, ALARM #2 :  These ports can be used as alarm input or output ports. If used as input ports, 

alarm input or day/night sensors can be connect to them. If used as output ports, 
alarm output signals can be connect to them. 

 Alarm I/O changes can be made through the Webviewer setup.


~

GND : Common port for alarm in/output signal.

Содержание PNM-9031RV

Страница 1: ...NETWORK CAMERA User Manual PNM 9031RV ...

Страница 2: ... correctness of the contents in this document but no formal guarantee shall be provided Use of this document and the subsequent results shall be entirely on the user s own responsibility Hanwha Techwin reserves the right to change the contents of this document without prior notice Designandspecificationsaresubjecttochangewithoutpriornotice TheinitialadministratorIDis admin andthepasswordshouldbese...

Страница 3: ...iant tools the product may be damaged 18 Do not install the product in a place where chemical substances or oil mist exists or may be generated As edible oils such as soybean oil may damage or warp the product do not install the product in the kitchen or near the kitchen table This may cause damage to the product 19 When installing the product be careful not to allow the surface of the product to ...

Страница 4: ...he wired LAN hub providing power over the Ethernet PoE in accordance with IEEE 802 3at shall be a UL Listed device with the output evaluated as a Limited Power Source as defined in UL60950 1 or PS2 as defined in UL62368 1 Unit is intended for installation in a Network Environment 0 as defined in IEC TR 62102 As such associated Ethernet wiring shall be limited to inside the building Please read the...

Страница 5: ...TUP 23 23 Connecting the Camera Directly to Local Area Networking 23 Connecting the Camera Directly to a DHCP Based DSL Cable Modem 24 Using Device Manager 24 Automatically searching camera 24 Configuring IP address 25 Manually registering camera 25 Automatically configuring IP 26 Port Range Forward Port Mapping Setup 27 Connecting to the Camera from a Shared Local PC 27 Connecting to the Camera f...

Страница 6: ...s It is recommended to use a memory card of 16GB or more that conforms to the UHS 3 class MLC type specification J Micro SD card can support up to 512 GB if two slots are used Each slot supports up to 256 GB and one slot cannot support 512 GB by itself NAS RECOMMENDED SPECS Recommended capacity 200GB or higher is recommended For this camera you are recommended to use a NAS with the following manuf...

Страница 7: ... the RJ45 cable Screw bit 1 Used for dome cover disassembly assembly and camera installation OPTIONAL ACCESSORIES FOR INSTALLATION You can purchase appropriate optional accessories available Product type Wall mount Model Name SBP 300WMW1 Product type Hanging mount Ceiling mount Model Name SBP 276HMW SBP 300CMW Product type Corner mount Pole mount Model Name SBP 300KMW SBP 300PMW ...

Страница 8: ...lumination sensor d Reset Button The button restores all camera settings to the factory default Press and hold for about 5 seconds to reboot the system J If you reset the camera the network settings will be adjusted so that DHCP can be enabled If there is no DHCP server in the network you must run the Device Manager program to change the basic network settings such as IP address Subnet mask Gatewa...

Страница 9: ...tion a PoE port This port connects power and network via PoE injector b Audio Alarm cable port Plug in the audio and alarm cable to this port to connect with external alarm device microphone speaker c Power port DC 12 V Port for power terminal block a c b ...

Страница 10: ...les can cause damage to the product or a fire For safety purposes keep anyone else away from the installation site And put aside personal belongings from the site just in case If the product is installed with excessive force it may cause damage to the camera due to malfunction Forcing assembly using non compliant tools may damage the product Disassembling 1 Remove the dome cover by loosening the f...

Страница 11: ...camera 2 Insert a Micro SD card in the arrow direction shown in the figure J Before installing the camera the Micro SD card should be inserted while the power source and the body are separated Do not forcefully insert it in the reverse direction It might damage your Micro SD card and your product When it rains or the humidity is high insertion or ejection of a Micro SD card is not recommended Disa...

Страница 12: ...rface and drill holes for screws and cables 1 2 Fix the mount plate using appropriate screws 1 3 Pull out necessary cables among network power audio alarm cables through the hole in the mount plate Installing using pipe 2 1 Attach the installation template and drill holes for screws and cables 2 2 Separate the pipe cover of the mount plate by pressing its sides ...

Страница 13: ...audio alarm cables through the pipe Attaching to the unbundled adapter Choose and purchase a necessary one of the following options unbundled that is suitable to the installation site or for your convenience 3 1 Install the hanging mount to the wall mount adapter Wall mount adapters and hanging mounts are sold separately 3 2 Connect the mounting plate and the hanging mount ...

Страница 14: ...a body and dome cover 1 Connect the safety wire 2 Mount the camera body to the mount plate Mount it to fit the hinges as shown in the image 3 Pull the cable cover of the camera body to open it as shown in the figure below 4 Pull out the cable bushings from the camera body ...

Страница 15: ...big hole of the cable bushing and connect to the network cable connector 5 3 When using the power Route the power cable through the small hole of the cable bushing and connect it to the provided power terminal block 5 4 Mount the cable bushing to the camera body 5 5 Connect the network cable connector to the PoE port and connect the power terminal block to the power port Installing the network cab...

Страница 16: ...bushing to the camera body 6 4 Connect the network cable jack to the PoE port of the camera Installing audio alarm cables 7 Plug the cable bushing of the provided audio alarm cable into the camera body 8 Connect the connector of the audio alarm cable to its connection port ...

Страница 17: ...ews on the camera body fix the camera body to the mount plate 12 Adjust the lens to the desired direction by referring to Adjusting the monitoring direction for the camera If you tilt the lens you may need to adjust the lens as this may block the screen 13 Assemble the dome cover When assembling the dome cover align the pipe cover part to assemble it To ensure there are no issues with waterproofin...

Страница 18: ...e layer of taping Waterproof butyl tape is made of butyl rubber that can be stretched to twice its normal length Adjusting the monitoring direction for the camera Tilt Pan Adjusting the monitoring direction You can adjust the camera direction only when the camera is fixed on the ceiling At this time rotating the main body of the camera in the left and right direction is called PAN and adjusting th...

Страница 19: ...the video rotation if necessary Example of installing the ceiling mount Factory default direction ZONE 2 ZONE 2 ZONE 4 ZONE 4 ZONE 1 ZONE 1 ZONE 3 ZONE 3 Front direction ZONE 2 ZONE 2 ZONE 1 ZONE 1 ZONE 3 ZONE 3 ZONE 4 ZONE 4 Front direction CONNECTING WITH OTHER DEVICE WiFi dongle Power Ethernet PoE Router J The Micro USB port of the product is provided for easier installation and is not recommen...

Страница 20: ...ODATA WN S150UM TOTOLINK N300UM Power Supply Use a screwdriver to connect the and lines of the power adaptor to the provided power terminal block and then insert them in the power port DC12V J If the power sources for PoE and DC 12 V are simultaneously turned on the device power will be supplied by both of PoE and DC 12 V It is advisable to use only one power source from PoE and DC 12V Be careful ...

Страница 21: ...Kbps 32Kbps 40Kbps Sampling Frequency 8kHz AAC Bit Rate 48Kbps Sampling Frequency 16kHz Full duplex Audio Audio in Selectable microphone Line in Supported voltage 2 5VDC 4mA Input impedance 2K Ohm Audio out Line out 3 5mm mono jack Maximum output 1Vms Line out impedance 600Ω Connecting to the I O port box Connect the Alarm I O cable to the corresponding port of the port box Sensor Alarm Warning la...

Страница 22: ...amera To connect the alarm out If devices e g flashing light and siren that exceed the voltage and current specifications are connected by using the open collector method it may cause malfunction Refer to the alarm out connection diagram below when connecting devices that exceed the voltage and current specifications Alarm Out Wiring Diagram if you want ALARM 2 to be the output port Warning lamp S...

Страница 23: ... To change the IP address use the Device Manager For further details on Device Manager use refer to Using Device Manager Page 24 CONNECTING THE CAMERA DIRECTLY TO A DHCP BASED DSL CABLE MODEM 1 Connect the user PC directly with the network camera 2 Run the Device Manager and change the IP address of the camera so that you can use the web browser on your desktop to connect to the camera 3 Use the I...

Страница 24: ...administrator HTTP Port Used to access the camera using the Internet browser defaulted to 80 RTSP Port A port that controls real time streaming The initial value is 554 If using a Broadband Router IP Address Enter an address falling in the IP range provided by the Broadband Router ex 192 168 1 2 254 192 168 0 2 254 192 168 XXX 2 254 Subnet Mask The Subnet Mask of the Broadband Router will be the S...

Страница 25: ... OK MANUALLY REGISTERING CAMERA If the camera cannot be found using search function the camera can be registered remotely by manually inserting IP information if the camera is connected to external network 1 Click Add Devices Manually Add Device at the main page of device manager 2 Insert the range of IP address that you search 3 Select the Model Name of the camera that you register and insert HTT...

Страница 26: ...orwarding setting is an example of setting CISCO IP router The settings may differ depending on the connected Broadband Router model For more information refer to the user manual of the applicable router Setting up Port Range Forward for several network cameras You can set a rule of Port Forwarding on the Broadband Router device through its configuration web page A user can change each port using ...

Страница 27: ...a remote computer that is not in the Broadband Router s network cluster is not allowed users can access cameras within a Broadband Router s network by using the camera s DDNS URL 1 Before you can access a camera in the Broadband Router network you should have set the port range forward for the Broadband Router 2 From the remote PC launch the Internet browser and type the DDNS URL address of the ca...

Страница 28: ... system in support of the UPnP protocol 2 Click the camera name for search In the Windows operating system click the camera name searched from the network menu The login window is displayed Connecting via Bonjour 1 Run the client or operating system in support of the Bonjour protocol 2 Click the camera name for search In the Mac operating system click the camera name searched from the Bonjour tab ...

Страница 29: ... LOGIN Whenever you access the camera the login window appears Enter the User ID and password to access the camera 1 Enter admin in the User name input box The administrator ID admin is fixed and can not be changed 2 Enter the password in the Password input field 3 Click Sign in If you have logged in successfully you will the Live Viewer screen J When you access the camera web viewer pay special a...

Страница 30: ...er user without formatting the default folder saved or used Confirm that you used recommended NAS equipment TROUBLESHOOTING PROBLEM SOLUTION No video is displayed when accessing the plug in free webviewer on Safari via HTTPS On the authentication popup window prompted when initially accessing https click View Authentication Certificate and select the Always trust when connecting to the designated ...

Страница 31: ...f where and how they can take these items for environmentally safe recycling Business users should contact their supplier and check the terms and conditions of the purchase contract This product and its electronic accessories should not be mixed with other commercial wastes for disposal Hanwha Techwin cares for the environment at all product manufacturing stages and is taking measures to provide c...

Страница 32: ......

Отзывы: