-
10
-
USER'S MANUAL
HDMI input, the On Screen Display will show this message.
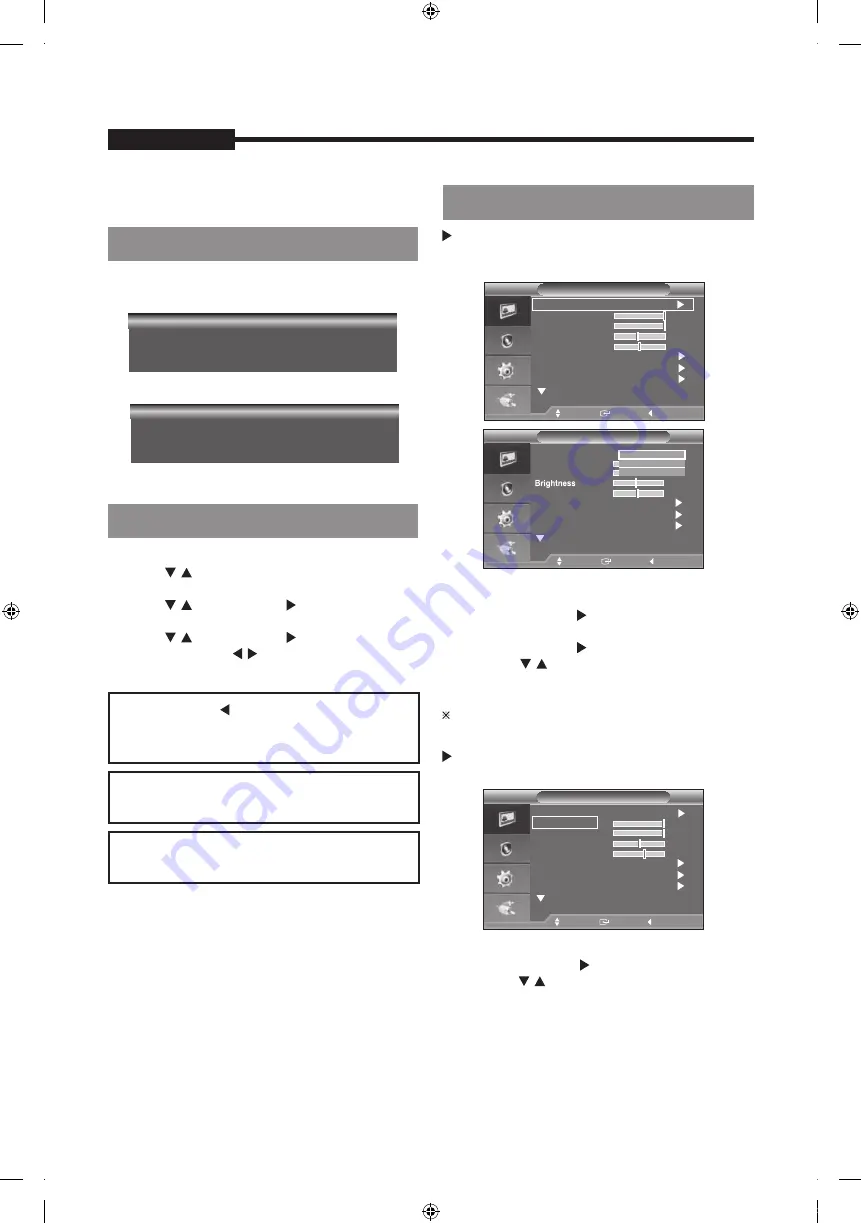
1. Press the MENU button to see the main menu.
2. Press / and ENTER button to select the main
menu.
3. Press / and ENTER (or ) button to select the
sub menu.
4. Press / and ENTER (or ) button to select
setting. (Or press / button to select setting)
5. Press the MENU button to exit.
Mode : Dynamic, Standard, Movie
1. Press the MENU button to select the
Picture menu.
2. Press the ENTER or button to select the Mode
menu.
3. Press the ENTER or button.
4. Press the / and ENTER button to select the
mode you want. (Dynamic, Standard, Movie )
5. Press the MENU button to exit.
You can return to the factory defaults picture
settings by selecting the "Reset".
1. Press the MENU button to select the Picture menu.
2. Press the ENTER or button.
3. Press the / button to select the setting you want.
(Backlight,Contrast,Brightness,Sharpness,Colour,
Tint)
Press the ENTER button.
OSD Menu Configurations
USER'S MANUAL
No Signal Display
OSD Menu Selection
NOTE1:
Press the button to return to the
previous screen.
Press the MENU button to exit .
NOTE2:
The OSD display will be disapear after 1
minutes if there is no button input.
NOTE3:
The displayed image may differ depending
on the model.
No Signal
<Video mode>
Picture Menu
Check signal cable
<VGA.HDMI mode>
Picture
Mode
: Dynamic
Brightness
45
Sharpness
50
Move
Enter
Return
Picture
Mode
:
Sharpness
50
Move
Enter
Return
Move
Enter
Return
Mode
: Dynamic
Screen
Picture
Backlight
Contrast
10
100
Brightness
45
Sharpness
50
Advanced Settings
Contrast
0
Auto Adjustment
More
0
0
Movie
Standard
Dynamic
Backlight
Screen
Auto Adjustment
Advanced
Settings
More
45
Custom : Backlight,Contrast,Brightness,
Sharpness, Colour,Tint
100
Contrast
Backlight
10
Screen
Advanced
Auto Adjustment
More
Settings
When there is no connection at the VGA,
and
Video
The displayed image may differ depending on the
input signal.
Screen
·
PC Position
Adjust the PC’s screen positioning if it does not fit
the Monitor screen.
1. Follow the "Image Lock" instructions number
2 to 4.
2. Press the /
ENTER button.
3. Press the / button to adjust the Vertical
Press the / button to adjust the Horizontal
Press the ENTER button.
4. Press the MENU button to exit.
·
You can replace all image settings with the
factory default values.
1. Follow the "Image Lock" instructions number
2 to 4.
2. Press the / button to select "Image Reset",then
press the ENTER button.
3. Press the MENU button to exit.
USER'S MANUAL
USER'S MANUAL
- 1
1
-
USER'S MANUAL
PC Position
Move
Enter
Return
Screen
Image Lock
PC Position
Image Reset
Move
Enter
Return
button to select "PC Position",
then press
In VGA Mode, "Sharpness" can not be adjusted.
Only when the input signal is NTSC mode, can Tint
function be applicable.
Image Lock , PC Position , Image Reset
·
Image Lock (Coarse and Fine Tuning of the Image)
The purpose of picture quality adjustment is to
remove or reduce picture noise.
If the noise is not removed by Fine-tuning alone,
then adjust the frequency as best as possible
(coarse) and Fine-tune again.
After the noise has been reduced, re-adjust the
picture so that it is aligned on the center of screen.
1. Preset: Press the SOURCE button to select VGA
mode.
2. Press the MENU button to select the
Picture menu.
3. Press the ENTER or button.
4. Press the / and ENTER button to select the
Screen menu.
5. Press the / to select "Image Lock", then press the
ENTER button.
6. Press the / button to select "Coarse" or "Fine",
then press the ENTER button.
7. Press the / button to adjust the screen quality.
Press the ENTER button.
8. Press the MENU button to exit.
Screen
Image Lock
PC Position
Image Reset
Move
Enter
Return
Image Lock
Move
Enter
Return
Image Reset (Initializing the Image Settings)
Only in VGA Mode, "Screen" can be adjusted.
100
100
Position.
Position.
PT01-004287A(S03)-SMT-1935,2233,1931,2731-manual-ENG_GU.indd 10
2018-02-08 오후 1:57:45
Содержание CT-SMT-1935
Страница 5: ...PT01 004287A S03 SMT 1935 2233 1931 2731 manual ENG_GU indd 5 2018 02 08 오후 1 57 36 ...
Страница 21: ...PT01 004287A S03 SMT 1935 2233 1931 2731 manual ENG_GU indd 21 2018 02 08 오후 1 57 50 ...
Страница 22: ...PT01 004287A S03 SMT 1935 2233 1931 2731 manual ENG_GU indd 22 2018 02 08 오후 1 57 53 ...
Страница 23: ...PT01 004287A S03 SMT 1935 2233 1931 2731 manual ENG_GU indd 23 2018 02 08 오후 1 57 54 ...
Страница 24: ...PT01 004287A S03 SMT 1935 2233 1931 2731 manual ENG_GU indd 24 2018 02 08 오후 1 57 55 ...


